OkHttp3源码解析(整体流程)
点击上方蓝字关注 :point_up_2:
作者:秦子帅
来源:程序员进阶圈
整理:code小生
前言
今天主要讲一下OkHttp3源码解析(整体流程),主要分为四大块:
-
okhttp的基本用法
-
OkHttpClient分析
-
Request分析
-
Call分析 {同步请求与异步请求}
基本用法

1.集成
1.1.依赖
implementation 'com.squareup.okhttp3:okhttp:3.11.0'
可以去 Okhttp-Github 查看并依赖最新的版本。
1.2权限
添加网络权限
<uses-permission android:name="android.permission.INTERNET" />
2.使用
2.1 同步GET请求
-
构建OkHttpClient对象
-
构建Request对象
-
构建Call对象并通过
execute()方法来执行同步Get请求
//同步请求 OkHttpClient okHttpClient=new OkHttpClient(); final Request request=new Request.Builder() .url("https://www.wanandroid.com/navi/json") .get() .build(); final Call call = okHttpClient.newCall(request); try { Response response = call.execute(); Log.e("同步结果---- ",response.body().string()+""); } catch (IOException e) { e.printStackTrace(); }
运行后发现报错:
android.os.NetworkOnMainThreadException
在Android4.0以后,会发现,只要是写在主线程(就是Activity)中的HTTP请求,运行时都会报错,这是因为Android在4.0以后为了防止应用的ANR(Aplication Not Response)异常。解决方法就是在子线程中运行:
//同步请求 OkHttpClient okHttpClient=new OkHttpClient(); final Request request=new Request.Builder() .url("https://www.wanandroid.com/navi/json") .get() .build(); final Call call = okHttpClient.newCall(request); new Thread(new Runnable() { @Override public void run() { try { Response response = call.execute(); Log.e("同步结果---- ",response.body().string()+""); } catch (IOException e) { e.printStackTrace(); } } }).start();
2.2 异步GET请求
//异步请求 OkHttpClient okHttpClient=new OkHttpClient(); final Request request=new Request.Builder() .url("https://www.wanandroid.com/navi/json") .get() .build(); final Call call = okHttpClient.newCall(request); call.enqueue(new Callback() { @Override public void onFailure(Call call, IOException e) { Log.d("okhttp_error",e.getMessage()); } @Override public void onResponse(Call call, Response response) throws IOException { Gson gson=new Gson(); Log.d("okhttp_success",response.body().string()); } });
2.3 POST请求
POST请求支持提交文件,流,string,表单等等 。这里拿POST表单请求作为请求示例:
OkHttpClient okHttpClient = new OkHttpClient(); RequestBody requestBody = new FormBody.Builder() .add("username", "qinzishuai") .add("password", "111111") .build(); Request request = new Request.Builder() .url("https://www.wanandroid.com/user/login") .post(requestBody) .build(); okHttpClient.newCall(request).enqueue(new Callback() { @Override public void onFailure(Call call, IOException e) { Log.d("okhttp", "onFailure: " + e.getMessage()); } @Override public void onResponse(Call call, Response response) throws IOException { Log.d("okhttp", "onResponse: " + response.body().string()); } });
OkHttpClient分析
初始化-构造方式
创建 OkHttpClient实例的两种方式
1. OkHttpClient okHttpClient = new OkHttpClient();
2. OkHttpClient okHttpClient = new OkHttpClient.Builder().build();
我们先研究第一种构造方式,也是默认的方式,我们点击OkHttpClient方法进去:
public OkHttpClient() { this(new Builder()); }
发现是一个类构造方法,this其实就是指的是OkHttpClient,也就是如下方法:
OkHttpClient(Builder builder) { this.dispatcher = builder.dispatcher; this.proxy = builder.proxy; this.protocols = builder.protocols; this.connectionSpecs = builder.connectionSpecs; this.interceptors = Util.immutableList(builder.interceptors); this.networkInterceptors = Util.immutableList(builder.networkInterceptors); this.eventListenerFactory = builder.eventListenerFactory; this.proxySelector = builder.proxySelector; this.cookieJar = builder.cookieJar; this.cache = builder.cache; this.internalCache = builder.internalCache; this.socketFactory = builder.socketFactory; ....部分代码省略 }
然后顺理成章的看一下new Builder() 方法
public Builder() { dispatcher = new Dispatcher(); protocols = DEFAULT_PROTOCOLS; connectionSpecs = DEFAULT_CONNECTION_SPECS; eventListenerFactory = EventListener.factory(EventListener.NONE); proxySelector = ProxySelector.getDefault(); cookieJar = CookieJar.NO_COOKIES; socketFactory = SocketFactory.getDefault(); hostnameVerifier = OkHostnameVerifier.INSTANCE; certificatePinner = CertificatePinner.DEFAULT; proxyAuthenticator = Authenticator.NONE; authenticator = Authenticator.NONE; connectionPool = new ConnectionPool(); dns = Dns.SYSTEM; followSslRedirects = true; followRedirects = true; retryOnConnectionFailure = true; connectTimeout = 10_000; readTimeout = 10_000; writeTimeout = 10_000; pingInterval = 0; }
不出意料, 都是做了一些初始化配置...这块的细节先不说,我们继续看另一个种 构造方式
2. OkHttpClient okHttpClient = new OkHttpClient.Builder().build();
我们点击build()方法:
public OkHttpClient build() { return new OkHttpClient(this); }
这里需要我们注意的是 Builder 它是静态内部类,这很关键!看源码一定要仔细哦...
这下就全明白了吧?

这里的建造者Builder这部分是用了 设计模式中的-建造者模式
如果不知道此模式的伙伴先去把它搞懂,我这里就先简单的说一下:
定义:建造者模式是设计模式的一种,将一个复杂对象的构建与它的表示分离,使得同样的构建过程可以创建不同的表示。
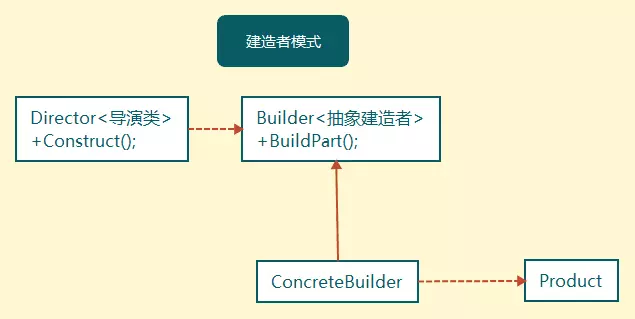
实用范围
当创建复杂对象的算法应该独立于该对象的组成部分以及它们的装配方式时。
当构造过程必须允许被构造的对象有不同表示时。
可以在网上上找找建造者模式的例子去学习一下,学习之后可以通过建造者模式去模仿okhttp的请求(Request) 就理解的充分了!
OkHttpClient初始化都配置了什么????
上面讲到了OkHttpClient的两种构造方式, 通过查看源码,两种方式的配置是相同的,下面具体看一下到底配置了什么:
public Builder() { dispatcher = new Dispatcher(); protocols = DEFAULT_PROTOCOLS; connectionSpecs = DEFAULT_CONNECTION_SPECS; eventListenerFactory = EventListener.factory(EventListener.NONE); proxySelector = ProxySelector.getDefault(); cookieJar = CookieJar.NO_COOKIES; socketFactory = SocketFactory.getDefault(); hostnameVerifier = OkHostnameVerifier.INSTANCE; certificatePinner = CertificatePinner.DEFAULT; proxyAuthenticator = Authenticator.NONE; authenticator = Authenticator.NONE; connectionPool = new ConnectionPool(); dns = Dns.SYSTEM; followSslRedirects = true; followRedirects = true; retryOnConnectionFailure = true; connectTimeout = 10_000; readTimeout = 10_000; writeTimeout = 10_000; pingInterval = 0; }
-
Dispatcher 调度器,执行异步请求时的策略
-
protocols OKHTTP实现的协议LIST
-
connectionSpecs TLS版本与连接协议
-
eventListenerFactory 监听器
-
proxySelector 代理选择器
-
CookieJar cookie
-
socketFactory socket 工厂
-
hostnameVerifier 主机name验证
-
proxyAuthenticator 代理验证
-
authenticator 验证
-
connectionPool 连接池
-
dns dns域名
-
cache 缓存
-
interceptors 拦截器
-
networkInterceptors 网络拦截器
等等等等,我就不一一列出了,这些如果开始不知道是干什么的,可以用谷歌翻译去翻译类开头的注释或者成员变量的名字,开始会好理解一下的。我也是这样翻译的。
至于每个成员变量的具体原理我们分析到它时再具体讲解...
Request分析
Request初始化
当我们构建完OkHttpClient对象,需要构造Request对象,构造方式如下:
1.Get请求
final Request request=new Request.Builder() .url("https://www.wanandroid.com/navi/json") .get() .build();
2.POST请求
拿POST提交表单请求,这时就需要声明一个RequestBody对象了
RequestBody requestBody = new FormBody.Builder() .add("username", "qinzishuai") .add("password", "123456") .build(); Request request = new Request.Builder() .url("https://www.wanandroid.com/user/login") .post(requestBody) .build()
看到上面代码是不是很熟悉?和OkHttpClient很相似, 没错 Request 的构建也是Builder模式!

我们点击Request源码进去,果然 其中有静态的Builder内部类:
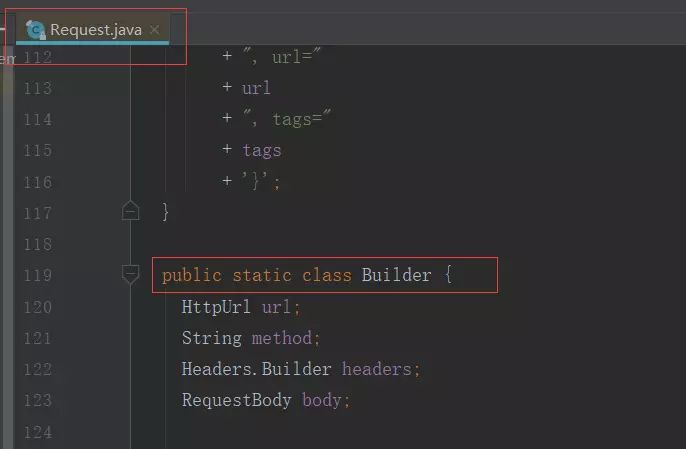
然后我们查一下 Request在初始化时配置了哪些参数???
public static class Builder { HttpUrl url; String method; Headers.Builder headers; RequestBody body; public Builder() { this.method = "GET"; this.headers = new Headers.Builder(); } //省略部分代码 public Request build() { if (url == null) throw new IllegalStateException("url == null"); return new Request(this); } }
从代码看到了 如果没有声明,默认是Get请求 this.method = "GET" ,至于 url 等字段需要我们自己去配置:
HttpUrl
请求访问的url ,可以传String与URL 具体方法如下:
public Builder url(String url) { if (url == null) throw new NullPointerException("url == null"); // Silently replace web socket URLs with HTTP URLs. if (url.regionMatches(true, 0, "ws:", 0, 3)) { url = "http:" + url.substring(3); } else if (url.regionMatches(true, 0, "wss:", 0, 4)) { url = "https:" + url.substring(4); } return url(HttpUrl.get(url)); } public Builder url(URL url) { if (url == null) throw new NullPointerException("url == null"); return url(HttpUrl.get(url.toString())); }
method
请求类型 String method ,支持多种请求类型

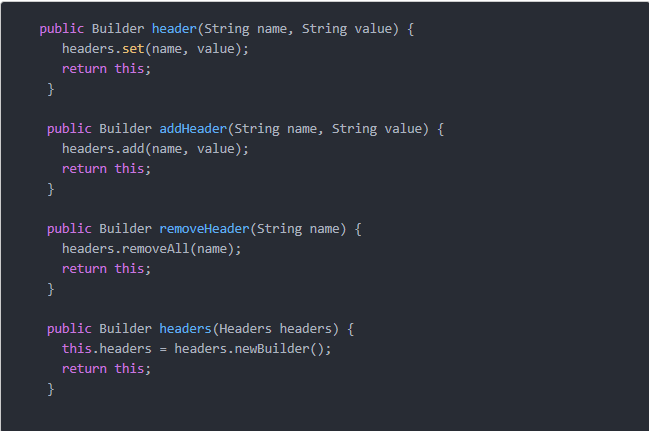
Headers
Headers.Builder
Http消息的头字段
前面看到了,
我们在初始化Request的时候 同时初始化了headers
,
this.headers = new Headers.Builder()
可以通过 header addHeader removeHeader headers 方法做一些操作
body
RequestBody类型,它是抽象类, 有些请求需要我们传入body实例 ,我们在通过源码来看一下:
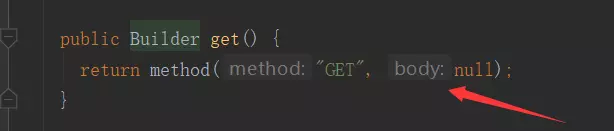
如果是GET请求,body对象传的是null
Get与head方法不能传body对象 ,其他method是可以的
如果是POST请求,就需要我们去设定了
RequestBody解析
首先我们看一下RequestBody如何初始化??拿提交表单举例:
RequestBody requestBody = new FormBody.Builder() .add("username", "qinzishuai") .add("password", "000000") .build();
不出所料,也是Builder模式,而且 RequestBody 是抽象类, FormBody 是 RequestBody 的其中一种实现类 ,另一个实现类是 MultipartBody
RequestBody源码如下:
public abstract class RequestBody { /** Returns the Content-Type header for this body. */ public abstract @Nullable MediaType contentType(); /** * Returns the number of bytes that will be written to {@code sink} in a call to {@link #writeTo}, * or -1 if that count is unknown. */ public long contentLength() throws IOException { return -1; } /** Writes the content of this request to {@code sink}. */ public abstract void writeTo(BufferedSink sink) throws IOException; /** * Returns a new request body that transmits {@code content}. If {@code contentType} is non-null * and lacks a charset, this will use UTF-8. */ public static RequestBody create(@Nullable MediaType contentType, String content) { Charset charset = Util.UTF_8; if (contentType != null) { charset = contentType.charset(); if (charset == null) { charset = Util.UTF_8; contentType = MediaType.parse(contentType + "; charset=utf-8"); } } byte[] bytes = content.getBytes(charset); return create(contentType, bytes); } /** Returns a new request body that transmits {@code content}. */ public static RequestBody create( final @Nullable MediaType contentType, final ByteString content) { return new RequestBody() { @Override public @Nullable MediaType contentType() { return contentType; } @Override public long contentLength() throws IOException { return content.size(); } @Override public void writeTo(BufferedSink sink) throws IOException { sink.write(content); } }; } /** Returns a new request body that transmits {@code content}. */ public static RequestBody create(final @Nullable MediaType contentType, final byte[] content) { return create(contentType, content, 0, content.length); } //省略部分代码... }
核心方法有三个:
-
contentType()//数据类型
-
contentLength()//数据长度
-
writeTo(BufferedSink sink) //写操作
Call分析-同步异步请求流程
newCall分析
Call初始化
我们首先看一下在哪用到了Call:
final Call call = okHttpClient.newCall(request);
想起来了吧?无论是get还是post请求 都要生成call对象,在上面我们发现call实例需要一个 okHttpClient 与 request 实例 ,我们先点进Call类去看看:
public interface Call extends Cloneable { //请求 Request request(); //同步 Response execute() throws IOException; //异步 void enqueue(Callback responseCallback); //取消请求 void cancel(); //是否在请求过程中 boolean isExecuted(); //是否取消 boolean isCanceled(); Call clone(); //工厂接口 interface Factory { Call newCall(Request request); } }
我们发现Call是个接口, 并定义了一些方方法(方法含义在注释上)。
我们继续看
newCal()
方法
@Override public Call newCall(Request request) { return RealCall.newRealCall(this, request, false /* for web socket */); }
继续点击 newRealCall() 去:
private RealCall(OkHttpClient client, Request originalRequest, boolean forWebSocket) { this.client = client; this.originalRequest = originalRequest; this.forWebSocket = forWebSocket; this.retryAndFollowUpInterceptor = new RetryAndFollowUpInterceptor(client, forWebSocket); } static RealCall newRealCall(OkHttpClient client, Request originalRequest, boolean forWebSocket) { // Safely publish the Call instance to the EventListener. RealCall call = new RealCall(client, originalRequest, forWebSocket); call.eventListener = client.eventListenerFactory().create(call); return call; }
从代码中我们发现在 newRealCall() 中初始化了 RealCall , RealCall 中初始化了 retryAndFollowUpInterceptor :
-
client:OkHttpClient 实例
-
originalRequest :最初的Request
-
forWebSocket :是否支持websocket通信
-
retryAndFollowUpInterceptor 从字面意思来说, 是重试和重定向拦截器 ,至于它有什么作用我们继续往下看
同步请求分析
Response response = call.execute();
我们点进 execute() 中查看:
@Override public Response execute() throws IOException { synchronized (this) { if (executed) throw new IllegalStateException("Already Executed"); executed = true; } captureCallStackTrace(); eventListener.callStart(this); try { client.dispatcher().executed(this); Response result = getResponseWithInterceptorChain(); if (result == null) throw new IOException("Canceled"); return result; } catch (IOException e) { eventListener.callFailed(this, e); throw e; } finally { client.dispatcher().finished(this); } }
从上面代码得知步骤:
(1).通过
synchronized
保证线程同步,判断是否已经执行过 ,如果是直接抛异常
(2).
captureCallStackTrace();
字面意思:捕获调用堆栈跟踪,我们通过源码发现里面涉及到了
retryAndFollowUpInterceptor
(3).
eventListener
回调
CallStart()
(4).
client.dispatcher().executed(this);
看到了
dispatcher
是不是很熟悉?之前在分析
okhttpClient
初始化的时候遇到了,我们点击
executed()
方法进去:
synchronized void executed(RealCall call) { runningSyncCalls.add(call); }
发现把我们传进来的 realcall 放到了 runningSyncCalls 队列中,从字面意思来说就是正在运行的同步的调用队列中,为什么说是队列呢?:
private final Deque<RealCall> runningSyncCalls = new ArrayDeque<>();

(5).我们回到 execute() 继续往下分析,剩下的代码我们提取出三行代码:
-
equesr result = getResponseWithInterceptorChain();生成一个Response 实例 -
eventListener.callFailed(this, e);:eventListener的callFailed回调 -
client.dispatcher().finished(this);:dispatcher实例的finished方法
不难看出, getResponseWithInterceptorChain() 一定是此方法中的 核心 ,字面意思是获取拦截器链的响应,这就明白了,就是 通过拦截器链处理后返回Response

getResponseWithInterceptorChain() 分析
Response getResponseWithInterceptorChain() throws IOException { // Build a full stack of interceptors. List<Interceptor> interceptors = new ArrayList<>(); interceptors.addAll(client.interceptors()); //自定义 interceptors.add(retryAndFollowUpInterceptor); //错误与跟踪拦截器 interceptors.add(new BridgeInterceptor(client.cookieJar())); //桥拦截器 interceptors.add(new CacheInterceptor(client.internalCache())); //缓存拦截器 interceptors.add(new ConnectInterceptor(client)); //连接拦截器 if (!forWebSocket) { interceptors.addAll(client.networkInterceptors()); //网络拦截器 } interceptors.add(new CallServerInterceptor(forWebSocket)); //调用服务器拦截器 Interceptor.Chain chain = new RealInterceptorChain(interceptors, null, null, null, 0, originalRequest, this, eventListener, client.connectTimeoutMillis(), client.readTimeoutMillis(), client.writeTimeoutMillis()); return chain.proceed(originalRequest); }
从上面代码不难看出, 对最初的request做了层层拦截,每个拦截器的原理我们放在以后的章节去讲, 这里就不展开了!
这里需要强调的一下 interceptors.addAll(client.interceptors()); , client.interceptors() 是我们自定义的拦截器 它是在哪定义的?如何添加?我们去OkHttpClient类中发现:

可以通过初始化
okHttpClient
实例
.addInterceptor
的形式 添加。
另外这里涉及到了责任链设计模式,下节具体讲!
异步请求分析
call.enqueue(new Callback() { @Override public void onFailure(Call call, IOException e) { Log.d("okhttp_error",e.getMessage()); } @Override public void onResponse(Call call, Response response) throws IOException { Gson gson=new Gson(); Log.d("okhttp_success",response.body().string()); } });
点击 enqueue() 查看:
@Override public void enqueue(Callback responseCallback) { synchronized (this) { if (executed) throw new IllegalStateException("Already Executed"); executed = true; } captureCallStackTrace(); eventListener.callStart(this); client.dispatcher().enqueue(new AsyncCall(responseCallback)); }
(1).通过
(3).
(4).
synchronized
保证线程同步,判断是否已经执行过 ,如果是直接抛异常
(2).
captureCallStackTrace();
字面意思:捕获调用堆栈跟踪,我们通过源码发现里面涉及到了
retryAndFollowUpInterceptor
(3).
eventListener
回调
CallStart()
(4).
client.dispatcher().enqueue(new AsyncCall(responseCallback));
调用了
Dispatcher.enqueue()
并传入了一个 new AsyncCall(responseCallback) 实例,点击 AsyncCall 查看:
AsyncCall 是RealCall的内部类!
final class AsyncCall extends NamedRunnable { private final Callback responseCallback; AsyncCall(Callback responseCallback) { super("OkHttp %s", redactedUrl()); this.responseCallback = responseCallback; } String host() { return originalRequest.url().host(); } Request request() { return originalRequest; } RealCall get() { return RealCall.this; } @Override protected void execute() { boolean signalledCallback = false; try { Response response = getResponseWithInterceptorChain(); if (retryAndFollowUpInterceptor.isCanceled()) { signalledCallback = true; responseCallback.onFailure(RealCall.this, new IOException("Canceled")); } else { signalledCallback = true; responseCallback.onResponse(RealCall.this, response); } } catch (IOException e) { if (signalledCallback) { // Do not signal the callback twice! Platform.get().log(INFO, "Callback failure for " + toLoggableString(), e); } else { eventListener.callFailed(RealCall.this, e); responseCallback.onFailure(RealCall.this, e); } } finally { client.dispatcher().finished(this); } } }
AsyncCall 继承了 NamedRunnable ,我们看下 NamedRunnable 是什么:
public abstract class NamedRunnable implements Runnable { protected final String name; public NamedRunnable(String format, Object... args) { this.name = Util.format(format, args); } @Override public final void run() { String oldName = Thread.currentThread().getName(); Thread.currentThread().setName(name); try { execute(); } finally { Thread.currentThread().setName(oldName); } } protected abstract void execute(); }
原来 NamedRunnable 实现了 Runnable 接口 是个线程类,在 run() 中 添加了抽象的 execute(); 方法,看到这里 我们应该有一个反应,那就是 AsyncCall中具体的execute()应该在子线程执行
我们继续分析, client.dispatcher().enqueue(new AsyncCall(responseCallback)); 点击进入enqueue():
synchronized void enqueue(AsyncCall call) { if (runningAsyncCalls.size() < maxRequests && runningCallsForHost(call) < maxRequestsPerHost) { runningAsyncCalls.add(call); executorService().execute(call); } else { readyAsyncCalls.add(call); } }
-
runningAsyncCalls正在运行的异步请求的队列 -
maxRequests最大的请求数 64 -
maxRequestsPerHosthost最大请求数 5 (可以通过Get与Set方式自定义设置)
如果正在运行的异步请求的队列大小低于64并且 正在请求的host数量低于5,就会执行(满足条件)
runningAsyncCalls.add(call); executorService().execute(call);
这里把
AsyncCall
实例添加到
runningAsyncCalls
中。
ExecutorService
表示线程池 继续看
executorService()
:
public synchronized ExecutorService executorService() { if (executorService == null) { executorService = new ThreadPoolExecutor(0, Integer.MAX_VALUE, 60, TimeUnit.SECONDS, new SynchronousQueue<Runnable>(), Util.threadFactory("OkHttp Dispatcher", false)); } return executorService; }
其实就是生成了executorService 实例,这就明白了, AsyncCall 实例放入线程池中执行了!
如果不满足上面的请求数等条件:
readyAsyncCalls.add(call);
就会被添加到一个等待就绪的异步请求队列中,目的是什么呢???当然是等待时机再次添加到runningAsyncCalls中并放入线程池中执行,这块逻辑在 AsyncCall 类中的 execute() 至于原因我们继续往下看!

刚才我们说了,如果条件满足, AsyncCall 实例就会在线程池中执行(.start),那我们直接去看run()中的 execute() :
@Override protected void execute() { boolean signalledCallback = false; try { Response response = getResponseWithInterceptorChain(); if (retryAndFollowUpInterceptor.isCanceled()) { signalledCallback = true; responseCallback.onFailure(RealCall.this, new IOException("Canceled")); } else { signalledCallback = true; responseCallback.onResponse(RealCall.this, response); } } catch (IOException e) { if (signalledCallback) { // Do not signal the callback twice! Platform.get().log(INFO, "Callback failure for " + toLoggableString(), e); } else { eventListener.callFailed(RealCall.this, e); responseCallback.onFailure(RealCall.this, e); } } finally { client.dispatcher().finished(this); } }
上面代码中得知, 首先通过层层拦截器链处理生成了 response ;然后通过一系列的判断, responseCallback 进行 onResponse 与 onFailure 回调,最后调用的 Dispatcher.finifshed()
这里需要注意的是 这里的 Dispatcher.finifshed(this) 与同步中的 Dispatcher.finifshed(this) 不一样 参数不同。
/** Used by {@code AsyncCall#run} to signal completion. */ void finished(AsyncCall call) { finished(runningAsyncCalls, call, true); }
我们继续看具体的finifshed()方法:
private <T> void finished(Deque<T> calls, T call, boolean promoteCalls) { int runningCallsCount; Runnable idleCallback; synchronized (this) { if (!calls.remove(call)) throw new AssertionError("Call wasn't in-flight!"); if (promoteCalls) promoteCalls(); runningCallsCount = runningCallsCount(); idleCallback = this.idleCallback; } if (runningCallsCount == 0 && idleCallback != null) { idleCallback.run(); } }
在线程同步的情况下 执行了 promoteCalls(); :
private void promoteCalls() { if (runningAsyncCalls.size() >= maxRequests) return; // Already running max capacity. if (readyAsyncCalls.isEmpty()) return; // No ready calls to promote. for (Iterator<AsyncCall> i = readyAsyncCalls.iterator(); i.hasNext(); ) { AsyncCall call = i.next(); if (runningCallsForHost(call) < maxRequestsPerHost) { i.remove(); runningAsyncCalls.add(call); executorService().execute(call); } if (runningAsyncCalls.size() >= maxRequests) return; // Reached max capacity. } }
经过一系列的判断, 对等待就绪的异步队列进行遍历,生成对应的 AsyncCall 实例,并添加到runningAsyncCalls中,最后放入到线程池中执行!这里就是我们上面说到的等待就绪的异步队列如何与runningAsyncCalls对接的逻辑。
总结
同步请求流程:
-
生成
call实例realcall -
Dispatcher.executed()中的runningSyncCalls添加realcall到此队列中 -
通过
getResponseWithInterceptorChain()对request层层拦截,生成Response -
通过
Dispatcher.finished(),把call实例从队列中移除,返回最终的response
异步请求流程:
-
生成一个
AsyncCall(responseCallback)实例(实现了Runnable) -
AsyncCall实例放入了Dispatcher.enqueue()中,并判断maxRequests(最大请求数)maxRequestsPerHost(最大host请求数)是否满足条件,如果满足就把AsyncCall添加到runningAsyncCalls中,并放入线程池中执行;如果条件不满足,就添加到等待就绪的异步队列,当那些满足的条件的执行时 ,在Dispatcher.finifshed(this)中的promoteCalls();方法中 对等待就绪的异步队列进行遍历,生成对应的AsyncCall实例,并添加到runningAsyncCalls中,最后放入到线程池中执行,一直到所有请求都结束。
至此OKhttp整体流程就分析完了, 下一篇会分块去分析,希望对大家有所帮助...
—————END—————

创作不易,点个“ 在看 ”
正文到此结束
- 本文标签: 监听器 域名 实例 希望 协议 同步 缓存 Word GitHub 解析 ORM 谷歌 ArrayList ip client 配置 线程池 设计模式 URLs MQ ssl 总结 Proxy DNS http IDE Android Service list cookies tab build cat 调度器 注释 Select IO 服务器 final 连接池 js ECS 数据 queue 程序员 value 线程同步 源码 Connection 线程 1111 Full Stack parse executor web 解决方法 synchronized https 主机 UI message CTO json id 翻译 ThreadPoolExecutor retry tar ACE 代码 遍历 cache rmi 参数 构造方法 git src Region
- 版权声明: 本文为互联网转载文章,出处已在文章中说明(部分除外)。如果侵权,请联系本站长删除,谢谢。
- 本文海报: 生成海报一 生成海报二
热门推荐


相关文章

近期评论
-
收到
-
https://www.liuhaihua.cn/archives/40657.html 这篇博客中的图片打不开了
-
不会英语啊。
-
-
-
https://pplx.ai/floraliu4199466 这个链接打不开是什么原因?
-
-
-
-
来看看,最近更新了一波,顺着友联过来的,几年过去了,网站越搞越好,厉害
Loading...
![[HBLOG]公众号](https://www.liuhaihua.cn/img/qrcode_gzh.jpg)

