并发艺术(二)一玩到底,玩透JAVA各种锁机制
原创技术文章,版权归作者所有,若转载请标明出处
公众号,待定,原公众号长期试灰已被冻结
前言
上篇文章介绍了多线程的原理及其意义,在文末提出了线程安全的问题,这也是我们在高并发下常常听到的词。本文主要介绍在单实例服务中,我们如何快速上手使用 jdk 为我们提供的锁机制,并了解其原理,剩余 AQS 和 Condition 留到后面讲解,全文 纯手打 ,代码 纯手写 ,图片 纯手画 ,希望能给大家带来一些收获,如有不对的地方,欢迎指正。
思考,什么样的场景是线程不安全的
我们在开发高并发应用时,常常都在强调线程安全,那什么样的场景是不安全的呢?
上道(an)具(li),上个章节中提到了搬货的例子,不知道小伙伴们有没有试下最后的案例,
上篇文章提到的案例,
马上双十一了,加入仓库有一堆货物,目前只有一个人搬(甲),暂定有1000000件,如果甲只能一次搬一件,那么总共需要搬运1000000次,如果能加入一个乙与甲一起搬,假定两人搬运时间一样,那么两人各搬500000次,就能搞定。
上章节结果,
搬运完成,员工:乙,搬运:[272708]次
搬运完成,员工:甲,搬运:[727292]次
上章节思考
例子中用到了synchronized和AtomicInteger,是为了保证货物剩余总量在多人搬运下,数值也是对的,可以尝试将AtomicInteger换成Integer或者去除synchronized,两人最终总计搬运和将与原货物总量不一致。
下面我们去掉synchronized,并将AtomicInteger替换成int
# 搬货
static class Carry extends Thread{

    /** 搬运人*/
    private String peopleName;
    /** 搬运次数*/
    private int carryNum;

    public Carry(String peopleName) {
        this.peopleName = peopleName;
    }

    @Override
    public void run() {
        while (!isInterrupted()) {
                if (cargoNum > 0) {
                    cargoNum--;
                    carryNum++;
                } else {
                    System.out.println("搬运完成,员工:" + peopleName + ",搬运:[" + carryNum + "]次");
                    interrupt();
                }
        }
    }
}
复制代码
开搬
/** 货物个数*/
static int cargoNum = 1000000;

public static void main(String[] args) {
    Carry carry1 = new Carry("甲");
    Carry carry2 = new Carry("乙");

    carry1.start();
    carry2.start();
}
复制代码
结果
搬运完成,员工:乙,搬运:[983347]次
搬运完成,员工:甲,搬运:[995228]次
复制代码
我们发现,总共只有1000000的货物,讲道理,最终两人应该总共搬了1000000次,但是两个人都接近搬了1000000次,这样不是重复劳动了吗?没错,这就是在多线程下的线程不安全引发的。
我们想下这样的原因,

甲、乙两人同时搬运,甲搬的时候拿到了总货物剩余量,然后-1,自己的工作量+1,然后搬走货物,乙同样如此操作,看似好像没什么问题,但是试想一下,如果甲、乙同时搬时,同时拿到剩余量,比如1000,然后同时-1,那么两人都认为还剩余999,于是就产生了多余的劳动力。
如果我们能保证,剩余总量在甲更新的时候,乙不会更新,反之,乙更新的时候,甲也不会更新,那么最终就不会出现这样的问题了。
所以这里就会用到锁,加把锁,我用的时候锁上,你等着,我用完,打开锁,你用,如此既能保证数据是安全的。
《Java Concurrency In Practice》中对线程安全的定义如下,当多个线程访问一个对象时,如果不用考虑这些线程在运行时环境下的调度和交替执行,也不需要进行额外的同步,或者在调用方进行任何其他的协调操作,调用这个对象的行为都可以获得正确的结果,那这个对象是线程安全的。
内置锁
synchronized
synchronized 是jdk为我们提供的一个内置互斥锁,大致分为 类锁 和 对象锁 ,见名知意,类锁就是锁类文件的对象(class),对象锁则是锁类实例对象。
下面简单理解其原理, 深入剖析将在后续字节码、JMM章节中 ,
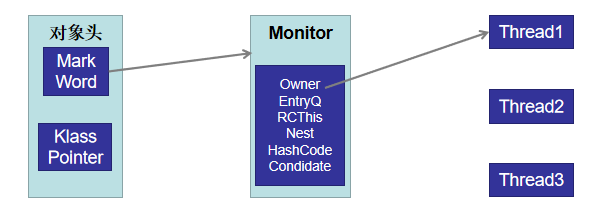
synchronized的实现是依赖Monitor,而一个对象实例会关联一个Monitor, 参考JVM规范
Each object is associated with a monitor. A monitor is locked if and only if it has an owner. The thread that executes monitorenter attempts to gain ownership of the monitor associated with objectref
关系信息主要在对象头中,对象头分为 Mark Word(标记信息) 和 Klass Pointer(指向类元数据) 两个部分。 (具体关于对象分析,会在后续有关字节码的章节中探讨)
其中 Mark Word 中的 LockWord 会指向一个 Monitor , Monitor 包含的信息如上图,
Owner
EntryQ
RCThis
Nest
HashCode
Condidate
根据上图,简单总结,一个线程想锁住一个对象,那么它需要持有对象关联的Monitor,其他线程则(Thread2、Thread3)会阻塞。有人会问了,抢夺的过程如何保证线程安全,其实JVM是通过CAS实现的,CAS则会在后文中讲解。
类锁
类锁锁的是class对象,class文件在JVM中的对象
举例如下
首先我们创建一个打印类
public class Print {

    public void print() throws InterruptedException {
        System.out.println(Thread.currentThread().getName() + " print.....");
        # 睡眠1s
        Thread.sleep(1000);
        System.out.println(Thread.currentThread().getName() + " print end.....");
    }
}
复制代码
线程类
static class PrintThread extends Thread {

    @Override
    public void run() {
        Print print = new Print();
        # 锁住类
        synchronized (Print.class) {
            try {
                print.print();
            } catch (InterruptedException e) {
                e.printStackTrace();
            }
        }
    }
}
复制代码
执行
public static void main(String[] args) {
    PrintThread printThread1 = new PrintThread();
    PrintThread printThread2 = new PrintThread();

    printThread1.start();
    printThread2.start();
}
复制代码
结果
Thread-0 print.....
Thread-0 print end.....
Thread-1 print.....
Thread-1 print end.....
复制代码
我们可以看到,虽然是两个线程调用各自的打印实例,但是,第二个线程明显被阻塞了,如果我们去掉 synchronized (Print.class) ,结果如下
Thread-0 print.....
Thread-1 print.....
Thread-0 print end.....
Thread-1 print end.....
复制代码
这样两个线程就是并行执行了,同理,对于调用类static 修饰的方法,在方法上添加 synchronized ,也会锁住类,此处不做演示。
对象锁
对象锁的是实例对象
我们改造下线程类,print实例通过构造传入
static class PrintThread extends Thread {

    private Print print;

    PrintThread(Print print) {
        this.print = print;
    }

    @Override
    public void run() {
        synchronized (print) {
            try {
                print.print();
            } catch (InterruptedException e) {
                e.printStackTrace();
            }
        }
    }
}
复制代码
执行类,这里还是两个线程传入不同的类实例
public static void main(String[] args) {
    PrintThread printThread1 = new PrintThread(new Print());
    PrintThread printThread2 = new PrintThread(new Print());

    printThread1.start();
    printThread2.start();
}
复制代码
结果
Thread-0 print.....
Thread-1 print.....
Thread-1 print end.....
Thread-0 print end.....
复制代码
可以看到,不同的线程互不影响
那么,我们如果传入同一个实例呢?
执行类
public static void main(String[] args) {
    Print print = new Print();

    PrintThread printThread1 = new PrintThread(print);
    PrintThread printThread2 = new PrintThread(print);

    printThread1.start();
    printThread2.start();
}
复制代码
结果
Thread-0 print.....
Thread-0 print end.....
Thread-1 print.....
Thread-1 print end.....
复制代码
可以看到,对于同一个打印实例,两个线程执行是有顺序的,第一个线程持有了锁,然后第二个线程被阻塞了,等第一个线程执行完成,第二个线程才获取到对象锁执行。
volatile
volatile相对于synchronized是jdk提供的更加轻量的锁,为了便于理解,我们先来两个开胃菜。
线程间数据共享
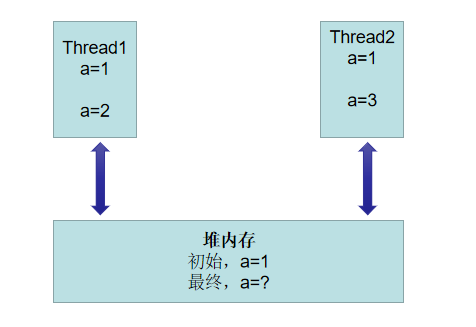
目前有个变量a为1,而线程1和线程2都需要更新a的值,那么同时操作完成后,a的值是多少?
显然,a最终有可能为2,也有可能为3,比如线程1拿到了a,此时a为1,然后赋值为2,但是还没有同步回主内存中,此时线程2拿到了a仍然为1,设置成了3,那这样数据不就不安全了吗?除了可以用前面将的 synchronized 保证线程安全,我们还可以使用 volatile 。
如果一个字段被声明成 volatile ,java线程内存模型确保所有线程看到这个变量的值是一致的。但是,仅支持原子操作可见,比如
# 两个线程同时对i进行++操作
public class VolatileTest {

    static volatile int i = 0;

    static class AddThread extends Thread {

        @Override
        public void run() {
            for (int j = 0; j < 100000; j++) {
                i++;
            }
        }
    }

    public static void main(String[] args) {
        AddThread add1 = new AddThread();
        AddThread add2 = new AddThread();

        add1.start();
        add2.start();

        while (Thread.activeCount() > 2) {
            Thread.yield();
        }

        System.out.println("i 最终为 " + i);
    }
}
复制代码
结果
i 最终为 177762
复制代码
而最终, i 应该为 200000 才是正确的,所以volatile无法保证非原子操作的线程安全。
下面加下volatile的几个特性:
- 原子性,对原子操作可以保证线程安全,如赋值,true&false等原子操作,a++这种的就不算是原子操作
- 可见性,上面讲过,被volatile修饰的变量,在发生原子操作值变更后,能立马被其他的线程所看到
- 防止重排序,如下,
jvm为了性能优化,运行编译器和处理器对指令进行重排序,看下面一段代码:
public class VolatileDemo {

    private int i = 0;
    private boolean flag = false;

    public void write() {
        # 操作1
        i = 1;
        # 操作2
        flag = true;
        System.out.println("更新完成...");
    }

    public void read() {
        # 操作3
        if (flag) {
            # 操作4
            System.out.println("i 被更新为, i -> " + i);
        }
    }
}
复制代码
正常的写操作是 1->2 ,读操作是 3->4 ,但是如果发生指令重排,写操作可能变成 2->1 ,那么读操作时,可能存在还未更新完成,就读到了值,所以我们可以使用 volatile 修饰 flag
private volatile boolean flag = false;
复制代码
这样可以防止编译器或处理器对其进行指令重排,而实现方式时基于 内存屏障
| 内存屏障 | 说明 |
|---|---|
| StoreStore | 禁止上面的普通写和下面的 volatile 写重排序 |
| StoreLoad | 防止上面的 volatile 写与下面可能有的 volatile 读/写重排序 |
| LoadLoad | 禁止下面所有的普通读操作和上面的 volatile 读重排序 |
| LoadStore | 禁止下面所有的普通写操作和上面的 volatile 读重排序 |
而对于被volatile修饰的变量
| 操作 | 说明 |
|---|---|
| volatile 写 | 前插入一个 StoreStore 屏障。 |
| volatile 写 | 后插入一个 StoreLoad 屏障。 |
| volatile 读 | 前插入一个 LoadLoad 屏障。 |
| volatile 读 | 后插入一个 LoadStore 屏障。 |
综上,我们可以得出如下防重排规则,NO代表禁止重排

ThreadLocal
ThreadLocal能够提供线程局部变量,同一个线程中可共享,不同的线程互相隔离。
简单举例说明
# 创建线程副本,默认至1
static ThreadLocal<Integer> threadLocal = ThreadLocal.withInitial(() -> 1);

public static void main(String[] args) {
    for (int i = 0; i < 5; i++) {
        new Thread(() -> {
            # 获取值
            int n = threadLocal.get();
            # ++
            n++;
            System.out.println(Thread.currentThread().getId() + ": " + n);
        }).start();
    }
}
复制代码
结果
13: 2
15: 2
14: 2
12: 2
16: 2
复制代码
我们可以看出,从threadlocal获取的值,每个线程是互相独立的,那么接下来我们看下ThreadLocal是如何实现的
下面我们来 手撕源码
set()方法
/**
 * Sets the current thread's copy of this thread-local variable
 * to the specified value.  Most subclasses will have no need to
 * override this method, relying solely on the {@link #initialValue}
 * method to set the values of thread-locals.
 *
 * @param value the value to be stored in the current thread's copy of
 *        this thread-local.
 */
public void set(T value) {
    Thread t = Thread.currentThread();
    ThreadLocalMap map = getMap(t);
    if (map != null)
        map.set(this, value);
    else
        createMap(t, value);
}
复制代码
看注释,将此线程局部变量的当前线程副本设置为指定的值。有点拗口,我们可以看到,这里获取了当前线程,并且调用了 getMap(t) ,那我们看下这个方法
/**
 * Get the map associated with a ThreadLocal. Overridden in
 * InheritableThreadLocal.
 *
 * @param  t the current thread
 * @return the map
 */
ThreadLocalMap getMap(Thread t) {
    return t.threadLocals;
}
复制代码
获取了当前线程的 t.threadLocals ,返回的是 ThreadLocal.ThreadLocalMap ,这里我们先搞清楚第一层关系, Thread内会包含一个ThreadLocal.ThreadLocalMap
那我看下ThreadLocal.ThreadLocalMap
/**
 * ThreadLocalMap is a customized hash map suitable only for
 * maintaining thread local values. No operations are exported
 * outside of the ThreadLocal class. The class is package private to
 * allow declaration of fields in class Thread.  To help deal with
 * very large and long-lived usages, the hash table entries use
 * WeakReferences for keys. However, since reference queues are not
 * used, stale entries are guaranteed to be removed only when
 * the table starts running out of space.
 */
static class ThreadLocalMap {

    /**
     * The entries in this hash map extend WeakReference, using
     * its main ref field as the key (which is always a
     * ThreadLocal object).  Note that null keys (i.e. entry.get()
     * == null) mean that the key is no longer referenced, so the
     * entry can be expunged from table.  Such entries are referred to
     * as "stale entries" in the code that follows.
     */
    static class Entry extends WeakReference<ThreadLocal<?>> {
        /** The value associated with this ThreadLocal. */
        Object value;

        Entry(ThreadLocal<?> k, Object v) {
            super(k);
            value = v;
        }
    }

    /**
     * The initial capacity -- MUST be a power of two.
     */
    private static final int INITIAL_CAPACITY = 16;

    /**
     * The table, resized as necessary.
     * table.length MUST always be a power of two.
     */
    private Entry[] table;

// ...后面略,着重看上面这些
复制代码
ThreadLocalMap中定义了Entry,key是指向ThreadLocal的弱引用 WeakReference ,value则是我们保存的值,什么是弱引用呢?
我们平时使用的最多的就是强引用,如 Object o = new Object() ,o与Object之间是强引用,如果一直引用,GC时,不会回收o,而弱引用,是在下一次GC时,对象就会被回收。
好的,回到 set() ,我们得出大致的关系 Thread->ThreadLocal.ThreadLocalMap->ThreadLocal ,额,好像是有点绕,没关系,后面有 彩蛋 !
下面看下 get() 方法
/**
 * Returns the value in the current thread's copy of this
 * thread-local variable.  If the variable has no value for the
 * current thread, it is first initialized to the value returned
 * by an invocation of the {@link #initialValue} method.
 *
 * @return the current thread's value of this thread-local
 */
public T get() {
    # 获取当前线程
    Thread t = Thread.currentThread();
    # 获取当前线程的ThreadLocalMap
    ThreadLocalMap map = getMap(t);
    if (map != null) {
        # 获取当前线程对应当前ThreadLocal的值
        ThreadLocalMap.Entry e = map.getEntry(this);
        if (e != null) {
            @SuppressWarnings("unchecked")
            T result = (T)e.value;
            return result;
        }
    }
    return setInitialValue();
}
复制代码
理解了Thread、ThreadLocal、ThreadLocalMap的关系,get()应该就能很好理解了
然后看下 getEntry(this)
/**
 * Get the entry associated with key.  This method
 * itself handles only the fast path: a direct hit of existing
 * key. It otherwise relays to getEntryAfterMiss.  This is
 * designed to maximize performance for direct hits, in part
 * by making this method readily inlinable.
 *
 * @param  key the thread local object
 * @return the entry associated with key, or null if no such
 */
private Entry getEntry(ThreadLocal<?> key) {
    # 通过ThreadLocal获取其对应的值,通过散列算法
    int i = key.threadLocalHashCode & (table.length - 1);
    Entry e = table[i];
    # 比较key
    if (e != null && e.get() == key)
        return e;
    else
        return getEntryAfterMiss(key, i, e);
}
复制代码
没找到的话,会进行循环寻址 getEntryAfterMiss(key, i, e)
/**
 * Version of getEntry method for use when key is not found in
 * its direct hash slot.
 *
 * @param  key the thread local object
 * @param  i the table index for key's hash code
 * @param  e the entry at table[i]
 * @return the entry associated with key, or null if no such
 */

# 循环遍历,直到找到为止,此处markdown显示bug,o_o
private Entry getEntryAfterMiss(ThreadLocal<?> key, int i, Entry e) {
    Entry[] tab = table;
    int len = tab.length;

    while (e != null) {
        ThreadLocal<?> k = e.get();
        if (k == key)
            return e;
        if (k == null)
            expungeStaleEntry(i);
        else
            i = nextIndex(i, len);
        e = tab[i];
    }
    return null;
}
复制代码
ok,读到这里,应该对ThreadLocal的原理有了比较清晰的认识吧,建议读者可以自己跟下源码。如果还不理解,没关系,看彩蛋:
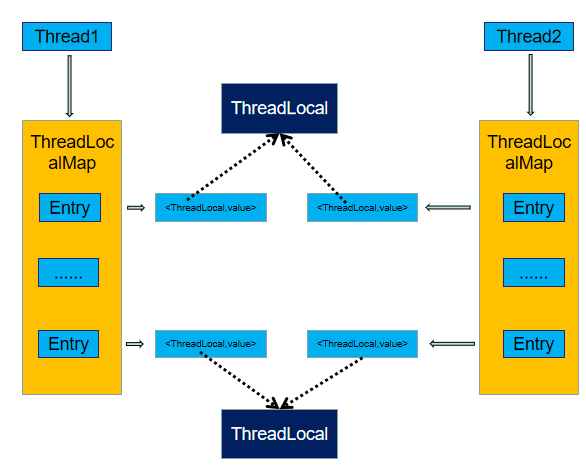
为了便于理解,笔者亲自供上上图,实线部分代表强引用,虚线部分代表的是弱引用,看懂这张关系图,对ThreadLocal应该就得心应手了。
但是,我们常常会发现使用ThreadLocal会造成 内存泄漏 ,这是为什么呢,特别是在使用 线程池 的时候。看图可知,因为Entry是个强引用,如果线程未结束,这块内存是会一直存在的,如果使用线程池,同一个线程上就会存在大量的不需要数据,此时使用完成应该及时释放。
显式锁
lock
了解完了内置锁,我们学习一下一种更轻量级的锁, 显式锁 ,这块会主要讲解如何使用(写到这里已经 4000 字了,避免读者用脑过度o_o), 后面会详细讲解其核心AQS及Condition原理 。
ReentrantLock
用例
老规矩,先来一段非线程安全案例
# 计数器
public class Counter {

    private Integer n = 0;

    public void Add() {
        n++;
    }

    public Integer getN() {
        return n;
    }
}
复制代码
启动两个线程,各调用add() 100000次
static class AddThead extends Thread {

    private Counter counter;

    AddThead(Counter counter) {
        this.counter = counter;
    }

    @Override
    public void run() {
        for (int i = 0; i < 100000; i++) {
            counter.Add();
        }
    }
}

public static void main(String[] args) {
    Counter counter = new Counter();

    for (int i = 0; i < 2; i++) {
        new AddThead(counter).start();
    }

    while(Thread.activeCount() > 2) {
        Thread.yield();
    }

    System.out.println("结果:" + counter.getN());
}

结果:194758
复制代码
使用Lock
public class Counter {

    private Lock lock = new ReentrantLock();
    private Integer n = 0;

    public void Add() {
        try {
            lock.lock();
            n++;
        } finally {
            lock.unlock();
        }
    }

    public Integer getN() {
        return n;
    }
}

结果:200000
复制代码
编写范式
try {
    lock.lock();
    # 其他
} finally {
    lock.unlock();
}
复制代码
使用完成之后记得释放锁
可重入
public static void main(String[] args) {
    Lock lock = new ReentrantLock();
    # 锁5次
    for (int i = 0; i < 5; i++) {
        lock.lock();
    }

    # 解锁5次
    for (int i = 0; i < 5; i++) {
        lock.unlock();
    }

    System.out.println("end ....");
}
复制代码
获取锁
我们启动两个线程,让一个线程持有锁,另一个线程tryLock()
尝试获取锁
static Lock lock = new ReentrantLock();

# 持有锁
static class Holder extends Thread {
    @Override
    public void run() {
        try {
            lock.lock();
            # 睡眠
            Thread.sleep(5000);
        } catch (InterruptedException e) {
            e.printStackTrace();
        } finally {
            lock.unlock();
        }
    }
}

# 尝试锁
static class TryLock implements Callable<Boolean> {

    @Override
    public Boolean call() throws Exception {
        # 尝试获取锁,获取到则返回true
        if (lock.tryLock()) {
            try{
                return true;
            }finally {
                lock.unlock();
            }
        }
        return false;
    }
}

public static void main(String[] args) throws ExecutionException, InterruptedException {
    Holder holder = new Holder();
    holder.start();

    FutureTask<Boolean> futureTask = new FutureTask<>(new TryLock());
    Thread tryThread = new Thread(futureTask);
    tryThread.start();
    Boolean result = futureTask.get();
    System.out.println("result :" + result);
}


result :false
复制代码
获取锁超时
添加获取等待时间, lock.tryLock(6000, TimeUnit.MILLISECONDS) ,然后我们再次执行
结果
result :true
复制代码
公平锁和非公平锁
所谓公平锁是指先到先锁,而非公平锁是在线程切换时允许抢占,谁抢到谁拥有锁。
ReentrantReadWriteLock
前面讲到的ReetrantLock同时只运行一个线程执行,而 ReentrantReadWriteLock 允许多个线程同时执行以提升在读多写少的场景的吞吐量。
demo
public class ReentrantReadWriteLockDemo {

    ReadWriteLock lock = new ReentrantReadWriteLock();

    public void write() {
        try {
            lock.writeLock().lock();
            System.out.println(Thread.currentThread().getId() + " 持有写锁");
            Thread.sleep(1000);
            System.out.println(Thread.currentThread().getId() + " 准备释放写锁");
        } catch (InterruptedException e) {
            e.printStackTrace();
        } finally {
            lock.writeLock().unlock();
        }
    }

    public void read() {
        try {
            lock.readLock().lock();
            System.out.println(Thread.currentThread().getId() + " 持有读锁");
            Thread.sleep(1000);
            System.out.println(Thread.currentThread().getId() + " 准备释放读锁");
        } catch (InterruptedException e) {
            e.printStackTrace();
        } finally {
            lock.readLock().unlock();
        }
    }
}
复制代码
读读
public static void main(String[] args) {
    ReentrantReadWriteLockDemo lockDemo = new ReentrantReadWriteLockDemo();

    new Thread(()->{
        lockDemo.read();
    }).start();

    new Thread(()->{
        lockDemo.read();
    }).start();
}

=======================结果========================
11 持有读锁
12 持有读锁
11 准备释放读锁
12 准备释放读锁
复制代码
可以看到两个线程是可以同时执行的
读写
public static void main(String[] args) {
    ReentrantReadWriteLockDemo lockDemo = new ReentrantReadWriteLockDemo();

    new Thread(()->{
        lockDemo.read();
    }).start();

    new Thread(()->{
        lockDemo.write();
    }).start();
}

=======================结果========================
11 持有读锁
11 准备释放读锁
12 持有写锁
12 准备释放写锁
复制代码
可以看到两个是互斥的,写读类似,不做举例
写写
public static void main(String[] args) {
    ReentrantReadWriteLockDemo lockDemo = new ReentrantReadWriteLockDemo();

    new Thread(()->{
        lockDemo.write();
    }).start();

    new Thread(()->{
        lockDemo.write();
    }).start();
}

=======================结果========================
11 持有写锁
11 准备释放写锁
12 持有写锁
12 准备释放写锁
复制代码
同样互斥,所以我们可以总结出,写操作是互斥的,只要有写就互斥:
| 操作 | 是否互斥 |
|---|---|
| 读读 | 否 |
| 读写 | 是 |
| 写写 | 是 |
| 写读 | 是 |
jdk1.8提供了 StampedLock (改进后的读写锁),后续章节会深入探讨。
LockSupport
除了使用wait()、notify()/notifyall()来阻塞和唤醒线程,我们还可以使用 LockSupport 工具。
LockSupport区别于前者的是,它阻塞及唤醒的是线程,而wait、notify我们可以仔细看,它是调用的对象的方法,锁住的是对象。
看下LockSupport源码
park()
public static void park() {
    UNSAFE.park(false, 0L);
}

# 可设置阻塞时长
public static void parkNanos(long nanos) {
    if (nanos > 0)
        UNSAFE.park(false, nanos);
}
复制代码
upPark()
# 唤醒某个线程
public static void unpark(Thread thread) {
    if (thread != null)
        UNSAFE.unpark(thread);
}
复制代码
park、unpark调用的是native方法,除了锁住的是线程外,还需要注意,阻塞时,是不能捕获Interrupt异常的,需要自己手动去判断状态。
CAS
CAS(compare and swap),看名字应该挺好理解,比较且替换。这是目前CPU处理器能够提供的技术,前面我们用到的锁,不管是锁对象、阻塞线程,都相对来说会有性能损耗。而CAS相比不需要锁,它是通过一个地址V,原值A,新值B来实现,比如,a=0,我们想改为1,我们首先需要知道a的内存地址,然后比较是否为0,如果是就改为1。如果不是,就返回目前的值,然后自旋操作。
CAS在对象锁,AQS中同样有应用,原理跟上述一致,后续写AQS时会讲解。在JAVA中,提供了一些通过CAS实现的原子操作类,如:
- AtomicBoolean
- AtomicInteger
- AtomicLong
- AtomicReference
- ......
回顾之前,我们使用了synchronized来锁Integer来实现货物计算,现在我们来使用AtomicInteger来计算
static AtomicInteger n = new AtomicInteger(0);d

# 每个线程计算10000次
static class AddThread extends Thread {

    @Override
    public void run() {
        for (int i = 0; i < 10000; i++) {
            n.incrementAndGet();
        }
    }
}

public static void main(String[] args) {
    # 启动五个线程
    for (int i = 0; i < 5; i++) {
        new AddThread().start();
    }

    while(Thread.activeCount() > 2) {
        Thread.yield();
    }

    System.out.println("n :" + n.get());
}

结果
n :50000
复制代码
可以看到,我们并没有使用什么synchronized、volatile、lock,但是最终结果是正确的。其他AtomicXXX使用可自己练习。
总结
本章节主要介绍了JAVA中的锁机制,包括synchronized、volatile、lock、cas等,其中有的深入讲了,有的主要讲了使用(本次写的有点多,后面尽量拆细点,深入点),希望能给大家带来一些帮助。如果有写的有问题的或需要讨论的可留言指正。
正文到此结束
- 本文标签: ask db map ORM 注释 java线程 锁 rmi 文章 tar NSA id value Markdown src tab 安全 处理器 时间 性能优化 volatile ACE IDE 希望 key synchronized 同步 源码 cat Atom 代码 bug 重排序 Word https 数据 IO 实例 字节码 总结 编译 线程 queue 内存模型 模型 开发 http ip UI 图片 遍历 JVM final java swap 线程池 多线程 高并发 REST 并发
- 版权声明: 本文为互联网转载文章,出处已在文章中说明(部分除外)。如果侵权,请联系本站长删除,谢谢。
- 本文海报: 生成海报一 生成海报二
热门推荐


相关文章

近期评论
-
ws0132613@gmail.comhttps://getmacos.com/gopanel/william smith
-
谢谢
-
https://www.newcmy.com/register?aff=HBVX建议您试试草莓云机场,可以流畅观看youtube和tiktok,上reddit/x也没有问题,还有各种ai优化节点。
-
-
-
想购买您这个站,我的联系方式QQ741756694微信同步 能卖联系
-
-
-
-
Loading...
![[HBLOG]公众号](https://www.liuhaihua.cn/img/qrcode_gzh.jpg)

