SpringMVC注解版:读取核心配置类
按照之前传统的方式来配置SpringMVC需要在web.xml中配置DispatcherServlet,但是在Servlet3规范和Spring3.1之后新增了一种方式,那就是java和注解的方式进行配置,今天我们以Spring的最新版本5.2.1.RELEASE来进行一下配置,一起来看一下吧!
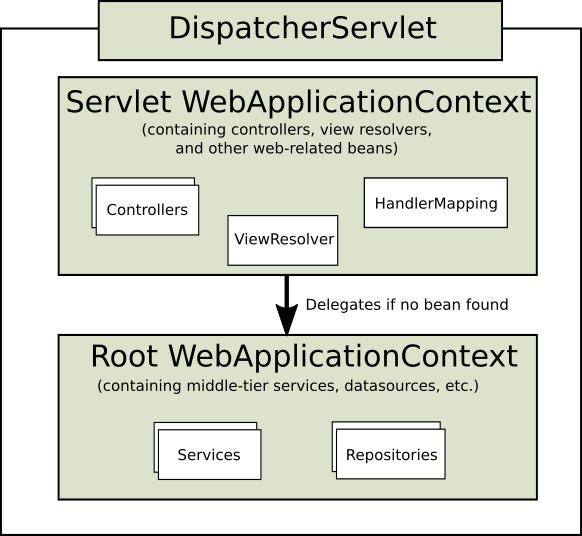
在Web MVC框架中,每个DispatcherServlet都有自己的WebApplicationContext,它继承了在根WebApplicationContext中已经定义的所有bean。 根WebApplicationContext应该包含应在其他上下文和Servlet实例之间共享的所有基础结构Bean。 这些继承的bean可以在servlet特定的作用域中被覆盖,并且您可以在给定Servlet实例本地定义新的特定于作用域的bean。
复制代码
下面的配置来自域官方文档:
取消web.xml改用java来配置首先需要有一个入口,下面展示了这个入口,即先创建一个初始化的类GolfingWebAppInitializer ,GolfingWebAppInitializer 类继承了一个名为AbstractAnnotationConfigDispatcherServletInitializer的抽象类,同样这个抽象类实现了org.springframework.web.WebApplicationInitializer接口。
复制代码
public class GolfingWebAppInitializer extends AbstractAnnotationConfigDispatcherServletInitializer {
    @Override
    protected Class<?>[] getRootConfigClasses() {
        // GolfingAppConfig defines beans that would be in root-context.xml
        return new Class[] { GolfingAppConfig.class };//Spring框架的核心配置文件
    }

    @Override
    protected Class<?>[] getServletConfigClasses() {
        // GolfingWebConfig defines beans that would be in golfing-servlet.xml
        return new Class[] { GolfingWebConfig.class };//Spring MVC框架的核心配置文件
    }

    @Override
    protected String[] getServletMappings() {
        return new String[] { "/" };
    }

}
复制代码
-
继承
AbstractAnnotationConfigDispatcherServletInitializer需要实现三个方法,其中getServletMappings()会返回一个路径数组,将一个或多个路径映射到 DispatcherServlet 上,本例中它映射的是“/”,表示DispatcherServlet会处理所有的请求。 -
getServletConfigClasses()方法要返回一个带有@Configuration注解的类,这个类将会用来定义DispatcherServlet应用上下文。 -
getRootConfigClasses()方法要返回一个带有@Configuration注解的类,这个类将会用来配置原来xml中ContextLoaderListener所创建的应用上下文。
启动原理:
在Servlet3.0环境中容器会查找类路径下的实现了 javax.servlet.ServletContainerInitializer 接口的类,找到了就会用它来配置Servlet容器。从这个接口的全限定名称上可以看出它是java标准api的一部分,是在Servlet 3.0以后才添加的。Spring为这个接口提供了一个实现类:
package org.springframework.web;

@HandlesTypes({WebApplicationInitializer.class})
public class SpringServletContainerInitializer implements ServletContainerInitializer {
    public SpringServletContainerInitializer() {}
}
复制代码
这个实现类又会把配置任务交给WebApplicationInitializer接口的实现类来完成。我们这里实现的抽象类AbstractAnnotationConfigDispatcherServletInitializer正是WebApplicationInitializer的一个实现类。而我们的GolfingWebAppInitializer正是AbstractAnnotationConfigDispatcherServletInitializer的一个扩展,所以这样就把配置任务最终交给了我们自定义的这个配置类GolfingWebAppInitializer。
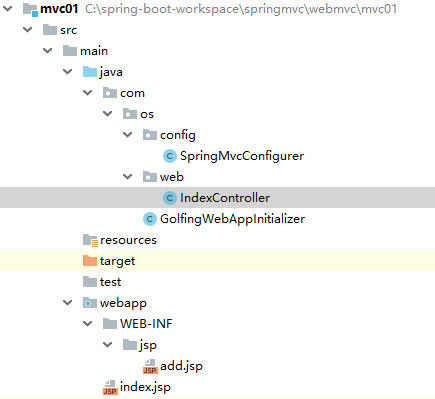
第二步:SpringMVC配置
package com.os;

import com.os.config.SpringMvcConfigurer;
import org.springframework.web.servlet.support.AbstractAnnotationConfigDispatcherServletInitializer;

public class GolfingWebAppInitializer extends AbstractAnnotationConfigDispatcherServletInitializer {
    @Override
    protected Class<?>[] getRootConfigClasses() {
        return new Class[0];
    }

    @Override
    protected Class<?>[] getServletConfigClasses() {
        return new Class[]{
            SpringMvcConfigurer.class/*这个就是SpringMVC的核心配置文件,相当于之前配置果的xml*/
        };
    }

    @Override
    protected String[] getServletMappings() {
        return new String[] { "/" };//映射的路径
    }
}
复制代码
SpringMvcConfigurer
package com.os.config;

import org.springframework.context.annotation.ComponentScan;
import org.springframework.context.annotation.Configuration;
import org.springframework.web.servlet.config.annotation.ViewResolverRegistry;
import org.springframework.web.servlet.config.annotation.WebMvcConfigurer;
import org.springframework.web.servlet.view.InternalResourceViewResolver;

@Configuration
@ComponentScan(basePackages = "com.os.**.web")
public class SpringMvcConfigurer implements WebMvcConfigurer {

    @Override
    public void configureViewResolvers(ViewResolverRegistry registry) {
        InternalResourceViewResolver jspViewResolver = new InternalResourceViewResolver();
        jspViewResolver.setPrefix("/WEB-INF/jsp/");
        jspViewResolver.setSuffix((".jsp"));

        registry.viewResolver(jspViewResolver);
    }
}
复制代码
WebMvcConfigurer提供了回调方法来供我们自定义SpringMVC的默认配置。如果是使用@EnableWebMvc注解的话表示启用WebMvcConfigurationSupport类的默认配置。我们并没有使用@EnableWebMvc注解而是实现了WebMvcConfigurer,这样做是为了扩展。
第三步:编写Controller
package com.os.web;

import org.springframework.stereotype.Controller;
import org.springframework.web.bind.annotation.GetMapping;
import org.springframework.web.bind.annotation.RequestMapping;

@Controller
@RequestMapping("/user")
public class IndexController {
    @GetMapping("/add")
    public String add(){
        return "add";
    }
}
复制代码
基本上就搞定了!发布一下项目就行了,这里没有使用Tomcat插件的形式进行发布,还是使用原始的发布方式,这里就不过多说明和配置了,这些东西还是比较简单的!上述配置和加载SpringMVC的核心配置文件的方式是我们推荐的方式,但是还有一种可以读取前端控制器的方式,这里简单的记录一下!
附录
package com.hanpang.config;

import javax.servlet.ServletContext;
import javax.servlet.ServletException;
import javax.servlet.ServletRegistration;
import org.springframework.web.WebApplicationInitializer;
import org.springframework.web.context.support.AnnotationConfigWebApplicationContext;
import org.springframework.web.servlet.DispatcherServlet;

public class HelloWorldInitializer implements WebApplicationInitializer {

	@Override
	public void onStartup( ServletContext application ) throws ServletException {
		System.out.println("开始加载容器");
		AnnotationConfigWebApplicationContext ctx = new AnnotationConfigWebApplicationContext();
		ctx.register(SpringMvcConfiguration.class);//核心类
		ctx.setServletContext(application);

		ServletRegistration.Dynamic servlet = application.addServlet("dispatcher", new DispatcherServlet(ctx));

		servlet.setLoadOnStartup(2);
		servlet.addMapping("/");

	}

}
复制代码
正文到此结束
热门推荐


相关文章

近期评论
-
主要用的是AI
-
博主的博客用的什么技术栈,内容都是干货,赞
-
-
https://www.liuhaihua.cn/archives/40657.html 这篇博客中的图片打不开了
-
不会英语啊。
-
-
-
-
-
Loading...
![[HBLOG]公众号](https://www.liuhaihua.cn/img/qrcode_gzh.jpg)

