Mybatis之缓存分析
前言
缓存可以说是提升性能的标配,操作系统,cpu,各种各样的框架我们总能看到缓存的身影,当然Mybatis也不例外,Mybatis提供了强大的缓存功能,分别有一级缓存和二级缓存,接下来我们来做一一介绍。
缓存配置
在深入之前我们先看看Mybatis都提供了哪些缓存的配置,方便开发者使用,可以大致归为三类配置,下面分别详细说明:
1.setting配置
setting配置中包含了相关缓存的配置有:cacheEnabled和localCacheScope;
cacheEnabled:全局地开启或关闭配置文件中的所有映射器已经配置的任何缓存,默认值true;
localCacheScope:MyBatis 利用本地缓存机制(Local Cache)防止循环引用(circular references)和加速重复嵌套查询。 默认值为 SESSION,这种情况下会缓存一个会话中执行的所有查询。 若设置值为 STATEMENT,本地会话仅用在语句执行上,对相同 SqlSession 的不同调用将不会共享数据,默认为session。
2.statement配置
XML映射文件包括select标签和insert/update/delete标签两类;select标签包括flushCache和useCache,另外三个只有useCache:
flushCache:将其设置为true后,只要语句被调用,都会导致本地缓存和二级缓存被清空,默认值:false;
useCache:将其设置为true后,将会导致本条语句的结果被二级缓存缓存起来,默认值:对select元素为true。
3.cache标签
XML映射文件可以包含cache和cache-ref两类标签:
cache:对给定命名空间的缓存配置,要启用全局的二级缓存,只需要在你的SQL映射文件中添加一行<cache/>,当然里面也包含一些自定义的属性,如下完整的配置:
<cache
        blocking="true"
        eviction="FIFO"
        flushInterval="60000"
        readOnly="true"
        size="512"
        type="org.apache.ibatis.cache.impl.PerpetualCache">
    </cache>
eviction :清除策略常见的有:LRU,FIFO,SOFT,WEAK;默认的清除策略是LRU;
flushInterval :(刷新间隔)属性可以被设置为任意的正整数,设置的值应该是一个以毫秒为单位的合理时间量。 默认情况是不设置,也就是没有刷新间隔,缓存仅仅会在调用语句时刷新;
size :(引用数目)属性可以被设置为任意正整数,要注意欲缓存对象的大小和运行环境中可用的内存资源。默认值是 1024;
readOnly :(只读)属性可以被设置为 true 或 false。只读的缓存会给所有调用者返回缓存对象的相同实例。 因此这些对象不能被修改。这就提供了可观的性能提升。而可读写的缓存会(通过序列化)返回缓存对象的拷贝。 速度上会慢一些,但是更安全,因此默认值是 false;
blocking :当在缓存中找不到元素时,它设置对缓存键的锁定;这样其他线程将等待此元素被填充,而不是命中数据库;
type :指定缓存器类型,可以自定义缓存;
cache-ref:对某一命名空间的语句,只会使用该命名空间的缓存进行缓存或刷新。 但你可能会想要在多个命名空间中共享相同的缓存配置和实例。要实现这种需求,你可以使用 cache-ref 元素来引用另一个缓存。
缓存测试
1.默认配置
默认是没有开启二级缓存的,只有一级缓存,并且缓存范围是SESSION,flushCache为false语句被调用,不会导致本地缓存;
public static void main(String[] args) throws IOException {
        String resource = "mybatis-config-sourceCode.xml";
        InputStream inputStream = Resources.getResourceAsStream(resource);
        SqlSessionFactory sqlSessionFactory = new SqlSessionFactoryBuilder().build(inputStream);
        SqlSession session = sqlSessionFactory.openSession();
        try {
            BlogMapper<Blog> mapper = session.getMapper(BlogMapper.class);
            System.out.println(mapper.selectBlog(160));
            // 默认开启一级缓存,在参数和sql相同的情况下,只执行一次sql
            System.out.println(mapper.selectBlog(160));
        } finally {
            session.close();
        }
        SqlSession session2 = sqlSessionFactory.openSession();
        try {
            BlogMapper<Blog> mapper = session2.getMapper(BlogMapper.class);
            System.out.println(mapper.selectBlog(160));
        } finally {
            session.close();
        }
    }
分别创建了2个session,第一个session连续查询了两次,第二session查询了一次结果如下:
com.mybatis.vo.Blog@2b71e916
com.mybatis.vo.Blog@2b71e916
com.mybatis.vo.Blog@13c9d689
因为开启了一级缓存并且缓存范围是SESSION,所以session1的两次查询返回同一个对象;而不同的session2返回了不同的对象;
2.flushCache为true
同样执行以上的程序,结果如下:
com.mybatis.vo.Blog@2b71e916
com.mybatis.vo.Blog@13c9d689
com.mybatis.vo.Blog@4afcd809
因为设置了只要语句被调用,都会导致本地缓存,所以获取的对象都是不同的;
3.localCacheScope设置为STATEMENT
同样执行以上的程序,结果如下:
com.mybatis.vo.Blog@2b71e916
com.mybatis.vo.Blog@13c9d689
com.mybatis.vo.Blog@4afcd809
设置值为STATEMENT,本地会话仅用在语句执行上,对相同SqlSession的不同调用将不会共享数据,所以获取的对象都是不同的;
4.cacheEnabled设置为false
同样执行以上的程序,结果如下:
com.mybatis.vo.Blog@6771beb3
com.mybatis.vo.Blog@6771beb3
com.mybatis.vo.Blog@411f53a0
可以发现此配置对一级缓存并不起作用,只作用于二级缓存;
5.配置cache标签
在xxMapper.xml中配置<cache />,同样执行以上的程序,结果如下:
com.mybatis.vo.Blog@292b08d6
com.mybatis.vo.Blog@292b08d6
com.mybatis.vo.Blog@24313fcc
为什么已经设置了二级缓存,获取的对象还是不一样;主要原因是cache中默认的readOnly属性为false,也就是说会返回缓存对象的拷贝,所有这里对象不一致,但其实并没有再次查询数据库;再次设置readOnly属性如下所示:
<cache readOnly="true"/>
再次运行,可以发现所有对象都是同一个,结果如下:
com.mybatis.vo.Blog@6c6cb480
com.mybatis.vo.Blog@6c6cb480
com.mybatis.vo.Blog@6c6cb480
注:需要注意的是如果设置readOnly=true需要注意其他线程修改此对象值,进而影响当前线程的对象值,因为所有线程都是共享的同一个对象,如果设置为false那么其他线程获取的对象都是拷贝,不会影响当前线程数据。
映射语句文件中的所有insert、update和delete语句会刷新缓存,在session2查询之前执行更新操作如下:
SqlSession session21 = sqlSessionFactory.openSession();
try {
    BlogMapper mapper = session21.getMapper(BlogMapper.class);
    Blog blog = new Blog();
    blog.setId(158);
    blog.setTitle("hello java new");
    mapper.updateBlog(blog);
    session21.commit();
} finally {
    session21.close();
}
再次运行,缓存已经被清除,获取新的对象,结果如下:
com.mybatis.vo.Blog@6c6cb480
com.mybatis.vo.Blog@6c6cb480
com.mybatis.vo.Blog@4b2bac3f
6.配置cache属性blocking="true"
blocking=true的情况下其他线程将等待此元素被填充,而不是命中数据库;可以简单做个测试,首先不设置blocking,然后分别创建两个线程分别查询selectBlog:
new Thread(new Runnable() {
        @Override
        public void run() {
              ...selectBlog...
       }
}).start();
new Thread(new Runnable() {
        @Override
        public void run() {
              ...selectBlog...
        }
}).start();
结果如下,每个线程都查询了一次数据库,这样如果是很费时的sql,起不到缓存的作用:
com.mybatis.vo.Blog@4eebc002
com.mybatis.vo.Blog@354d6d02
注:如果以上查询出来是两个相同的结果,可以增加相关查询的sql时间,这样效果更加明显;修改配置设置blocking="true",配置如下:
<cache readOnly="true" blocking="true" />
再次运行结果如下:
com.mybatis.vo.Blog@f9ecfca
com.mybatis.vo.Blog@f9ecfca
可以发现对象是同一个,说明只查询了一次数据库;
缓存分析
上节中对一级缓存和二级缓存通过实例测试的方式,详细结束了如何使用,以及注意点;本节从源码入手,更加深入的了解mybatis的缓存机制;
1.缓存类型
Mybatis提供了缓存接口类Cache,具体如下所示:
public interface Cache {
  String getId();
  void putObject(Object key, Object value);
  Object getObject(Object key);
  Object removeObject(Object key);
  void clear();
  int getSize();
  ReadWriteLock getReadWriteLock();
}
提供了put,get,remove操作,同时还提供了清除,获取大小,获取读写锁功能;基于此接口Mybatis提供了多个实现类,具体如下图所示:
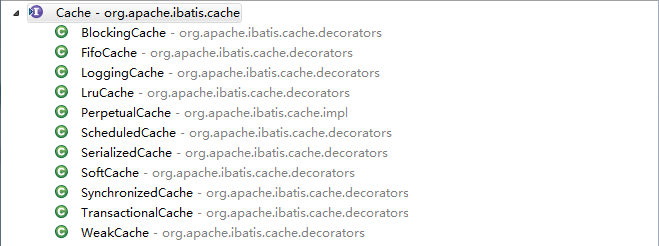
FifoCache,LruCache,SoftCache,WeakCache:这四个是可以在cache标签里面配置的策略eviction默认为LruCache;
- LRU– 最近最少使用:移除最长时间不被使用的对象。
- FIFO– 先进先出:按对象进入缓存的顺序来移除它们。
- SOFT– 软引用:基于垃圾回收器状态和软引用规则移除对象。
- WEAK– 弱引用:更积极地基于垃圾收集器状态和弱引用规则移除对象。
其他的缓存是不能当作缓存策略来配置的,他们主要被用来当作以上四种策略的补充,配合四种策略使用的:
BlockingCache:在我们设置blocking="true"时会自动使用此缓存,用来防止多个线程同时执行相同sql,查询多次数据库的问题;
LoggingCache:为缓存提供日志功能的;
SerializedCache:当缓存有读写功能的时候,提供序列化功能;
ScheduledCache:如果配置了刷新间隔flushInterval,提供检查是否到刷新时间;
SynchronizedCache:提供同步功能synchronized关键字;
PerpetualCache:提供缓存最基本,最纯粹的功能,内置HashMap保存数据;可以说以上配置的四种策略都由此类提供保存功能;一级缓存就是直接使用此类;
TransactionalCache:提供事务管理机制;
2.一级缓存
Mybatis默认开启一级缓存,使用的是PerpetualCache作为缓存工具类,内部就是一个最简单的HashMap,使用CacheKey作为Map的key,value就是查询处理的数据;相关功能可以参考BaseExecutor的query方法:
public <E> List<E> query(MappedStatement ms, Object parameter, RowBounds rowBounds, ResultHandler resultHandler, CacheKey key, BoundSql boundSql) throws SQLException {
    ErrorContext.instance().resource(ms.getResource()).activity("executing a query").object(ms.getId());
    if (closed) {
      throw new ExecutorException("Executor was closed.");
    }
    if (queryStack == 0 && ms.isFlushCacheRequired()) {
      clearLocalCache();
    }
    List<E> list;
    try {
      queryStack++;
      list = resultHandler == null ? (List<E>) localCache.getObject(key) : null;
      if (list != null) {
        handleLocallyCachedOutputParameters(ms, key, parameter, boundSql);
      } else {
        list = queryFromDatabase(ms, parameter, rowBounds, resultHandler, key, boundSql);
      }
    } finally {
      queryStack--;
    }
    if (queryStack == 0) {
      for (DeferredLoad deferredLoad : deferredLoads) {
        deferredLoad.load();
      }
      // issue #601
      deferredLoads.clear();
      if (configuration.getLocalCacheScope() == LocalCacheScope.STATEMENT,则清除缓存数据;) {
        // issue #482
        clearLocalCache();
      }
    }
    return list;
  }
首先判定是否开启了flushCache开关,之前说过如果开启了开关,则每次查询都会清除缓存,但是这里加了另外一个条件,必须queryStack==0的情况下;从名字可以大致猜测出就是查询的堆栈深度,查询之前+1,结束之后-1;为什么需要等于0,大概猜测一下可能是为了防止在查询的过程中,有其他线程进来直接把缓存给清掉了;
然后把queryStack+1,并且只有在没有设置resultHandler的情况下才会从本地缓存里面获取值,否则不会从缓存获取,直接查询数据库;结束时queryStack-1,本次查询结束,queryStack归0;
最后同样是在queryStack==0的情况下处理延迟加载,以及缓存范围如果是STATEMENT,则清除缓存数据;
总结一下:一级缓存是默认开启的,也没有开关对其进行关闭,唯一的两个参数分别是localCacheScope和flushCache用来控制删除缓存,当然session关闭的时候也会清除缓存;另外一个问题就是为什么本地缓存没有引入删除策略比如lru等,可能还是因为session的生命周期比较短,关闭session即可删除缓存。
3.二级缓存
上面我们介绍到cacheEnabled==true的情况下才会开启二级缓存,默认为true;在configuration中会创建Executor,如下所示:
public Executor newExecutor(Transaction transaction, ExecutorType executorType) {
    executorType = executorType == null ? defaultExecutorType : executorType;
    executorType = executorType == null ? ExecutorType.SIMPLE : executorType;
    Executor executor;
    if (ExecutorType.BATCH == executorType) {
      executor = new BatchExecutor(this, transaction);
    } else if (ExecutorType.REUSE == executorType) {
      executor = new ReuseExecutor(this, transaction);
    } else {
      executor = new SimpleExecutor(this, transaction);
    }
    if (cacheEnabled) {
      executor = new CachingExecutor(executor);
    }
    executor = (Executor) interceptorChain.pluginAll(executor);
    return executor;
  }
executorType在configuration中设置,如下所示:
<!-- 执行器类型:SIMPLE,REUSE.BATCH -->
<setting name="defaultExecutorType" value="SIMPLE" />
如果没有设置executorType,默认为ExecutorType.SIMPLE;可以看到创建完Executor之后会判断cacheEnabled是否为true,只有为true才会创建CachingExecutor,此类是专门用来处理二级缓存的;当然并不是设置了cacheEnabled就开启了二级缓存,还必须设置cache标签,不然同样不会开启二级缓存;具体看CachingExecutor中的查询功能:
public <E> List<E> query(MappedStatement ms, Object parameterObject, RowBounds rowBounds, ResultHandler resultHandler, CacheKey key, BoundSql boundSql)
      throws SQLException {
    Cache cache = ms.getCache();
    if (cache != null) {
      flushCacheIfRequired(ms);
      if (ms.isUseCache() && resultHandler == null) {
        ensureNoOutParams(ms, boundSql);
        @SuppressWarnings("unchecked")
        List<E> list = (List<E>) tcm.getObject(cache, key);
        if (list == null) {
          list = delegate.<E> query(ms, parameterObject, rowBounds, resultHandler, key, boundSql);
          tcm.putObject(cache, key, list); // issue #578 and #116
        }
        return list;
      }
    }
    return delegate.<E> query(ms, parameterObject, rowBounds, resultHandler, key, boundSql);
  }
首先获取缓存实现类,如果没有配置cache标签,这里获取的实现类就为null,所以就直接查询数据库;如果不为null,则先判断是否开启了flushCache功能,可以发现此功能不仅用在一级缓存,同样用在二级缓存,如果设置为则直接清除缓存;
接下来会判断select标签是否开启了useCache功能,默认是开启的;同时还需要没有设置resultHandler,这一点和本地缓存一样;
最后就是查询数据然后放入缓存中,这里并没有直接用获取的Cache实现类去get/put操作,而是外层有一个包装缓存类TransactionalCache,也就是默认开启了事务;
下面看一下是如何获取Cache的,这个主要和xxxMapper.xml中配置的cache标签有关;Cache实现类在MapperBuilderAssistant中实现,具体如下:
public Cache useNewCache(Class<? extends Cache> typeClass,
      Class<? extends Cache> evictionClass,
      Long flushInterval,
      Integer size,
      boolean readWrite,
      boolean blocking,
      Properties props) {
    Cache cache = new CacheBuilder(currentNamespace)
        .implementation(valueOrDefault(typeClass, PerpetualCache.class))
        .addDecorator(valueOrDefault(evictionClass, LruCache.class))
        .clearInterval(flushInterval)
        .size(size)
        .readWrite(readWrite)
        .blocking(blocking)
        .properties(props)
        .build();
    configuration.addCache(cache);
    currentCache = cache;
    return cache;
  }
可以发现这里设置的参数基本和cache标签里面设置的一致:
implementation:对应cache标签中的type,如果没有设置默认为PerpetualCache;
addDecorator:对应cache标签中的eviction,也就是清除策略,默认是LruCache;
clearInterval:对应cache标签中的flushInterval,默认情况是不设置,也就是没有刷新间隔;
readWrite:对应cache标签中的readOnly,默认为false,支持读写功能;
blocking:对应cache标签中的blocking,默认为false;
最后执行build方法,具体代码如下:
public Cache build() {
    setDefaultImplementations();
    Cache cache = newBaseCacheInstance(implementation, id);
    setCacheProperties(cache);
    // issue #352, do not apply decorators to custom caches
    if (PerpetualCache.class.equals(cache.getClass())) {
      for (Class<? extends Cache> decorator : decorators) {
        cache = newCacheDecoratorInstance(decorator, cache);
        setCacheProperties(cache);
      }
      cache = setStandardDecorators(cache);
    } else if (!LoggingCache.class.isAssignableFrom(cache.getClass())) {
      cache = new LoggingCache(cache);
    }
    return cache;
  }

    private Cache setStandardDecorators(Cache cache) {
    try {
      MetaObject metaCache = SystemMetaObject.forObject(cache);
      if (size != null && metaCache.hasSetter("size")) {
        metaCache.setValue("size", size);
      }
      if (clearInterval != null) {
        cache = new ScheduledCache(cache);
        ((ScheduledCache) cache).setClearInterval(clearInterval);
      }
      if (readWrite) {
        cache = new SerializedCache(cache);
      }
      cache = new LoggingCache(cache);
      cache = new SynchronizedCache(cache);
      if (blocking) {
        cache = new BlockingCache(cache);
      }
      return cache;
    } catch (Exception e) {
      throw new CacheException("Error building standard cache decorators.  Cause: " + e, e);
    }
  }
首先newBaseCacheInstance,这里默认的implementation其实就是PerpetualCache,当然如何这里指定了自定义的缓存类型,就直接返回用户自定义的类型了;如果没有指定那么继续往下会newCacheDecoratorInstance,这里的decorators就是配置的eviction,默认是LruCache,同时包含了默认的PerpetualCache;
然后执行setStandardDecorators方法,这个方法其实就是判断用户是否配置了相关的参数比如:flushInterval,readOnly,blocking等,每个新的缓存实例都会包含原来的实例,类似装饰者模式;具体每个缓存实例这里就不过多介绍了,反正就是每个实现一个功能,最后就是把所有功能过滤一遍,有点像过滤器;
自定义缓存
从上面的内容中我们可以知道,可以在cache标签中设置type类型,这里其实就可以指定自定义的缓存类型了;并且我们在分析二级缓存源码的时候如果type类型不是PerpetualCache实现类,那么就不会有下面的setStandardDecorators,直接返回用户自定义的缓存,很多功能就没有了,所以自定义缓存还是要小心谨慎;
当然简单实现一个自定义的缓存还是比较简单的,实现接口Cache即可;比如我们常用的redis,Memcached,EhCache等做缓存,其实也可以通过扩展作为Mybatis的二级缓存,Mybatis官方也提供了实现: 二级缓存扩展 ,我们只需要引入jar即可:
<dependency>
    <groupId>org.mybatis.caches</groupId>
    <artifactId>mybatis-redis</artifactId>
    <version>1.0.0-beta2</version>
</dependency>
<dependency>
    <groupId>org.mybatis.caches</groupId>
    <artifactId>mybatis-memcached</artifactId>
    <version>1.1.0</version>
</dependency>
<dependency>
    <groupId>org.mybatis.caches</groupId>
    <artifactId>mybatis-ehcache</artifactId>
    <version>1.1.0</version>
</dependency>
引入相关jar包以后,只需要在Cache标签中配置type类型即可:
type="org.mybatis.caches.memcached.MemcachedCache"
type="org.mybatis.caches.redis.RedisCache"
type="org.mybatis.caches.ehcache.EhcacheCache"
总结
本文首先介绍了Mybatis缓存的相关配置项,一一介绍;然后通过改变各种参数进行一一验证,并从源码层面进行分析重点分析了一级缓存,二级缓存;最后介绍了自定义缓存,以及官方提供的一下扩展缓存实现。
示例代码地址
Github
正文到此结束
- 本文标签: cache HashMap 测试 线程 数据 时间 value final ACE plugin id apache 数据库 开发者 需求 key 锁 生命 sqlsession iBATIS stream update tar UI 代码 XML 开发 删除 mapper 垃圾回收 缓存 java 配置 GitHub 实例 操作系统 http SqlSessionFactory IO Statement https map 管理 Select mybatis缓存 src 一级缓存 synchronized git sql NSA App 参数 build SqlSessionFactoryBuilder 二级缓存 equals tab 安全 IDE CTO mybatis 同步 Action executor session 源码 cat redis 空间 list 总结 Logging
- 版权声明: 本文为互联网转载文章,出处已在文章中说明(部分除外)。如果侵权,请联系本站长删除,谢谢。
- 本文海报: 生成海报一 生成海报二
热门推荐


相关文章


Loading...
![[HBLOG]公众号](https://www.liuhaihua.cn/img/qrcode_gzh.jpg)

