Spring Boot: Spring Doc生成OpenAPI3.0文档
1. 概述
公司正好最近在整理项目的文档,且文档对于构建REST API来说是至关重要的。在这篇文章中,我将介绍 Spring Doc
, 一个基于 OpenAPI 3
规范简化了 Spring Boot 1.x
和 2.x
应用程序的API文档的生成和维护的工具。
2. 设置springdoc-openapi
如果想让 springdoc-openapi 为我们的API生成标准的 OpenAPI 3 文档, 只需要添加 springdoc-openapi-core 依赖到 pom.xml :
<dependency>
    <groupId>org.springdoc</groupId>
    <artifactId>springdoc-openapi-core</artifactId>
    <version>1.1.45</version>
</dependency>复制代码
添加完成后,启动应用程序,即可访问默认路径 /v3/api-docs
查看文档,如下所示:
http://localhost:8080/v3/api-docs/复制代码
如果想要自定义路径,可在 application.properties 文件中指定 :
springdoc.api-docs.path=/api-docs复制代码
这样,文档的访问路径就变成 :
http://localhost:8080/api-docs/复制代码
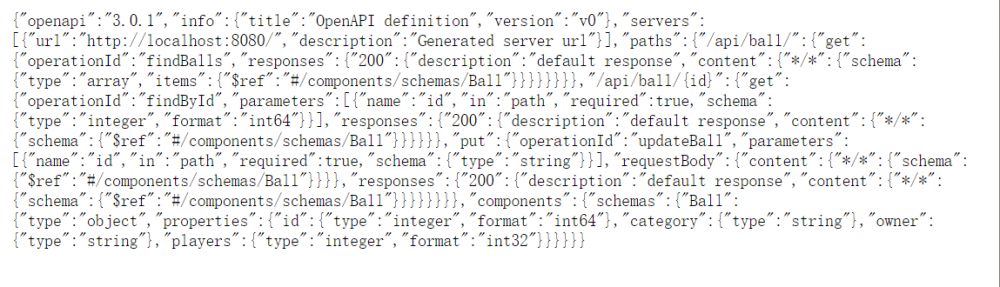
OpenAPI 默认定义为JSON 格式。对于 yaml 格式,可以访问下面的路径获取 :
http://localhost:8080/api-docs.yaml复制代码
3.整合springdoc-openapi 和Swagger UI
除了自己生成 OpenAPI 3
规范外,我们还可以将 springdoc-openapi
与 Swagger UI
集成在一起,以便可以与我们的API规范进行交互并测试端点。
3.1. Maven 依赖
要整合 springdoc-openapi
和 Swagger UI
, 唯一要做的就是添加 springdoc-openapi-ui
依赖到项目pom.xml文件中。
<dependency>
    <groupId>org.springdoc</groupId>
    <artifactId>springdoc-openapi-ui</artifactId>
    <version>1.1.45</version>
</dependency>复制代码
访问swagger-ui页面:
http://localhost:8080/swagger-ui.html复制代码
当然也可以像上面一样,自定义访问路径:
springdoc.swagger-ui.path=/swagger-ui-custom.html复制代码
3.2. 举个栗子
假设有个球(国足令人伤心,所以需要个球啊!!)的controller。
@RestController
@RequestMapping("/api/ball")
public class BallController {

    @Autowired
    private BallRepository repository;

    @GetMapping("/{id}")
    public Ball findById(@PathVariable long id) {
        return repository.findById(id)
            .orElseThrow(() -> new BallNotFoundException());
    }

    @GetMapping("/")
    public Collection<Book> findBooks() {
        return repository.getBooks();
    }

    @PutMapping("/{id}")
    @ResponseStatus(HttpStatus.OK)
    public Book updateBook(@PathVariable("id") final String id, @RequestBody final Book book) {
        return book;
    }
}复制代码
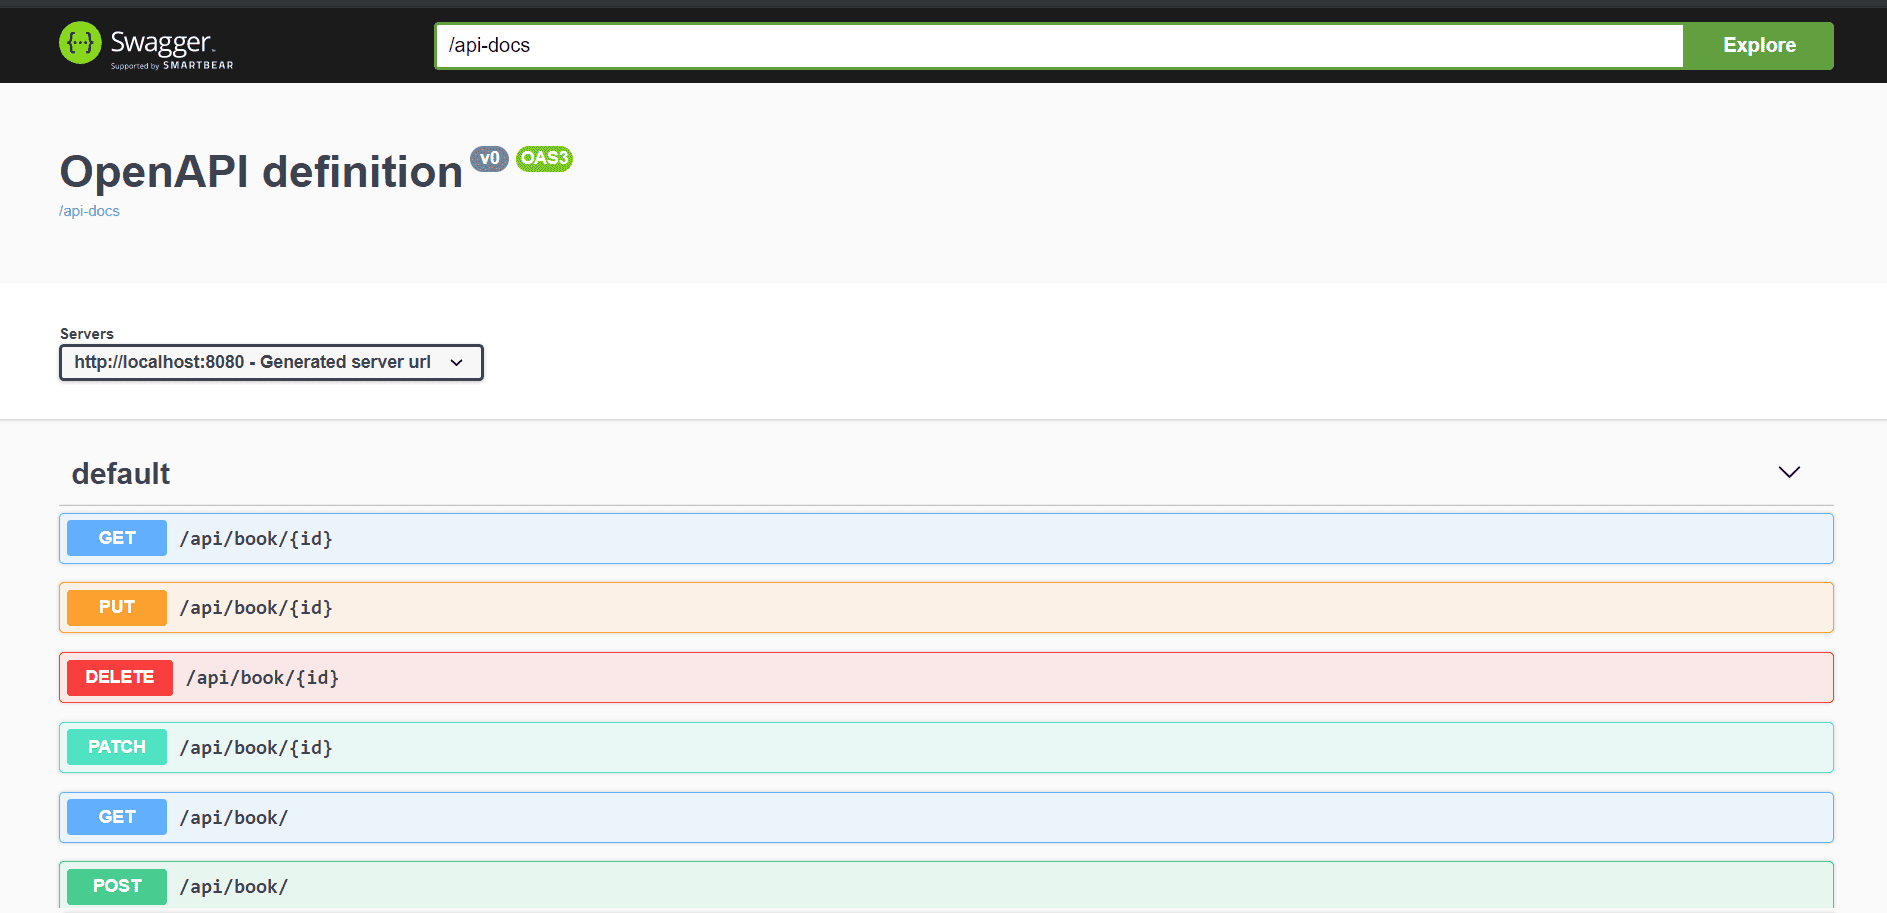
启动项目,在浏览器中访问地址:
http://localhost:8080/swagger-ui-custom.html复制代码
swagger-ui的界面:
4. springdoc-openapi 与Spring WebFlux集成
我们可以在Spring WebFlux 项目中通过添加依赖: springdoc-openapi-webflux-ui
与 springdoc-openapi
and Swagger UI
集成:
<dependency>
    <groupId>org.springdoc</groupId>
    <artifactId>springdoc-openapi-webflux-ui</artifactId>
    <version>1.1.45</version>
</dependency>复制代码
然后,浏览器访问地址
http://localhost:8080/swagger-ui.html复制代码
同样的,可以通过添加 springdoc.swagger-ui.path 配置项到 application.properties 文件来自定义文档访问路径。
5. 使用
springdoc-openapi
Maven 插件
springdoc-openapi
库提供了 springdoc-openapi-maven-plugin
插件,用来生成JSON或者yaml格式的Open API 描述。
springdoc-openapi-maven-plugin 依赖于 spring-boot-maven 插件. Maven在集成测试阶段运行openapi插件。
那么,如何在 pom.xml
中配置插件呢?请看下面的代码:
<plugin>
    <groupId>org.springframework.boot</groupId>
    <artifactId>spring-boot-maven-plugin</artifactId>
    <version>2.1.8.RELEASE</version>
    <executions>
        <execution>
            <id>pre-integration-test</id>
            <goals>
                <goal>start</goal>
            </goals>
        </execution>
        <execution>
            <id>post-integration-test</id>
            <goals>
                <goal>stop</goal>
            </goals>
        </execution>
    </executions>
</plugin>
<plugin>
    <groupId>org.springdoc</groupId>
    <artifactId>springdoc-openapi-maven-plugin</artifactId>
    <version>0.2</version>
    <executions>
        <execution>
            <phase>integration-test</phase>
            <goals>
                <goal>generate</goal>
            </goals>
        </execution>
    </executions>
</plugin>复制代码
当然, 也可以用自定义值来配置插件:
<plugin>
    <executions>
        .........
    </executions>
    <configuration>
        <apiDocsUrl>http://localhost:8080/v3/api-docs</apiDocsUrl>
        <outputFileName>openapi.json</outputFileName>
        <outputDir>${project.build.directory}</outputDir>
    </configuration>
</plugin>复制代码
仔细看看我们在插件中配置的几个参数:
- apiDocsUrl – 访问json格式文档的URL, 默认路径: http://localhost:8080/v3/api-docs
- outputFileName – 存放定义的路径, 默认为: openapi.json
- outputDir – 文档存放的绝对路径–默认为: ${project.build.directory}
6. 使用 JSR-303 Bean Validation 自动生成文档
当我们在模型中使用 JSR-303 bean validation 注解, 诸如 @NotNull , @NotBlank , @Size , @Min , @Max 等, springdoc-openapi 会为这些bean生成相应的约束。
举个栗子:
public class Ball {

    private long id;

    @NotBlank
    @Size(min = 0, max = 20)
    private String title;

    @NotBlank
    @Size(min = 0, max = 30)
    private String author;

}复制代码
为 Ball
bean生成的文档内容更为丰富: 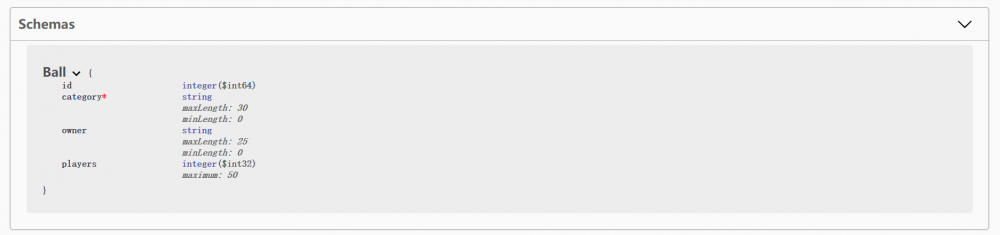
7. 使用 @ControllerAdvice和@ResponseStatus生成文档
在 @RestControllerAdvice
注解的类中,在方法上使用 @ResponseStatus
会自动生成带有返回状态码的文档。如以下被 @ControllerAdvice
注解的类中, @ResponseStatus
修饰的两个方法:
@RestControllerAdvice
public class GlobalControllerExceptionHandler {

    @ExceptionHandler(ConversionFailedException.class)
    @ResponseStatus(HttpStatus.BAD_REQUEST)
    public ResponseEntity<String> handleConnversion(RuntimeException ex) {
        return new ResponseEntity<>(ex.getMessage(), HttpStatus.BAD_REQUEST);
    }

    @ExceptionHandler(BallNotFoundException.class)
    @ResponseStatus(HttpStatus.NOT_FOUND)
    public ResponseEntity<String> handleBallNotFound(RuntimeException ex) {
        return new ResponseEntity<>(ex.getMessage(), HttpStatus.NOT_FOUND);
    }
}复制代码
现在我们可以在文档中看到返回状态码为400和404。 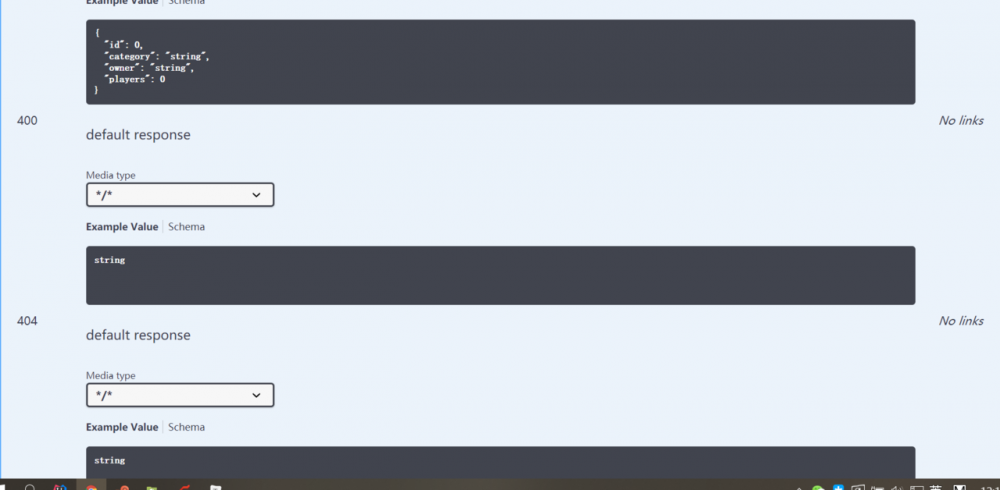
8. 小结
Spring Boot 2.2.x版本目前可能不支持,因此使用时最好使用2.1.x ,本文所使用Spring Boot版本 2.1.8.RELEASE。
以上代码可在我的github中找到, over on GitHub .
关注公众号: 回复666 领取翻译文章福利: 
正文到此结束
- 本文标签: GitHub 参数 maven message cat 2019 HTML update src js IO API REST db 文章 find 模型 App java build https 自动生成 UI 插件 测试 http tar Spring Boot CTO spring schema git plugin 配置 XML 翻译 core id 代码 final pom bean map json web entity CDN Collection
- 版权声明: 本文为互联网转载文章,出处已在文章中说明(部分除外)。如果侵权,请联系本站长删除,谢谢。
- 本文海报: 生成海报一 生成海报二
热门推荐


相关文章

近期评论
-
谢谢
-
https://www.newcmy.com/register?aff=HBVX建议您试试草莓云机场,可以流畅观看youtube和tiktok,上reddit/x也没有问题,还有各种ai优化节点。
-
-
-
想购买您这个站,我的联系方式QQ741756694微信同步 能卖联系
-
-
-
-
-
https://www.liuhaihua.cn/archives/40657.html 这篇博客中的图片打不开了
Loading...
![[HBLOG]公众号](https://www.liuhaihua.cn/img/qrcode_gzh.jpg)

