Flutter 启动流程简析 | 开发者说·DTalk
本文原作者: juexingzhe,原文发布于简书:
https://www.jianshu.com/p/26ea6bc38a6a
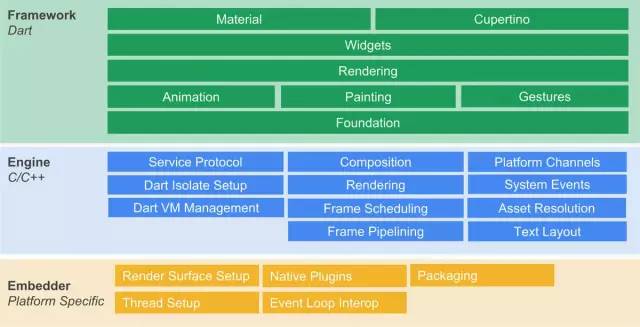
今天基于 Android 分析下 Flutter 的启动流程,首先看下官网提供的框架图,最下面一层 Embedder 是特定的平台实现,Android 平台代码在 engine/shell/platform/android 下,其中有 java 的嫁接层在 engine/shell/platform/android/io/flutter 下面。 Embedder 层是 Flutter 启动的关键,在应用启动后通过该层初始化 Flutter Engine ,在 Engine 中会创建 DartVM ,在 DartVM 中执行 dart 编写的入口方法 main 方法,这样 Flutter 模块就启动成功。
1. Android 平台代码分析
这部分代码是 Embedder 层的,在 engine/shell/platform/android/io/flutter 下面。
首先看到 FlutterApplication 中的 onCreate
@CallSuper
public void onCreate() {
super.onCreate();
FlutterMain.startInitialization(this);
}
接着到 FlutterMain 中:
public static void startInitialization(Context applicationContext, FlutterMain.Settings settings) {
if (Looper.myLooper() != Looper.getMainLooper()) {
throw new IllegalStateException("startInitialization must be called on the main thread");
} else if (sSettings == null) {
sSettings = settings;
long initStartTimestampMillis = SystemClock.uptimeMillis();
initConfig(applicationContext);
initAot(applicationContext);
initResources(applicationContext);
System.loadLibrary("flutter");
long initTimeMillis = SystemClock.uptimeMillis() - initStartTimestampMillis;
nativeRecordStartTimestamp(initTimeMillis);
}
}
在这里会进行配置信息初始化,初始化 AOT 模式或者 JIT 模式变量,资源文件初始化,主要是将 asset 目录下的 flutter 相关资源 copy 到私有目录下,看一个手机上私有目录下的截图
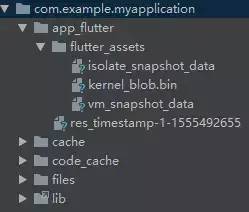
最后调用 JNI 方法 nativeRecordStartTimestamp 记录到 C++ 层。
FlutterApplication 执行完会执行 MainActivity 中的 onCreate ,主要工作会在父类 FlutterActivity 中,然后委托给 FlutterActivityDelegate :
// FlutterActivity
protected void onCreate(Bundle savedInstanceState) {
super.onCreate(savedInstanceState);
this.eventDelegate.onCreate(savedInstanceState);
}
// FlutterActivityDelegate
@Override
public void onCreate(Bundle savedInstanceState) {
if (Build.VERSION.SDK_INT >= Build.VERSION_CODES.LOLLIPOP) {
Window window = activity.getWindow();
window.addFlags(LayoutParams.FLAG_DRAWS_SYSTEM_BAR_BACKGROUNDS);
window.setStatusBarColor(0x40000000);
window.getDecorView().setSystemUiVisibility(PlatformPlugin.DEFAULT_SYSTEM_UI);
}
String[] args = getArgsFromIntent(activity.getIntent());
FlutterMain.ensureInitializationComplete(activity.getApplicationContext(), args);
flutterView = viewFactory.createFlutterView(activity);
if (flutterView == null) {
FlutterNativeView nativeView = viewFactory.createFlutterNativeView();
flutterView = new FlutterView(activity, null, nativeView);
flutterView.setLayoutParams(matchParent);
activity.setContentView(flutterView);
launchView = createLaunchView();
if (launchView != null) {
addLaunchView();
}
}
if (loadIntent(activity.getIntent())) {
return;
}
String appBundlePath = FlutterMain.findAppBundlePath(activity.getApplicationContext());
if (appBundlePath != null) {
runBundle(appBundlePath);
}
}
可以看到有个 setContentView ,就是在这里设置内容视图,总结下 FlutterActivityDelegate 做的事:
-
根据系统版本设置状态栏样式
-
获取 Intent
-
FlutterMain.ensureInitializationComplete
-
create FlutterNativeView
-
create FlutterView
-
设置 activity 的内容视图
-
执行 appBundlePath
前面 2 步没什么说的,从第 3 步开始看。
2. FlutterMain
public static void ensureInitializationComplete(Context applicationContext, String[] args) {        if (Looper.myLooper() != Looper.getMainLooper()) {            throw new IllegalStateException("ensureInitializationComplete must be called on the main thread");        } else if (sSettings == null) {            throw new IllegalStateException("ensureInitializationComplete must be called after startInitialization");        } else if (!sInitialized) {            try {                sResourceExtractor.waitForCompletion();                List<String> shellArgs = new ArrayList();                shellArgs.add("--icu-symbol-prefix=_binary_icudtl_dat");                if (args != null) {                    Collections.addAll(shellArgs, args);                }
                if (sIsPrecompiledAsSharedLibrary) {                    shellArgs.add("--aot-shared-library-path=" + new File(PathUtils.getDataDirectory(applicationContext), sAotSharedLibraryPath));                } else {                    if (sIsPrecompiledAsBlobs) {                        shellArgs.add("--aot-snapshot-path=" + PathUtils.getDataDirectory(applicationContext));                    } else {                        shellArgs.add("--cache-dir-path=" + PathUtils.getCacheDirectory(applicationContext));                        shellArgs.add("--aot-snapshot-path=" + PathUtils.getDataDirectory(applicationContext) + "/" + sFlutterAssetsDir);                    }
                    shellArgs.add("--vm-snapshot-data=" + sAotVmSnapshotData);                    shellArgs.add("--vm-snapshot-instr=" + sAotVmSnapshotInstr);                    shellArgs.add("--isolate-snapshot-data=" + sAotIsolateSnapshotData);                    shellArgs.add("--isolate-snapshot-instr=" + sAotIsolateSnapshotInstr);                }
                if (sSettings.getLogTag() != null) {                    shellArgs.add("--log-tag=" + sSettings.getLogTag());                }
                String appBundlePath = findAppBundlePath(applicationContext);                String appStoragePath = PathUtils.getFilesDir(applicationContext);                String engineCachesPath = PathUtils.getCacheDirectory(applicationContext);                nativeInit(applicationContext, (String[])shellArgs.toArray(new String[0]), appBundlePath, appStoragePath, engineCachesPath);                sInitialized = true;            } catch (Exception var6) {                Log.e("FlutterMain", "Flutter initialization failed.", var6);                throw new RuntimeException(var6);            }        }    }
该方法必须要在主线程中执行并且只执行一次。并且要等 sResourceExtractor 把资源 copy 到安装包目录下完成后才能往下继续:
sResourceExtractor.waitForCompletion();
void waitForCompletion() {        if (this.mExtractTask != null) {            try {                this.mExtractTask.get();            } catch (ExecutionException | InterruptedException | CancellationException var2) {                this.deleteFiles();            }
        }    }
private class ExtractTask extends AsyncTask<Void, Void, Void> {...}
那么拷贝的是哪些东西呢?看一个 debug 下的 apk:
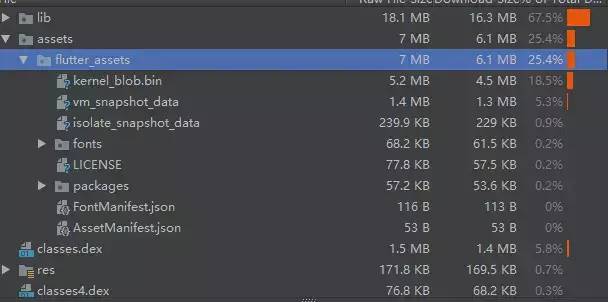
其中 vm 开头的是 dartvm 执行需要的, isolate 就是我们用 dart 语言编写的业务代码。
看下 release 包的 apk,和 debug 有点不一样,多出了几个文件。
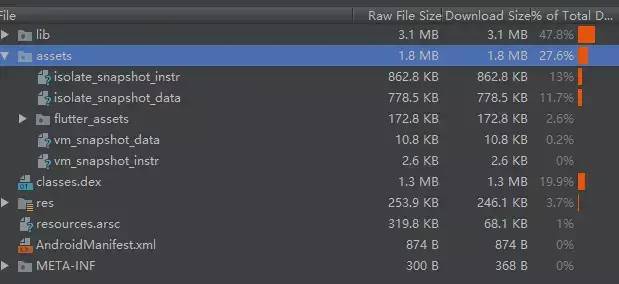
再回到之前的代码那里,就是把 assets 目录下的这些文件拷贝到安装包私有目录下的 flutter_assets .
代码里面有很多的路径名:
private static final String DEFAULT_KERNEL_BLOB = "kernel_blob.bin";
private static final String DEFAULT_FLUTTER_ASSETS_DIR = "flutter_assets";
private static String sAotSharedLibraryPath = "app.so";
private static String sAotVmSnapshotData = "vm_snapshot_data";
private static String sAotVmSnapshotInstr = "vm_snapshot_instr";
private static String sAotIsolateSnapshotData = "isolate_snapshot_data";
private static String sAotIsolateSnapshotInstr = "isolate_snapshot_instr";
private static String sFlx = "app.flx";
private static String sFlutterAssetsDir = "flutter_assets";
接着会初始化一些目录,包括 appBundle 路径 , 应用存储目录 , 引擎缓存目录 等。然后会调用 JNI 方法 nativeInit 在 C++ 层初始化这些信息,在 FlutterMain 中把这些路径设置给 setting ,然后传递构造 FlutterMain ,再保存到全局变量 g_flutter_main 中。
// shell/platform/android/flutter_main.cc
static std::unique_ptr<FlutterMain> g_flutter_main;
void FlutterMain::Init(JNIEnv* env,
jclass clazz,
jobject context,
jobjectArray jargs,
jstring bundlePath,
jstring appStoragePath,
jstring engineCachesPath) {
std::vector<std::string> args;
args.push_back("flutter");
for (auto& arg : fml::jni::StringArrayToVector(env, jargs)) {
args.push_back(std::move(arg));
}
auto command_line = fml::CommandLineFromIterators(args.begin(), args.end());
auto settings = SettingsFromCommandLine(command_line);
settings.assets_path = fml::jni::JavaStringToString(env, bundlePath);
// Restore the callback cache.
// TODO(chinmaygarde): Route all cache file access through FML and remove this
// setter.
blink::DartCallbackCache::SetCachePath(
fml::jni::JavaStringToString(env, appStoragePath));
fml::paths::InitializeAndroidCachesPath(
fml::jni::JavaStringToString(env, engineCachesPath));
blink::DartCallbackCache::LoadCacheFromDisk();
if (!blink::DartVM::IsRunningPrecompiledCode()) {
// Check to see if the appropriate kernel files are present and configure
// settings accordingly.
auto application_kernel_path =
fml::paths::JoinPaths({settings.assets_path, "kernel_blob.bin"});
if (fml::IsFile(application_kernel_path)) {
settings.application_kernel_asset = application_kernel_path;
}
}
settings.task_observer_add = [](intptr_t key, fml::closure callback) {
fml::MessageLoop::GetCurrent().AddTaskObserver(key, std::move(callback));
};
settings.task_observer_remove = [](intptr_t key) {
fml::MessageLoop::GetCurrent().RemoveTaskObserver(key);
};
...
// Not thread safe. Will be removed when FlutterMain is refactored to no
// longer be a singleton.
g_flutter_main.reset(new FlutterMain(std::move(settings)));
}
接着看上面第四部 create FlutterNativeView .
3. FlutterNativeView
public FlutterNativeView(Context context, boolean isBackgroundView) {
this.mNextReplyId = 1;
this.mPendingReplies = new HashMap();
this.mContext = context;
this.mPluginRegistry = new FlutterPluginRegistry(this, context);
this.mFlutterJNI = new FlutterJNI();
this.mFlutterJNI.setRenderSurface(new FlutterNativeView.RenderSurfaceImpl());
this.mFlutterJNI.setPlatformMessageHandler(new FlutterNativeView.PlatformMessageHandlerImpl());
this.mFlutterJNI.addEngineLifecycleListener(new FlutterNativeView.EngineLifecycleListenerImpl());
this.attach(this, isBackgroundView);
this.assertAttached();
this.mMessageHandlers = new HashMap();
}
其中 FlutterJNI 是 Java 层和 Flutter Engine 通信的桥梁,包括创建并启动 Flutter engine、当前 FlutterView 的 Surface 生命周期的通知、传递 platform 数据给 dart 层、回传 dart 层调用 platform 层方法返回的结果数据等待。
然后会调用 attach 方法:
// FlutterNativeView.java
private void attach(FlutterNativeView view, boolean isBackgroundView) {
this.mFlutterJNI.attachToNative(isBackgroundView);
}
// FlutterJNI.java
@UiThread
public void attachToNative(boolean isBackgroundView) {
this.ensureNotAttachedToNative();
this.nativePlatformViewId = this.nativeAttach(this, isBackgroundView);
}
attachToNative 方法中通过调用 JNI 方法 nativeAttach 将当前 flutterJNI 对象传递给 c++ 层 (后续一些 dart 层调用 java 层的方法就是通过该对象调用对应的方法实现的),得到 c++ 层返回的 nativePlatformViewId ,这个值非常重要,是 c++ 层 AndroidShellHolder 的对象指针值,后续会通过该值调用一系列 c++ 层的方法执行操作,并将其保存以供后续使用。
对应的 C++ 方法如下,通过之前初始化保存在 g_flutter_main 对象中的 settings 值和传入的 java 对象 flutterJNI 创建 std::unique_ptr 对象 (该对象通过指针占有并管理 AndroidShellHolder 对象),该对象有效的情况下会调用 release 方法返回其管理对象的指针并释放对象的所有权,reinterpret_cast() 方法将该 AndroidShellHolder 对象指针强制转化为 long 类型的值并返回 java 层保存。
// platform_view_android_jni.cc
// Called By Java
static jlong AttachJNI(JNIEnv* env,
jclass clazz,
jobject flutterJNI,
jboolean is_background_view) {
fml::jni::JavaObjectWeakGlobalRef java_object(env, flutterJNI);
auto shell_holder = std::make_unique<AndroidShellHolder>(
FlutterMain::Get().GetSettings(), java_object, is_background_view);
if (shell_holder->IsValid()) {
return reinterpret_cast<jlong>(shell_holder.release());
} else {
return 0;
}
}
接着看下很重要的一个类 AndroiudShellHolder .
4. AndroiudShellHolder
代码比较长,先看下前半部分,传入的参数 is_background_view 为 false,会首先通过 ThreadHost 初始化三个线程 ui_thread , gpu_thread , io_thread ,而当前线程就是 platform_thread
-
platform_thread 负责和 Engine 层的通信
-
io_thread 负责 IO 操作
-
gpu_thread 执行 GPU 指令
-
ui_thread 执行 Dart 层 isolate 代码
// android_shell_holder.cc
AndroidShellHolder::AndroidShellHolder(
blink::Settings settings,
fml::jni::JavaObjectWeakGlobalRef java_object,
bool is_background_view)
: settings_(std::move(settings)), java_object_(java_object) {
static size_t shell_count = 1;
auto thread_label = std::to_string(shell_count++);
FML_CHECK(pthread_key_create(&thread_destruct_key_, ThreadDestructCallback) ==
0);
if (is_background_view) {
thread_host_ = {thread_label, ThreadHost::Type::UI};
} else {
thread_host_ = {thread_label, ThreadHost::Type::UI | ThreadHost::Type::GPU |
ThreadHost::Type::IO};
}
...
}
四个线程会持有 MessageLoop ,通过他可以往线程添加工作任务, 具体可以参考另外一篇 Flutter 和原生之间的平台通道实践与原理 的线程部分。接着会构造 Shell :
-
Flutter 和原生之间的平台通道实践与原理
https://www.jianshu.com/p/23161d476b33
// android_shell_holder.cc
blink::TaskRunners task_runners(thread_label, // label
platform_runner, // platform
gpu_runner, // gpu
ui_runner, // ui
io_runner // io
);
shell_ =
Shell::Create(task_runners, // task runners
settings_, // settings
on_create_platform_view, // platform view create callback
on_create_rasterizer // rasterizer create callback
);
// shell.cc
std::unique_ptr<Shell> Shell::Create(
blink::TaskRunners task_runners,
blink::Settings settings,
Shell::CreateCallback<PlatformView> on_create_platform_view,
Shell::CreateCallback<Rasterizer> on_create_rasterizer) {
PerformInitializationTasks(settings);
TRACE_EVENT0("flutter", "Shell::Create");
auto vm = blink::DartVMRef::Create(settings);
FML_CHECK(vm) << "Must be able to initialize the VM.";
auto vm_data = vm->GetVMData();
return Shell::Create(std::move(task_runners), //
std::move(settings), //
vm_data->GetIsolateSnapshot(), // isolate snapshot
blink::DartSnapshot::Empty(), // shared snapshot
std::move(on_create_platform_view), //
std::move(on_create_rasterizer), //
std::move(vm) //
);
}
在 Shell Create 中会根据传入的 settings 参数通过 blink::DartVMRef::Create 构造 Dart VM,跟进去看看 Dart VM 的创建过程, VM 只会构造一次:
// dart_vm_lifecycle.cc
DartVMRef DartVMRef::Create(Settings settings,
fml::RefPtr<DartSnapshot> vm_snapshot,
fml::RefPtr<DartSnapshot> isolate_snapshot,
fml::RefPtr<DartSnapshot> shared_snapshot) {
std::lock_guard<std::mutex> lifecycle_lock(gVMMutex);
// If there is already a running VM in the process, grab a strong reference to
// it.
if (auto vm = gVM.lock()) {
FML_DLOG(WARNING) << "Attempted to create a VM in a process where one was "
"already running. Ignoring arguments for current VM "
"create call and reusing the old VM.";
// There was already a running VM in the process,
return DartVMRef{std::move(vm)};
}
std::lock_guard<std::mutex> dependents_lock(gVMDependentsMutex);
gVMData.reset();
gVMServiceProtocol.reset();
gVMIsolateNameServer.reset();
gVM.reset();
// If there is no VM in the process. Initialize one, hold the weak reference
// and pass a strong reference to the caller.
auto isolate_name_server = std::make_shared<IsolateNameServer>();
auto vm = DartVM::Create(std::move(settings), //
std::move(vm_snapshot), //
std::move(isolate_snapshot), //
std::move(shared_snapshot), //
isolate_name_server //
);
if (!vm) {
FML_LOG(ERROR) << "Could not create Dart VM instance.";
return {nullptr};
}
gVMData = vm->GetVMData();
gVMServiceProtocol = vm->GetServiceProtocol();
gVMIsolateNameServer = isolate_name_server;
gVM = vm;
if (settings.leak_vm) {
gVMLeak = vm;
}
return DartVMRef{std::move(vm)};
}
然后通过 DartVM::Create 执行具体的构造过程,在 Create 中会调用 DartVM 构造函数,通过执行 dart::bin::BootstrapDartIo() 方法引导启动 dart:io 时间处理程序:
//dart_vm.cc
DartVM::DartVM(std::shared_ptr<const DartVMData> vm_data,
std::shared_ptr<IsolateNameServer> isolate_name_server)
: settings_(vm_data->GetSettings()),
vm_data_(vm_data),
isolate_name_server_(std::move(isolate_name_server)),
service_protocol_(std::make_shared<ServiceProtocol>()) {
TRACE_EVENT0("flutter", "DartVMInitializer");
gVMLaunchCount++;
FML_DCHECK(vm_data_);
FML_DCHECK(isolate_name_server_);
FML_DCHECK(service_protocol_);
FML_DLOG(INFO) << "Attempting Dart VM launch for mode: "
<< (IsRunningPrecompiledCode() ? "AOT" : "Interpreter");
{
TRACE_EVENT0("flutter", "dart::bin::BootstrapDartIo");
dart::bin::BootstrapDartIo();
if (!settings_.temp_directory_path.empty()) {
dart::bin::SetSystemTempDirectory(settings_.temp_directory_path.c_str());
}
}
...
DartUI::InitForGlobal();
{
TRACE_EVENT0("flutter", "Dart_Initialize");
Dart_InitializeParams params = {};
params.version = DART_INITIALIZE_PARAMS_CURRENT_VERSION;
params.vm_snapshot_data =
vm_data_->GetVMSnapshot().GetData()->GetSnapshotPointer();
params.vm_snapshot_instructions =
vm_data_->GetVMSnapshot().GetInstructionsIfPresent();
params.create = reinterpret_cast<decltype(params.create)>(
DartIsolate::DartIsolateCreateCallback);
params.shutdown = reinterpret_cast<decltype(params.shutdown)>(
DartIsolate::DartIsolateShutdownCallback);
params.cleanup = reinterpret_cast<decltype(params.cleanup)>(
DartIsolate::DartIsolateCleanupCallback);
params.thread_exit = ThreadExitCallback;
params.get_service_assets = GetVMServiceAssetsArchiveCallback;
params.entropy_source = DartIO::EntropySource;
char* init_error = Dart_Initialize(¶ms);
...
}
}
DartUI::InitForGlobal 会注册 dart 的各种本地方法,主要用于 dart 调用 c++ 层方法,有点类似于 java 中的 jni 注册:
// dart_ui.cc
void DartUI::InitForGlobal() {
if (!g_natives) {
g_natives = new tonic::DartLibraryNatives();
Canvas::RegisterNatives(g_natives);
CanvasGradient::RegisterNatives(g_natives);
CanvasImage::RegisterNatives(g_natives);
CanvasPath::RegisterNatives(g_natives);
CanvasPathMeasure::RegisterNatives(g_natives);
Codec::RegisterNatives(g_natives);
DartRuntimeHooks::RegisterNatives(g_natives);
EngineLayer::RegisterNatives(g_natives);
FontCollection::RegisterNatives(g_natives);
FrameInfo::RegisterNatives(g_natives);
ImageFilter::RegisterNatives(g_natives);
ImageShader::RegisterNatives(g_natives);
IsolateNameServerNatives::RegisterNatives(g_natives);
Paragraph::RegisterNatives(g_natives);
ParagraphBuilder::RegisterNatives(g_natives);
Picture::RegisterNatives(g_natives);
PictureRecorder::RegisterNatives(g_natives);
Scene::RegisterNatives(g_natives);
SceneBuilder::RegisterNatives(g_natives);
SceneHost::RegisterNatives(g_natives);
SemanticsUpdate::RegisterNatives(g_natives);
SemanticsUpdateBuilder::RegisterNatives(g_natives);
Versions::RegisterNatives(g_natives);
Vertices::RegisterNatives(g_natives);
Window::RegisterNatives(g_natives);
// Secondary isolates do not provide UI-related APIs.
g_natives_secondary = new tonic::DartLibraryNatives();
DartRuntimeHooks::RegisterNatives(g_natives_secondary);
IsolateNameServerNatives::RegisterNatives(g_natives_secondary);
}
}
// window.cc
void Window::RegisterNatives(tonic::DartLibraryNatives* natives) {
natives->Register({
{"Window_defaultRouteName", DefaultRouteName, 1, true},
{"Window_scheduleFrame", ScheduleFrame, 1, true},
{"Window_sendPlatformMessage", _SendPlatformMessage, 4, true},
{"Window_respondToPlatformMessage", _RespondToPlatformMessage, 3, true},
{"Window_render", Render, 2, true},
{"Window_updateSemantics", UpdateSemantics, 2, true},
{"Window_setIsolateDebugName", SetIsolateDebugName, 2, true},
{"Window_reportUnhandledException", ReportUnhandledException, 2, true},
});
}
然后再 DartVM 中通过 Dart_Initialize 初始化 Dart 运行时环境,后面就不往下跟了,返回到 shell.cc 中,构造玩 vm 后会赋值给 Shell,再通过 CreateShellOnPlatformThread 构造 Shell ,该方法会在 PlatformThread 线程中执行。
std::unique_ptr<Shell> Shell::Create(
blink::TaskRunners task_runners,
blink::Settings settings,
fml::RefPtr<const blink::DartSnapshot> isolate_snapshot,
fml::RefPtr<const blink::DartSnapshot> shared_snapshot,
Shell::CreateCallback<PlatformView> on_create_platform_view,
Shell::CreateCallback<Rasterizer> on_create_rasterizer,
blink::DartVMRef vm) {
PerformInitializationTasks(settings);
TRACE_EVENT0("flutter", "Shell::CreateWithSnapshots");
if (!task_runners.IsValid() || !on_create_platform_view ||
!on_create_rasterizer) {
return nullptr;
}
fml::AutoResetWaitableEvent latch;
std::unique_ptr<Shell> shell;
fml::TaskRunner::RunNowOrPostTask(
task_runners.GetPlatformTaskRunner(),
fml::MakeCopyable([&latch, //
vm = std::move(vm), //
&shell, //
task_runners = std::move(task_runners), //
settings, //
isolate_snapshot = std::move(isolate_snapshot), //
shared_snapshot = std::move(shared_snapshot), //
on_create_platform_view, //
on_create_rasterizer //
]() mutable {
shell = CreateShellOnPlatformThread(std::move(vm),
std::move(task_runners), //
settings, //
std::move(isolate_snapshot), //
std::move(shared_snapshot), //
on_create_platform_view, //
on_create_rasterizer //
);
latch.Signal();
}));
latch.Wait();
return shell;
}
接下来到 CreateShellOnPlatformThread 看看,代码比较多分成几个部分来看,首先调用 new Shell 构造,然后调用 on_create_platform_view ,这个方法在 android_shell_holder.cc 中通过 Shell::Create 传递过来的:
// shell.cc
std::unique_ptr<Shell> Shell::CreateShellOnPlatformThread(
blink::DartVMRef vm,
blink::TaskRunners task_runners,
blink::Settings settings,
fml::RefPtr<const blink::DartSnapshot> isolate_snapshot,
fml::RefPtr<const blink::DartSnapshot> shared_snapshot,
Shell::CreateCallback<PlatformView> on_create_platform_view,
Shell::CreateCallback<Rasterizer> on_create_rasterizer) {
if (!task_runners.IsValid()) {
FML_LOG(ERROR) << "Task runners to run the shell were invalid.";
return nullptr;
}
auto shell =
std::unique_ptr<Shell>(new Shell(std::move(vm), task_runners, settings));
// Create the platform view on the platform thread (this thread).
auto platform_view = on_create_platform_view(*shell.get());
if (!platform_view || !platform_view->GetWeakPtr()) {
return nullptr;
}
...
}
看下 on_create_platform_view ,在这里会构造 PlatformViewAndroid 并且交给 platform_view 管理。
// android_shell_holder.cc
fml::WeakPtr<PlatformViewAndroid> weak_platform_view;
Shell::CreateCallback<PlatformView> on_create_platform_view =
[is_background_view, java_object, &weak_platform_view](Shell& shell) {
std::unique_ptr<PlatformViewAndroid> platform_view_android;
if (is_background_view) {
platform_view_android = std::make_unique<PlatformViewAndroid>(
shell, // delegate
shell.GetTaskRunners(), // task runners
java_object // java object handle for JNI interop
);
} else {
platform_view_android = std::make_unique<PlatformViewAndroid>(
shell, // delegate
shell.GetTaskRunners(), // task runners
java_object, // java object handle for JNI interop
shell.GetSettings()
.enable_software_rendering // use software rendering
);
}
weak_platform_view = platform_view_android->GetWeakPtr();
return platform_view_android;
};
再回到 shell.cc 中接着往下看,接着会在 IO Thread 中构造 IOManager 对象并且交给 io_manager 管理:
// Create the IO manager on the IO thread. The IO manager must be initialized
// first because it has state that the other subsystems depend on. It must
// first be booted and the necessary references obtained to initialize the
// other subsystems.
fml::AutoResetWaitableEvent io_latch;
std::unique_ptr<IOManager> io_manager;
auto io_task_runner = shell->GetTaskRunners().GetIOTaskRunner();
fml::TaskRunner::RunNowOrPostTask(
io_task_runner,
[&io_latch, //
&io_manager, //
&platform_view, //
io_task_runner //
]() {
TRACE_EVENT0("flutter", "ShellSetupIOSubsystem");
io_manager = std::make_unique<IOManager>(
platform_view->CreateResourceContext(), io_task_runner);
io_latch.Signal();
});
io_latch.Wait();
接着会在 GPU Thread 中构造 Rasterizer 对象并且交给 rasterizer 管理, on_create_rasterizer 也是在 android_shell_holder.cc 中通过 Shell::Create 传递过来的:
    // Create the rasterizer on the GPU thread.  fml::AutoResetWaitableEvent gpu_latch;  std::unique_ptr<Rasterizer> rasterizer;  fml::WeakPtr<blink::SnapshotDelegate> snapshot_delegate;  fml::TaskRunner::RunNowOrPostTask(      task_runners.GetGPUTaskRunner(), [&gpu_latch,            //                                        &rasterizer,           //                                        on_create_rasterizer,  //                                        shell = shell.get(),   //                                        &snapshot_delegate     //  ]() {        TRACE_EVENT0("flutter", "ShellSetupGPUSubsystem");        if (auto new_rasterizer = on_create_rasterizer(*shell)) {          rasterizer = std::move(new_rasterizer);          snapshot_delegate = rasterizer->GetSnapshotDelegate();        }        gpu_latch.Signal();      });
  gpu_latch.Wait();
接着在 UIThread 中创建 Engine ,并且交给 engine 管理:
  // Create the engine on the UI thread.  fml::AutoResetWaitableEvent ui_latch;  std::unique_ptr<Engine> engine;  fml::TaskRunner::RunNowOrPostTask(      shell->GetTaskRunners().GetUITaskRunner(),      fml::MakeCopyable([&ui_latch,                                         //                         &engine,                                           //                         shell = shell.get(),                               //                         isolate_snapshot = std::move(isolate_snapshot),    //                         shared_snapshot = std::move(shared_snapshot),      //                         vsync_waiter = std::move(vsync_waiter),            //                         snapshot_delegate = std::move(snapshot_delegate),  //                         io_manager = io_manager->GetWeakPtr()              //  ]() mutable {        TRACE_EVENT0("flutter", "ShellSetupUISubsystem");        const auto& task_runners = shell->GetTaskRunners();
        // The animator is owned by the UI thread but it gets its vsync pulses        // from the platform.        auto animator = std::make_unique<Animator>(*shell, task_runners,                                                   std::move(vsync_waiter));
        engine = std::make_unique<Engine>(*shell,                        //                                          *shell->GetDartVM(),           //                                          std::move(isolate_snapshot),   //                                          std::move(shared_snapshot),    //                                          task_runners,                  //                                          shell->GetSettings(),          //                                          std::move(animator),           //                                          std::move(snapshot_delegate),  //                                          std::move(io_manager)          //        );        ui_latch.Signal();      }));
  ui_latch.Wait();
最后通过 shell->Setup 方法将 platform_view engine rasterizer io_manager 四个对象交给 Shell 对象管理:
  // We are already on the platform thread. So there is no platform latch to  // wait on.
  if (!shell->Setup(std::move(platform_view),  //                    std::move(engine),         //                    std::move(rasterizer),     //                    std::move(io_manager))     //  ) {    return nullptr;  }
  return shell;
再回到前面的 android_shell_holder.cc 中,通过 Shell::Create() 创建完成后的 shell 对象返回给 AndroidShellHolder 对象持有。到这里整体思路就清晰了, Embedder 层通过 Shell 对象与 Engine 层建立了连接,后续的一切操作通过 Shell 对象进行。而 Shell 对象又通过 AndroidShellHolder 对象持有, AndroidShellHolder 对象指针值又返回给了 java 层,然后 java 层在调用 JNI 方法 的时候将这个指针值传递过去便能拿到 Embedder 层的 AndroidShellHolder 对象,进而通过 Shell 对象向 engine 层发送一系列操作指令。
5. RunBundle
经过上面的流程,已经为 dart 层代码执行创建好了运行时环境,接下来就是加载 dart 层相关的代码了。
再回到 java 层的 FlutterActivityDelegate 中的 onCreate 代码:
//FlutterActivityDelegate.java/onCreate
if (!this.loadIntent(this.activity.getIntent())) {
String appBundlePath = FlutterMain.findAppBundlePath(this.activity.getApplicationContext());
if (appBundlePath != null) {
this.runBundle(appBundlePath);
}
}
//FlutterActivityDelegate.java/runBundle
private void runBundle(String appBundlePath) {
if (!this.flutterView.getFlutterNativeView().isApplicationRunning()) {
FlutterRunArguments args = new FlutterRunArguments();
ArrayList<String> bundlePaths = new ArrayList();
ResourceUpdater resourceUpdater = FlutterMain.getResourceUpdater();
if (resourceUpdater != null) {
File patchFile = resourceUpdater.getInstalledPatch();
JSONObject manifest = resourceUpdater.readManifest(patchFile);
if (resourceUpdater.validateManifest(manifest)) {
bundlePaths.add(patchFile.getPath());
}
}
bundlePaths.add(appBundlePath);
args.bundlePaths = (String[])bundlePaths.toArray(new String[0]);
args.entrypoint = "main";
this.flutterView.runFromBundle(args);
}
}
调用自己的 runBundle 函数,在 if 语句里面可以看到资源提取的代码,这里是 Flutter 预埋的动态更新代码,目前应该还没起作用,然后会调用 FlutterView runFromBundle :
// FlutterView.java
public void runFromBundle(FlutterRunArguments args) {
this.assertAttached();
this.preRun();
this.mNativeView.runFromBundle(args);
this.postRun();
}
java 层最终会调到 FlutterJNI 中,其中 nativePlatformViewId 就是 AndroidShellHolder 在 java 层的指针值,此时的 prioritizedBundlePaths 数组中只有一个值类似 /data/data/包名/flutter/flutter_assets/ 的路径值, entrypointFunctionName 为 main , pathToEntrypointFunction 为 null 。
// FlutterJNI.java  @UiThread  public void runBundleAndSnapshotFromLibrary(      @NonNull String[] prioritizedBundlePaths,      @Nullable String entrypointFunctionName,      @Nullable String pathToEntrypointFunction,      @NonNull AssetManager assetManager  ) {    ensureAttachedToNative();    nativeRunBundleAndSnapshotFromLibrary(        nativePlatformViewId,        prioritizedBundlePaths,        entrypointFunctionName,        pathToEntrypointFunction,        assetManager    );  }
  private native void nativeRunBundleAndSnapshotFromLibrary(      long nativePlatformViewId,      @NonNull String[] prioritizedBundlePaths,      @Nullable String entrypointFunctionName,      @Nullable String pathToEntrypointFunction,      @NonNull AssetManager manager  );
后面就到了 JNI 层了,在 PlatformViewAndroid 中:
// platform_view_android_jni.cc
{
.name = "nativeRunBundleAndSnapshotFromLibrary",
.signature = "(J[Ljava/lang/String;Ljava/lang/String;"
"Ljava/lang/String;Landroid/content/res/AssetManager;)V",
.fnPtr =
reinterpret_cast<void*>(&shell::RunBundleAndSnapshotFromLibrary),
},
// RunBundleAndSnapshotFromLibrary
static void RunBundleAndSnapshotFromLibrary(JNIEnv* env,
jobject jcaller,
jlong shell_holder,
jobjectArray jbundlepaths,
jstring jEntrypoint,
jstring jLibraryUrl,
jobject jAssetManager) {
auto asset_manager = std::make_shared<blink::AssetManager>();
for (const auto& bundlepath :
fml::jni::StringArrayToVector(env, jbundlepaths)) {
if (bundlepath.empty()) {
continue;
}
// If we got a bundle path, attempt to use that as a directory asset
// bundle or a zip asset bundle.
const auto file_ext_index = bundlepath.rfind(".");
if (bundlepath.substr(file_ext_index) == ".zip") {
asset_manager->PushBack(std::make_unique<blink::ZipAssetStore>(
bundlepath, "assets/flutter_assets"));
} else {
asset_manager->PushBack(
std::make_unique<blink::DirectoryAssetBundle>(fml::OpenDirectory(
bundlepath.c_str(), false, fml::FilePermission::kRead)));
// Use the last path component of the bundle path to determine the
// directory in the APK assets.
const auto last_slash_index = bundlepath.rfind("/", bundlepath.size());
if (last_slash_index != std::string::npos) {
auto apk_asset_dir = bundlepath.substr(
last_slash_index + 1, bundlepath.size() - last_slash_index);
asset_manager->PushBack(std::make_unique<blink::APKAssetProvider>(
env, // jni environment
jAssetManager, // asset manager
std::move(apk_asset_dir)) // apk asset dir
);
}
}
}
上面逻辑首先通过 bundlePath 创建 DirectoryAssetBundle 对象交给 asset_manager 对象管理,然后欻功能键运行配置对象 config ,通过 ANDROID_SHELL_HOLDER->Launch(std::move(config)); 根据运行配置信息启动, ANDROID_SHELL_HOLDER 是一个宏,通过将 java 层持有的 AndroidShellHolder 指针值强转为 AndroidShellHolder 对象指针,这样就可以调用它的方法了。
// platform_view_android_jni.cc
#define ANDROID_SHELL_HOLDER /
(reinterpret_cast<shell::AndroidShellHolder*>(shell_holder))
再看到 AndroidShellHolder 中的方法 Launch ,就是到 shell 中取出 engine ,然后在 UIThread 中运行 engine->Run :
void AndroidShellHolder::Launch(RunConfiguration config) {
if (!IsValid()) {
return;
}
shell_->GetTaskRunners().GetUITaskRunner()->PostTask(
fml::MakeCopyable([engine = shell_->GetEngine(), //
config = std::move(config) //
]() mutable {
FML_LOG(INFO) << "Attempting to launch engine configuration...";
if (!engine || engine->Run(std::move(config)) ==
shell::Engine::RunStatus::Failure) {
FML_LOG(ERROR) << "Could not launch engine in configuration.";
} else {
FML_LOG(INFO) << "Isolate for engine configuration successfully "
"started and run.";
}
}));
}
再看下 engine->Run :
// engine.cc
Engine::RunStatus Engine::Run(RunConfiguration configuration) {
if (!configuration.IsValid()) {
FML_LOG(ERROR) << "Engine run configuration was invalid.";
return RunStatus::Failure;
}
auto isolate_launch_status =
PrepareAndLaunchIsolate(std::move(configuration));
...
return isolate_running ? Engine::RunStatus::Success
: Engine::RunStatus::Failure;
}
shell::Engine::RunStatus Engine::PrepareAndLaunchIsolate(
RunConfiguration configuration) {
...
if (configuration.GetEntrypointLibrary().empty()) {
if (!isolate->Run(configuration.GetEntrypoint())) {
FML_LOG(ERROR) << "Could not run the isolate.";
return RunStatus::Failure;
}
} else {
if (!isolate->RunFromLibrary(configuration.GetEntrypointLibrary(),
configuration.GetEntrypoint())) {
FML_LOG(ERROR) << "Could not run the isolate.";
return RunStatus::Failure;
}
}
return RunStatus::Success;
}
最终调到 DartIsolate 的 Run 方法,通过 DartInvokeField 执行到 Dart 层的 main() 方法入口,这样整个 Dart 代码就跑起来了, Flutter 界面也就显示到 FlutterView 中。
// dart_isolate.cc
FML_WARN_UNUSED_RESULT
bool DartIsolate::Run(const std::string& entrypoint_name, fml::closure on_run) {
TRACE_EVENT0("flutter", "DartIsolate::Run");
if (phase_ != Phase::Ready) {
return false;
}
tonic::DartState::Scope scope(this);
auto user_entrypoint_function =
Dart_GetField(Dart_RootLibrary(), tonic::ToDart(entrypoint_name.c_str()));
if (!InvokeMainEntrypoint(user_entrypoint_function)) {
return false;
}
phase_ = Phase::Running;
FML_DLOG(INFO) << "New isolate is in the running state.";
if (on_run) {
on_run();
}
return true;
}
FML_WARN_UNUSED_RESULT
static bool InvokeMainEntrypoint(Dart_Handle user_entrypoint_function) {
if (tonic::LogIfError(user_entrypoint_function)) {
FML_LOG(ERROR) << "Could not resolve main entrypoint function.";
return false;
}
Dart_Handle start_main_isolate_function =
tonic::DartInvokeField(Dart_LookupLibrary(tonic::ToDart("dart:isolate")),
"_getStartMainIsolateFunction", {});
if (tonic::LogIfError(start_main_isolate_function)) {
FML_LOG(ERROR) << "Could not resolve main entrypoint trampoline.";
return false;
}
if (tonic::LogIfError(tonic::DartInvokeField(
Dart_LookupLibrary(tonic::ToDart("dart:ui")), "_runMainZoned",
{start_main_isolate_function, user_entrypoint_function}))) {
FML_LOG(ERROR) << "Could not invoke the main entrypoint.";
return false;
}
return true;
}
6.总结
整个代码比较长,简单总结就是在 Android 平台上 Flutter 是显示到 FlutterView 上的, FlutterView 会通过 FlutterNativeView 调用到 FlutterJNI ,在 FlutterJNI 会持有一个很重要的对象 AndroidShellHolder ,而 AndroidShellHolder 会持有 shell 对象, Embedder 层通过 Shell 对象与 Engine 层建立了连接,后续的一切操作通过 Shell 对象进行。 AndroidShellHolder 对象指针值又返回给了 java 层,然后 FlutterJNI 在调用 JNI 方法的时候将这个指针值传递过去便能拿到 Embedder 层的 AndroidShellHolder 对象,进而通过 Shell 对象向 engine 层发送一系列操作指令。 Engine 对象会调用 dart 层代码执行。
"开发者说·DTalk" 面向中国开发者们征集 Google
 移动应用 (apps & games) 相关的产品/技术内容。欢迎大家前来分享您对移动应用的行业洞察或见解、移动开发过程中的心得或新发现、以及应用出海的实战经验总结和相关产品的使用反馈等。我们由衷地希望可以给这些出众的中国开发者们提供更好展现自己、充分发挥自己特长的平台。我们将通过大家的技术内容着重选出优秀案例进行谷歌开发技术专家 (GDE) 的推荐。
点击屏末 | 阅 读 原 文 | 了解更多 " 开发者说 · DTalk" 活动详情与参与方式
长按右侧二维码
报名参与


正文到此结束
- 本文标签: 安装 DDL ORM 目录 Google ArrayList shell key grep 总结 数据 ACE Collection update App js 二维码 map src API Service HashMap db Collections find final 开发者 生命 IO ssh CTO tk https 谷歌 cat lib 管理 message bug tab json Ipo 开发 UI http cache java 时间 tag struct 经验总结 产品 build Bootstrap Job id root Android tar 参数 配置 ask plugin rmi 代码 缓存 ip list 线程 provider IDE IOS 希望 zip HTML REST
- 版权声明: 本文为互联网转载文章,出处已在文章中说明(部分除外)。如果侵权,请联系本站长删除,谢谢。
- 本文海报: 生成海报一 生成海报二
热门推荐


相关文章

近期评论
-
https://www.newcmy.com/register?aff=HBVX
建议您试试草莓云机场,可以流畅观看youtube和tiktok,上reddit/x也没有问题,还有各种ai优化节点。 -
出现OpenClaw "device signature expired"。the Gateway rejects if Math.abs(Date.now() - signedAt) > 10 * 60 * 1000 (10 minutes)
-
-
想购买您这个站,我的联系方式QQ741756694微信同步 能卖联系
-
-
-
-
-
https://www.liuhaihua.cn/archives/40657.html 这篇博客中的图片打不开了
-
不会英语啊。
Loading...
![[HBLOG]公众号](https://www.liuhaihua.cn/img/qrcode_gzh.jpg)

