为 Android 构建一个智慧的移动卡路里监视器
想要构建一个改善健康状况的漂亮的移动应用程序?本教程展示如何使用 IBM Bluemix 中的 Mobile Cloud 样板,创建一个可供您和其他人用来跟踪卡路里获取和消耗情况的 Android 应用程序。
阅读: 构建 Mobile Cloud 应用程序
该应用程序使用 Mobile Data 服务来存储和获取通过饮食获取和通过身体活动消耗的卡路里数的信息。也可以使用 Push 服务来扩展该应用程序,以便发送输入获取/消耗的卡路里数的提醒,并在添加新食物或活动时发送通知。
阅读: 开始使用 Mobile Data
阅读: Push 服务入门
“ 让健身变得十分有趣。为 Android 构建一个在 Bluemix 上运行的卡路里计数应用程序。 ”
构建您的应用程序需要做的准备工作
- 熟悉 Android 开发 。
- 一个 Bluemix 帐户。
- 一个 Android 开发环境。本教程中的步骤使用 Eclipse Android Development Tools (ADT) Plugin。
- Cloud Foundry 命令行接口 。
获取代码
第 1 步. 获取项目代码
单击上面的 获取代码 转到 DevOps Services 上的 SmartHealthMonitor 项目。您可通过该项目的 Git URL 获取它,或者下载 ZIP 文件形式的代码并将其解压到本地计算机。
第 2 步. 在 Bluemix 上创建一个 Mobile Cloud 应用程序
- 登录到 Bluemix (或者如果尚未做好准备,请 注册使用免费试用版 )。
- 在 Bluemix 仪表板中,单击 CREATE AN APP 。
- 单击 MOBILE 作为应用程序类型。
- 选择 Mobile (iOS, Android, Hybrid) 作为应用程序平台,然后单击 CONTINUE 。
- 为您的应用程序输入一个惟一名称(我将在这些步骤中使用 SmartHealthMonitor),然后单击 FINISH :

- 在 “Enabling your web application for mobile” 页面上, 记下 Route、App Key 和 App Secret。单击 CONTINUE :

- 在 “Start coding with Cloud Foundry command line interface” 页面上,记下要在推送 Node.js 应用程序时使用的
cf命令。单击 VIEW APP OVERVIEW 。 - 在 App Overview 上的 “Install and configure the SDK for your client” 下,单击 Android 符号。
- 在 “Building Android Apps” 页面上的 “Add the Mobile Cloud Services SDK to your Android app” 下,单击 Get SDK zip 下载该 SDK。
- 将该 Android SDK 解压到您计算机上,在 SmartHealthMonitor 项目中创建一个 libs 文件夹,并将需要的 JAR 复制到 libs 文件夹中。
- 将
appID、appSecret和appRoute复制到您 SmartHealthMonitor 项目的 assets 文件夹中的 smarthealth.properties 文件中。
第 3 步. 获取一个 Google API 项目编号和 GCM API 密钥,将它们添加到您的 Bluemix 应用程序中
- 登录到 Google Developers Console 。
- 单击 Create Project ,提供一个项目名称,然后单击 Create 。
- 记下页面顶部的项目编号。该编号是 GCM Sender ID。
- 单击左侧窗格中的 APIs & auth -> APIs 。
- 打开 Google Cloud Messaging for Android。
- 单击左侧窗格中的 APIs & auth -> Credentials 。
- 单击 Public API Access 下的 Create new Key 。
- 单击 Server key 。
- 单击 Create 。
- 记下 API Key。这是 Sender Auth Token (GCM API Key)。
- 返回到您 Bluemix 应用程序的概述页面,单击 Push 服务磁贴:
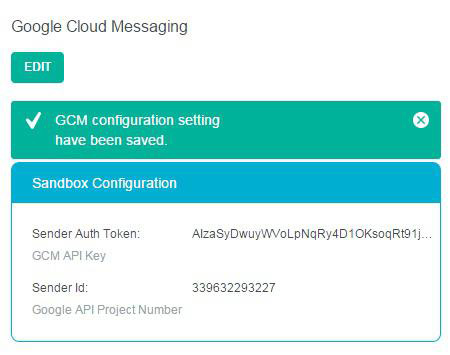
- 在配置页面上,单击 “Google Cloud Messaging” 下的 EDIT 按钮。
- 添加您从 Google 获取的 GCM API Key 和 Google API Project Number ,并单击 SAVE :
- 在 Tags 页面上,创建几个新标签,分别将它们命名为
morning、afternoon、evening和night: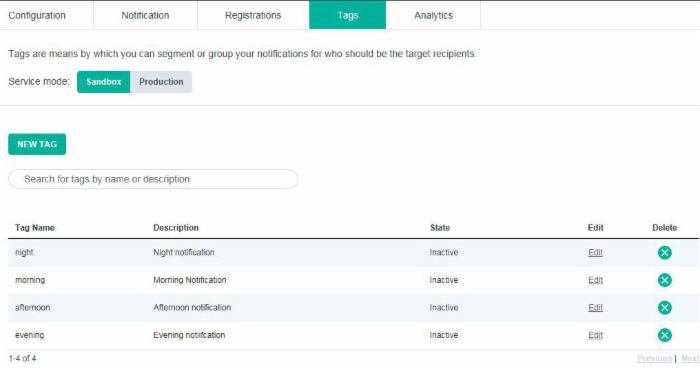
点击查看大图
关闭 [x]
第 4 步. 安装并添加依赖项
- 在 Eclipse 中,选择 Window -> Android SDK Manager 。
- 在 Extras 节中,选择 Android Support Library 和 Google Play services ,并安装它们:

- 成功安装 Android Support Library 后,将该项目导入 Eclipse 中,方法是选择 File -> Import -> Android -> Existing Android Code into workspace ,并选择文件系统位置 Android SDK Location /extras/android/support/v7/ 中可用的 appcompat 项目。
- 成功安装 Google Play services 后,将该项目导入 Eclipse 中,方法是选择 File -> Import -> Android -> Existing Android Code into workspace ,并选择文件系统位置 Android SDK Location /extras/android/support/v7/ 中可用的 google-play-services_lib 项目。
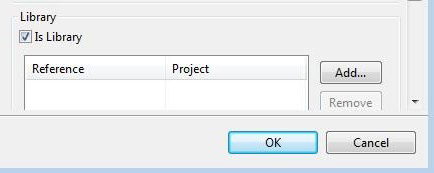
- 导入项目后,打开项目的特性,在底部选择 Is Library 复选框来将这些项目标记为 Android Library Projects:
- 对库项目的引用必须添加到 Android 项目中。选择该项目,右键单击,然后选择 Properties 。选择 Android ,单击 Add 来添加库项目:

第 5 步. 检查配置代码
- 打开并检查 AndroidManifest.xml 文件,以便了解成功运行应用程序而必须添加的权限:
<!-- Push Permissions --> <permission android:name="com.ibm.smarthealthmonitor.permission.C2D_MESSAGE" android:protectionLevel="signature" /> <uses-permission android:name="android.permission.INTERNET" /> <uses-permission android:name="android.permission.WAKE_LOCK" /> <uses-permission android:name="android.permission.GET_ACCOUNTS" /> <uses-permission android:name="android.permission.USE_CREDENTIALS" /> <uses-permission android:name="android.permission.ACCESS_WIFI_STATE" /> <!-- Push Permissions --> <uses-permission android:name="android.permission.WRITE_EXTERNAL_STORAGE" /> <uses-permission android:name="com.ibm.smarthealthmonitor.permission.C2D_MESSAGE" /> <uses-permission android:name="com.google.android.c2dm.permission.RECEIVE" />
- 检查
SmartHealthApplication类的OnCreate方法,看看它如何从 smarthealth.properties 文件读取配置值,并初始化 SDK 和 Mobile Cloud 服务:// Read from properties file Properties props = new java.util.Properties(); Context context = getApplicationContext(); try { AssetManager assetManager = context.getAssets(); props.load(assetManager.open(PROPS_FILE)); Log.i(CLASS_NAME, "Found configuration file: " + PROPS_FILE); } catch (FileNotFoundException e) { Log.e(CLASS_NAME, "The smarthealth.properties file was not found.", e); } catch (IOException e) { Log.e(CLASS_NAME, "The smarthealth.properties file could not be read properly.", e); } // initialize the IBM Bluemix core service IBMBluemix.initialize(this, props.getProperty(APP_ID), props.getProperty(APP_SECRET), props.getProperty(APP_ROUTE)); // initialize the IBM Data IBMData.initializeService(); // Initialize IBM Push service. IBMPush.initializeService(); // Retrieve instance of the IBM Push service. push = IBMPush.getService(); // Initialize IBM CloudCode service. IBMCloudCode.initializeService(); // Retrieve instance of the IBM CloudCode service. cloudService = IBMCloudCode.getService();
第 6 步. 创建和导入数据类
- 在您的 Bluemix 应用程序的概述页面上,单击 Mobile Data 服务磁贴。
- 单击 Manage Data -> Import ,从您项目代码的本地副本导入 Calorie.csv 文件来创建一个
Calorie类: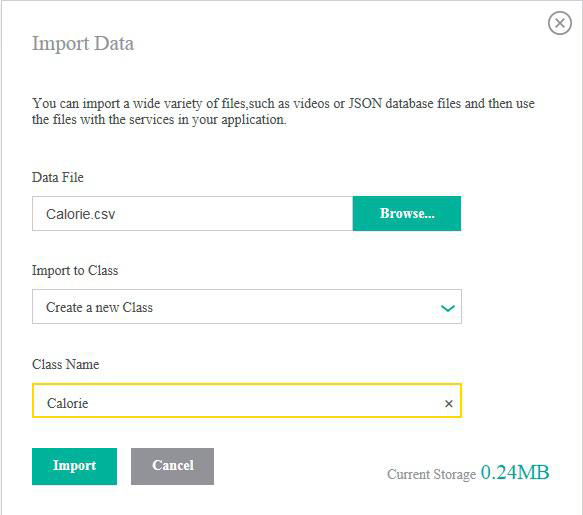
- 类似地,导入 Exercise.csv 文件来创建一个
Exercise类。
第 7 步. 部署 Node.js 应用程序
- 在计算机上打开一个命令提示符,更改到 SmartHealthMonitor_node 目录。
- 在 manifest.yml 文件中,更新服务、主机名和域名。
- 在 appConfig.json 文件中,更新
applicationId和applicationRoute。 - 运行此命令序列来将应用程序推送到 Bluemix:
cf api https://api.ng.bluemix.net
cf login -u user_name -o user_name -s dev
cf push Application name
第 8 步. 运行应用程序
在开发环境的模拟器中运行该移动应用程序,或者观看作者在本教程顶部提供的视频,以便了解该应用程序的功能。
第 9 步. 在云中查看数据
您可以在 Bluemix 上查看应用程序数据。在此视频中了解如何:
观看: 在云中检查数据
结束语
您创建了一个 Android 应用程序并配置了该应用程序,以便使用 Mobile Data 服务来存储和获取必要的监视信息。您还学习了如何配置 Push 服务来发送提醒。您可以进一步增强该应用程序,通过使用 Node.js 从 Mobile Data 服务来获取数据,在推送通知提醒中发送获取/消耗的卡路里数。
正文到此结束
热门推荐


相关文章


Loading...
![[HBLOG]公众号](https://www.liuhaihua.cn/img/qrcode_gzh.jpg)

