JDK源码那些事儿之浅析Thread下篇
上一篇文章对Thread的状态转换和其中的部分源码进行了一个说明,今天继续对Thread源码进行解读,有很多涉及到底层的知识,笔者这里也只能进行简单了解,一起看一看吧
前言
JDK版本号:1.8.0_171
在并发操作中,线程作为基本的操作单位,对于其了解的深度或多或少都会影响我们在多线程中的操作,今天就继续对Thread源码进行分析,看一看其中涉及的线程操作,理解下其是如何实现的,当然,由于其大量调用了native方法,我们也只能了解个大概,不过这也不妨碍我们对其更深一步的理解
常量/变量
// 线程名称
    private volatile String name;
    // 优先级
    private int            priority;
    // 下面这两个暂时还没明白是做什么的
    // debug时eetop是有值的
    private Thread         threadQ;
    private long           eetop;

    /* Whether or not to single_step this thread. */
    // 是否是单步执行
    private boolean     single_step;

    /* Whether or not the thread is a daemon thread. */
    // 是否是守护线程,默认false
    private boolean     daemon = false;

    /* JVM state */
    // 虚拟机状态
    private boolean     stillborn = false;

    /* What will be run. */
    // Runnable实现类,最终调用的业务处理代码就在这了
    private Runnable target;

    /* The group of this thread */
    // 所属线程组
    private ThreadGroup group;

    /* The context ClassLoader for this thread */
    // 当前线程的ClassLoader
    private ClassLoader contextClassLoader;

    /* The inherited AccessControlContext of this thread */
    // 当前线程继承的权限控制上下文,和安全机制相关
    private AccessControlContext inheritedAccessControlContext;

    /* For autonumbering anonymous threads. */
    // 自动编号匿名线程,线程名中的编号获取的就是这个变量值
    private static int threadInitNumber;

    /* ThreadLocal values pertaining to this thread. This map is maintained
     * by the ThreadLocal class. */
    // 此线程的本地变量值.此map由ThreadLocal类进行维护,因为这个类在ThreadLocal中是包级私有的
    // ThreadLocalMap是一个用于维护线程本地变量的hashmap
    ThreadLocal.ThreadLocalMap threadLocals = null;

    /*
     * InheritableThreadLocal values pertaining to this thread. This map is
     * maintained by the InheritableThreadLocal class.
     */
    // 与当前线程有关继承过来的本地变量值,由InheritableThreadLocal维护
    ThreadLocal.ThreadLocalMap inheritableThreadLocals = null;

    /*
     * The requested stack size for this thread, or 0 if the creator did
     * not specify a stack size.  It is up to the VM to do whatever it
     * likes with this number; some VMs will ignore it.
     */
    // 线程请求栈大小,未指定则默认0,最终由所使用的虚拟机决定,一些虚拟机会忽略这个参数
    private long stackSize;

    /*
     * JVM-private state that persists after native thread termination.
     */
    // 在本地线程终止之后保留jvm私有状态,没搞懂什么意思
    private long nativeParkEventPointer;

    /*
     * Thread ID
     */
    // 线程id
    private long tid;

    /* For generating thread ID */
    // 用来生成线程id,tid变量的设置是通过这个值设置的
    private static long threadSeqNumber;

    /* Java thread status for tools,
     * initialized to indicate thread 'not yet started'
     */
    // 线程状态,初始化时标记默认未启动
    private volatile int threadStatus = 0;

    /**
     * The argument supplied to the current call to
     * java.util.concurrent.locks.LockSupport.park.
     * Set by (private) java.util.concurrent.locks.LockSupport.setBlocker
     * Accessed using java.util.concurrent.locks.LockSupport.getBlocker
     */
    // 用于调用java.util.concurrent.locks.LockSupport.park的参数
    // 值由java.util.concurrent.locks.LockSupport.setBlocker设置
    // 由java.util.concurrent.locks.LockSupport.getBlocker访问
    volatile Object parkBlocker;

    /* The object in which this thread is blocked in an interruptible I/O
     * operation, if any.  The blocker's interrupt method should be invoked
     * after setting this thread's interrupt status.
     */
    // 可中断I/O操作时这个线程的这个对象处于阻塞状态
    // 当线程中断状态被设置时,这个blocker的interrupt方法应该被调用
    // 可参考interrupt方法
    private volatile Interruptible blocker;
    // 设置block用到的对象锁
    private final Object blockerLock = new Object();

    /* Set the blocker field; invoked via sun.misc.SharedSecrets from java.nio code
     * 设置blocker的值,通过java.nio代码中的 sun.misc.SharedSecrets进行调用
     */
    void blockedOn(Interruptible b) {
        synchronized (blockerLock) {
            blocker = b;
        }
    }

    /**
     * The minimum priority that a thread can have.
     */
    // 最小优先级
    public final static int MIN_PRIORITY = 1;

   /**
     * The default priority that is assigned to a thread.
     */
    // 线程默认优先级
    public final static int NORM_PRIORITY = 5;

    /**
     * The maximum priority that a thread can have.
     */
    // 最高优先级
    public final static int MAX_PRIORITY = 10;

    private static final RuntimePermission SUBCLASS_IMPLEMENTATION_PERMISSION =
                    new RuntimePermission("enableContextClassLoaderOverride");

    // The following three initially uninitialized fields are exclusively
    // managed by class java.util.concurrent.ThreadLocalRandom. These
    // fields are used to build the high-performance PRNGs in the
    // concurrent code, and we can not risk accidental false sharing.
    // Hence, the fields are isolated with @Contended.
    // 以下三个初始未初化的变量专门由java.util.concurrent.ThreadLocalRandom管理
    // 这些变量用在并发代码中构建高性能的PRNGs,由于存在共享失败的情况所以我们不能冒险共享
    // 因此,这些变量使用注解@Contended隔离
    // 避免伪共享,偏底层,有兴趣可以找资料研究下

    /** The current seed for a ThreadLocalRandom */
    @sun.misc.Contended("tlr")
    long threadLocalRandomSeed;

    /** Probe hash value; nonzero if threadLocalRandomSeed initialized */
    @sun.misc.Contended("tlr")
    int threadLocalRandomProbe;

    /** Secondary seed isolated from public ThreadLocalRandom sequence */
    @sun.misc.Contended("tlr")
    int threadLocalRandomSecondarySeed;
其中有很多变量我也不是很明白,这里大家先了解下就好,也不用太过纠结,毕竟有很多涉及到了底层部分,可能要进行JVM的源码学习才能明白做了什么,这里我稍微简单说明下部分变量
eetop
eetop可能有些偏向底层了,网上没有仔细说明的,本地debug的时候确实有值,只是不知道存储的是什么,不过我在stackoverflow上倒是搜到了提问,大家有兴趣可以看看:
https://stackoverflow.com/que...
threadLocals/inheritableThreadLocals
threadLocals和inheritableThreadLocals两个变量值我在之后ThreadLocal源码部分会进行说明,这里可以先简单理解,毕竟ThreadLocal也确实比较重要
parkBlocker
parkBlocker的部分涉及到了LockSupport,parkBlocker是用于记录线程是被谁阻塞的。可以通过LockSupport的getBlocker获取到阻塞的对象。用于监控和分析线程用的,后面有时间也会进行LockSupport的源码分析,这里大概了解下就好
构造方法
构造方法还是挺多的,最终调用都是init方法,主要入参为线程组,实现Runnable接口的类,线程名,线程id,线程栈大小,稍后分析init方法
public Thread() {
        init(null, null, "Thread-" + nextThreadNum(), 0);
    }
    public Thread(Runnable target) {
        init(null, target, "Thread-" + nextThreadNum(), 0);
    }
    Thread(Runnable target, AccessControlContext acc) {
        init(null, target, "Thread-" + nextThreadNum(), 0, acc, false);
    }
    public Thread(ThreadGroup group, Runnable target) {
        init(group, target, "Thread-" + nextThreadNum(), 0);
    }
    public Thread(String name) {
        init(null, null, name, 0);
    }
    public Thread(ThreadGroup group, String name) {
        init(group, null, name, 0);
    }
    public Thread(Runnable target, String name) {
        init(null, target, name, 0);
    }
    public Thread(ThreadGroup group, Runnable target, String name) {
        init(group, target, name, 0);
    }
    public Thread(ThreadGroup group, Runnable target, String name,
                  long stackSize) {
        init(group, target, name, stackSize);
    }
其中我们可以看到在默认设置name的时候调用了nextThreadNum,方法实现如下,使用了synchronized来保证并发安全,这个变量只是在设置name时使用,这样也解释了为什么我们在debug的时候看到的线程名都是Thread-0,Thread-1等等这样顺序的线程名
private static synchronized int nextThreadNum() {
        return threadInitNumber++;
    }
stackSize默认为0,一般我们也不会设置这个,虚拟机本身有默认的大小。同时可传入AccessControlContext(安全机制相关,不深入,可自行查找相关资料)。我们需要关注的也就是group,target,name三个参数了,所以相对来说还是比较简单的
native方法
其中涉及到很多native方法,先来了解下其含义
/**
     * Returns a reference to the currently executing thread object.
     * 返回当前正在执行线程对象的引用,当前线程本身
     * 我们经常用的方法,Thread.currentThread()获取当前线程对象
     * @return  the currently executing thread.
     */
    public static native Thread currentThread();
    /**
     * 提示线程调度器当前线程愿意放弃当前CPU的使用。当然调度器可以忽略这个提示
     * 让出CPU是一种尝试,防止某些线程过度使用,一般很少使用,并发时可能比较有用
     * 另外让出只是放弃,但是之后CPU时间片的分配还是有可能继续分到这个让出线程上
     */
    public static native void yield();
    /**
     * 此方法使得当前执行线程暂停指定毫秒数
     * 上一篇文章我也说过,sleep会释放cpu使用权,但是不会释放锁,也就是资源还在被占用着
     */
    public static native void sleep(long millis) throws InterruptedException;
    /**
     * 启动线程
     */
    private native void start0();

    /**
     * 测试一些线程是否被中断
     * 入参是否清理中断状态
     * 中断状态会被重置或者并不依赖于之前的ClearInterrupted的值
     */
    private native boolean isInterrupted(boolClearInterrupted);

    /**
     * 当且仅当当前线程持有对象的monitor锁时返回true
     * 这个方法设计目的是程序自身表明已经获取了某个对象的锁
     * assert Thread.holdsLock(obj)
     */
    public static native boolean holdsLock(Object obj);

    // 堆栈信息数组,获取线程堆栈信息时用到
    private native static StackTraceElement[][] dumpThreads(Thread[] threads);
    // 获取线程数组
    private native static Thread[] getThreads();

    /* Some private helper methods */
    // 私有的本地辅助方法
    // 设置优先级
    private native void setPriority0(int newPriority);
    // 停止
    private native void stop0(Object o);
    // 暂停
    private native void suspend0();
    // 重新开始
    private native void resume0();
    // 中断
    private native void interrupt0();
    // 设置线程名
    private native void setNativeName(String name);
    // 线程是否存活
    public final native boolean isAlive();

    @Deprecated
    public native int countStackFrames();
非native方法
非native方法大部分最终还是进行了native方法的调用,可以理解,毕竟涉及到操作系统层面的调用,下面我们来看下其中的部分源码实现
init
init通过入参初始化Thread对象属性,进行安全检查,权限检查,之后设置当前线程的部分属性,很多都是根据父线程属性进行的处理
private void init(ThreadGroup g, Runnable target, String name,
                      long stackSize, AccessControlContext acc,
                      boolean inheritThreadLocals) {
        if (name == null) {
            throw new NullPointerException("name cannot be null");
        }

        this.name = name;
        // 当前正在执行的线程,即创建这个新线程的父线程
        Thread parent = currentThread();
        // 所属线程组处理
        SecurityManager security = System.getSecurityManager();
        if (g == null) {
            /* Determine if it's an applet or not */

            /* If there is a security manager, ask the security manager
               what to do. */
            if (security != null) {
                g = security.getThreadGroup();
            }

            /* If the security doesn't have a strong opinion of the matter
               use the parent thread group. */
            if (g == null) {
                g = parent.getThreadGroup();
            }
        }

        /* checkAccess regardless of whether or not threadgroup is
           explicitly passed in. */
        // 安全检查
        g.checkAccess();

        /*
         * Do we have the required permissions?
         */
        // 权限检查
        if (security != null) {
            if (isCCLOverridden(getClass())) {
                security.checkPermission(SUBCLASS_IMPLEMENTATION_PERMISSION);
            }
        }
        // 线程组中未启动线程数加1
        g.addUnstarted();

        this.group = g;
        // 这里我们看到当前线程是否为守护进程是由创建当前线程的父线程决定的
        // 父线程是守护线程,则其创建的子线程也是守护线程
        this.daemon = parent.isDaemon();
        // 优先级同样与父线程保持一致
        this.priority = parent.getPriority();
        // 设置contextClassLoader
        if (security == null || isCCLOverridden(parent.getClass()))
            this.contextClassLoader = parent.getContextClassLoader();
        else
            this.contextClassLoader = parent.contextClassLoader;
        // 设置inheritedAccessControlContext
        this.inheritedAccessControlContext =
                acc != null ? acc : AccessController.getContext();
        this.target = target;
        setPriority(priority);
        // 设置inheritableThreadLocals
        if (inheritThreadLocals && parent.inheritableThreadLocals != null)
            this.inheritableThreadLocals =
                ThreadLocal.createInheritedMap(parent.inheritableThreadLocals);
        /* Stash the specified stack size in case the VM cares */
        this.stackSize = stackSize;

        /* Set thread ID */
        tid = nextThreadID();
    }
sleep
可以看到最终还是调用毫秒的native sleep方法,只是对纳秒进行了处理
public static void sleep(long millis, int nanos)
    throws InterruptedException {
        if (millis < 0) {
            throw new IllegalArgumentException("timeout value is negative");
        }

        if (nanos < 0 || nanos > 999999) {
            throw new IllegalArgumentException(
                                "nanosecond timeout value out of range");
        }

        if (nanos >= 500000 || (nanos != 0 && millis == 0)) {
            millis++;
        }

        sleep(millis);
    }
clone
不支持clone方法,可以理解,克隆的线程是没有意义的,只能重建
/**
     * Throws CloneNotSupportedException as a Thread can not be meaningfully
     * cloned. Construct a new Thread instead.
     *
     * @throws  CloneNotSupportedException
     *          always
     */
    @Override
    protected Object clone() throws CloneNotSupportedException {
        throw new CloneNotSupportedException();
    }
start
在注释上说明了:start的方法调用会使得线程开始执行,JVM会调用此线程的run()方法。结果就是两个线程并发执行:当前线程(调用start方法的线程)和另一个线程(也就是新的线程,执行run方法的线程)。
start方法添加了synchronized同步锁,防止并发问题,同时检查设置状态,避免了多次启动,这也就是我们程序里调用的线程启动的方法入口
public synchronized void start() {
        /**
         * This method is not invoked for the main method thread or "system"
         * group threads created/set up by the VM. Any new functionality added
         * to this method in the future may have to also be added to the VM.
         *
         * A zero status value corresponds to state "NEW".
         */
        // 创建线程时设置0状态(初始态),这里判断非0直接抛错
        if (threadStatus != 0)
            throw new IllegalThreadStateException();

        /* Notify the group that this thread is about to be started
         * so that it can be added to the group's list of threads
         * and the group's unstarted count can be decremented. */
        // 添加线程到所属线程组
        // 会进行一些处理,比如记录当前线程到线程数组中,启动线程数+1,未启动线程数-1
        group.add(this);
        // 启动状态
        boolean started = false;
        try {
            // 调用native方法启动
            start0();
            // 成功启动设置标识
            started = true;
        } finally {
            try {
                if (!started) {
                    // 未启动成功则线程组要进行处理
                    // 从线程数组中移除当前线程,同时启动线程数-1,未启动线程数+1
                    // 和上面add是对应的
                    group.threadStartFailed(this);
                }
            } catch (Throwable ignore) {
                /* do nothing. If start0 threw a Throwable then
                  it will be passed up the call stack */
            }
        }
    }
run
重写run也很简单清晰,就是如果有runnable对象,则调用我们传入的runnable对象的run方法,否则什么都不执行
@Override
    public void run() {
        if (target != null) {
            target.run();
        }
    }
exit
此方法由系统调用,用于在一个线程退出前做一些清理工作,为了释放资源将变量都置空操作
/**
     * This method is called by the system to give a Thread
     * a chance to clean up before it actually exits.
     */
    private void exit() {
        if (group != null) {
            // 通知线程组线程已经终止了,从线程组中移除终止的线程
            // 同时线程组自身进行一些处理
            group.threadTerminated(this);
            group = null;
        }
        /* Aggressively null out all reference fields: see bug 4006245 */
        // target置空以便尽快释放资源
        // 地址参考:https://bugs.java.com/bugdatabase/view_bug.do?bug_id=4006245
        target = null;
        /* Speed the release of some of these resources */
        // 其他变量也一样置空,尽快释放资源
        threadLocals = null;
        inheritableThreadLocals = null;
        inheritedAccessControlContext = null;
        blocker = null;
        uncaughtExceptionHandler = null;
    }
interrupt
中断当前线程,注释上写了很多内容,大概翻译如下:
- 当前线程允许中断时才能执行,否则抛错SecurityException。
- 如果当前线程由于wait,join,sleep进入阻塞态,那么中断状态将被清除,同时会收到中断异常InterruptedException
- 如果当前线程由于InterruptibleChannel的I/O操作阻塞,此方法将导致线程中断状态被重置,并且收到异常ClosedByInterruptException
- 如果当前线程由于java.nio.channels.Selector被阻塞,此方法将导致线程中断状态被重置,同时将立即从选择操作中返回,返回值是一个非0值,就和Selector的wakeup被调用一样
- 如果前面都不成立,则线程中断状态被重置
public void interrupt() {
        // 当前线程检查是否允许中断
        if (this != Thread.currentThread())
            checkAccess();

        // 同步代码块完成blocker的interrupt调用
        synchronized (blockerLock) {
            Interruptible b = blocker;
            if (b != null) {
                interrupt0();           // Just to set the interrupt flag
                b.interrupt(this);
                return;
            }
        }
        // 调用native方法
        interrupt0();
    }
interrupted
检查当前线程是否被中断,中断状态会被清理,换句话说如果两次调用都能成功,则第二次返回结果为false,除非第一次之后清理了中断状态,第二次调用前被再次中断,然后再调用这个方法才返回true
我们可以看到isInterrupted方法那个boolean入参名是ClearInterrupted,也就能明白其含义了,是否清理中断状态
public static boolean interrupted() {
        return currentThread().isInterrupted(true);
    }
isInterrupted
检查当前线程是否被中断,中断状态不会被处理
public boolean isInterrupted() {
        return isInterrupted(false);
    }
setPriority
设置线程优先级,其中线程的优先级不能超过线程组的最高优先级
public final void setPriority(int newPriority) {
        ThreadGroup g;
        checkAccess();
        // 优先级检查
        if (newPriority > MAX_PRIORITY || newPriority < MIN_PRIORITY) {
            throw new IllegalArgumentException();
        }
        // 线程必须有线程组
        if((g = getThreadGroup()) != null) {
            // 不能超过线程组的最高优先级
            if (newPriority > g.getMaxPriority()) {
                newPriority = g.getMaxPriority();
            }
            setPriority0(priority = newPriority);
        }
    }
setName
同步方法设定线程名
public final synchronized void setName(String name) {
        checkAccess();
        if (name == null) {
            throw new NullPointerException("name cannot be null");
        }

        this.name = name;
        if (threadStatus != 0) {
            setNativeName(name);
        }
    }
activeCount
获取当前线程所属线程组的活跃线程数
public static int activeCount() {
        return currentThread().getThreadGroup().activeCount();
    }
enumerate
获取线程所属线程组中的所有活跃线程,拷贝到tarray中,注释上推荐只用在debug和监听上
public static int enumerate(Thread tarray[]) {
        return currentThread().getThreadGroup().enumerate(tarray);
    }
join
最多等待millis毫秒当前线程执行,如果为0则表示一直等待直到执行结束
public final synchronized void join(long millis)
    throws InterruptedException {
        long base = System.currentTimeMillis();
        long now = 0;

        if (millis < 0) {
            throw new IllegalArgumentException("timeout value is negative");
        }

        if (millis == 0) {
            // 为循环调用isAlive执行wait
            while (isAlive()) {
                wait(0);
            }
        } else {
            while (isAlive()) {
                long delay = millis - now;
                if (delay <= 0) {
                    break;
                }
                // 等待delay毫秒
                wait(delay);
                // 如果等待中间被唤醒则继续循环等待剩下的时间
                now = System.currentTimeMillis() - base;
            }
        }
    }
    // 纳秒处理
    public final synchronized void join(long millis, int nanos)
    throws InterruptedException {

        if (millis < 0) {
            throw new IllegalArgumentException("timeout value is negative");
        }

        if (nanos < 0 || nanos > 999999) {
            throw new IllegalArgumentException(
                                "nanosecond timeout value out of range");
        }

        if (nanos >= 500000 || (nanos != 0 && millis == 0)) {
            millis++;
        }

        join(millis);
    }
    // 相当于一直等待
    public final void join() throws InterruptedException {
        join(0);
    }
dumpStack
打印当前线程的标准error流堆栈信息,只用于debug
public static void dumpStack() {
        new Exception("Stack trace").printStackTrace();
    }
setDaemon
标记线程是守护线程还是用户线程,当jvm中只有守护线程时将停止运行,此方法只能线程启动前设置
public final void setDaemon(boolean on) {
        checkAccess();
        if (isAlive()) {
            throw new IllegalThreadStateException();
        }
        daemon = on;
    }
toString
我们可以通过toString看到线程的几个属性被打印出来了:name,优先级,组名
public String toString() {
        ThreadGroup group = getThreadGroup();
        if (group != null) {
            return "Thread[" + getName() + "," + getPriority() + "," +
                           group.getName() + "]";
        } else {
            return "Thread[" + getName() + "," + getPriority() + "," +
                            "" + "]";
        }
    }
getState
获取线程的状态
public State getState() {
        // get current thread state
        return sun.misc.VM.toThreadState(threadStatus);
    }
使用
Thread基本的使用方法初学者应该都是了解的,上一篇文章中我也说明了其两种实现方式,我们下面验证下线程使用中的部分问题
1.同一个Thread线程能不能多次启动?
Thread test = new Thread(new Runnable() {
            @Override
            public void run() {
                System.out.println("test");
            }
        });
        test.start();
        test.start();
        test.start();
结果:
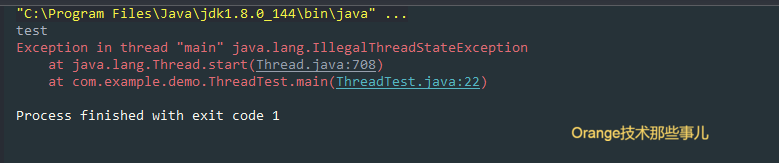
很明显答案是不能,我们可以看到第二次启动就报错了,直接看堆栈信息就能看到是因为threadStatus != 0,也就是说线程在一次使用生命周期后,状态不会被重置为0,也就是初始态,只能被使用一次
2.线程被中断后会不会立即停止?
非阻塞中的线程中断:
Thread test = new Thread(new Runnable() {
            @Override
            public void run() {
                while(true){
                    if(Thread.currentThread().isInterrupted()){
                        System.out.println("Interrupted");
                    }
                    else{
                        System.out.println("NoInterrupted");
                    }
                }
            }
        });
        test.start();
        Thread.sleep(2000);
        test.interrupt();
对于非阻塞中的线程,可以运行上面例子看到线程中断状态确实改变了,但是线程还在执行,没有终止,因为调用了interrupt之后我们只是给了test线程一个中断信号,改变了中断状态而已
阻塞中的线程中断:
Thread test = new Thread(new Runnable() {
            @Override
            public void run() {
                while(true){
                    try {
                        Thread.sleep(3000);
                    } catch (InterruptedException e) {
                        e.printStackTrace();
                    }
                    if(Thread.currentThread().isInterrupted()){
                        System.out.println("Interrupted");
                    }
                    else{
                        System.out.println("NoInterrupted");
                    }
                }
            }
        });
        test.start();
        Thread.sleep(1000);
        test.interrupt();
结果:
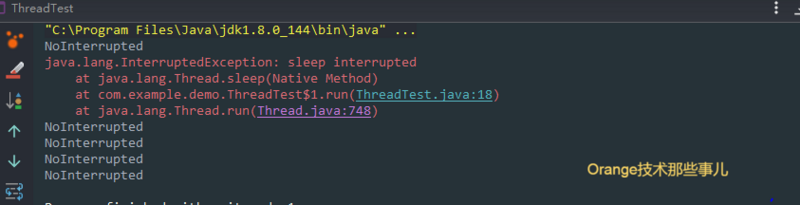
对于阻塞中的线程,运行上面例子看到线程中断状态未改变,在sleep的catch处抛错了,可以取看下我上面对interrupt方法的说明,其中第二点说明了处于阻塞状态的线程进行中断会出现什么结果?中断状态将被清除,同时会收到中断异常InterruptedException,和上图中的结果是一致的,因为我们捕获了,所以test线程未受影响继续执行
从上面两个简单例子我们应该明白,线程被中断后不会立即停止,当我们需要停止线程时,直接调用interrupt是没用的,我们需要自己在代码里进行处理
- run方法里通过Thread.currentThread().isInterrupted()判断当前线程状态,中断了不再执行业务,退出业务代码的执行
- run方法里通过捕获InterruptedException异常来结束阻塞态线程的执行,一旦发现InterruptedException异常直接结束执行
当然interrupt还有其他两种异常,这里需要根据情况进行处理,使用到时可以自己思考下中断的处理,这里不再详述
3.join方法是怎么回事?
private static AtomicInteger i = new AtomicInteger(1);

    public static void main(String[] args) throws InterruptedException {
        Thread test = new Thread(new Runnable() {
            @Override
            public void run() {
                try {
                    Thread.sleep(3000);
                } catch (InterruptedException e) {
                    e.printStackTrace();
                }
                System.out.println("线程test中:" + i.addAndGet(1));
            }
        });
        test.start();
        test.join();
        System.out.println("线程main中:" + i.addAndGet(1));
    }
我们可以使用join来先完成test线程的执行,test线程执行完毕之后才进行main线程的处理,使之处理上变的有序
总结
至此,关于Thread的部分已经基本了解完毕,其中最重要的还是对于线程状态转换的理解,明白了线程处于的状态时才能更好的对其进行处理,比如上面例子中的阻塞态下的线程调用中断方法时会出现什么现象?我们编程过程中需要考虑到,再比如,我们如何停止一个while循环的线程,我想作为技术人员都应该多思考下吧。思考的多了,理解的也就深刻了
以上内容如有问题欢迎指出,笔者验证后将及时修正,谢谢
正文到此结束
- 本文标签: 调度器 cat 注释 权限控制 参数 java ask https IDE NIO 初学者 构造方法 final 源码 文章 进程 时间 bug list rmi src struct UI ORM App JVM 锁 测试 ACE 线程 代码 id value rand build mina map Atom CTO HashMap volatile 翻译 生命 tar 多线程 MQ Select 并发 同步 db Security 安全 Apple 提问 操作系统 ssl http 管理 IO DOM synchronized 总结 tab
- 版权声明: 本文为互联网转载文章,出处已在文章中说明(部分除外)。如果侵权,请联系本站长删除,谢谢。
- 本文海报: 生成海报一 生成海报二
热门推荐


相关文章

近期评论
-
收到
-
https://www.liuhaihua.cn/archives/40657.html 这篇博客中的图片打不开了
-
不会英语啊。
-
-
-
https://pplx.ai/floraliu4199466 这个链接打不开是什么原因?
-
-
-
-
来看看,最近更新了一波,顺着友联过来的,几年过去了,网站越搞越好,厉害
Loading...
![[HBLOG]公众号](https://www.liuhaihua.cn/img/qrcode_gzh.jpg)

