走心Springboot源码解析: 三、prepareEnvironment()环境配置 解析配置文件信息
个人想写《springboot源码解析》这一系列很久了,但是一直角儿心底的知识积累不足,所以一直没有动笔。 所以想找一些小伙伴一起写这一系列,互相纠错交流学习。 如果有小伙伴有兴趣一起把这一系列的讲解写完的话,加下我微信:13670426148,我们一起完成,当交流学习。 后期还想写一系列介绍rpc框架的,不过要再过一阵子了,先把springboot的写完
前言
之前讲了监听器模式的加载过程,关于环境的装配过程则一笔带过了,现在补充一波。
一、prepareEnvironment总方法
private ConfigurableEnvironment prepareEnvironment(SpringApplicationRunListeners listeners,
        ApplicationArguments applicationArguments) {
    // Create and configure the environment
    //如果environment不为空直接返回 || 如果是web环境则直接实例化StandardServletEnvironment类 || 如果不是web环境则直接实例化StandardEnvironment类
    ConfigurableEnvironment environment = getOrCreateEnvironment();
    //配置环境信息
    configureEnvironment(environment, applicationArguments.getSourceArgs());
    //通知所有的监听者,环境已经准备好了
    listeners.environmentPrepared(environment);
    // bindToSpringApplication绑定环境
    bindToSpringApplication(environment);
    if (!this.isCustomEnvironment) {
        environment = new EnvironmentConverter(getClassLoader()).convertEnvironmentIfNecessary(environment,
                deduceEnvironmentClass());
    }
    // 如果配置了configurationProperties属性, 那么将其放在environment的propertySources的首部
    ConfigurationPropertySources.attach(environment);
    return environment;
}
复制代码
二、Environment的介绍
我们知道 Spring中的 Environment 功能比较明确,就是
1. 加载:加载写入配置好的 properties 值
在 Spring Boot 里面,可以使用以下几种方式来加载配置:
- yaml文件
- properties文件
- 系统环境变量
- 命令行参数
而配置加载的顺序:数字小的优先级越高,即数字小的会覆盖数字大的参数值,我们来实践下,验证以上配置参数的加载顺序。
1、开发者工具 `Devtools` 全局配置参数;
2、单元测试上的 [`@TestPropertySource](mailto:`@TestPropertySource)` 注解指定的参数;
3、单元测试上的 [`@SpringBootTest](mailto:`@SpringBootTest)` 注解指定的参数;
4、命令行指定的参数,如 `java -jar springboot.jar --name="Java技术栈"`;
5、命令行中的 `SPRING_APPLICATION_JSONJSON` 指定参数, 如 `java -Dspring.application.json='{"name":"Java技术栈"}' -jar springboot.jar`
6、`ServletConfig` 初始化参数;
7、`ServletContext` 初始化参数;
8、JNDI参数(如 `java:comp/env/spring.application.json`);
9、Java系统参数(来源:`System.getProperties()`);
10、操作系统环境变量参数;
11、`RandomValuePropertySource` 随机数,仅匹配:`ramdom.*`;
12、JAR包外面的配置文件参数(`application-{profile}.properties(YAML)`)
13、JAR包里面的配置文件参数(`application-{profile}.properties(YAML)`)
14、JAR包外面的配置文件参数(`application.properties(YAML)`)
15、JAR包里面的配置文件参数(`application.properties(YAML)`)
16、[`@Configuration](mailto:`@Configuration)`配置文件上 [`@PropertySource](mailto:`@PropertySource)` 注解加载的参数;
17、默认参数(通过 `SpringApplication.setDefaultProperties` 指定);
复制代码
2. 读取:后续可以获取 properties 值
@PropertySource
前三种都是有默认指定路径的,可以自己指定,具体的默认指定路径下面讲解。第4种是当要注入的文件不是默认指定路径的时候,手动用url指定文件,具体用法在此不做赘述。
三、 剖析 StandardServletEnvironment 组成
如下图所示, StandardServletEnvironment 的类关系图如下所示,
一般想了解一个类功能,最好的方式就是看其继承图,
教大家一个方法,spring大部分情况下是很遵循单一原则思想, 而接口是对行为的抽象,抽象类是对事物整体的抽象。 面向对象的原则规定提倡的写法使得 StandardServletEnvironment 所继承的 抽象类 或者 接口 都
一个类的功能基本可以从其继承的接口,或者抽象类中看出来,而且是一个接口、一个抽象类定义了类的一部分行为,这样理解起来就比较好点。
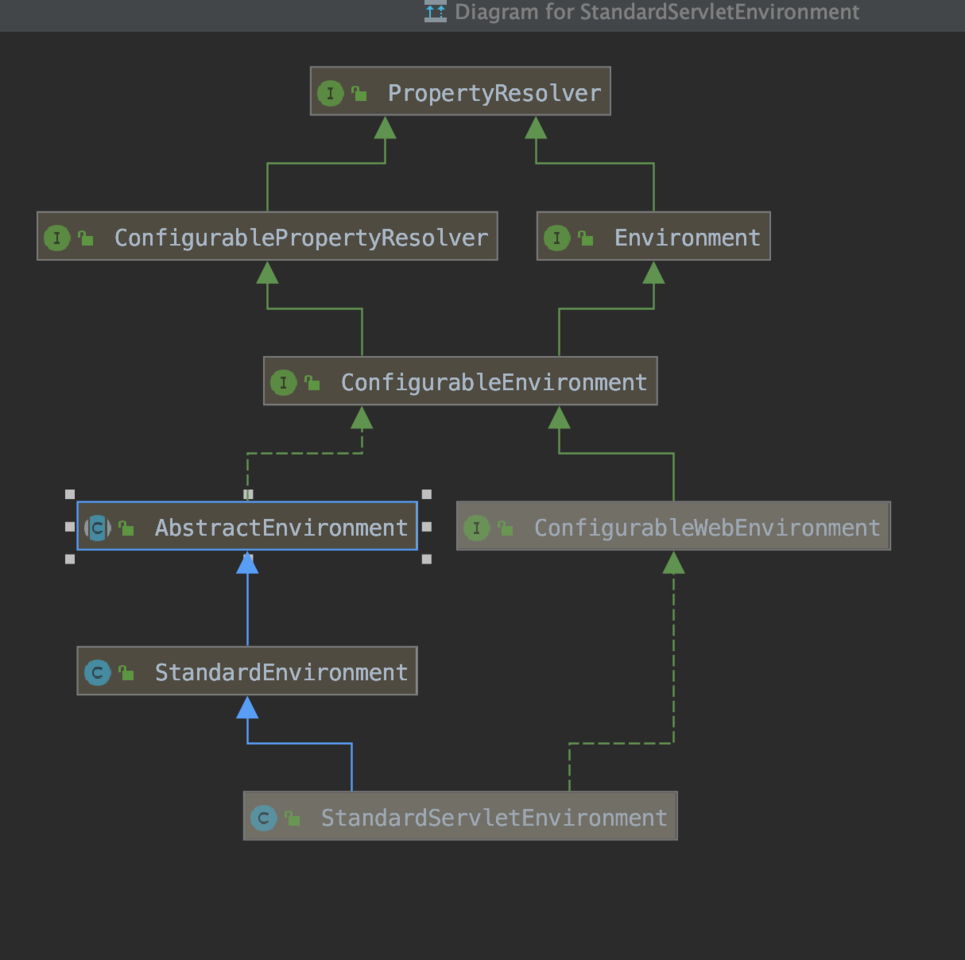
从上到下:
(1) PropertyResolver : PropertyResolver接口定义了按属性名获取对应属性配置的接口以及解析字符串中的属性表达式的接口
public interface PropertyResolver {
	// 是否包含key对应的value
	boolean containsProperty(String key);
	// 获取 key对应的value,
	String getProperty(String key)
  // 获取 key对应的value,如果不存在赋予 defaultValue
	String getProperty(String key, String defaultValue);
	// 获取 key对应的value,并转成类 targetType
	<T> T getProperty(String key, Class<T> targetType);
	<T> T getProperty(String key, Class<T> targetType, T defaultValue);
	<T> Class<T> getPropertyAsClass(String key, Class<T> targetType);
	// 方法名加了 Required 表示如果属性不存在就报错
	String getRequiredProperty(String key) throws IllegalStateException;
	<T> T getRequiredProperty(String key, Class<T> targetType) throws IllegalStateException;
	// 获取之前对 key指进行一次占位符转换, 再用转换后的key去取得value值
	String resolvePlaceholders(String text);
	String resolveRequiredPlaceholders(String text) throws IllegalArgumentException;
}
复制代码
(2) Environment 则是在其中加入 Profiles 的维度。
public interface Environment extends PropertyResolver {

	String[] getActiveProfiles();

	String[] getDefaultProfiles();

	boolean acceptsProfiles(String... profiles);

}
复制代码
前两个基本已经完成了 StandardServletEnvironment 的大部分行为属性的定义了,
(3) ConfigurablePropertyResolver : 此接口是大多数PropertyResolver实现类的父接口,它规范了使用property的方法,并且使用户可以定制化PropertyResolver在解析和转换property时候的逻辑
(4) ConfigurableEnvieronment : 在 Environment 在添加了一些对 Profiles操作的方法
public interface ConfigurableEnvironment extends Environment, ConfigurablePropertyResolver {
	void setActiveProfiles(String... profiles);

	void addActiveProfile(String profile);

	void setDefaultProfiles(String... profiles);

	MutablePropertySources getPropertySources();

	Map<String, Object> getSystemEnvironment();

	Map<String, Object> getSystemProperties();

	void merge(ConfigurableEnvironment parent);
}
复制代码
(5) ConfigurableWebEnvieronment : 加入了 web的元素.
public interface ConfigurableWebEnvironment extends ConfigurableEnvironment {

	// 该方法的实现就是添加web元素的,详细操作看下面方法实现.
	void initPropertySources(ServletContext servletContext, ServletConfig servletConfig);

	}
}
------ 下面是方法实现  -----
	@Override
	public void initPropertySources(ServletContext servletContext, ServletConfig servletConfig) {
		WebApplicationContextUtils.initServletPropertySources(getPropertySources(), servletContext, servletConfig);
@Override
	protected void customizePropertySources(MutablePropertySources propertySources) {
    // SERVLET_CONFIG
    // SERVLET_CONTEXT 就是把servlet 中的配置的都添加进来
	propertySources.addLast(new StubPropertySource(SERVLET_CONFIG_PROPERTY_SOURCE_NAME));
	propertySources.addLast(new StubPropertySource(SERVLET_CONTEXT_PROPERTY_SOURCE_NAME));
	if (JndiLocatorDelegate.isDefaultJndiEnvironmentAvailable()) {
    // JNDI 配置
	propertySources.addLast(new JndiPropertySource(JNDI_PROPERTY_SOURCE_NAME));
	}
	super.customizePropertySources(propertySources);
}
复制代码
(6) AbstactEnvironment
开始实现上述接口中的方法了,内容太多就不贴代码了
需要注意的是,有一个类: ConfigurablePropertyResolver 详细的获取properties 方法的实现都是写在该类中的,现在是以依赖的方式,添加到 StandardEnvironment中的。
总而言之,StandardServletEnvironment 里面就这么点东西,功能已经展示出来了,现在欠缺的就是他实例化过程中对配置文件的加载过程了。
四、 prepareEnvironment
Class Application{

	public ConfigurableApplicationContext run(String... args) {
    // 获取所有监听器
    SpringApplicationRunListeners listeners = getRunListeners(args);
    // 发布starting消息
		listeners.starting();
			//....前面的忽略,装配环境
			ConfigurableEnvironment environment = prepareEnvironment(listeners, applicationArguments);
  }

  private ConfigurableEnvironment prepareEnvironment(SpringApplicationRunListeners listeners,
	ApplicationArguments applicationArguments) {
	// 1. 创建 StandardServletEnvironment ,就是上面说的那个类.
	ConfigurableEnvironment environment = getOrCreateEnvironment();
    // 2. 配置环境
    // 两步,第一、配置属性configurePropertySources
    // 第二、配置profile
	configureEnvironment(environment, applicationArguments.getSourceArgs());
    // 3. 发布ApplicationEnvironmentPreparedEvent事件
	listeners.environmentPrepared(environment);
	// 4.  bindToSpringApplication绑定环境
	bindToSpringApplication(environment);
	if (!this.isCustomEnvironment) {
		environment = new EnvironmentConverter(getClassLoader()).convertEnvironmentIfNecessary(environment,
			deduceEnvironmentClass());
	}
	ConfigurationPropertySources.attach(environment);
	return environment;
	}

}
复制代码
1. 创建环境
Class SpringApplication {

  // 创建环境
  private ConfigurableEnvironment getOrCreateEnvironment() {
	if (this.environment != null) {
		return this.environment;
	}
	switch (this.webApplicationType) {
    // 因为我们是Servlet架构的,所以是创建servletEnvironment
	case SERVLET:
		return new StandardServletEnvironment();
	case REACTIVE:
		return new StandardReactiveWebEnvironment();
	default:
		return new StandardEnvironment();
	}

}
复制代码
看 StandardServletEnvironment 的实例化方法,我们会发现,“诶,为什么构造器里面没有东西”,继续读
public class StandardServletEnvironment extends StandardEnvironment implements ConfigurableWebEnvironment {
    public static final String SERVLET_CONTEXT_PROPERTY_SOURCE_NAME = "servletContextInitParams";
    public static final String SERVLET_CONFIG_PROPERTY_SOURCE_NAME = "servletConfigInitParams";
    public static final String JNDI_PROPERTY_SOURCE_NAME = "jndiProperties";
		//“诶,为什么构造器里面没有东西”?????,
    public StandardServletEnvironment() {
    }
    protected void customizePropertySources(MutablePropertySources propertySources) {
      // .... 略

}

// 看了父类的构造器会发现其实调用的是父类 StandardEnvironment 的父类 AbstractEnvironment 的构造方法中, 顺便先科普一下AbstractEnvironment
public abstract class AbstractEnvironment implements ConfigurableEnvironment {

  // 存ignore的profile的
	public static final String IGNORE_GETENV_PROPERTY_NAME = "spring.getenv.ignore";

  // 存 active常量的
	public static final String ACTIVE_PROFILES_PROPERTY_NAME = "spring.profiles.active";

	public static final String DEFAULT_PROFILES_PROPERTY_NAME = "spring.profiles.default";

	// 默认的 profile, 如果配置的profile找不到 active类型的话,就会找一个默认的。
	protected static final String RESERVED_DEFAULT_PROFILE_NAME = "default";

	protected final Log logger = LogFactory.getLog(getClass());

  // 存有效profile的集合
	private final Set<String> activeProfiles = new LinkedHashSet<>();
	// 存默认profile的集合
	private final Set<String> defaultProfiles = new LinkedHashSet<>(getReservedDefaultProfiles());
	// 这才是最终存储环境配置信息的地方
	private final MutablePropertySources propertySources = new MutablePropertySources();
	// 这个才是最重要的一个解析器,后面详细说。暂时可以知道,解析器的实现类是 PropertySourcesPropertyResolver
  // 而存储配置信息的载体是 MutablePropertySources,有没有想到 @PropertySource这个注解?
	private final ConfigurablePropertyResolver propertyResolver =
			new PropertySourcesPropertyResolver(this.propertySources);
	// 来到了构造器内
	public AbstractEnvironment() {
    //  ------------   importance : 这才是入口
    // 回过头看,发现竟然是StandardServletEnvironment类里的方法
		customizePropertySources(this.propertySources);
	}

  @Override
	@Nullable
	public String getProperty(String key) {
    // 可以看出来 propertyResolver是解析器,也就是获取properties的工具
		return this.propertyResolver.getProperty(key);
	}

  // 获取有效的 profile
  	@Override
	public String[] getActiveProfiles() {
		return StringUtils.toStringArray(doGetActiveProfiles());
	}
	//
  @Override
	public void setActiveProfiles(String... profiles) {
		//....
	}
}

复制代码
两个概念 :
PropertySourcesPropertyResolver : 解析properties文件 yml文件的工具,名字叫解析器,很好记
MutablePropertySources : 存放properties文件信息的载体。
为了突出 AbstractEnvironment 以及其中的 ConfigurablePropertyResolver 和 MutablePropertySources 的重要性,我刚才暂时把 StandardServletEnvironment 隔断了, 不知道你们有没有住过北京的隔断呢?
接着讲 StandardServletEnvironment 的实例化构造过程
public class StandardServletEnvironment extends StandardEnvironment implements ConfigurableWebEnvironment {
  // 看名字就知道了, 关于 servletContext的配置信息,如果忘了 spring会加载那些配置信息,建议返上面回顾一下
    public static final String SERVLET_CONTEXT_PROPERTY_SOURCE_NAME = "servletContextInitParams";
    // servletConfig的配置信息
    public static final String SERVLET_CONFIG_PROPERTY_SOURCE_NAME = "servletConfigInitParams";
    public static final String JNDI_PROPERTY_SOURCE_NAME = "jndiProperties";

    public StandardServletEnvironment() {
    }
	// StubPropertySource 是配置信息的载体,可以说一个properties文件的信息就存在一个StubPropertySource中
    protected void customizePropertySources(MutablePropertySources propertySources) {
     // propertySources列表末尾添加一个名称为servletConfigInitParams的 配置信息,
        propertySources.addLast(new StubPropertySource("servletConfigInitParams"));

      //propertySources列表末尾再添加一个名称为servletContextInitParams的空配置
        propertySources.addLast(new StubPropertySource("servletContextInitParams"));
      // JNDI配置
        if (JndiLocatorDelegate.isDefaultJndiEnvironmentAvailable()) {
            propertySources.addLast(new JndiPropertySource("jndiProperties"));
        }
      // 这是父类的方法
        super.customizePropertySources(propertySources);
    }

    public void initPropertySources(@Nullable ServletContext servletContext, @Nullable ServletConfig servletConfig) {
        WebApplicationContextUtils.initServletPropertySources(this.getPropertySources(), servletContext, servletConfig);
    }
}

// 父类方法这里点一下吧.
	protected void customizePropertySources(MutablePropertySources propertySources) {
	propertySources.addLast(
        // propertySources末尾添加systemProperties(系统属性)
        //  把System.getProperties()获取到的内容装载
	new PropertiesPropertySource(SYSTEM_PROPERTIES_PROPERTY_SOURCE_NAME, getSystemProperties()));
        //propertySources 末尾获取systemEnvironment(系统环境变量)
        // System.getenv(attributeName);
	propertySources.addLast(
				new SystemEnvironmentPropertySource(SYSTEM_ENVIRONMENT_PROPERTY_SOURCE_NAME, getSystemEnvironment()));
	}
复制代码
好了,到此为止, StandardServletEnvironment 构造完成, 到此为止,重要的信息有
-
MutablePropertySources中的PropertySources信息有servletConfigInitParams, servletContextInitParams, systemProperties, systemEnvironment, 顺序是从前到后的。 -
PropertySourcesPropertyResolver: 解析properties文件 yml文件的工具,名字叫解析器,很好记 -
MutablePropertySources: 存放properties文件信息的载体。
2. 配置环境
protected void configureEnvironment(ConfigurableEnvironment environment, String[] args) {
  // ConversionService是转换器,这里先不介绍了.
    if (this.addConversionService) {
	ConversionService conversionService = ApplicationConversionService.getSharedInstance();
	environment.setConversionService((ConfigurableConversionService) conversionService);
	}
  	// 1. 根据 运行参数存在与否配置环境
	configurePropertySources(environment, args);
  	// 2. 配置profile信息.
	configureProfiles(environment, args);
	}

// 1. 根据 运行参数存在与否配置环境
// 假设我们现在配置了 args,没指定defaultProfile的话。此时是往开头添加了一个 sources.addFirst(new SimpleCommandLinePropertySource(args));
protected void configurePropertySources(ConfigurableEnvironment environment,
			String[] args) {
      //1. 获取 MutablePropertySources, 也就是我们说的载体
    MutablePropertySources sources = environment.getPropertySources();
    //2. 如果指定了 defaultProperties,那么就添加 MapPropertySource
	if (this.defaultProperties != null && !this.defaultProperties.isEmpty()) {
	    sources.addLast(
		new MapPropertySource("defaultProperties", this.defaultProperties));
	}
  	//3. addCommandLineProperties默认是true,而args就是我们启动时候指定的参数,
  	// 可以在 idea -> Edit Configurations -> Environment -> Program argumemts中指定
  	// 如果存在的话,就添加一个 SimpleCommandLinePropertySource
	if (this.addCommandLineProperties && args.length > 0) {
	    String name = CommandLinePropertySource.COMMAND_LINE_PROPERTY_SOURCE_NAME;
		if (sources.contains(name)) {
			PropertySource<?> source = sources.get(name);
			CompositePropertySource composite = new CompositePropertySource(name);
			composite.addPropertySource(new SimpleCommandLinePropertySource(name + "-" + args.hashCode(), args));				composite.addPropertySource(source)
				sources.replace(name, composite);
			}
			else {
				sources.addFirst(new SimpleCommandLinePropertySource(args));
			}
		}
	}

//2. 看注释的意思,大概就是找到配置中的 active profile的值
protected void configureProfiles(ConfigurableEnvironment environment, String[] args) {
    // 1 让ServletStandardEnvironment中的 PropertySourcesPropertyResolver去 已经加载了的 MutablePropertySources中,遍历每一个PropertySources, 获取里面的spring.profiles.active对应的值,,
    // 2 并执行 this.activeProfiles.add(profile);,添加到 AbstractEnvironment的实例变量private final Set<String> activeProfiles 中
    // 3 一般情况下,是不存在的,我们一般指定的地方都是在 application.properties文件中指定的,因为此时还没有读到,所以 此时获取到的是空
  	// 4 那什么时候能获取到呢,PropertiesPropertySource 或者 SystemEnvironmentPropertySource 中指定了,或者 SimpleCommandLinePropertySource中,
  	// SimpleCommandLinePropertySource中 可以在 idea -> Edit Configurations -> Environment -> Program argumemts中指定
    // PropertiesPropertySource或者SystemEnvironmentPropertySource中一个是在 idea -> Edit Configurations -> Environment -> VM Option 中指定的,忘记哪个是了。
  	//具体代码不贴了,太多。
	environment.getActiveProfiles();
	// But these ones should go first (last wins in a property key clash)
	Set<String> profiles = new LinkedHashSet<>(this.additionalProfiles);
	profiles.addAll(Arrays.asList(environment.getActiveProfiles()));
	environment.setActiveProfiles(StringUtils.toStringArray(profiles));
  	// 一般情况下setActiveProfiles设置的是null,因为我们都是在application.properties文件指定的,而不会再运行变量中指定profile.
}
复制代码
总结一下:
- 到此为止,
MutablePropertySources中的PropertySources信息有SimpleCommandLinePropertySource , servletConfigInitParams, servletContextInitParams, systemProperties, systemEnvironment, 顺序是从前到后的 - 找到
spring.profile.active信息,但是一般是找不到的,因为此时application.properties或者yml文件还没有加载,而我们一般不会再 启动变量中指定spring.profile.active的值 - 还有一个忽略了的
environment.setConversionService后面再说
3. 发布ApplicationEnvironmentPreparedEvent事件
listeners.environmentPrepared(environment), 代码之前已经分析过了, 触发的监听器有:
- ConfigFileApplicationListener
- AnsiOutputApplicationListener
- LoggingApplicationListener
- ClasspathLoggingApplicationListener
- BackgroundPreinitializer
- DelegatingApplicationListener
- FileEncodingApplicationListener
最重要的一个是 ConfigFileApplicationListener , 先提个问题,大家不妨带着问题看下面的解说
Problem : profile.active指定了之后,是如何进行动态配置的呢?根据我们定义的是dev,就去找 application-dev.yml ,如果定义的是 pro,就会去装配 application-pro.yml 文件, spring中是如何帮我们进行处理了的呢?
public class ConfigFileApplicationListener implements EnvironmentPostProcessor, SmartApplicationListener, Ordered {

	private static final String DEFAULT_PROPERTIES = "defaultProperties";
	// 这是默认寻址的 文件地址
	private static final String DEFAULT_SEARCH_LOCATIONS = "classpath:/,classpath:/config/,file:./,file:./config/";
	// 下面5个比较重要的属性。
	public static final String ACTIVE_PROFILES_PROPERTY = "spring.profiles.active";
	public static final String INCLUDE_PROFILES_PROPERTY = "spring.profiles.include";
	public static final String CONFIG_NAME_PROPERTY = "spring.config.name";
	public static final String CONFIG_LOCATION_PROPERTY = "spring.config.location";
	public static final String CONFIG_ADDITIONAL_LOCATION_PROPERTY = "spring.config.additional-location";

  // 第一步
  public void onApplicationEvent(ApplicationEvent event) {
		if (event instanceof ApplicationEnvironmentPreparedEvent) {
			onApplicationEnvironmentPreparedEvent((ApplicationEnvironmentPreparedEvent) event);
		}
		if (event instanceof ApplicationPreparedEvent) {
			onApplicationPreparedEvent(event);
		}
	}

  // 第二步。
  private void onApplicationEnvironmentPreparedEvent(ApplicationEnvironmentPreparedEvent event) {
    // 加载 EnvironmentPostProcessor子类 postProcessor,这里加载到的有3个:
    // SystemEnvironmentPropertySourceEnvironmentPostProcessor
    // SpringApplicationJsonEnvironmentPostProcessor
    // CloudFoundryVcapEnvironmentPostProcessor
		List<EnvironmentPostProcessor> postProcessors = loadPostProcessors();
    // 再把自己本身加进去,惊不惊喜,
    // ConfigFileApplicationListener本身也实现了EnvironmentPostProcessor , 他也是读取过程中最重要的一个类
		postProcessors.add(this);
    // 根据 @Order 注解指定的顺序进行排序
		AnnotationAwareOrderComparator.sort(postProcessors);
    // 此时就有4个 EnvironmentPostprocessor 了
		for (EnvironmentPostProcessor postProcessor : postProcessors) {
      // 触发每一个  EnvironmentPostprocessor的postProcessEnvironment() 方法
			postProcessor.postProcessEnvironment(event.getEnvironment(), event.getSpringApplication());
		}
	}
}
复制代码
开始讲4大 EnvironmentPostProcessor 的故事
第一金刚: SystemEnvironmentPropertySourceEnvironmentPostProcessor 看这名字,就知道跟 SystemEnvironment 有关,就是把 原本已经装载了的 MutablePropertySources 的 SystemEnvironmentPropertySource 替换成 OriginAwareSystemEnvironmentPropertySource
@Override
public void postProcessEnvironment(ConfigurableEnvironment environment, SpringApplication application) {
    //  sourceName = 'systemEnvironment'
	String sourceName = StandardEnvironment.SYSTEM_ENVIRONMENT_PROPERTY_SOURCE_NAME;
    // 获取已经存在于 `MutablePropertySources` 中的 SystemEnvironmentPropertySource
	PropertySource<?> propertySource = environment.getPropertySources().get(sourceName);
	if (propertySource != null) {
      // 替换
	replacePropertySource(environment, sourceName, propertySource);
	}
}

@SuppressWarnings("unchecked")
private void replacePropertySource(ConfigurableEnvironment environment, String sourceName,
		PropertySource<?> propertySource) {
	Map<String, Object> originalSource = (Map<String, Object>) propertySource.getSource();
    // 进行一步转换,把 SystemEnvironmentPropertySource 转换成 OriginAwareSystemEnvironmentPropertySource
	SystemEnvironmentPropertySource source = new  OriginAwareSystemEnvironmentPropertySource(sourceName,
				originalSource);
    // 再替换,里面的步骤就是
    // 1. 获取 MutablePropertySources 中 SystemEnvironmentPropertySource 的位置 index
    // 2. 把 MutablePropertySources 中 位置index上的元素替换成 OriginAwareSystemEnvironmentPropertySource
	environment.getPropertySources().replace(sourceName, source);
	}
复制代码
第二金刚: SpringApplicationJsonEnvironmentPostProcessor
第三金刚: CloudFoundryVcapEnvironmentPostProcessor
最大BOSS : ConfigFileApplicationListener
上面俩讲的太没意思了, 大伙儿自己看代码去吧,直接到重点, 加载 application.xml
public class ConfigFileApplicationListener implements EnvironmentPostProcessor, SmartApplicationListener, Ordered {

	private static final String DEFAULT_PROPERTIES = "defaultProperties";
	// 这是默认寻址的 文件地址
	private static final String DEFAULT_SEARCH_LOCATIONS = "classpath:/,classpath:/config/,file:./,file:./config/";
	// 下面5个比较重要的属性。
	public static final String ACTIVE_PROFILES_PROPERTY = "spring.profiles.active";
	public static final String INCLUDE_PROFILES_PROPERTY = "spring.profiles.include";
	public static final String CONFIG_NAME_PROPERTY = "spring.config.name";
	public static final String CONFIG_LOCATION_PROPERTY = "spring.config.location";
	public static final String CONFIG_ADDITIONAL_LOCATION_PROPERTY = "spring.config.additional-location";

  // 第一步:
    public void onApplicationEvent(ApplicationEvent event) {
      //... 略过,上面讲了
    }

	// 第二步。
  private void onApplicationEnvironmentPreparedEvent(ApplicationEnvironmentPreparedEvent event{
		//... 略过,上面讲了
  }

    // 第三步,最重要的来了,开始触发后置处理器.
    @Override
    public void postProcessEnvironment(ConfigurableEnvironment environment, SpringApplication application) {
		addPropertySources(environment, application.getResourceLoader());
    }

    // 加载propertySource了
    protected void addPropertySources(ConfigurableEnvironment environment, ResourceLoader resourceLoader) {
  	// 把 RandomValuePropertySource 添加到 environment中,随机数据源,不管他
	RandomValuePropertySource.addToEnvironment(environment);
  	// 来了,就是那个男人,那个男人的气息感受到没有
  	// 全篇最最要的地方。
  	// spring把对配置文件的加载逻辑封装在了 `ConfigFileApplicationListener`的内部类 Loader中,
  	// 一向符合他的作风。怕嵌入太多层,把loader拎出来解析
	new Loader(environment, resourceLoader).load();
	}

}

复制代码
单独拎出来讲 Loader , 记住外层是有个外部类的 ConfigFileApplicationListener 的。
private class Loader {

	private final Log logger = ConfigFileApplicationListener.this.logger;
	private final ConfigurableEnvironment environment;
	private final PropertySourcesPlaceholdersResolver placeholdersResolver;
	private final ResourceLoader resourceLoader;
	private final List<PropertySourceLoader> propertySourceLoaders;
	private Deque<Profile> profiles;
	private List<Profile> processedProfiles;
	private boolean activatedProfiles;
	private Map<Profile, MutablePropertySources> loaded;
	private Map<DocumentsCacheKey, List<Document>> loadDocumentsCache = new HashMap<>();
	Loader(ConfigurableEnvironment environment, ResourceLoader resourceLoader) {
		this.environment = environment;
		this.placeholdersResolver = new PropertySourcesPlaceholdersResolver(this.environment);
		this.resourceLoader = (resourceLoader != null) ? resourceLoader : new DefaultResourceLoader();
		this.propertySourceLoaders = SpringFactoriesLoader.loadFactories(PropertySourceLoader.class, getClass().getClassLoader());
	}
    // 1. 构造方法
    Loader(ConfigurableEnvironment environment, ResourceLoader resourceLoader) {
      // 好了 environment 是被依赖进来了。
	this.environment = environment;
	this.placeholdersResolver = new PropertySourcesPlaceholdersResolver(this.environment);
	this.resourceLoader = (resourceLoader != null) ? resourceLoader : new DefaultResourceLoader();
       // 加载PropertySourceLoader的实现类,得到两个:
       //PropertiesPropertySourceLoader 加载 properties文件
       //YamlPropertySourceLoader 加载 yml文件
	this.propertySourceLoaders = SpringFactoriesLoader.loadFactories(PropertySourceLoader.class,
					getClass().getClassLoader());
		}

    // 2. load() 方法
  public void load() {

	this.profiles = new LinkedList<>();
	this.processedProfiles = new LinkedList<>();
	this.activatedProfiles = false;
	this.loaded = new LinkedHashMap<>();
    // 2.1 初始化 Profile 到此之前都是初始化数据,第一次加载 application 配置文件
	initializeProfiles();
	while (!this.profiles.isEmpty()) {
    // profiles此时是null
	Profile profile = this.profiles.poll();
	if (profile != null && !profile.isDefaultProfile()) {
		addProfileToEnvironment(profile.getName());
	}
    // 来了,开始加载了
    // 看起来好像这个方法有点变态,addToLoaded(MutablePropertySources::addLast 是吧取到的 propertySource 加到  Environment的 MutablePropertySources 中而已
	load(profile, this::getPositiveProfileFilter, addToLoaded(MutablePropertySources::addLast, false));
	this.processedProfiles.add(profile);
	}
	resetEnvironmentProfiles(this.processedProfiles);
	load(null, this::getNegativeProfileFilter, addToLoaded(MutablePropertySources::addFirst, true));
	addLoadedPropertySources();
}

 //2.1 初始化 Profile
private void initializeProfiles() {
	this.profiles.add(null);
        // 获取 active的profile, 去environment遍历所有的 propertySource, 每个propertySource 通过key active为key 去找对应的 value, 这个时候一般是是找不到的
	Set<Profile> activatedViaProperty = getProfilesActivatedViaProperty();
	this.profiles.addAll(getOtherActiveProfiles(activatedViaProperty));

	addActiveProfiles(activatedViaProperty);
	if (this.profiles.size() == 1) {
        // 如果上面步骤都找不到的话,走下面,添加一个defaultProfile,里面没有装配属性,就一个空壳
	for (String defaultProfileName : this.environment.getDefaultProfiles()) {
	    Profile defaultProfile = new Profile(defaultProfileName, true);
		this.profiles.add(defaultProfile);
	}
}


// 继续加载
  private void load(Profile profile, DocumentFilterFactory filterFactory, DocumentConsumer consumer) {
    	// getSearchLocations获取了4个位置,还记得 ConfigFileApplicationListener里面的常量,根据逗号分隔出来:
    // private static final String DEFAULT_SEARCH_LOCATIONS = "classpath:/,classpath:/config/,file:./,file:./config/";
	getSearchLocations().forEach((location) -> {
		boolean isFolder = location.endsWith("/");
        // getSearchNames 判断环境之前加载的propertySource中是否有 spring.config.name对应的值,找不到就取默认的 application ,也就是我们配置文件默认的名字
		Set<String> names = isFolder ? getSearchNames() : NO_SEARCH_NAMES;
		names.forEach((name) -> load(location, name, profile, filterFactory, consumer));
		});
	}
}

/**
 *
 * @param location 表示文件位置 比如: classpath:/config/
 * @param name 表示文件名,默认是 application
 * @name 表示 profile ,一开始是 null, 到时候会连起来"location-profile",联想一下 "application-dev"
 * DocumentFilterFactory是文档过滤器,不知道过滤什么,感兴趣可以点进去看
 */
private void load(String location, String name, Profile profile, DocumentFilterFactory filterFactory,
				DocumentConsumer consumer) {
		// ...省略
  	//
	Set<String> processed = new HashSet<>();
  	//两个propertySourceLoaders
  	// PropertiesPropertySourceLoader 、YamlPropertySourceLoader
	for (PropertySourceLoader loader : this.propertySourceLoaders) {
        // PropertiesPropertySourceLoader 对应的文件扩展名有 properties 和xml
        // YamlPropertySourceLoader 对应的文件扩展名有 yaml, yml
	for (String fileExtension : loader.getFileExtensions()) {
		if (processed.add(fileExtension)) {
			loadForFileExtension(loader, location + name, "." + fileExtension, profile, filterFactory,
					consumer);
		}
	}
}

/*
* 直接到这里来吧,中间一堆重载方法跳过,
* @ Param : 先是PropertiesPropertySourceLoader,后来是 YamlPropertySourceLoader
* @ Param : location , 重载方法就是为了组装 location, 此时profile为null,所以  location是 file:./config/application.properties, 第二次进入这个方法就是 file:./config/application.properties,接下来就笛卡尔基那种,4*4=16种情况。
*
*/
private void load(PropertySourceLoader loader, String location, Profile profile, DocumentFilter filter,
				DocumentConsumer consumer) {
	try {
       	// 加载文件成 Resource
		Resource resource = this.resourceLoader.getResource(location);
        // 如果为空直接跳过
		if (resource == null || !resource.exists()) {
			if (this.logger.isTraceEnabled()) {
				StringBuilder description = getDescription("Skipped missing config ", location, resource,profile);
				this.logger.trace(description);
				}
				return;
			}
	//***** 省略非重点
        // 直到读取到 classpath:application.yml 文件的时候
		List<Document> loaded = new ArrayList<>();
				for (Document document : documents) {
					if (filter.match(document)) {
            // 判断document中有没有 spring.profiles.active:, 此时会发现,我草,找到了,如果是dev
            // 就会执行:
            // 1. environment中 profiles.add(profile)
            // 2. activatedProfiles设置为true表
            // 3. 移除掉一开始的 default profile
					addActiveProfiles(document.getActiveProfiles());
					addIncludedProfiles(document.getIncludeProfiles());
            // 最后把找得到的 文件都解析成 document ,放到loaded 列表中,loaded.add(document);
					loaded.add(document);
					}
				}
				Collections.reverse(loaded);
				if (!loaded.isEmpty()) {
					loaded.forEach((document) -> consumer.accept(profile, document));
					if (this.logger.isDebugEnabled()) {
						StringBuilder description = getDescription("Loaded config file ", location, resource, profile);
						this.logger.debug(description);
					}
				}
			}
			catch (Exception ex) {
				throw new IllegalStateException("Failed to load property " + "source from location '" + location + "'",
						ex);
			}
		}
}
复制代码
好了,你们终于看完了 加载 配置文件的操作了,好累, “氦~~”, 给自己打个气,迎接刚才提的问题。
Problem : profile.active指定了之后,是如何进行动态配置的呢?
再跑一个问题, Document已经被加载了,那接下来 Document 怎么处理呢?
让我们回到 ConfigFileApplicationListener 中,
private class Loader {

    public void load() {
    // ** 略
      // 记得这里不?? 此时profiles被添加了dev,
      // 继续走了
	while (!this.profiles.isEmpty()) {
        // profile 就是 dev了
        // 好了,接下来不我就不说了,留点悬念~~,
		Profile profile = this.profiles.poll();
		if (profile != null && !profile.isDefaultProfile()) {
			addProfileToEnvironment(profile.getName());
		}
		load(profile, this::getPositiveProfileFilter, addToLoaded(MutablePropertySources::addLast, false));
		this.processedProfiles.add(profile);
	}
      //将profile属性加到environment中
	resetEnvironmentProfiles(this.processedProfiles);
	// 获取配置, 加入到this.loaded中
      load(null, this::getNegativeProfileFilter, addToLoaded(MutablePropertySources::addFirst, true));
      //将this.loaded按顺序添加到environment的propertySources中
      //如果存在defaultProperties,放在defaultProperties之前
      //如果不存在defaultProperties,直接添加到最后
	addLoadedPropertySources();
		}

    private void addLoadedPropertySources() {
      //1. MutablePropertySources
	MutablePropertySources destination = this.environment.getPropertySources();
      //2.  此时有 loaded.values()得到 application,yml 和application-dev.yml对应的 propertySource
	List<MutablePropertySources> loaded = new ArrayList<>(this.loaded.values());
	Collections.reverse(loaded);
	String lastAdded = null;
	Set<String> added = new HashSet<>();
	for (MutablePropertySources sources : loaded) {
		for (PropertySource<?> source : sources) {
			if (added.add(source.getName())) {
    // 添加
			addLoadedPropertySource(destination, lastAdded, source);
			lastAdded = source.getName();
		    }
		}
	}
    }
 }
复制代码
到此,终于解析完了, 但是记得占位符解析吗?例如 @Value(${name} ) , 他是怎么去配置文件中找到 name 对应的值, 再替换掉 @Value 中的值得呢? 后面继续讲.敬请期待
//将profile属性加到environment中
            resetEnvironmentProfiles(this.processedProfiles);
            //获取配置, 加入到this.loaded中
            load(null, this::getNegativeProfileFilter,
                    addToLoaded(MutablePropertySources::addFirst, true));

复制代码
参考链接: Spring源码4:prepareEnvironment()
正文到此结束
- 本文标签: apr http cache CEO ArrayList 定制 Collections https 总结 开发者 Logging Spring Boot 遍历 rand tab list cat DDL Service 注释 LinkedList ssl json ip final UI Listeners id 解析 HashSet 源码 value description src Property 代码 HashMap web 实例 servlet 开发 配置 ACE Collection App 单元测试 classpath key tar build 处理器 IDE bug java DOM 操作系统 map strace IO CTO 构造方法 测试 XML js consumer 数据 监听器 springboot spring Document mail 参数
- 版权声明: 本文为互联网转载文章,出处已在文章中说明(部分除外)。如果侵权,请联系本站长删除,谢谢。
- 本文海报: 生成海报一 生成海报二
热门推荐


相关文章

近期评论
-
ws0132613@gmail.comhttps://getmacos.com/gopanel/william smith
-
谢谢
-
https://www.newcmy.com/register?aff=HBVX建议您试试草莓云机场,可以流畅观看youtube和tiktok,上reddit/x也没有问题,还有各种ai优化节点。
-
-
-
想购买您这个站,我的联系方式QQ741756694微信同步 能卖联系
-
-
-
-
Loading...
![[HBLOG]公众号](https://www.liuhaihua.cn/img/qrcode_gzh.jpg)

