微服务实战——高可用的SpringCloudConfig
管理微服务配置
对于单体应用架构来说,会使用配置文件管理我们的配置,这就是之前项目中的application.properties或application.yml。如果需要在多环境下使用,传统的做法是复制这些文件命名为application-xxx.properties,并且在启动时配置spring.profiles.active={profile}来指定环境。
在微服务架构下我们可能会有很多的微服务,所以要求的不只是在各自微服务中进行配置,我们需要将所有的配置放在统一平台上进行操作,不同的环境进行不同的配置,运行期间动态调整参数等等。总之一句话,使用集中管理配置是很有必要的。
Spring Cloud Config
- 官方地址
- 为分布式系统外部配置提供了服务器端和客户端的支持,它包括config server端和 config client端两部分
- Config server端是一个可以横向扩展、集中式的配置服务器,它用于集中管理应用程序各个环境下的配置,默认 使用Git存储配置内容
- Config client 是config server的客户端,用于操作存储在server中的配置属性
- 优势
- 集中管理配置
- 不同环境不同配置
- 运行期间可以动态调整
- 配置修改后可以自动更新
本章源码
源码
全部SpringCloud教程
架构图
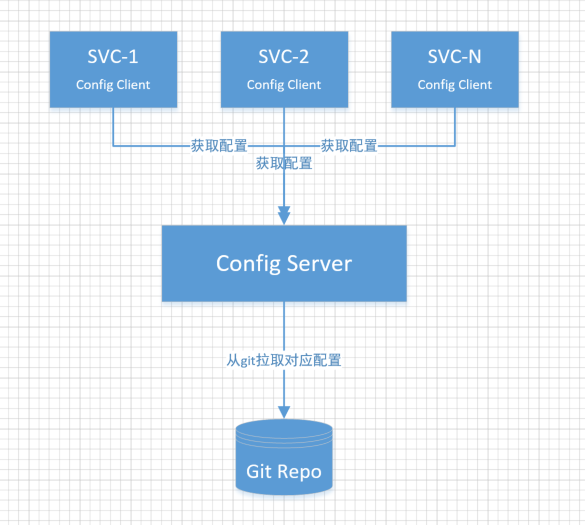
引入spring cloud config步骤
可基于之前SpringCloudDemo项目改造,也可以创建为新的项目
一、在GitHub创建一个git仓库用来存放git配置
- 创建仓库名字为spring-cloud-config-repo的私有仓库
- 增加其他模块(后面config client会详细说,可先跳过)的配置文件,格式为
{application}-{profile}.properties并将配置项粘贴到新建的文件中,如:创建zuul-dev.properties,并将原来的zuul模块中的application.properties全部配置粘贴进来 - {application}-{profile}.properties,{application}表示微服务的名称,{label}表示Git对应的分支,默认为master,{profile}表示配置文件的profile
访问时就 /{application}/{profile}[/{label}]或/{label}/{application}-{profile}.properties
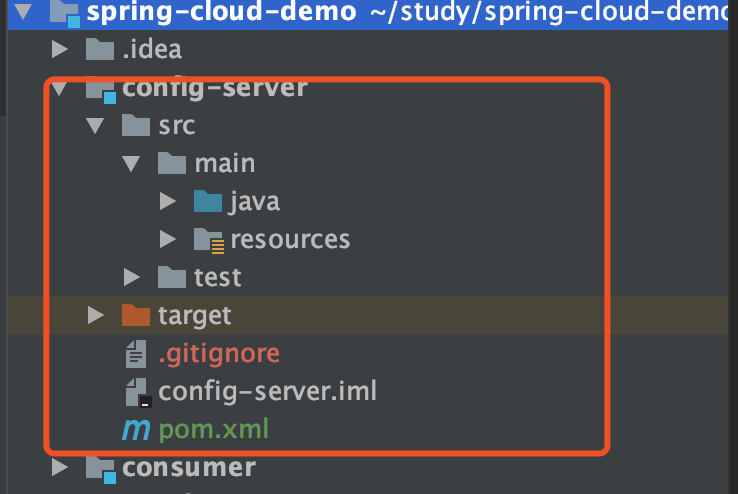
二、 创建config server端
-
创建maven项目,可在原项目中创建Module
-
引入pom依赖
<dependency> <groupId>org.springframework.cloud</groupId> <artifactId>spring-cloud-config-server</artifactId> </dependency> -
创建启动类
package cn.kxtop.blog.configserver; import org.springframework.boot.SpringApplication; import org.springframework.boot.autoconfigure.SpringBootApplication; import org.springframework.cloud.client.discovery.EnableDiscoveryClient; import org.springframework.cloud.config.server.EnableConfigServer; // 注入到Eureka中,使高可用 @EnableDiscoveryClient @SpringBootApplication @EnableConfigServer public class ConfigServerApplication { public static void main(String[] args) { SpringApplication.run(ConfigServerApplication.class); } } -
配置配置文件application.properties
server.port=9999
  # 配置git仓库的地址(修改为你自己的git仓库地址)
  spring.cloud.config.server.git.uri=https://github.com/qupengkun/spring-cloud-config-repo.git
  # git仓库账号
  spring.cloud.config.server.git.username=YOU_NAME
  # git仓库秘密
  spring.cloud.config.server.git.password=YOU_PASSWORD
  #eureka,确保Spring cloud config 高可用
  eureka.client.serviceUrl.defaultZone = http://localhost:8761/eureka/
-
启动项目并访问测试
http请求localhost:9999/zuul/dev

三、创建config client端
- 引入依赖
<dependency> <groupId>org.springframework.cloud</groupId> <artifactId>spring-cloud-config-client</artifactId> </dependency> - 创建bootstrap.properties
#对应之前git仓库的文件名,如zuul-dev.properties spring.application.name=zuul #config server 地址 spring.cloud.config.uri=http://localhost:9999 #{profile}名(环境) spring.cloud.config.profile=dev #{label}名,git仓库分支 spring.cloud.config.label=master - 删除原来的application.properties,如没有,则不用操作直接下一步
- 启动client端可见连接到了config-server端

- 查看eureka发现已经注册到eureka中

- 测试在线参数修改
可在Controller上加注解 @RefreshScope 请求server:port/refresh手动刷新
总结及后续
以上基本演示了Spring Cloud Config的用法,还是比较简单的,我们引入了Eureka使Config Server能保证高可用,还可以增加@RefreshScope手动刷新配置文件,如果配置对安全要求较高,也可以引入JCE(Java Cryptography Extension)进行加解密操作。
其实每次都去手动刷新配置还是比较麻烦且有很大的局限性的,那么如何修改配置后自动感知并刷新呢?请关注下一章基于Spring Cloud Bus实现自动刷新配置。
持续学习,记录点滴。更多文章请访问 文章首发
正文到此结束
- 本文标签: Config Server HTML 文章 源码 分布式系统 UI client 应用架构 https Spring Cloud Config App Word 测试 springboot 配置 总结 Master git zuul GitHub 删除 服务器 高可用 安全 微服务 参数 IO pom Spring cloud 管理 http 分布式 java cat bus Eureka Service maven springcloud Bootstrap src id spring
- 版权声明: 本文为互联网转载文章,出处已在文章中说明(部分除外)。如果侵权,请联系本站长删除,谢谢。
- 本文海报: 生成海报一 生成海报二
热门推荐


相关文章


Loading...
![[HBLOG]公众号](https://www.liuhaihua.cn/img/qrcode_gzh.jpg)

