MAC下使用HSDIS生成汇编代码并使用JITWatch查看
jdk
安装jdk8
笔者之前使用的java12版本愣是不能使用HSdis和JITWatch,于是就安装了JDK8。
前往Oracle官网下载jdk8: https://www.oracle.com/java/technologies/javase-jdk8-downloads.html
多版本管理
试了一下使用jenv不能用,还是老实export JAVA_HOME参数。
环境变量配置
/usr/libexec/java_home -V
显示:
(base) ➜  java /usr/libexec/java_home -V
Matching Java Virtual Machines (2):
    12.0.1, x86_64:	"OpenJDK 12.0.1"	/Library/Java/JavaVirtualMachines/openjdk-12.0.1.jdk/Contents/Home
    1.8.0_241, x86_64:	"Java SE 8"	/Library/Java/JavaVirtualMachines/jdk1.8.0_241.jdk/Contents/Home

/Library/Java/JavaVirtualMachines/openjdk-12.0.1.jdk/Contents/Home
在~/.zshrc下配置:
多个版本java:
export JDK6_HOME="/Library/Java/JavaVirtualMachines/1.6.0.jdk/Contents/Home"
export JDK8_HOME="/Library/Java/JavaVirtualMachines/adoptopenjdk-8.jdk/Contents/Home"
export JDK12_HOME="/Library/Java/JavaVirtualMachines/openjdk-12.0.1.jdk/Contents/Home"

# alias 命令链接到 export 命令
alias jdk6="export JAVA_HOME=$JDK6_HOME"
alias jdk8="export JAVA_HOME=$JDK8_HOME"
alias jdk12="export JAVA_HOME=$JDK12_HOME”
不过笔者实验过程中还是直接 export JAVA_HOME=/Library/Java/JavaVirtualMachines/jdk1.8.0_241.jdk/Contents/Home
HSDIS
下载插件
链接: https://pan.baidu.com/s/1XRNJrRZH73U-pJida-Bo9A 密码:f76j
放到jre中
sudo cp $JAVA_HOME/jre/lib/
查看是否工作
java -XX:+UnlockDiagnosticVMOptions -XX:+PrintAssembly -version
如果提示 Could not load hsdis-amd64.dylib; library not loadable; PrintAssembly is disabled 则是没安装好,如果输出一大堆汇编则是已经装好可用了。
执行反编译命令
准备java文件
public class Test {
    public volatile long sum = 0;

    public int add(int a, int b) {
        int temp = a + b;
        sum += temp;
        return temp;
    }

    public static void main(String[] args) {
        Test test = new Test();

        int sum = 0;

        for (int i = 0; i < 1000000; i++) {
            sum = test.add(sum, 1);
        }

        System.out.println("Sum:" + sum);
        System.out.println("Test.sum:" + test.sum);
    }
}
反编译
java -XX:+UnlockDiagnosticVMOptions -XX:+PrintAssembly -Xcomp -XX:CompileCommand=dontinline,Test.add -XX:CompileCommand=compileonly,Test.add Test
-Xcomp选项指定了JVM以编译模式运行,否则默认是Mix模式,只有热点代码才会被JIT编译优化。
会输出一堆汇编:
Java HotSpot(TM) 64-Bit Server VM warning: PrintAssembly is enabled; turning on DebugNonSafepoints to gain additional output
CompilerOracle: dontinline Test.add
CompilerOracle: compileonly Test.add
Loaded disassembler from /Library/Java/JavaVirtualMachines/jdk1.8.0_241.jdk/Contents/Home/jre/lib/hsdis-amd64.dylib
Decoding compiled method 0x00000001071dec10:
Code:
[Disassembling for mach='i386:x86-64']
[Entry Point]
[Constants]
  # {method} {0x000000011f4de3b8} 'add' '(II)I' in 'Test'
  # this:     rsi:rsi   = 'Test'
  # parm0:    rdx       = int
  # parm1:    rcx       = int
  #           [sp+0x50]  (sp of caller)
  0x00000001071ded60: mov    0x8(%rsi),%r10d
  0x00000001071ded64: shl    $0x3,%r10
  0x00000001071ded68: cmp    %rax,%r10
  0x00000001071ded6b: jne    0x0000000107122e60  ;   {runtime_call}
  0x00000001071ded71: data32 data32 nopw 0x0(%rax,%rax,1)
  0x00000001071ded7c: data32 data32 xchg %ax,%ax
[Verified Entry Point]
  0x00000001071ded80: mov    %eax,-0x14000(%rsp)
  0x00000001071ded87: push   %rbp
  0x00000001071ded88: sub    $0x40,%rsp
  0x00000001071ded8c: movabs $0x11f4de700,%rax  ;   {metadata(method data for {method} {0x000000011f4de3b8} 'add' '(II)I' in 'Test')}
  0x00000001071ded96: mov    0xdc(%rax),%edi
  0x00000001071ded9c: add    $0x8,%edi
  0x00000001071ded9f: mov    %edi,0xdc(%rax)
  0x00000001071deda5: movabs $0x11f4de3b8,%rax  ;   {metadata({method} {0x000000011f4de3b8} 'add' '(II)I' in 'Test')}
  0x00000001071dedaf: and    $0x0,%edi
  0x00000001071dedb2: cmp    $0x0,%edi
  0x00000001071dedb5: je     0x00000001071dedf1  ;*iload_1
                                                ; - Test::add@0 (line 5)
以下省略
JITWatch
上面的汇编比较长,一个一个对应看着累,可以使用JITWatch对照着源码和字节码来看。
生成JIT日志
在terminal中使用java然后在JITWatch里面查看会报一堆path找不到,可以在IDE里面运行生成日志。这里使用IDEA。
IDEA设置使用jdk8
之前在idea里面用12,在File -> Project Structure里面设置使用jdk8后一堆报错,需要几处Language Level设置为8才可以:
- Project Structure -> Modules
- IntelliJ IDEA -> Java Compiler -> Project bytecode version
在VM参数里面加上:
-XX:+UnlockDiagnosticVMOptions -XX:+PrintAssembly -Xcomp -XX:CompileCommand=dontinline,Test.add -XX:CompileCommand=compileonly,Test.add -XX:+TraceClassLoading -XX:+LogCompilation -XX:LogFile={your_path}/test.log
JITWatch
下载JITWatch并启动
github: https://github.com/AdoptOpenJDK/jitwatch
拉下来后按照下面README的方式启动: mvn clean compile test exec:java
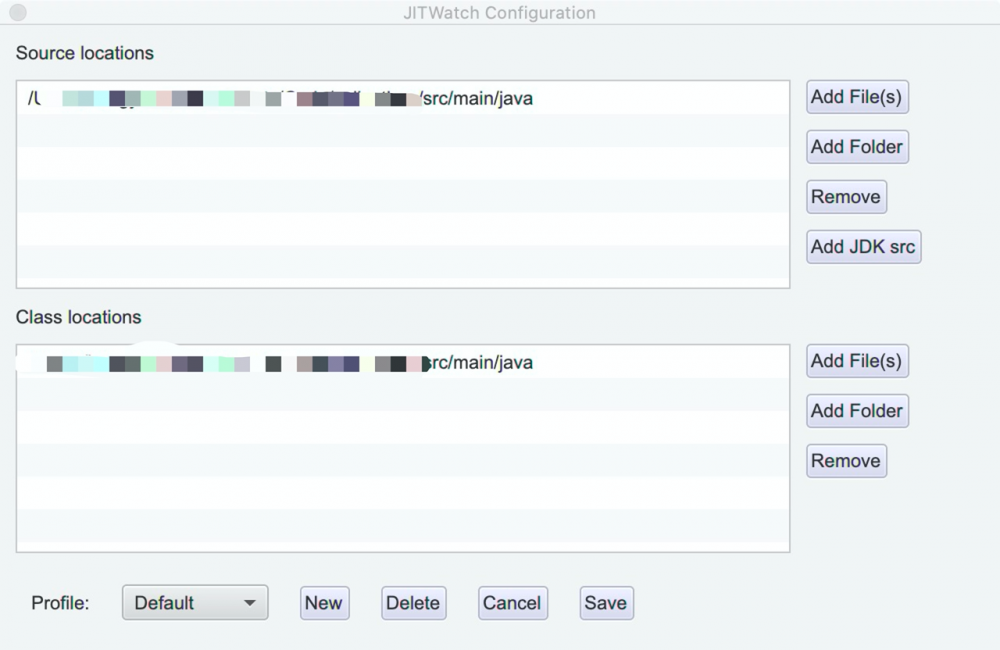
添加path
在界面上方点击Config,添加java文件和class文件的路径
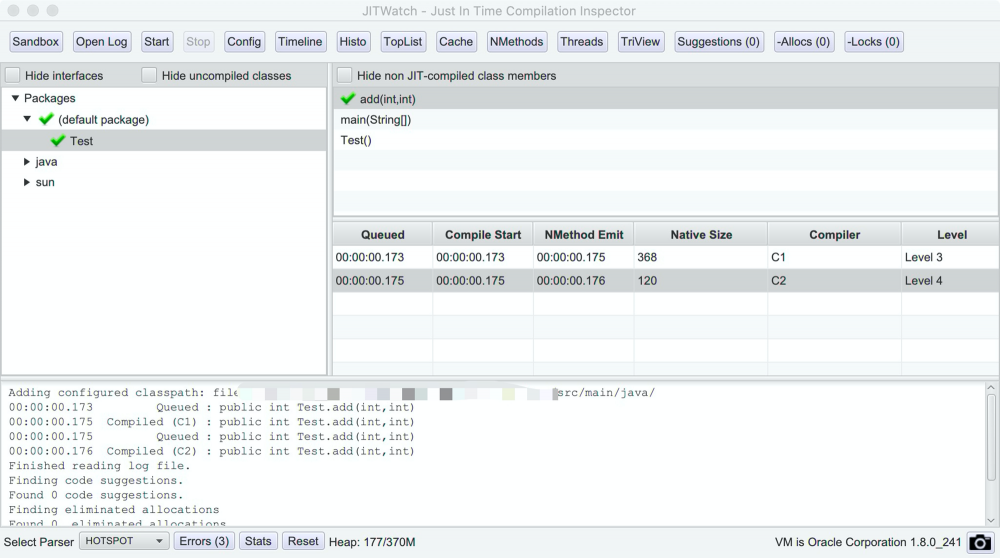
生产结果
点击界面上的Start后,点击进入Test就可以看到了
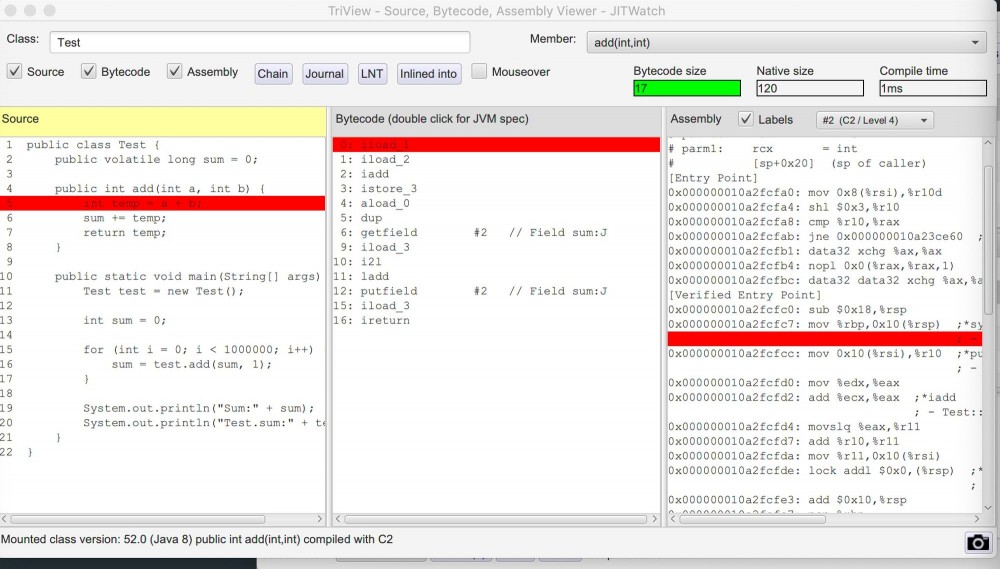
这里可以看到volatile的实现,在MacOS x64的实现是在volatile write后添加一个lock指令作为StoreLoad屏障来保证可见性和防止重排序的。摘抄 https://stackoverflow.com/questions/8891067/what-does-the-lock-instruction-mean-in-x86-assembly:
LOCK is not an instruction itself: it is an instruction prefix, which applies to the following instruction. That instruction must be something that does a read-modify-write on memory (INC, XCHG, CMPXCHG etc.) --- in this case it is the incl (%ecx) instruction which increments the long word at the address held in the ecx register. The LOCK prefix ensures that the CPU has exclusive ownership of the appropriate cache line for the duration of the operation, and provides certain additional ordering guarantees. This may be achieved by asserting a bus lock, but the CPU will avoid this where possible. If the bus is locked then it is only for the duration of the locked instruction. This code copies the address of the variable to be incremented off the stack into the ecx register, then it does lock incl (%ecx) to atomically increment that variable by 1. The next two instructions set the eax register (which holds the return value from the function) to 0 if the new value of the variable is 0, and 1 otherwise. The operation is an increment, not an add (hence the name).
lock前缀确保处理器可以独享共享内存,锁住系统总线,让其他CPU不能访问总线,也就是不能访问系统内存,或者依赖缓存一致性来保证加锁操作的自动执行。然后处理器的缓存回写到内存,导致其他处理器的缓存无效,线程接下来将从主内存中读取共享变量,也就是MESI协议所做的事(相当于volatile读的内存语义)。
在方法返回前,会插入safepoint polling page的代码 test %eax, 0xxxxxxx ,以便让线程进入到这个safepoint的时候可以被阻塞。
正文到此结束
热门推荐


相关文章


Loading...
![[HBLOG]公众号](https://www.liuhaihua.cn/img/qrcode_gzh.jpg)

