SpringCloud入门(十): Config 统一配置中心
SpringCloud Config 简介
在分布式系统中,由于服务组件过多,为了方便争对不通的环境下的服务配置文件统一管理,实时更新,所以出现了分布式配置中心组件。市面上开源的配置中心有很多,360的QConf、淘宝的diamond、百度的disconf都是解决这类问题。国外也有很多开源的配置中心Apache的Apache Commons Configuration等。SpringCloud中选用的是SpringCloud Config。
SpringCloud Config分为Config Server和Config Client两部分,为分布式系统外部化配置提供了支持。 由于Config Server和Config Client都实现了对Spring Environment和PropertySource抽象的映射,因此SpringCloud Config非常适合Spring应用程序,当然也可与其他语言应用程序配合使用。
Config Server是一个可横向扩展、集中式的配置服务器,它用于集中管理应用程序各个环境下的配置(开发,测试,生产,灰度),默认使用Git存储配置内容(也可使用Subversion、本地文件系统或Vault存储配置),因此可以方便的实现对配置的版本控制与内容审计。 Config Client 是Config Server的客户端,用于操作存储在Config Server中的配置属性。
SpringCloud Config带来的便利
1、集中管理配置,通过Config来对集群中所有组件服务的配置信息进行集中管理;
2、争对不同的环境进行不同的配置(开发,联调,测试,灰度,生产);
3、运行期间可动态调整,根据服务器的负载情况动态的设置连接池信息或者熔断阈值;
4、配置修改后,不需要关闭服务可自动更新配置;
SpringCloud Config入门
1、申请一个自己的git仓库,将测试项目得yml或properties文件上传至Git目录;
2、构建Config Service
<!-- 1、引入Jar包 -->
<dependency>
    <groupId>org.springframework.cloud</groupId>
    <artifactId>spring-cloud-config-server</artifactId>
</dependency>

<!-- 2、配置属性信息 -->
server:
  port: 9005
spring:
  application:
    name: ms-cfg-service
  cloud:
    config:
      server:
        git:
          uri: https://gitee.com/******/springcloudconfig.git
          username: ******
          password: ******

<!-- 3、加注解@EnableConfigServer -->
@SpringBootApplication
@EnableConfigServer
public class ConfigServiceApplication {

    public static void main(String[] args) {
        SpringApplication.run(ConfigServiceApplication.class, args);
    }
}
备注:配置文件有三种访问方式,分别是:
1)通过application-{profiles}.yml来访问,eg:http://localhost:8080/application-dev.yml
2)通过/application/{profiles}/{lable}来访问, eg:http://localhost:8080/application/dev/master
3)通过/{lable}/application-{profiles}.yml来访问,eg:http://localhost:8080/master/application-dev.yml
3、构建Config Client
<!-- 1. 引入Jar包 -->
<dependency>
    <groupId>org.springframework.cloud</groupId>
    <artifactId>spring-cloud-starter-config</artifactId>
</dependency>

<!-- 2. 创建配置文件bootstrap.yml -->
spring:
  application:
    name: application
  cloud:
    config:
      uri: http://localhost:8080/
      profile: dev
      label: master
备注: spring.application.name 对应访问规则中的{application}
spring.cloud.config.profile 对应访问规则中的{profiles}
spring.cloud.config.label 对应访问规则中的{lable}
SpringCloud config的常规用法
我们定义一个openTest开关,来控制业务逻辑代码走新的逻辑分支还是走老的业务逻辑分支
方法一:
<!-- 1、在属性文件中定义一个变量 -->
ycdhz.openTest=dev

<!-- 2、在代码中通过@Value注解引用 -->
@Value("${ycdhz.openTest}")
private String openTest;

public void findInfo(){
    if(openTest.equal("dev")){
        System.out.print("开发环境")
    } else if (openTest.equal("test")){
        System.out.print("测试环境")
    } else {
        System.out.print("生产环境")
    }
}

<!-- 3、修改属性文件,重启生效-->
方法二:
<!-- 1、再Client端工程,引入jar包 -->
<dependency>
    <groupId>org.springframework.boot</groupId>
    <artifactId>spring-boot-starter-actuator</artifactId>
</dependency>

<!-- 2、再Client端工程,开启refresh的监控端点 -->
management:
  endpoints:
    web:
      exposure:
        include: "*"   开启所有的端点

<!-- 3、在读取配置文件中的类上加入@RefreshScope -->
@RestController
@RequestMapping("/order")
@RefreshScope
public class OrderController {

    @Value("${openTest}")
    private String openTest;
}

<!-- 4、在git上修改openTest的配置文件 -->
通过Post请求,执行http://localhost:8001/actuator/refresh刷新接口
备注:不在需要重启,只需要通过Post执行刷新方法即可。但是当需要在集群中大面积修改的情况下依旧很繁琐,需要对每一个服务进行刷新。
方法三:
配置Config Client
<!-- 1、在client端工程,引入jar包 -->
<dependency>
    <groupId>org.springframework.cloud</groupId>
    <artifactId>spring-cloud-starter-bus-amqp</artifactId>
</dependency>

<dependency>
    <groupId>org.springframework.boot</groupId>
    <artifactId>spring-boot-starter-actuator</artifactId>
</dependency>

<!-- 2、在client端工程,配置属性 -->
spring:
  application:
    name: application
  cloud:
    config:
      uri: http://localhost:9000/
      label: master
  rabbitmq:
    host: ****IP地址****
    port: ****端口号****
    virtual-host: ****host名****
    username: root
    password: root
    connection-timeout: 10000
    template:
      mandatory: true
management:
  endpoints:
    web:
      exposure:
        include: "*"
  server:
    port: 8080
配置 config Service
<!-- 1、在Service端工程,引入jar包 -->
<dependency>
<groupId>org.springframework.cloud</groupId>
<artifactId>spring-cloud-starter-bus-amqp</artifactId>
</dependency>
<dependency>
<groupId>org.springframework.boot</groupId>
<artifactId>spring-boot-starter-actuator</artifactId>
</dependency>
<!-- 2、在Service端工程,配置属性 -->
server:
port: 9000
spring:
application:
name: ms-cfg-service
cloud:
config:
server:
git:
uri: https://gitee.com/******/springcloudconfig.git
username: ******
password: ******
rabbitmq:
host: ****IP地址****
port: ****端口号****
virtual-host: ****host名****
username: root
password: root
connection-timeout: 10000
template:
mandatory: true
<!-- 3、在Git上更新配置信息,访问bus-refresh刷新服务配置 -->
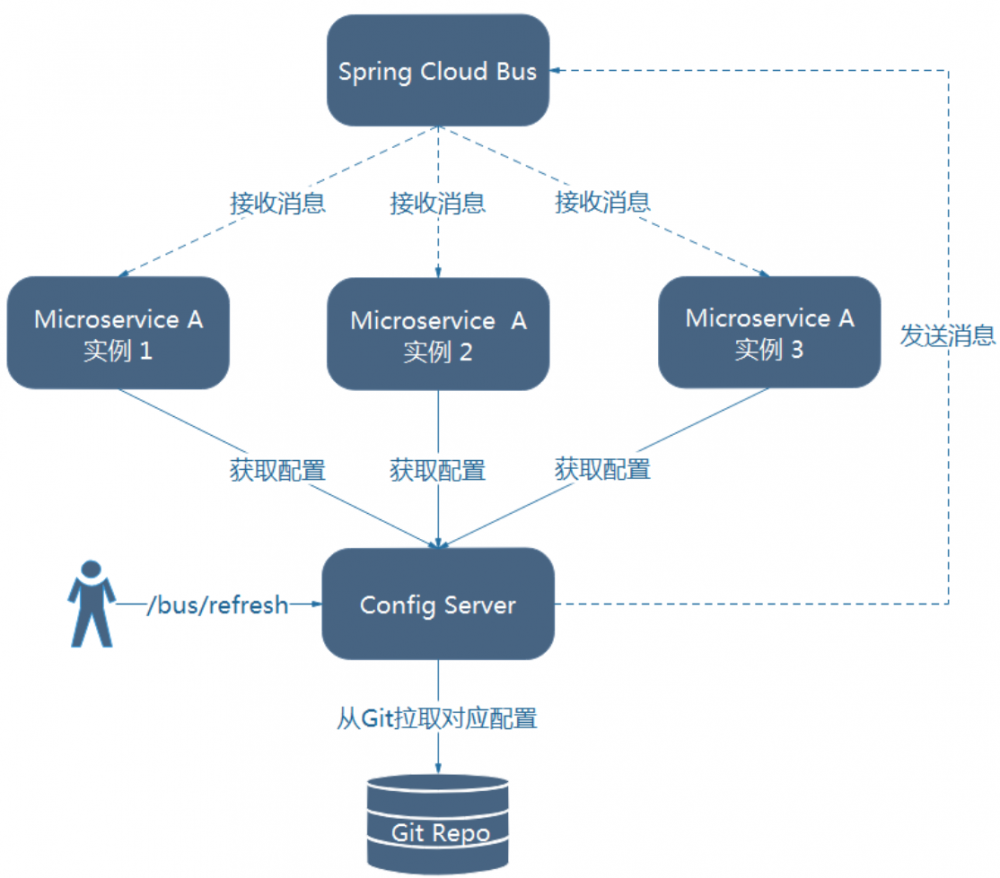
访问监控端点http://localhost:9000/actuator/bus-refresh刷新所有服务的配置信息
备注:使用消息总线bus来实现,不再需要去争对一个个服务组件做刷新。原理如图:
正文到此结束
- 本文标签: 文件上传 apache Word springboot 测试环境 管理 开源 测试 MQ 集群 Config Server value spring http https 分布式 连接池 Bootstrap 百度 服务器 IO cat springcloud HTML 目录 src git id amqp UI 开发 root Service find 分布式系统 App client ip Master 配置 bus REST web Property tar rabbitmq 代码 Connection 端口 文件系统 map 配置中心
- 版权声明: 本文为互联网转载文章,出处已在文章中说明(部分除外)。如果侵权,请联系本站长删除,谢谢。
- 本文海报: 生成海报一 生成海报二
热门推荐


相关文章

近期评论
-
收到
-
https://www.liuhaihua.cn/archives/40657.html 这篇博客中的图片打不开了
-
不会英语啊。
-
-
-
https://pplx.ai/floraliu4199466 这个链接打不开是什么原因?
-
-
-
-
来看看,最近更新了一波,顺着友联过来的,几年过去了,网站越搞越好,厉害
Loading...
![[HBLOG]公众号](https://www.liuhaihua.cn/img/qrcode_gzh.jpg)

