Forge 能量系统简述(四)
在这一讲和下一讲我们将制造一个作为导线的方块。
这一讲我们将从作为方块的导线着手(换言之只是一个空壳子),而下一讲我们将着重介绍作为能量传输载体的导线。
添加方块和方块实体
以下是方块类的基础实现:
@Mod.EventBusSubscriber(bus = Mod.EventBusSubscriber.Bus.MOD)
public class FEDemoWireBlock extends Block
{
    public static final String NAME = "fedemo:wire";

    @ObjectHolder(NAME)
    public static FEDemoWireBlock BLOCK;

    @SubscribeEvent
    public static void onRegisterBlock(@Nonnull RegistryEvent.Register<Block> event)
    {
        FEDemo.LOGGER.info("Registering wire block ...");
        event.getRegistry().register(new FEDemoWireBlock().setRegistryName(NAME));
    }

    @SubscribeEvent
    public static void onRegisterItem(@Nonnull RegistryEvent.Register<Item> event)
    {
        FEDemo.LOGGER.info("Registering wire item ...");
        event.getRegistry().register(new BlockItem(BLOCK, new Item.Properties().group(ItemGroup.MISC)).setRegistryName(NAME));
    }

    private FEDemoWireBlock()
    {
        super(Block.Properties.create(Material.GLASS).hardnessAndResistance(2));
    }

    @Override
    public boolean hasTileEntity(@Nonnull BlockState state)
    {
        return true;
    }

    @Override
    public TileEntity createTileEntity(@Nonnull BlockState state, @Nonnull IBlockReader world)
    {
        return FEDemoWireTileEntity.TILE_ENTITY_TYPE.create();
    }
}
以下是方块实体类的基础实现:
@Mod.EventBusSubscriber(bus = Mod.EventBusSubscriber.Bus.MOD)
public class FEDemoWireTileEntity extends TileEntity
{
    public static final String NAME = "fedemo:wire";

    @ObjectHolder(NAME)
    public static TileEntityType<FEDemoWireTileEntity> TILE_ENTITY_TYPE;

    @SubscribeEvent
    public static void onRegisterTileEntityType(@Nonnull RegistryEvent.Register<TileEntityType<?>> event)
    {
        FEDemo.LOGGER.info("Registering wire tile entity type ...");
        event.getRegistry().register(TileEntityType.Builder.create(FEDemoWireTileEntity::new, FEDemoWireBlock.BLOCK).build(DSL.remainderType()).setRegistryName(NAME));
    }

    private FEDemoWireTileEntity()
    {
        super(TILE_ENTITY_TYPE);
    }
}
我们还可以在 en_us,json 给方块起个名字:
"block.fedemo.wire": "FE Energy Transmission Conduit"
本讲接下来将不会涉及到方块实体的任何内容(放到下一讲进行)。
方块状态
由于导线在和周围连通时的状态会随着周边环境有所不同,因此我们需要为同一个导线指定不同的方块状态( BlockState )。每个方块状态都是特定属性( Property )和对应值的结合,我们需要声明导线在六个方向的连接状态,因此我们需要共六个描述方块状态属性。这六个属性都可以在 BlockStateProperties 类里找到,我们为这六个属性建立一个针对方向的映射表:
public static final Map<Direction, BooleanProperty> PROPERTY_MAP;

static
{
    Map<Direction, BooleanProperty> map = Maps.newEnumMap(Direction.class);
    map.put(Direction.NORTH, BlockStateProperties.NORTH);
    map.put(Direction.EAST, BlockStateProperties.EAST);
    map.put(Direction.SOUTH, BlockStateProperties.SOUTH);
    map.put(Direction.WEST, BlockStateProperties.WEST);
    map.put(Direction.UP, BlockStateProperties.UP);
    map.put(Direction.DOWN, BlockStateProperties.DOWN);
    PROPERTY_MAP = Collections.unmodifiableMap(map);
}
接下来我们需要覆盖 fillStateContainer 方法,用来声明该方块拥有以上全部六个属性:
@Override
protected void fillStateContainer(@Nonnull StateContainer.Builder<Block, BlockState> builder)
{
    builder.add(PROPERTY_MAP.values().toArray(new IProperty<?>[0]));
    super.fillStateContainer(builder);
}
StateContainer.Builder 的 add 方法需要传入变长参数,因此这里直接构造并传入了一个数组。
接下来我们需要在特定场合自动调整方块状态,我们需要:
- 在放置该方块时调整方块状态
- 在该方块周围的方块发生变动时调整方块状态
前者对应 getStateForPlacement 方法,后者对应 updatePostPlacement 方法。我们覆盖这两个方法:
@Override
public BlockState getStateForPlacement(@Nonnull BlockItemUseContext context)
{
    BlockState state = this.getDefaultState();
    for (Direction facing : Direction.values())
    {
        World world = context.getWorld();
        BlockPos facingPos = context.getPos().offset(facing);
        BlockState facingState = world.getBlockState(facingPos);
        state = state.with(PROPERTY_MAP.get(facing), this.canConnect(world, facing.getOpposite(), facingPos, facingState));
    }
    return state;
}

@Nonnull
@Override
@SuppressWarnings("deprecation")
public BlockState updatePostPlacement(@Nonnull BlockState state, @Nonnull Direction facing, @Nonnull BlockState facingState, @Nonnull IWorld world, @Nonnull BlockPos pos, @Nonnull BlockPos facingPos)
{
    return state.with(PROPERTY_MAP.get(facing), this.canConnect(world, facing.getOpposite(), facingPos, facingState));
}

private boolean canConnect(@Nonnull IWorld world, @Nonnull Direction facing, @Nonnull BlockPos pos, @Nonnull BlockState state)
{
    return false; // TODO
}
前者我们需要对六个方向分别检查属性值,而后者我们只需要对受到影响的方向检查就可以了。
我们对连接状态的检查主要分为两部分:
- 检查连接的是不是我们的导线
- 检查连接的方块是否有能量相关的 Capability
private boolean canConnect(@Nonnull IWorld world, @Nonnull Direction facing, @Nonnull BlockPos pos, @Nonnull BlockState state)
{
    if (!state.getBlock().equals(BLOCK))
    {
        TileEntity tileEntity = world.getTileEntity(pos);
        return tileEntity != null && tileEntity.getCapability(CapabilityEnergy.ENERGY, facing).isPresent();
    }
    return true;
}
方块材质
如果考虑所有的方块状态,一个导线甚至能够有多达 64 个方块状态。如果我们为每一个方块状态都指定一次材质和模型,那这注定会带来很大的工作量。
不过,原版 Minecraft 提供了 multipart 机制,能够让我们为每个属性指定独有的一部分模型和材质,然后将每个属性所指定的拼合起来。
以下是我们的整个方块状态 JSON:
{
  "multipart": [
    {
      "apply": {
        "model": "fedemo:block/wire_core"
      }
    },
    {
      "when": {
        "north": "true"
      },
      "apply": {
        "model": "fedemo:block/wire_part"
      }
    },
    {
      "when": {
        "east": "true"
      },
      "apply": {
        "model": "fedemo:block/wire_part",
        "y": 90
      }
    },
    {
      "when": {
        "south": "true"
      },
      "apply": {
        "model": "fedemo:block/wire_part",
        "y": 180
      }
    },
    {
      "when": {
        "west": "true"
      },
      "apply": {
        "model": "fedemo:block/wire_part",
        "y": 270
      }
    },
    {
      "when": {
        "up": "true"
      },
      "apply": {
        "model": "fedemo:block/wire_part",
        "x": 270
      }
    },
    {
      "when": {
        "down": "true"
      },
      "apply": {
        "model": "fedemo:block/wire_part",
        "x": 90
      }
    }
  ]
}
fedemo:block/wire_core
fedemo:block/wire_part
不同的连接方向属性所引用的 JSON 是相同的,但旋转方向有细微的差别(注意是顺时针):
north
east
south
west
up
down
现在我们需要制作一个代表核心的 wire_core.json :
{
  "parent": "block/block",
  "ambientocclusion": false,
  "textures": {
    "wire": "fedemo:block/wire_core_part",
    "particle": "fedemo:block/wire_core_part"
  },
  "elements": [
    {
      "from": [5, 5, 5],
      "to": [11, 11, 11],
      "faces": {
        "north": {
          "uv": [7, 7, 13, 13],
          "texture": "#wire"
        },
        "east": {
          "uv": [7, 7, 13, 13],
          "texture": "#wire"
        },
        "south": {
          "uv": [7, 7, 13, 13],
          "texture": "#wire"
        },
        "west": {
          "uv": [7, 7, 13, 13],
          "texture": "#wire"
        },
        "up": {
          "uv": [7, 7, 13, 13],
          "texture": "#wire"
        },
        "down": {
          "uv": [7, 7, 13, 13],
          "texture": "#wire"
        }
      }
    }
  ]
}
和一个代表连接状态的 wire_part.json :
{
  "ambientocclusion": false,
  "textures": {
    "wire": "fedemo:block/wire_core_part",
    "particle": "fedemo:block/wire_core_part"
  },
  "elements": [
    {
      "from": [6, 6, 0],
      "to": [10, 10, 7],
      "faces": {
        "north": {
          "uv": [3, 3, 7, 7],
          "texture": "#wire"
        },
        "east": {
          "uv": [6, 3, 13, 7],
          "texture": "#wire"
        },
        "west": {
          "uv": [6, 3, 13, 7],
          "texture": "#wire"
        },
        "up": {
          "uv": [3, 6, 7, 13],
          "texture": "#wire"
        },
        "down": {
          "uv": [3, 6, 7, 13],
          "texture": "#wire"
        }
      }
    }
  ]
}
两个 JSON 引用的是同一个材质(见下图 wire_core_part.png ):
最后别忘了添加描述物品材质的 JSON:
{
  "parent": "fedemo:block/wire_core"
}
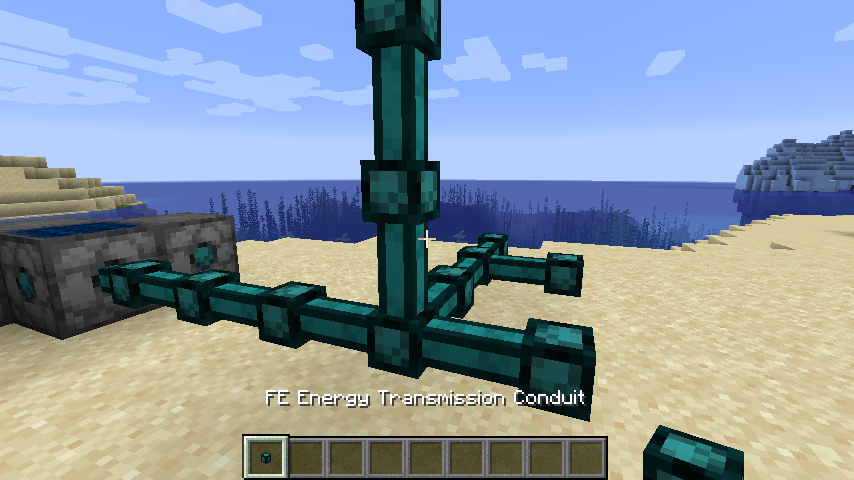
现在我们可以打开游戏看看效果了:
方块碰撞箱和选择框
由于导线是不完整方块,因此我们需要指定方块的碰撞箱和选择框的形态。
我们先从碰撞箱开始,我们需要覆盖 getCollisionShape 方法:
@Nonnull
@Override
@SuppressWarnings("deprecation")
public VoxelShape getCollisionShape(@Nonnull BlockState state, @Nonnull IBlockReader world, @Nonnull BlockPos pos, @Nonnull ISelectionContext context)
{
    return VoxelShapes.empty();
}
这里设置的是没有碰撞箱,读者也可以根据自己的喜好设置成其他的碰撞箱。
然后是选择框,我们在这里这里需要覆盖 getShape 方法:
@Nonnull
@Override
@SuppressWarnings("deprecation")
public VoxelShape getShape(@Nonnull BlockState state, @Nonnull IBlockReader world, @Nonnull BlockPos pos, @Nonnull ISelectionContext context)
{
    return Block.makeCuboidShape(4, 4, 4, 12, 12, 12);
}
我们已经在第二讲接触过碰撞箱的相关内容了,这里的设置大同小异。
这里设置的选择框比导线核心大了一圈,现在可以打开游戏看看了。

代码清单
这一部分添加的文件有:
src/main/java/com/github/ustc_zzzz/fedemo/block/FEDemoWireBlock.java
src/main/java/com/github/ustc_zzzz/fedemo/tileentity/FEDemoWireTileEntity.java
src/main/resources/assets/fedemo/blockstates/wire.json
src/main/resources/assets/fedemo/models/block/wire_core.json
src/main/resources/assets/fedemo/models/block/wire_part.json
src/main/resources/assets/fedemo/models/item/wire.json
src/main/resources/assets/fedemo/textures/block/wire_core_part.png
这一部分修改的文件有:
-
src/main/resources/assets/fedemo/lang/en_us.json
正文到此结束
热门推荐


相关文章

近期评论
-
收到
-
https://www.liuhaihua.cn/archives/40657.html 这篇博客中的图片打不开了
-
不会英语啊。
-
-
-
https://pplx.ai/floraliu4199466 这个链接打不开是什么原因?
-
-
-
-
来看看,最近更新了一波,顺着友联过来的,几年过去了,网站越搞越好,厉害
Loading...
![[HBLOG]公众号](https://www.liuhaihua.cn/img/qrcode_gzh.jpg)

