只需要6个步骤,springboot集成shiro,并完成登录
小Hub领读:
导入jar包,配置yml参数,编写ShiroConfig定义DefaultWebSecurityManager,重写Realm,编写controller,编写页面,一气呵成。搞定,是个高手~
上面一篇文章中,我们已经知道了shiro的认证与授权过程,这也是shiro里面最核心常用的基础功能。现在我们把shiro集成到我们的项目中,开始搭建一个有认证和权限体系的项目,比如用户中心需要登录之后才能访问等!
1、极简入门,Shiro的认证与授权流程解析
集成Shiro
根据官方文档:
https://shiro.apache.org/spring-boot.html第一步:集成导入jar包:
<dependency>
    <groupId>org.apache.shiro</groupId>
    <artifactId>shiro-spring-boot-web-starter</artifactId>
    <version>1.4.2</version>
</dependency>
有些同学还在用 shiro-spring 的jar包,但是集成的配置就相对多一点,所以可以直接使用starter包更加方便。
第二步:写好配置,官方给我们提供的属性参数,以及一些默认值,如果不符合我们的需求,可以自行改动哈。

从配置上就可以看出,shiro的注解功能,rememberMe等功能已近自动集成进来了。所以starter包使用起来还是非常简单的,只需要熟悉shiro的流程,从0开发不在话下哈。
- application.yml
shiro:
  web:
    enabled: true
  loginUrl: /login
spring:
  freemarker:
    suffix: .ftl # 注意新版本后缀是 .ftlh
    template-loader-path: classpath:/templates/
    settings:
      classic_compatible: true #处理空值
上面的配置,我就改了一下登录的url,其他都是使用默认的,作为我们最简单的测试,相信你们。
第三步:配置shiro的securityManager和自定义realm。因为realm负责我们的认证与授权,所以是必须的,自定义的realm必须要交给securityManager管理,所以这两个类需要重写。然后还有一些资源的权限说明,所以一般需要定义ShiroFilterChainDefinition,所以有3个类我们常写的:
- AuthorizingRealm
- DefaultWebSecurityManager shiro的核心管理器
- ShiroFilterChainDefinition 过滤器链配置
@Configuration
public class ShiroConfig {

    @Bean
    AccountRealm accountRealm() {
        return new AccountRealm();
    }

    @Bean
    public DefaultWebSecurityManager securityManager(AccountRealm accountRealm) {
        DefaultWebSecurityManager securityManager = new DefaultWebSecurityManager();
        securityManager.setRealm(accountRealm);
        return securityManager;
    }

    @Bean
    public ShiroFilterChainDefinition shiroFilterChainDefinition() {
        DefaultShiroFilterChainDefinition chainDefinition = new DefaultShiroFilterChainDefinition();

        // logged in users with the 'admin' role
        chainDefinition.addPathDefinition("/admin/**", "authc, roles[admin]");

        // logged in users with the 'document:read' permission
        chainDefinition.addPathDefinition("/docs/**", "authc, perms[document:read]");

        chainDefinition.addPathDefinition("/login", "anon");
        chainDefinition.addPathDefinition("/doLogin", "anon");

        // all other paths require a logged in user
        chainDefinition.addPathDefinition("/**", "authc");
        return chainDefinition;
    }
}
上面说到ShiroFilterChainDefinition是定义过滤器配置的,啥意思呢,我们来看看其中一句:
chainDefinition.addPathDefinition("/admin/**", "authc, roles[admin]");
这一句代码意思是说:访问 /admin/** 开头的链接,都需要已经完成登录认证 authc 、并且拥有 admin 角色权限才能访问。
你可以看到key-value是 链接-过滤器 的组合,过滤器可以同时多个。那么authc、role、perms、anon到底是哪来的呢?有啥特殊意义?是啥拦截器?
我们来看下这个说明文档:
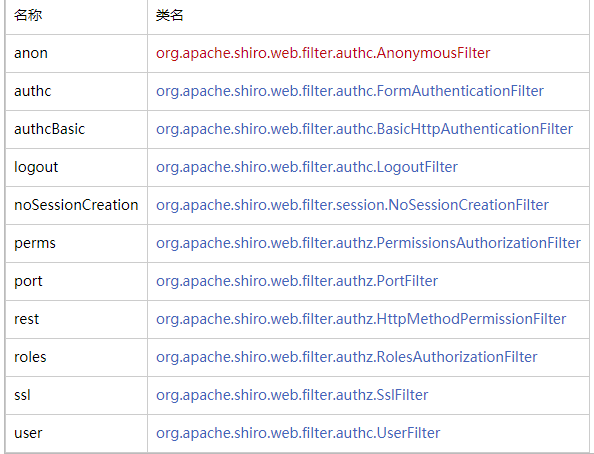
可以看到,其实每个简写单词,都是一个过滤器的名称。比如authc代表这 FormAuthenticationFilter 。每个过滤器具体是啥用的?我们看几个常用的吧:
- authc 基于表单的拦截器,没有登录会跳到相应的登录页面登录
- user 用户拦截器,用户已经身份验证 / 记住我登录的都可
- anon 匿名拦截器,即不需要登录即可访问
- roles 角色授权拦截器,验证用户是否拥有所有角色
- perms 权限授权拦截器,验证用户是否拥有所有权限
第四步:第ok,根据需求项目的资源制定项目过滤器链 ShiroFilterChainDefinition 。我们再回到AccountRealm这个类。我们之前说过,认证授权的过程,我们是在Realm里面完成的。所以我们需要继承Realm,并实现两个方法。
但是这里需要注意,我们一般不直接继承 Realm ,可以看看Realm接口:
- org.apache.shiro.realm.Realm
public interface Realm {
    String getName();

    boolean supports(AuthenticationToken token);

    AuthenticationInfo getAuthenticationInfo(AuthenticationToken token) throws AuthenticationException;

}
而从上一篇文章中,我们分析的认证授权的源码过程时候,你会看到,认证和授权分别调用的realm是 AuthenticatingRealm 和 AuthorizingRealm 。说明源码里面已经经过了一些封装,所以我们就不能再直接继承 Realm ,那么 AuthenticatingRealm 和 AuthorizingRealm 我们继承哪个呢?我们发现 AuthorizingRealm 是继承 AuthenticatingRealm 的,所以在重写realm的时候,我们只需要集成超类 AuthorizingRealm 即可。
public abstract class AuthorizingRealm extends AuthenticatingRealm
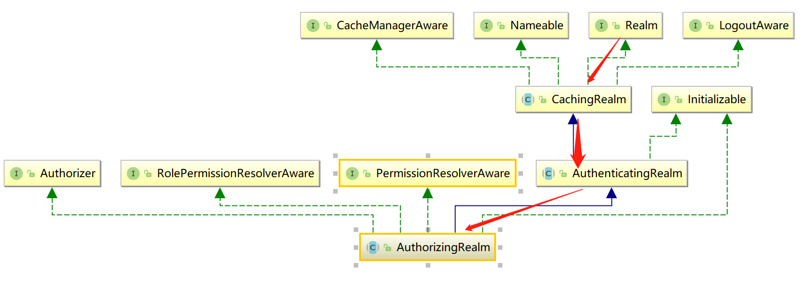
所以,结合了授权与验证,还有缓存功能,我们自定义Realm的时候继承AuthorizingRealm即可。
- com.markerhub.shiro.AccountRealm
public class AccountRealm extends AuthorizingRealm {

    @Autowired
    UserService userService;

    /**
     * 授权方法
     */
    @Override
    protected AuthorizationInfo doGetAuthorizationInfo(PrincipalCollection principalCollection) {

        AccountProfile principal = (AccountProfile) principalCollection.getPrimaryPrincipal();

        // 硬编码(赋予用户权限或角色)
        if(principal.getUsername().equals("MarkerHub")){
            SimpleAuthorizationInfo info = new SimpleAuthorizationInfo();
            info.addRole("admin");
            return info;
        }

        return null;
    }

    /**
     * 认证方法
     */
    @Override
    protected AuthenticationInfo doGetAuthenticationInfo(AuthenticationToken authenticationToken) throws AuthenticationException {

        UsernamePasswordToken token = (UsernamePasswordToken) authenticationToken;
        AccountProfile profile = userService.login(token.getUsername(), String.valueOf(token.getPassword()));
        // 把用户信息存到session中,方便前端展示
        SecurityUtils.getSubject().getSession().setAttribute("profile", profile);

        SimpleAuthenticationInfo info = new SimpleAuthenticationInfo(profile, token.getCredentials(), getName());
        return info;
    }
}
- com.markerhub.service.impl.UserServiceImpl
@Service
public class UserServiceImpl implements UserService {

    @Override
    public AccountProfile login(String username, String password) {

        //TODO 查库,然后匹配密码是否正确!

        if(!"MarkerHub".equals(username)) {
            // 抛出shiro异常,方便通知用户登录错误信息
            throw new UnknownAccountException("用户不存在");
        }
        if(!"111111".equals(password)) {
            throw new IncorrectCredentialsException("密码错误");
        }

        AccountProfile profile = new AccountProfile();
        profile.setId(1L);
        profile.setUsername("MarkerHub");
        profile.setSign("欢迎关注公众号MarkerHub哈");

        return profile;
    }
}
上面代码中,我login方法直接给出了账号MarkerHub,并赋予了角色admin。
第五步:ok,准备动作已经热身完毕,接下来我们去编写登录、退出接口,以及我们的界面:
- com.markerhub.controller.IndexController
@Controller
public class IndexController {

    @Autowired
    HttpServletRequest req;

    @RequestMapping({"/", "/index"})
    public String index() {
        System.out.println("已登录,正在访问!!");
        return "index";
    }

    @GetMapping("/login")
    public String login() {
        return "login";
    }

    /**
     * 登录
     */
    @PostMapping("/doLogin")
    public String doLogin(String username, String password) {

        UsernamePasswordToken token = new UsernamePasswordToken(username, password);
        try {
            SecurityUtils.getSubject().login(token);

        } catch (AuthenticationException e) {
            if (e instanceof UnknownAccountException) {
                req.setAttribute("errorMess", "用户不存在");
            } else if (e instanceof LockedAccountException) {
                req.setAttribute("errorMess", "用户被禁用");
            } else if (e instanceof IncorrectCredentialsException) {
                req.setAttribute("errorMess", "密码错误");
            } else {
                req.setAttribute("errorMess", "用户认证失败");
            }
            return "/login";
        }
        return "redirect:/";
    }


    /**
     * 退出登录
     */
    @GetMapping("/logout")
    public String logout() {
        SecurityUtils.getSubject().logout();
        return "redirect:/login";
    }

}
第六步:登录页面:
- templates/login.ftl
<!DOCTYPE html>
<html lang="en">
<head>
    <meta charset="utf-8"/>
    <title>MarkerHub 登录</title>
</head>
<body>
    <h1>用户登录</h1>
    <h3>欢迎关注公众号:MarkerHub</h3>

    <form method="post" action="/doLogin">
        username: <input name="username" type="text">
        password: <input name="password" type="password">
        <input type="submit" name="提交">
    </form>

    <div style="color: red;">${errorMess}</div>
</body>
</html>
登录成功页面:
- templates/index.ftl
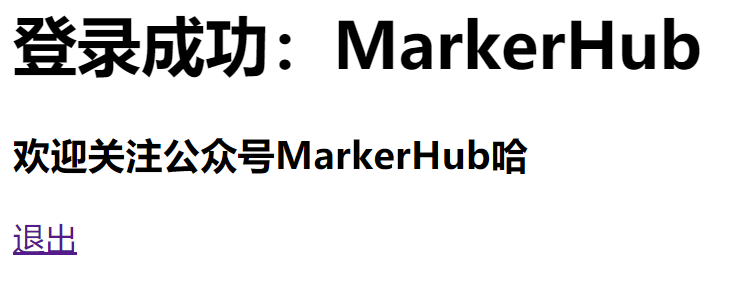
<h1>登录成功:${profile.username}</h1>
<h3>${profile.sign}</h3>

<div><a href="/logout">退出</a></div>
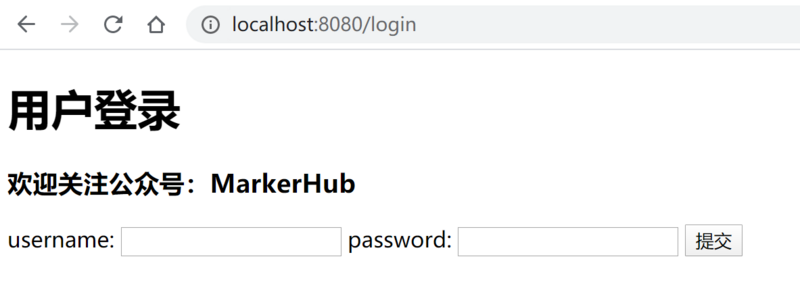
ok,代码我们已经编写完成,接下来,我们运行项目,然后访问首页,将自行跳转到登录页面,然后输入账号密码之后,我们可以看到完成登录!
登录界面:
登录成功页面:
结束语
好了,今天做了一个极简的登录注册功能,介绍了一下shiro的基本整合步骤。流程还是挺简单的哈哈,不知道你看懂了没。
而在一些负载均衡的场景中,我们的会话信息是需要共享的,所以shiro一般会和redis整合在一起,你知道怎么整合吗?我们明天再聊哈,记得来哦,MarkerHub每天发文时间19点20分。
附: demo git源码地址 : https://github.com/MarkerHub/...
正文到此结束
- 本文标签: CEO web src 负载均衡 Freemarker 管理 token Document 认证 1111 map ORM 时间 apache 开发 https Security IDE springboot 解析 源码 ACE cat bean 需求 缓存 spring 参数 git Authorization redis id HTML classpath Word tar Service 代码 equals rmi value ip 用户中心 UI Collection App 测试 http Action GitHub session logo key servlet 文章 配置 IO
- 版权声明: 本文为互联网转载文章,出处已在文章中说明(部分除外)。如果侵权,请联系本站长删除,谢谢。
- 本文海报: 生成海报一 生成海报二
热门推荐


相关文章

近期评论
-
谢谢
-
https://www.newcmy.com/register?aff=HBVX建议您试试草莓云机场,可以流畅观看youtube和tiktok,上reddit/x也没有问题,还有各种ai优化节点。
-
-
-
想购买您这个站,我的联系方式QQ741756694微信同步 能卖联系
-
-
-
-
-
https://www.liuhaihua.cn/archives/40657.html 这篇博客中的图片打不开了
Loading...
![[HBLOG]公众号](https://www.liuhaihua.cn/img/qrcode_gzh.jpg)

