如何在 vue 中封装好用不上火的一个列表条件过滤组件
平时工作中,想必你一定会遇到无数次列表需求,并且是带有搜索功能的列表需求,但不管怎么怎么样,请相信这一切都是万变不离其宗。
不信?请看:
- 可输入关键字进行搜索
- 可在下拉框中选择搜索条件
- 可以选择日期时间
- 可以勾选 的复选框
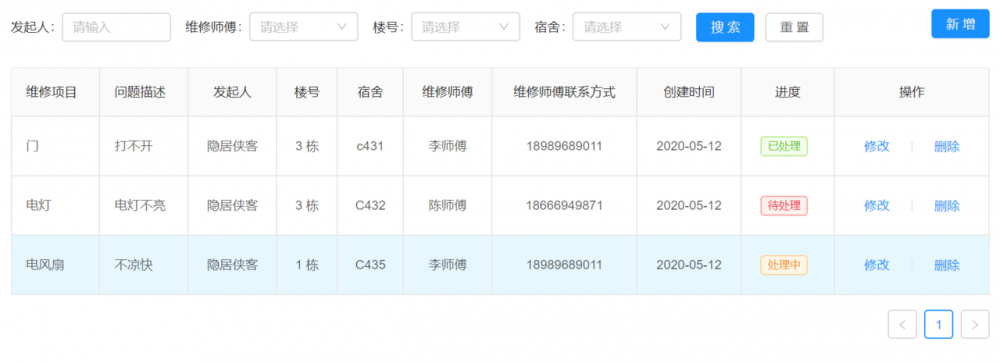
基本就是上面这些了吧?我们不妨看看下面这张截图:
本文所说的组件封装是指业务上的封装,而不是组件底层的封装,像这种底层封装的组件库很多,比如:antd、element。
正常套路
上面的截图也算是简单的了,只有一个两种类型,一个是输入框,一个是下拉框,但也足以说明问题了,回想一下,当你遇到这样的需求你会如何实现?一般地我们是不是会像下面这样写书:
<div class="container">
    <a-row>
      <a-col :span="20">
        <a-form class="search-form" layout="inline" @submit="search">
          <a-form-item label="维修项目">
            <a-input placeholder="请输入" />
          </a-form-item>
          <a-form-item label="维修师傅">
            <a-select placeholder="请选择">
              <a-select-option
                :value="item.id"
                :key="item.id"
                v-for="item of userOptions"
              >{{item.name}}</a-select-option>
            </a-select>
          </a-form-item>
          <a-form-item label="楼号">
            <a-select placeholder="请选择">
              <a-select-option
                :value="item.id"
                :key="item.id"
                v-for="item of floorOptions"
              >{{item.name}}</a-select-option>
            </a-select>
          </a-form-item>
          <a-form-item label="宿舍">
            <a-select placeholder="请选择">
              <a-select-option
                :value="item.id"
                :key="item.id"
                v-for="item of roomOptions"
              >{{item.name}}</a-select-option>
            </a-select>
          </a-form-item>
          <a-form-item class="button">
            <a-button class="offset-right-12" type="primary" html-type="submit">搜索</a-button>
            <a-button @click="reset">重置</a-button>
          </a-form-item>
        </a-form>
      </a-col>
      <a-col :span="4" class="text-right">
        <a-button type="primary" @click="showModal()">新增</a-button>
      </a-col>
    </a-row>
    <a-table
      class="offset-top-12"
      rowKey="id"
      :pagination="pagination"
      :loading="loading"
      bordered
      :columns="columns"
      :dataSource="dataList"
    >
      <span slot="visitDate" slot-scope="scope">{{scope.visitDate | date}}</span>
      <span slot="leaveDate" slot-scope="scope">{{scope.leaveDate | date}}</span>
      <span slot="createDate" slot-scope="scope">{{scope.createDate | date}}</span>
      <div slot="action" slot-scope="scope" class="text-right no-wrap">
        <a-button type="link" @click="showModal(scope)">修改</a-button>
        <a-divider type="vertical" />
        <a-button type="link" @click="deleteModal(scope.id)">删除</a-button>
      </div>
    </a-table>
  </div>
</template>
复制代码
示例基于 antd vue
如果过滤条件更多(常有的事),那么页面中的代码量更加惊人,整个页面弥漫着反客为主的味道,仅仅是过滤条件就已经占了整个页面的一半。
这会导致什么问题?
- 页面代码量过多
- 代码不好维护
- 无法对多个列表页面中的这些查询条件样式统一的修改(比如:样式)
- 即使不是修改这些查询条件,也会让你在维护时花更多的时间去定位代码
如果觉得页面代码时过多,不会对你在开发以及维护上产生过多的负面影响,但至少有一个理由我觉得你应该选择去把这些过滤条件进行封装,那就是如果不去对列表页过滤条件进行封装,若遇到统一修改这些过滤条件(不管是业务性的,还是样式及结构的)你就会变得很被动,瞬间从高大尚的脑力活变成了出力不讨好的苦力活。那么如何去封装呢?
- 我们可以把过滤条件里的所有可能都放到一个组件中,然后通过一个字段来判断到底要显示哪个
- 自定义键名(对于下拉框等场景需要,并且我们可以为其设置默认的
key,分别为:id,name) - 如何实现过滤条件的数据收集(用于接口请求的参数)
封装
组件有至少有两个参数以及两个事件。其中一个参数是用于遍历出过滤条件的一个数组,另一个是保存了所有查询参数的一个对象。
为什么分成两个参数,而不一个参数搞定。原因如下:
- 如果都放到一个参数里就会让组件思路不够清晰明,虽然说一个参数比两个参数更加方便,但对于开发者而言,需要兼顾效率的同时也要考虑到组件本身的封装及代码实现。
- 对于这个过滤组件来说,显示 UI 的数据及参数分开,可以让使用者更容易理解,这也是封装组件的一个必需要考虑细节之一。
两个事件分别是 search 和 rest ,这两个应该不用多说了。下面我们就先来看看封装好的条件过滤组件。
<template>
  <a-row>
    <a-col :span="20">
      <a-form class="search-form" :form="form" layout="inline" @submit="search">
        <a-form-item :label="item.name" v-for="(item, index) of items" :key="index">
          <a-input v-model="searchParams[item.key]" v-if="!item.type || item.type === 'input'" :placeholder="item.placeholder || '请输入'"/>
          <a-select allowClear v-model="searchParams[item.key]" v-else-if="item.type === 'select'" :placeholder="item.placeholder || '请选择'">
            <a-select-option
              :key="index"
              v-for="(option, index) of item.options"
              :value="option[item.optionValuekey || 'id']"
            >{{option[item.optionNamekey || 'name']}}</a-select-option>
          </a-select>
        </a-form-item>
        <a-form-item class="button">
          <a-button type="primary" html-type="submit">搜索</a-button>
          <a-button @click="reset">重置</a-button>
        </a-form-item>
      </a-form>
    </a-col>
    <a-col :span="4" class="text-right">
      <slot name="right-content"></slot>
    </a-col>
  </a-row>
</template>
<script>
import deepClone from "@/utils/deepClone";
/**
 * items 为过滤条件,可以在对应的项中自定义下拉选项的名称(optionNamekey)和值(optionValuekey)的键,默认分别取 name 和 id
 * items 如何要下拉框显示 placeholder,对应的下拉框的初始值可以设置为 undefined 或者 不定义查询参数,如果设置为空, placeholder 不会显示。
 * searchParams 为接口查询参数对象
 */
export default {
  model: {
    prop: 'searchParams',
    event: "change"
  },
  props: {
    searchParams: {
      type: Object,
      default: () => {
        return {};
      }
    },
    items: {
      type: Array,
      default: () => {
        return [];
      }
    }
  },
  data() {
    return {
      // 保存初始化时的项
      initSearchParams:{},
      form: this.$form.createForm(this, { name: "dynamic_search" })
    };
  },
  created() {
    this.init()
  },
  methods: {
    init(){
      // 保存初始值的
      this.initSearchParams = deepClone(this.searchParams)
    },
    search() {
      const cpValue = deepClone(this.searchParams)
      this.$emit("change", cpValue);
      this.$emit("search", cpValue);
    },
    reset() {
      const cpValue = deepClone(this.initSearchParams)
      this.$emit("change", cpValue);
      this.$emit("reset", cpValue);
    }
  }
};
</script>
<style lang="scss" scoped>
.search-form {
  @extend .offset-bottom-24;
  .ant-form-item {
    &.button {
      margin-right: 0;
      white-space: nowrap;
    }
    .ant-input {
      width: 120px;
    }
    .ant-select {
      min-width: 120px;
    }
    .ant-btn + .ant-btn {
      @extend .offset-left-12;
    }
  }
}
</style>
复制代码
上面的这个组件只是包涵了两各情况(输入框,下拉框),其它的话可以自己按需添加。 deepClone() 方法为深度拷贝。为会把需要深度拷贝?原因如下:
searchParams
组件接收两个 prop 属性
-
items是用以保存用于渲染过滤条件的一个数据。 -
searchParams初始化及收集请求接口参数,这个参数实现了双向绑定,配合v-model使用。
如何使用
用法就很简单了,引入,调用,传参:
<template>
  <div class="container">
    <search-form :items="searchForm" v-model="searchParams" @search="findRepair">
      <a-button slot="right-content" type="primary" @click="showModal()">新增</a-button>
    </search-form>
    <a-table
      rowKey="id"
      :pagination="pagination"
      :loading="loading"
      bordered
      :columns="columns"
      :dataSource="dataList"
    >
      <template slot="createDate" slot-scope="createDate">{{createDate | date }}</template>
      <a-tag :color="scheduleMap[scope.schedule].color" slot="schedule" slot-scope="scope">{{ scheduleMap[scope.schedule].name }}</a-tag>
      <div slot="action" slot-scope="scope" class="text-right no-wrap">
        <a-button type="link" @click="showModal(scope)">修改</a-button>
        <a-divider type="vertical" />
        <a-button type="link" @click="deleteModal(scope.id)">删除</a-button>
      </div>
    </a-table>
    <EditModal ref="EditModal"></EditModal>
  </div>
</template>
复制代码
然后在 data 中定义两个 searchForm 和 searchParams
data() {
    return {
      searchForm: [
        { name: "发起人", key: "name" },
        { name: "维修师傅", key: "repairerId", type: "select", options: [] },
        { name: "楼号", key: "floorId", type: "select", options: [] },
        { name: "宿舍", key: "roomId", type: "select", options: [] }
      ],
      searchParams: {
        pageNo: 1,
        pageSize: 15,
        name: "",
        repairerId: undefined,
        floorId: undefined,
        roomId: undefined
      }
    };
  },
复制代码
searchParams 对象中有三个字段的值设置为 undefined ,这三个属性是用于收集下拉框的选中值,所以不可以给空字符串,而如果你不想这么写,你也可能直接写成:
searchParams: {
  pageNo: 1,
  pageSize: 15,
  name: ""
}
复制代码
两种方式都可能,不过第一种方式相对来说会比较好一些,就是一看就知道这接口的请求参数都有哪些,有时写代码真的不能过于含蓄,要直白一点,毕竟公司里都是团队模式开发,要让改你代码的年轻小伙也能享受到如鱼得水感觉,并且可以让类似:“前人种树,后人乘凉” 这样的佳句一直传承下去,而不是让后来者接连 ***,何乐而不为呢。
正文到此结束
热门推荐


相关文章

近期评论
-
ws0132613@gmail.comhttps://getmacos.com/gopanel/william smith
-
谢谢
-
https://www.newcmy.com/register?aff=HBVX建议您试试草莓云机场,可以流畅观看youtube和tiktok,上reddit/x也没有问题,还有各种ai优化节点。
-
-
-
想购买您这个站,我的联系方式QQ741756694微信同步 能卖联系
-
-
-
-
Loading...
![[HBLOG]公众号](https://www.liuhaihua.cn/img/qrcode_gzh.jpg)

