分享使用Go案例开发到持续集成整个过程
分享一个使用 Go 编写的极简单的Demo案例,为什么要分享呢?涉及到几个小知识点
Go mod
1. Go mod 如何使用
我们准备一个apis模块,在该模块中实现一个打印字符串的函数 Says(str string) :所以
mkdir apis
cat << EOF > ./apis.go
package apis

import "fmt"

func Says(str string) {
    fmt.Printf("hello,%s", name)
}
然后我们初始化一下 go mod
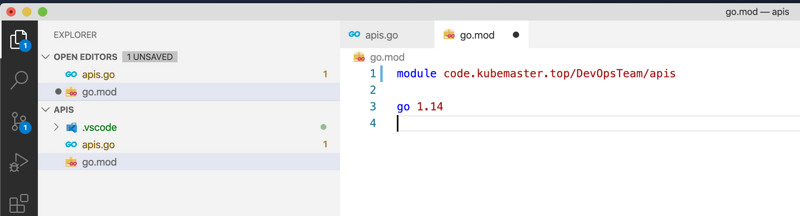
go env -w GO111MODULE="auto"
go mod init code.kubemaster.top/DevOpsTeam/apis
# 此时查看一下mod文件的内容为:
cat go.mod
module code.kubemaster.top/DevOpsTeam/apis

go 1.14
然后工作区内生成一个 go.mod 文件
然后我们初始化提交到代码仓库中即可,代码仓库的地址为 https://code.kubemaster.top/DevOpsTeam/apis.git ,
2. 如何导入包
接下来应该编写Demo了,Demo依赖 apis 模块实现功能,Demo的文件名为 main.go :
package main

import "code.kubemaster.top/DevOpsTeam/apis"

func main() {
    apis.Says("云原生·生态圈/n")
}
这里有个注意的地方:
当程序调用的模块与模块的文件名不一致的时候,需要通过 别名 引入,否则直接 import 即可:
# 实际上模块名为apis,但是此处文件名是api,所以需要通过别名解决
import m_api "code.kubemaster.top/DevOpsTeam/api"
当需要运行和构建 main.go 的时候:
go get -insecure code.kubemaster.top/DevOpsTeam/apis
go run main.go
到这里基本上就明确 go mod 的基础使用了,然后我们将其提交代码到代码仓库: https://code.kubemaster.top/DevOpsTeam/goci.git 。
3. 应该怎样构建Go程序
使用Docker构建镜像,首先要准备一个 Dockerfile ,仔细思考一下,Go编写的程序会直接编译成指定编译架构的二进制文件,所以我们可以通过分层构建的方式首先在Go的环境中进行构建,再把构建后的二进制文件拷贝到微小镜像内,以便减小镜像的体积,下面写了一个Dockerfile的案例:
FROM golang:1.14 as builder
WORKDIR /go/src/code.kubemaster.top/DevOpsTeam/demos/
ARG ARCH="amd64"
ARG OS="linux"
COPY main.go .
RUN go get -insecure code.kubemaster.top/DevOpsTeam/apis && /
    CGO_ENABLED=0 GOOS=linux go build -a -installsuffix cgo -o main .

FROM alpine:latest
WORKDIR /root/
COPY --from=builder /go/src/code.kubemaster.top/DevOpsTeam/demos/ .
CMD [ "./main" ]
在镜像编译后,镜像的体积为 7.69M ,在 Dockerfile 准备好之后,我们把Dockerfile提交到 goci 的代码仓库内。下面我们就可以配置一下Jenkinsfile,以便于我们持续构建了
4. 通过Jenkinsfile实现持续构建
这里简单的通过脚本式 pipeline 实现服务的持续构建,很简单,但也是一个完整的基础框架:
pipeline {
agent any
environment {
registry = "registry-vpc.cn-beijing.aliyuncs.com/kubemaster/gocodecitestdemo"
registryCredential = '854bfe2f-7923-48a5-9156-7be54cc38a88'
}
stages {
stage('Cloning Git') {
steps {
git 'https://code.kubemaster.top/DevOpsTeam/goci.git'
}
}
stage('Building image') {
steps{
script {
dockerImage = docker.build registry + ":$BUILD_NUMBER"
}
}
}
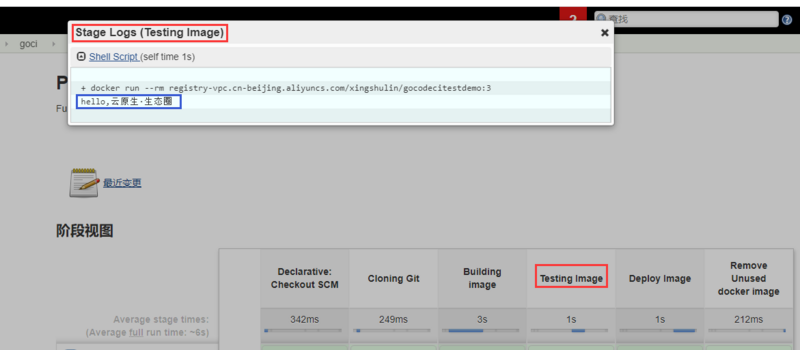
stage('Testing Image'){
steps{
sh "docker run --rm $registry:$BUILD_NUMBER"
}
}
stage('Deploy Image') {
steps{
script {
docker.withRegistry('https://registry-vpc.cn-beijing.aliyuncs.com', registryCredential ) {
dockerImage.push()
}
}
}
}
stage('Remove Unused docker image') {
steps{
sh "docker rmi $registry:$BUILD_NUMBER"
}
}
}
}
在完成 Jenkinsfile 的准备工作后,依旧提交到 goci 代码仓库内,然后我们在jenkins上配置即可:
首先准备 Jenkins job 配置的 xml 配置文件 goci.xml :
<?xml version='1.1' encoding='UTF-8'?>
<flow-definition plugin="workflow-job@2.36">
    <actions>
        <org.jenkinsci.plugins.pipeline.modeldefinition.actions.DeclarativeJobAction plugin="pipeline-model-definition@1.5.0"/>
        <org.jenkinsci.plugins.pipeline.modeldefinition.actions.DeclarativeJobPropertyTrackerAction plugin="pipeline-model-definition@1.5.0">
            <jobProperties/>
            <triggers/>
            <parameters/>
            <options/>
        </org.jenkinsci.plugins.pipeline.modeldefinition.actions.DeclarativeJobPropertyTrackerAction>
    </actions>
    <description></description>
    <keepDependencies>false</keepDependencies>
    <properties>
        <com.dabsquared.gitlabjenkins.connection.GitLabConnectionProperty plugin="gitlab-plugin@1.5.13">
            <gitLabConnection></gitLabConnection>
        </com.dabsquared.gitlabjenkins.connection.GitLabConnectionProperty>
        <org.jenkinsci.plugins.gitlablogo.GitlabLogoProperty plugin="gitlab-logo@1.0.5">
            <repositoryName></repositoryName>
        </org.jenkinsci.plugins.gitlablogo.GitlabLogoProperty>
        <com.synopsys.arc.jenkinsci.plugins.jobrestrictions.jobs.JobRestrictionProperty plugin="job-restrictions@0.8"/>
    </properties>
    <definition class="org.jenkinsci.plugins.workflow.cps.CpsScmFlowDefinition" plugin="workflow-cps@2.78">
        <scm class="hudson.plugins.git.GitSCM" plugin="git@4.1.1">
            <configVersion>2</configVersion>
            <userRemoteConfigs>
                <hudson.plugins.git.UserRemoteConfig>
                    <url>https://code.kubemaster.top/DevOpsTeam/goci.git</url>
                    <credentialsId>73a21ee2-2cdb-4658-8f99-309a3b77f2d4</credentialsId>
                </hudson.plugins.git.UserRemoteConfig>
            </userRemoteConfigs>
            <branches>
                <hudson.plugins.git.BranchSpec>
                    <name>*/master</name>
                </hudson.plugins.git.BranchSpec>
            </branches>
            <doGenerateSubmoduleConfigurations>false</doGenerateSubmoduleConfigurations>
            <submoduleCfg class="list"/>
            <extensions/>
        </scm>
        <scriptPath>Jenkinsfile</scriptPath>
        <lightweight>true</lightweight>
    </definition>
    <triggers/>
    <disabled>false</disabled>
然后,我们就可以创建构建job和执行触发构建了:
# 获取jenkins-crumb
crumb=$(curl -u "admin:admin" -s 'http://jenkins.kubemaster.top/crumbIssuer/api/xml?xpath=concat(//crumbRequestField,":",//crumb)')
# 创建job
curl -X POST "http://admin:admin@jenkins.kubemaster.top/createItem?name=goci" --data-binary "@goci.xml" -H "Content-Type: text/xml" -H ${jenkins_crumb}
# 执行job
curl -X POST -u admin:admin -H ${jenkins_crumb} http://jenkins.kubemaster.top/job/goci/build
看到这里,基本上就结束了,基本上在实践中完成了Demo的编写,容器化构建,持续构建相关环节,下面我们看一下构建的结果:
构建的视图:

完成的构建的日志:

本文由博客群发一文多发等运营工具平台 OpenWrite 发布
正文到此结束
- 本文标签: Property rmi tag https XML http MQ remote 配置 开发 Jobs 云 Agent git Docker 运营 IO cmd cat dependencies trigger logo Dockerfile ip 代码 src plugin 编译 description REST Job linux id jenkins API build Action root list 博客 Master db UI Connection
- 版权声明: 本文为互联网转载文章,出处已在文章中说明(部分除外)。如果侵权,请联系本站长删除,谢谢。
- 本文海报: 生成海报一 生成海报二
热门推荐


相关文章


Loading...
![[HBLOG]公众号](https://www.liuhaihua.cn/img/qrcode_gzh.jpg)

