Tomcat+Nginx反向代理部署
| 编辑推荐: |
| 文章主要讲解了为什么会产生跨域?本地开发跨域解决方案,云服务器部署时跨域解决方案等相关内容。 本文来自于csdn,由火龙果软件Anna编辑推荐。 |
最近自己做了一个前后端分离项目,前端采用HBuilder X开发,后端采用IDEA开发,在本地开发也跨域,部署到云服务器也跨域,下面介绍两种解决方案。
为什么会产生跨域?
出于浏览器的同源策略限制。同源策略(Sameoriginpolicy)是一种约定,它是浏览器最核心也最基本的安全功能,如果缺少了同源策略,则浏览器的正常功能可能都会受到影响。可以说Web是构建在同源策略基础之上的,浏览器只是针对同源策略的一种实现。同源策略会阻止一个域的javascript脚本和另外一个域的内容进行交互。所谓同源就是两个页面或者前后端的两个地址具有相同的协议(protocol),主机(host)和端口号(port)。
1、本地开发跨域解决方案
首先在前端接口请求接口下面加上如下配置
//允许跨域
xhrFields: {
withCredentials: true
},
crossDomain: true,
如图所示:

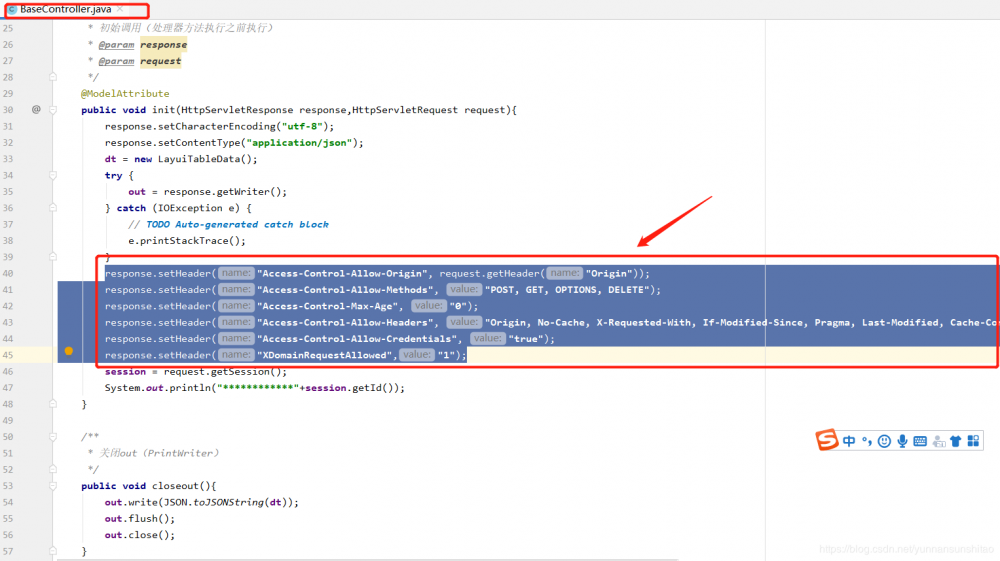
下面还需要在后端代码部分加上允许跨域代码
response.setHeader ("Access-Control-Allow-Origin", request.getHeader ("Origin"));
 response.setHeader ("Access-Control-Allow-Methods", "POST, GET, OPTIONS, DELETE");
 response.setHeader ("Access-Control-Max-Age", "0");
 response.setHeader ("Access-Control-Allow-Headers", "Origin, No-Cache, X-Requested-With, If-Modified-Since, Pragma, Last-Modified, Cache-Control, Expires, Content-Type, X-E4M-With,userId,token,Access-Control-Allow-Headers");
 response.setHeader ("Access-Control-Allow-Credentials", "true");
 response.setHeader ("XDomainRequestAllowed","1");
如下图所示,我的解决办法是吧该部分代码封装成一个类,然后每一个controller类继承一下就完事啦
下面是controller类继承我写的BaseController类
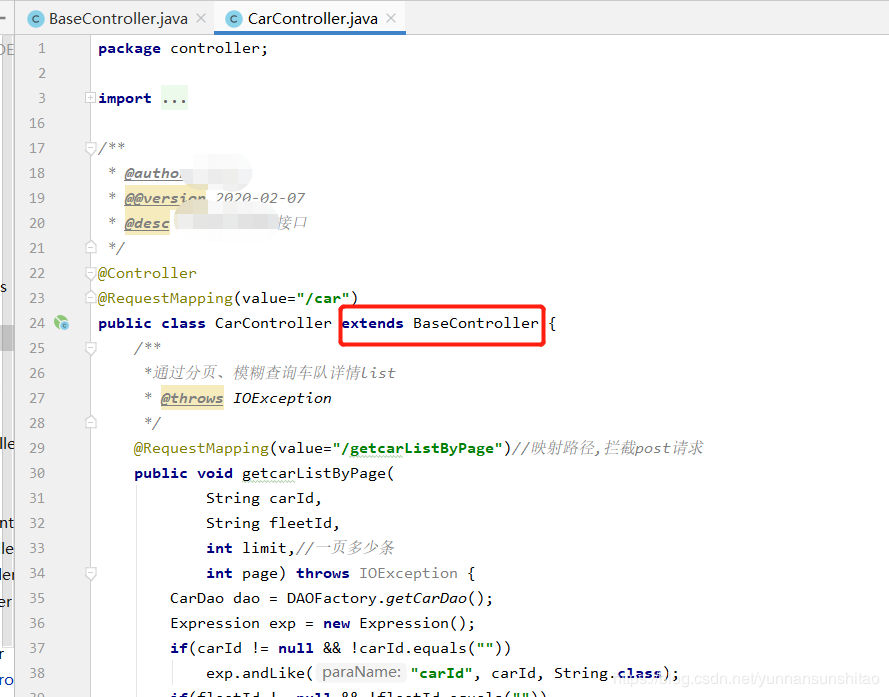
这样本地开发跨域就完美解决啦
2、云服务器部署时跨域解决方案
部署环境:腾讯云Windows服务器
先进入远程管理桌面安装以下部署环境
首先 得安装jdk1.8,Tomcat8.0,数据库我用的是sql server2012,nginx代理服务器
(1)jdk1.8下载地址: 链接
提取码:y1do,怎么安装自行百度吧
(2)Tomcat8.0下载地址: 链接
提取码:fg7n,怎么安装自行百度吧(注意:在安装的时候吧Tomcat服务改为自启)
接下来进入默认安装位置C:/Program Files/Apache Software Foundation/Tomcat 8.0/conf找到server.xml进行如下配置
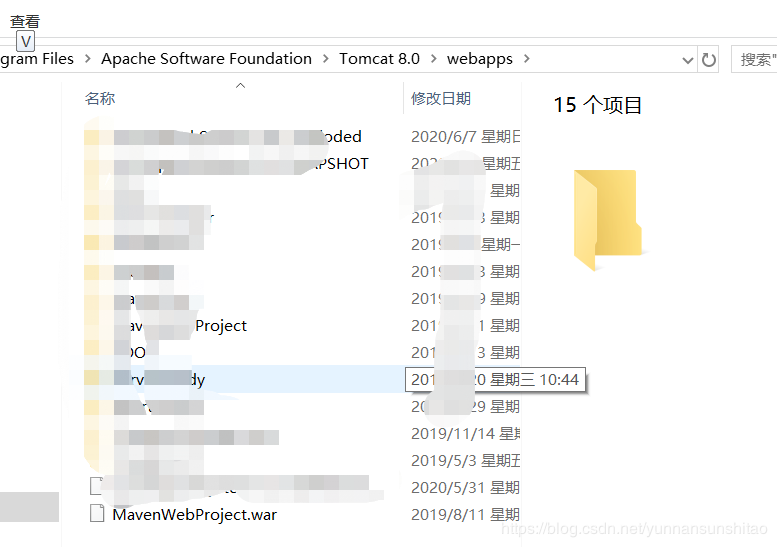
1、这里端口我用的是默认8080口,你们可以配置成其他的
 <Connector port="8080" protocol="HTTP/1.1"
 connectionTimeout="20000"
 redirectPort="8443" />

 2、找到该位置,把你们事先备案、解析好的域名写在defaultHost=""中
 <Engine name="Catalina" defaultHost="www.baidu.com">


 3、host这里配置一下name就可以了,其他不用管,在name=""填入域名
 <Host name="www.baidu.com" appBase="webapps"
 unpackWARs=" true" autoDeploy="true">


 <Valve className= "org.apache.catalina.valves.AccessLogValve" directory="logs"
 prefix="localhost_access_log" suffix=".txt"
 pattern="%h %l %u %t "%r" %s %b" />

 4、下面的<Context path="" docBase ="" reloadable=" false"></Context>默认安装是没有的,
 自行加进去,这里需要配置path=""虚拟路径,这里自行定义一个就可以,不过要和nginx配置成一样的,
 下面会讲,其次就是配置 docBase =""访问项目名,也就是你在C:/Program Files/Apache Software Foundation/Tomcat 8.0/webapps路径下的项目war包(test.war)
 <Context path="/apis" docBase ="test" reloadable=" false"></Context>
 </Host>
配置完成,将你的项目war包放在C:/Program Files/Apache Software Foundation/Tomcat 8.0/webapps路径下,如图:
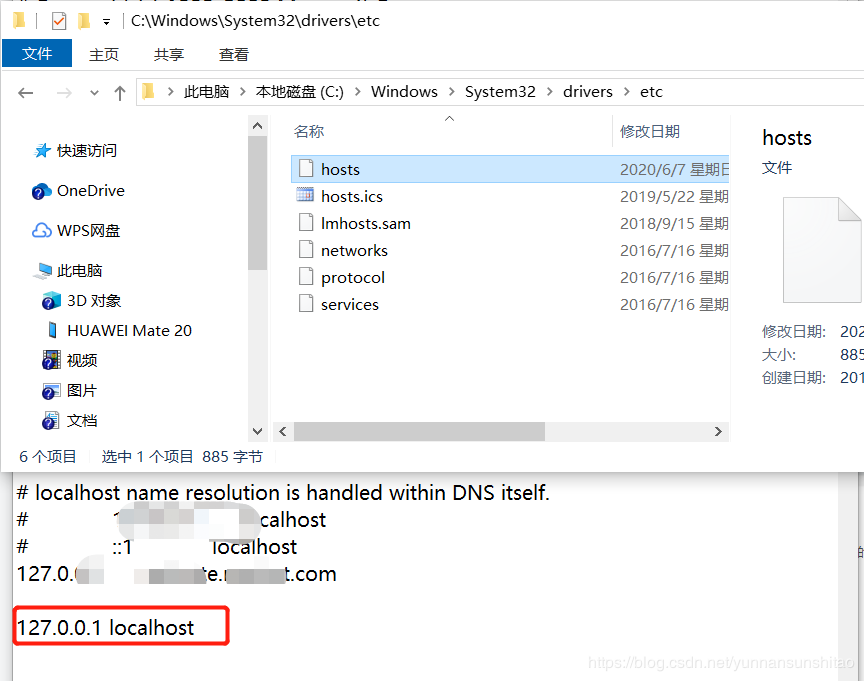
好了,Tomcat配置完成需要在远程桌面的C:/Windows/System32/drivers/etc路径下找到hosts配置文件进行如下配置,把172.0.0.1 localhost改为改为你的服务器IP和域名,如xxx.xxx.xxx.xxx www.baidu.com,这里是配置域名映射
现在Tomcat就配置完成
(3)nginx安装配置,官网下载地址:http://nginx.org/en/download.html,找一个适合Windows系统的nginx(稳定版)安装包下载自行百度安装

接下载进入安装路径C:/Program Files/Nginx/conf找到nginx.conf配置文件进行以下配置
#user nobody;
worker_processes ?1;
#error_log logs/error.log;
#error_log logs/error.log ?notice;
#error_log logs/error.log ?info;
#pid logs/nginx.pid;events {
worker_connections 1024;
}
http {
include mime.types;
default_type application/octet-stream;
#log_format main '$remote_addr - $remote_user [$time_local] "$request" '
# '$status $body_bytes_sent "$http_referer" '
# '"$http_user_agent" "$http_x_forwarded_for"';
#access_log ?logs/access.log ?main;
sendfile on;
#tcp_nopush on;
#keepalive_timeout ?0;
keepalive_timeout ?65;
#gzip on;
upstream apis {
#同一IP访问相同主机
ip_hash;
#weigth参数表示权值,权值越高被分配到的几率越大
server localhost:8080 weight=5;
}
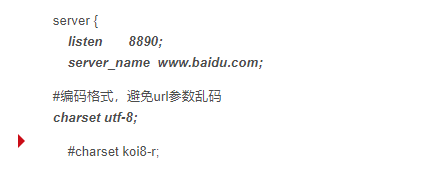
server {
listen 8890;
server_name www.baidu.com;
#编码格式,避免url参数乱码
charset utf-8;
#charset koi8-r;
#access_log ?logs/host.access.log ?main;
location /apis {
proxy_pass http://apis;
proxy_set_header Host $host;
proxy_set_header X-Forwarded-For $proxy_add_x_forwarded_for;
proxy_set_header X-Forwarded-Proto $scheme;
proxy_buffer_size 64k;
proxy_buffers 4 128k;
proxy_busy_buffers_size 256k;
}
location / {
root html;
#允许跨域访问
add_header 'Access-Control-Allow-Origin' '*';
index index.html index.htm;
}
#error_page 404 /index.html;
#location = /index.html {
# root html/page/404/;
# }
# redirect server error pages to the static page /50x.html
#
error_page ? 500 502 503 504 ?/50x.html;
location = /50x.html {
root html;
}
# proxy the PHP scripts to Apache listening on 127.0.0.1:80
#
#location ~ /.php$ {
# proxy_pass ? http://127.0.0.1;
#}
# pass the PHP scripts to FastCGI server listening on 127.0.0.1:9000
#
#location ~ /.php$ {
# root html;
# fastcgi_pass 127.0.0.1:9000;
# fastcgi_index index.php;
# fastcgi_param SCRIPT_FILENAME ?/scripts$fastcgi_script_name;
# include fastcgi_params;
#}
# deny access to .htaccess files, if Apache's document root
# concurs with nginx's one
#
#location ~ //.ht {
# deny ?all;
#}
}
# another virtual host using mix of IP-, name-, and port-based configuration
#
#server {
# listen 8000;
# listen somename:8080;
# server_name ?somename ?alias ?another.alias;
# location / {
# root html;
# index ?index.html index.htm;
# }
#}
# HTTPS server
#
#server {
# listen 443 ssl;
# server_name localhost;
# ssl_certificate cert.pem;
# ssl_certificate_key cert.key;
# ssl_session_cache shared:SSL:1m;
# ssl_session_timeout ?5m;
# ssl_ciphers ?HIGH:!aNULL:!MD5;
# ssl_prefer_server_ciphers ?on;
# location / {
# root html;
# index index.html index.htm;
# }
#}
}
在配置文件中加入如下配置,apis是上面Tomcat配置的虚拟路径,8080口是Tomcat的配置口,weight是分配权值配置

配置nginx的监听口8890(随意配置,别忘了在防火墙的高级配置/入站规则中也要放行高端口,自行百度防火墙开端口),还要配置你的域名
接下来配置反向代理(注意apis是Tomcat的虚拟路径,跟上面要同步)
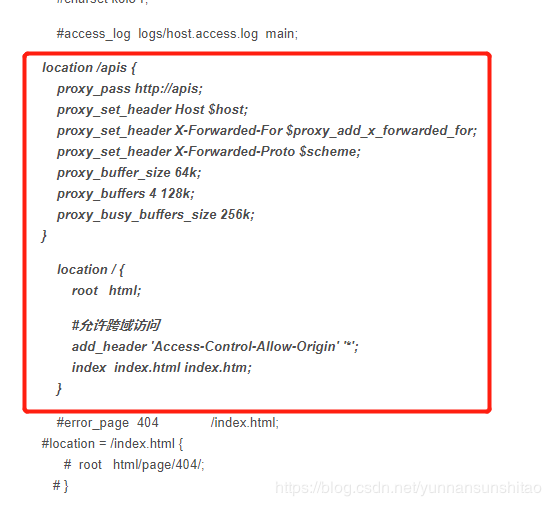
这里配置完成将你的静态资源放在?C:/Program Files/Nginx/html的html的根目录下,这样反向代理就算配置完成!!!
最后别忘了更改你的访问请求路径,如下:
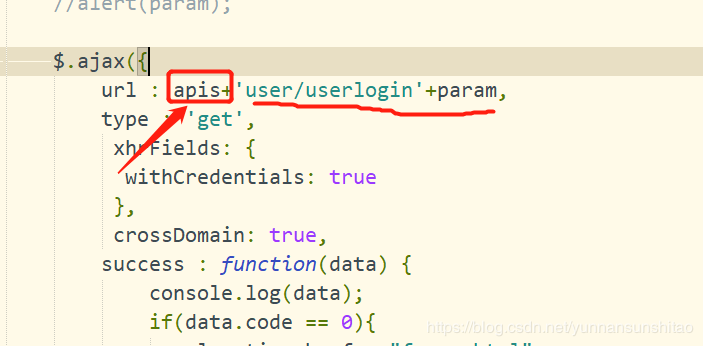
浏览器输入:https://域名:端口/就可以访问你的项目首页index.html。
正文到此结束
- 本文标签: 下载 配置 session apache 域名 tab list 数据库 build IO 管理 stream 安装配置 解析 tomcat 百度 文章 安装 bus zip TCP 协议 key Connection cache IDE Agent root HTML remote 开发 http sql token java 代码 ssl XML js SQL Server ORM 数据 反向代理 PHP App 端口 参数 安全 主机 乱码 目录 SDN 服务器 DOM https Webapps JavaScript UI Proxy web CTO windows 软件 cat src id 云 API 部署 Nginx Document ip 同步
- 版权声明: 本文为互联网转载文章,出处已在文章中说明(部分除外)。如果侵权,请联系本站长删除,谢谢。
- 本文海报: 生成海报一 生成海报二
热门推荐


相关文章

近期评论
-
ws0132613@gmail.comhttps://getmacos.com/gopanel/william smith
-
谢谢
-
https://www.newcmy.com/register?aff=HBVX建议您试试草莓云机场,可以流畅观看youtube和tiktok,上reddit/x也没有问题,还有各种ai优化节点。
-
-
-
想购买您这个站,我的联系方式QQ741756694微信同步 能卖联系
-
-
-
-
Loading...
![[HBLOG]公众号](https://www.liuhaihua.cn/img/qrcode_gzh.jpg)

