spring data操作ES简直不能再香
引言
Elasticsearch(以下简称ES)并不像mysql这么容易上手,很多java程序员会觉得ES的java客户端比较难以掌握,尽管ES 7.x官方推荐的 high level client 已经相对于早期的 TransportClient 好用很多了。
Spring Boot通过整合Spring Data ElasticSearch为我们提供了非常便捷的检索功能支持,我们几乎可以像操作数据库一样操作ES了。本篇文章是我肝了4个小时写出的文章,希望能对大家有所帮助。
看这篇文章的小伙伴,我假设是对ES有基本了解的。比如了解ES中索引(index),文档(document),文档的属性(field)等基本概念。
本篇最后给出代码示例的下载地址,小伙们可以放心使用,我的示例都是经过验证的。
环境准备
ES的环境我是本地搭建的7.1.0的版本,你可以启动集群模式或者单节点模式。集群模式是用不同的端口模拟的伪集群。具体的过程不是本文的重点这里不表。
spring boot 使用的是 2.3.1.RELEASE 版本。
spring data 使用的是 4.0.1.RELEASE 版本。
示例
引入依赖
首先是maven引入依赖,我这里引入写这篇文章时最新的spring data,如下:
<dependency>
            <groupId>org.springframework.data</groupId>
            <artifactId>spring-data-elasticsearch</artifactId>
            <version>4.0.1.RELEASE</version>
        </dependency>
这里有一点需要强调,4.0.1的spring-data-elasticsearch默认引入的ES客户端版本是7.6.2,而我前面说了集群是7.1.0版本。
在启动的时候会有警告信息告诉我们客户端和服务端版本不一致。因为我们是演示DEMO,并不影响。但是在实际项目中我还是建议你尽量保持客户端和服务端版本的一致。
集群配置
然后我们需要使用配置文件或者配置类注入ES集群的客户端,代码如下:
@Configuration
public class RestClientConfig extends AbstractElasticsearchConfiguration {

    @Override
    @Bean
    public RestHighLevelClient elasticsearchClient() {

        final ClientConfiguration clientConfiguration = ClientConfiguration.builder()
                .connectedTo("localhost:9200", "localhost:9201", "localhost:9202", "localhost:9203")
                .build();

        return RestClients.create(clientConfiguration).rest();
    }
}
前面说过,我是用本地的伪集群搭建的ES环境,这里大家根据自己的集群情况配置地址即可。
测试连通性
我写个单元测试看看集群连接是否正常,
@SpringBootTest(classes = {DemoApplication.class})
class DemoApplicationTests {
    @Autowired
    RestHighLevelClient highLevelClient;

    @Test
    void testESClient() throws IOException {
        GetRequest getRequest= new GetRequest("kibana_sample_data_ecommerce", "V5z1f28BdseAsPClo7bC");
        GetResponse getResponse = highLevelClient.get(getRequest, RequestOptions.DEFAULT);
        System.out.println(getResponse.getIndex());
        System.out.println(getResponse.toString());
    }

}
很简单,我读取集群中名为 kibana_sample_data_ecommerce 的索引(这是kibana自带的一个电商的索引示例),查询ID等于 V5z1f28BdseAsPClo7bC 的文档,这个测试程序打印的结果如下:
kibana_sample_data_ecommerce
{"_index":"kibana_sample_data_ecommerce","_type":"_doc","_id":"V5z1f28BdseAsPClo7bC","_version":1,"_seq_no":3,"_primary_term":1,"found":true,"_source":{"category":["Women's Shoes","Women's Clothing"],"currency":"EUR","customer_first_name":"Diane","customer_full_name":"Diane Chandler","customer_gender":"FEMALE","customer_id":22,"customer_last_name":"Chandler","customer_phone":"","day_of_week":"Sunday","day_of_week_i":6,"email":"diane@chandler-family.zzz","manufacturer":["Primemaster","Oceanavigations"],"order_date":"2020-01-26T22:58:05+00:00","order_id":584093,"products":[{"base_price":74.99,"discount_percentage":0,"quantity":1,"manufacturer":"Primemaster","tax_amount":0,"product_id":12304,"category":"Women's Shoes","sku":"ZO0360303603","taxless_price":74.99,"unit_discount_amount":0,"min_price":34.5,"_id":"sold_product_584093_12304","discount_amount":0,"created_on":"2016-12-25T22:58:05+00:00","product_name":"High heeled sandals - argento","price":74.99,"taxful_price":74.99,"base_unit_price":74.99},{"base_price":99.99,"discount_percentage":0,"quantity":1,"manufacturer":"Oceanavigations","tax_amount":0,"product_id":19587,"category":"Women's Clothing","sku":"ZO0272002720","taxless_price":99.99,"unit_discount_amount":0,"min_price":47,"_id":"sold_product_584093_19587","discount_amount":0,"created_on":"2016-12-25T22:58:05+00:00","product_name":"Classic coat - black","price":99.99,"taxful_price":99.99,"base_unit_price":99.99}],"sku":["ZO0360303603","ZO0272002720"],"taxful_total_price":174.98,"taxless_total_price":174.98,"total_quantity":2,"total_unique_products":2,"type":"order","user":"diane","geoip":{"country_iso_code":"GB","location":{"lon":-0.1,"lat":51.5},"continent_name":"Europe"}}}
ES实体映射
我们知道ES读写其实都是json类型的数据,而我们在客户端通常是对象实体定义。所以对象实体和json之间的映射也是一个核心概念。
Spring Data ES支持两种实体映射方案:
- Jackson Object Mapping
- Meta Model Object Mapping
早期的版本默认使用的是 jackson 的方案,但是在4.x之后 Meta Model 就上位了,而前者已经不再被支持。所以我们这里使用第二种方案。我们先定义一个实体类,并通过注解来表明它跟ES实体之间的映射关系。
@Document(indexName = "my_user")
@Data
@ToString
public class UserEsEntity implements Persistable<String> {

    @Id
    @Nullable
    private String id;

    @Field(value = "last-name", type = FieldType.Keyword)
    private String lastName;

    @Field(type = FieldType.Keyword)
    private String type;

    @Field(type = FieldType.Integer)
    private Integer age;

    @Nullable @Field(name = "birth-date", type = FieldType.Date, format = DateFormat.basic_date)
    private LocalDate birthDate;

    @Field(type = FieldType.Boolean)
    private Boolean isDeleted;
    @Field(type = FieldType.Date, format = DateFormat.basic_date)
    private LocalDate createTime;
    @Field(type = FieldType.Date, format = DateFormat.basic_date)
    private LocalDate updateTime;

    @Override
    public boolean isNew() {
        return id == null || (createTime == null);
    }
}
这里我们指定了索引的名字是 my_user , @Field 的value属性可以指定字段在ES中的字段名。另外我们看到日期格式我们还可以指定日期的显示格式。更多的选项我建议你查看官方文档。本篇文章的最后也有给出官方文档的地址。
读写测试
我们先来往索引写入文档试试看。
@Autowired
    private ElasticsearchOperations elasticsearchOperations;

    @Test
    public void testSave() {

        UserEsEntity user = new UserEsEntity();
        user.setLastName("张三");
        user.setAge(29);
        user.setBirthDate(LocalDate.ofYearDay(1989, 100));
        user.setId("1");
        user.setIsDeleted(false);
        user.setCreateTime(new Date());
        user.setUpdateTime(new Date());

        IndexCoordinates indexCoordinates = elasticsearchOperations.getIndexCoordinatesFor(user.getClass());

        IndexQuery indexQuery = new IndexQueryBuilder()
                .withId(user.getId())
                .withObject(user)
                .build();
        String documentId = elasticsearchOperations.index(indexQuery, indexCoordinates);
    }
解释下几个点:
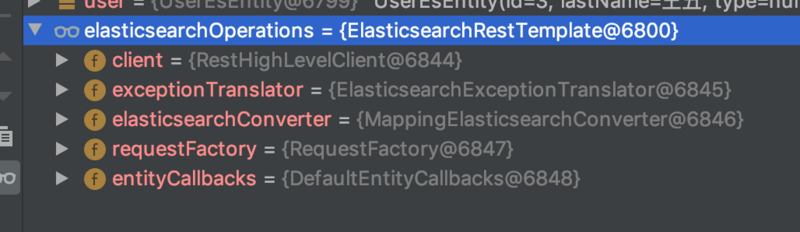
- ElasticsearchOperations是spring data es操作ES的一个接口,在4.x的版本它的默认实现是
ElasticsearchRestTemplate,我们可以通过debug模式看到这一点,如下图:
- indexCoordinates是4.x新增的一个参数,通过这个参数我们可以再操作ES的时候同时指定多个index。
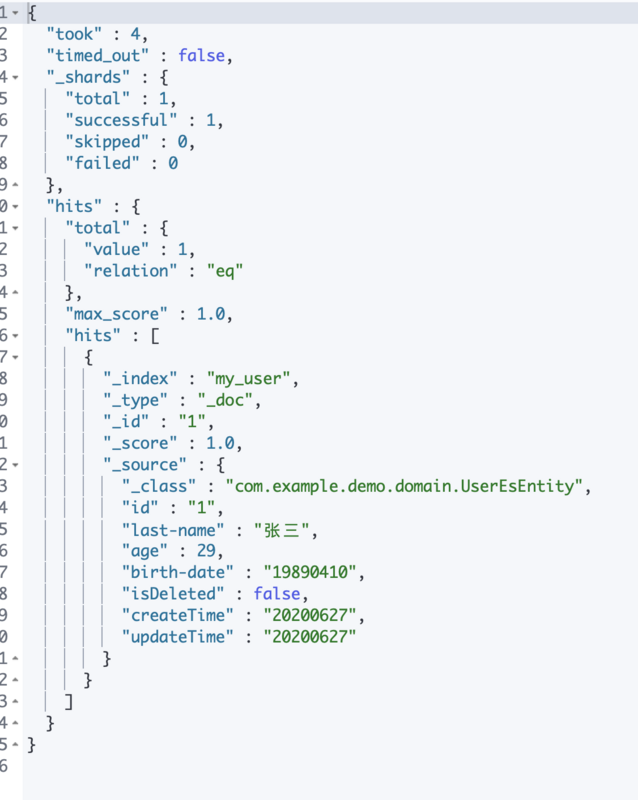
运行这个测试方法,成功后我们去ES里查看索引已经被正确的写入了,如下图所示:
我们继续来看写如何查询文档。查询之前我已经用上面的 testSave 方法写入了几条不同的文档。
@Test
    public void testQuery() {
        NativeSearchQuery searchQuery = new NativeSearchQueryBuilder()
                .withQuery(new MatchAllQueryBuilder())
                .build();

        SearchHits<UserEsEntity> searchHits = searchOperations.search(searchQuery, UserEsEntity.class);
        long count = searchHits.getTotalHits();
        System.out.println(count);
        List<SearchHit<UserEsEntity>> list = searchHits.getSearchHits();
        for (SearchHit hit:list) {
            System.out.println(hit.getContent());
        }
    }
我这里的示例是查询索引下的所有文档 MatchAllQueryBuilder 。
用过spring data的同学都知道,它里面有个核心的概念叫 Repository 。
Repository 接口是 Spring Data 的一个核心接口,它不提供任何方法,开发者需要在自己定义的接口中声明需要的方法
public interface Repository<T, ID extends Serializable> { }
Spring Data可以让我们只定义接口,只要遵循 Spring Data的规范,就无需写实现类。Repository 有几个常用的子接口:
- CrudRepository: 继承 Repository,实现了一组 CRUD 相关的方法
- PagingAndSortingRepository: 继承 CrudRepository,实现了一组分页排序相关的方法
- JpaRepository: 继承 PagingAndSortingRepository,实现一组 JPA 规范相关的方法
同样,我们操作ES其实也可以使用这种方式,这样即使你不了解ES的客户端也能轻松的操作ES了。我们可以把上面的例子重新用 Repository 的方式来写一遍。
首先要做的是定义自己的 Repository ,代码如下:
public interface UserEsRepository extends ElasticsearchRepository<UserEsEntity, String> {
}
是的,你没看错,只有这些代码,不需要任何实现类我们就能实现对ES基本的增删改查。(当然复杂的操作需要自定义实现)
然后我们写入一条文档,
@Autowired
    private UserEsRepository repository;

    @Test
    public void testSave() {
        UserEsEntity entity = new UserEsEntity();
        entity.setId(UUID.randomUUID().toString());
        entity.setAge(50);
        entity.setLastName("东野圭吾");
        entity.setBirthDate(LocalDate.ofYearDay(1964, 200));
        entity.setCreateTime(new Date());
        entity.setUpdateTime(new Date());
        entity.setIsDeleted(false);
        repository.save(entity);
    }
继续来看看查询,
@Test
    public void testFindAll() {
        long count = repository.count();
        System.out.println(count);
        Iterable<UserEsEntity> result = repository.findAll();
        Iterator<UserEsEntity> data = result.iterator();
        while (data.hasNext()) {
            System.out.println(data.next());
        }
    }

    @Test
    public void testFindById() {
        Optional<UserEsEntity> data = repository.findById("5c7ca0b7-4236-48f1-8ed4-8ce9555092d8");
        System.out.println(data.get());
    }
哈哈,简直不能再爽!跟操作数据库一模一样。
这篇文章只是带你入门spring data es的,我不打算讲解太复杂的操作,后面打算再写一篇进阶行踪的文章。
本篇文章使用的代码示例已经上传github,感兴趣的可以下载。
https://github.com/pony-maggi...
参考:
- https://spring.io/blog/2020/0...
- https://docs.spring.io/spring...
- https://github.com/spring-pro...
正文到此结束
- 本文标签: MQ 开发者 bug spring json build JPA 集群 id 代码 category tab REST http js IO UI Kibana mysql DOM final mail 下载 cat 服务端 GitHub 单元测试 测试 list entity https ORM 配置 Elasticsearch Document 开发 maven 文章 数据库 Master IDE zab update value src git bean map springboot 程序员 rand db 参数 ACE grep 希望 数据 索引 java key client ip Transport sql Spring Boot App tag 端口 分页 Word find
- 版权声明: 本文为互联网转载文章,出处已在文章中说明(部分除外)。如果侵权,请联系本站长删除,谢谢。
- 本文海报: 生成海报一 生成海报二
热门推荐


相关文章


Loading...
![[HBLOG]公众号](https://www.liuhaihua.cn/img/qrcode_gzh.jpg)

