Neety学习系列(四)-连接管理及Pipeline
这是本系列的第四篇文章,这篇文章的重点是对Netty的连接管理进行分析和Pipeline的运行及时。当有新连接产生的时候Netty是怎样检测到的?然后新连接又是怎样注册到NioEventLoop中的呢?本篇第一章就要解决这些问题,在此过程中大体可以分为, 检测新连接 、 创建NioSocketChannel 、 分配线程及注册selector ,第二章就是介绍Pipeline的相关知识点,netty是如何判断ChannelHandler类型的?对于ChannelHandler的添加应该遵循什么样的顺序?等这些问题在这一章都可以得到解决,下面具体的分析。
一 连接管理
1.1 检测新连接
这一节紧跟着上一篇文章中NioEventLoop的执行中第二步(处理IO事件)调用 processSelectedKeys() 方法进行的,具体的我们看看这个方法的源码,如下:
/**
* NioEventLoop.java 604行起
*/
  private void processSelectedKey(SelectionKey k, AbstractNioChannel ch) {
        final AbstractNioChannel.NioUnsafe unsafe = ch.unsafe();
        if (!k.isValid()) {
            final EventLoop eventLoop;
            try {
                eventLoop = ch.eventLoop();
            } catch (Throwable ignored) {
                // If the channel implementation throws an exception because there is no event loop, we ignore this
                // because we are only trying to determine if ch is registered to this event loop and thus has authority
                // to close ch.
                return;
            }
            // Only close ch if ch is still registerd to this EventLoop. ch could have deregistered from the event loop
            // and thus the SelectionKey could be cancelled as part of the deregistration process, but the channel is
            // still healthy and should not be closed.
            // See https://github.com/netty/netty/issues/5125
            if (eventLoop != this || eventLoop == null) {
                return;
            }
            // close the channel if the key is not valid anymore
            unsafe.close(unsafe.voidPromise());
            return;
        }

        try {
            int readyOps = k.readyOps();
            // We first need to call finishConnect() before try to trigger a read(...) or write(...) as otherwise
            // the NIO JDK channel implementation may throw a NotYetConnectedException.
            if ((readyOps & SelectionKey.OP_CONNECT) != 0) {
                // remove OP_CONNECT as otherwise Selector.select(..) will always return without blocking
                // See https://github.com/netty/netty/issues/924
                int ops = k.interestOps();
                ops &= ~SelectionKey.OP_CONNECT;
                k.interestOps(ops);

                unsafe.finishConnect();
            }

            // Process OP_WRITE first as we may be able to write some queued buffers and so free memory.
            if ((readyOps & SelectionKey.OP_WRITE) != 0) {
                // Call forceFlush which will also take care of clear the OP_WRITE once there is nothing left to write
                ch.unsafe().forceFlush();
            }

            // Also check for readOps of 0 to workaround possible JDK bug which may otherwise lead
            // to a spin loop
            if ((readyOps & (SelectionKey.OP_READ | SelectionKey.OP_ACCEPT)) != 0 || readyOps == 0) {
                unsafe.read();
                if (!ch.isOpen()) {
                    // Connection already closed - no need to handle write.
                    return;
                }
            }
        } catch (CancelledKeyException ignored) {
            unsafe.close(unsafe.voidPromise());
        }
    }
复制代码
这里我们直接分析最后几行代码,判断到是一个 accept 事件,然后就会运行 unsafe.read() 这行代码,这里的unsafe其实是 NioMessageUnsafe ,我们深入分析这个代码,源码如下:
/**
* AbstractNioMessageChannel.java 63行起
*/

public void read() {
            assert eventLoop().inEventLoop();
            final ChannelConfig config = config();
            final ChannelPipeline pipeline = pipeline();
            final RecvByteBufAllocator.Handle allocHandle = unsafe().recvBufAllocHandle();
            allocHandle.reset(config);

            boolean closed = false;
            Throwable exception = null;
            try {
                try {
                    do {
                        int localRead = doReadMessages(readBuf);
                        if (localRead == 0) {
                            break;
                        }
                        if (localRead < 0) {
                            closed = true;
                            break;
                        }

                        allocHandle.incMessagesRead(localRead);
                    } while (allocHandle.continueReading());
                } catch (Throwable t) {
                    exception = t;
                }

                int size = readBuf.size();
                for (int i = 0; i < size; i ++) {
                    readPending = false;
                    pipeline.fireChannelRead(readBuf.get(i));
                }
                readBuf.clear();
                allocHandle.readComplete();
                pipeline.fireChannelReadComplete();

                if (exception != null) {
                    closed = closeOnReadError(exception);

                    pipeline.fireExceptionCaught(exception);
                }

                if (closed) {
                    inputShutdown = true;
                    if (isOpen()) {
                        close(voidPromise());
                    }
                }
            } finally {
                // Check if there is a readPending which was not processed yet.
                // This could be for two reasons:
                // * The user called Channel.read() or ChannelHandlerContext.read() in channelRead(...) method
                // * The user called Channel.read() or ChannelHandlerContext.read() in channelReadComplete(...) method
                //
                // See https://github.com/netty/netty/issues/2254
                if (!readPending && !config.isAutoRead()) {
                    removeReadOp();
                }
            }
        }
    }
复制代码
在这段代码的前面先得到服务端channel的一些配置信息和pipeline,然后后面会有一个Handle,这个Handler主要是控制接入的速率,这里我先不详细介绍。紧跟着后面会调用一个 do-while 循环。在里面先调用了一个 doReadMessages 方法,这里我们具体的分析一下这个方法:
/**
* NioServerSocketChannel.java 139行起
*/
    @Override
    protected int doReadMessages(List<Object> buf) throws Exception {
        SocketChannel ch = javaChannel().accept();

        try {
            if (ch != null) {
                buf.add(new NioSocketChannel(this, ch));
                return 1;
            }
        } catch (Throwable t) {
            logger.warn("Failed to create a new channel from an accepted socket.", t);

            try {
                ch.close();
            } catch (Throwable t2) {
                logger.warn("Failed to close a socket.", t2);
            }
        }

        return 0;
    }
复制代码
这里的代码逻辑就是通过 javaChannel().accept() 得到一个jdk底层的channel,然后通过 new NioSocketChannel(this, ch) 将jdk底层的channel封装成自己的channel,添加到容器中,最后返回1,说明读到一个channel。然后我们回到read方法中,这个do-while方法会一直到 allocHandle.continueReading() 这个条件成立( 一次性默认读取16个连接 )或者读到不到连接(doReadMessages返回0)为止,结束循环。
1.2 创建NioSocketChannel
这一节我们的开始是从上一节结尾的地方 doReadMessages 方法处,在这个函数里面new了一个 NioSocketChannel ,我们跟进里面的构造函数看看,如下:
/**
* NioSocketChannel.java 96行起
*/
   public NioSocketChannel(Channel parent, SocketChannel socket) {
        super(parent, socket);
        config = new NioSocketChannelConfig(this, socket.socket());
    }
复制代码
这里我们先继续跟几个父类构造函数,具体的源码如下:
/*
* AbstractNioChannel.java 83行起
*/
    protected AbstractNioChannel(Channel parent, SelectableChannel ch, int readInterestOp) {
        super(parent);
        this.ch = ch;
        this.readInterestOp = readInterestOp;
        try {
            ch.configureBlocking(false);
        } catch (IOException e) {
            try {
                ch.close();
            } catch (IOException e2) {
                if (logger.isWarnEnabled()) {
                    logger.warn(
                            "Failed to close a partially initialized socket.", e2);
                }
            }

            throw new ChannelException("Failed to enter non-blocking mode.", e);
        }
    }
复制代码
在这里我先分析这个函数里面做了啥,然后才继续向上跟父类构造函数。其实这个函数在分析服务端启动流程的时候我们分析了的,这里先保存客服端channel,先前是服务端channel,然后设置读事件,接下来最重要的就是设置当前channel为非阻塞模式。下面我们继续跟进构造函数,源代码如下:
/**
* AbstractChannel.java 77行起
*/
 protected AbstractChannel(Channel parent) {
        this.parent = parent;
        id = newId();
        unsafe = newUnsafe();
        pipeline = newChannelPipeline();
    }
复制代码
上面这几行代码我们在服务端启动的时候也是分析过的,其实际含义就是首先保存 parent ,这个parent就是服务端channel是通过反射产生的,然后生成一个id,创建一个unsafe,最后创建一个pipeline,后面我们会详细分析,这里就不过多介绍。现在我们回到最先的构造函数的下一步,创建 NioSocketChannelConfig ,我们跟进他的构造函数,如下:
/**
* NioSocketChannel.java 478行起
*/
private final class NioSocketChannelConfig  extends DefaultSocketChannelConfig {
        private NioSocketChannelConfig(NioSocketChannel channel, Socket javaSocket) {
            super(channel, javaSocket);
        }

        @Override
        protected void autoReadCleared() {
            clearReadPending();
        }
    }
复制代码
这里我们还是继续跟进父类构造函数,代码如下:
/**
* DefaultSocketChannelConfig.java 45行起
*/
 public DefaultSocketChannelConfig(SocketChannel channel, Socket javaSocket) {
        super(channel);
        if (javaSocket == null) {
            throw new NullPointerException("javaSocket");
        }
        this.javaSocket = javaSocket;

        // Enable TCP_NODELAY by default if possible.
        if (PlatformDependent.canEnableTcpNoDelayByDefault()) {
            try {
                setTcpNoDelay(true);
            } catch (Exception e) {
                // Ignore.
            }
        }
    }
复制代码
在这里首先是保存传进来的Socket,下面有一个条件语句, canEnableTcpNoDelayByDefault() 方法表示运行在服务器上还是运行在android上,如果不是运行在android上则返回true,那么久会执行 setTcpNoDelay(true) 方法,这个方法的作用就是禁止 Nagle 算法(这个算法大概的意思就是将小的数据包集合成大的数据包然后发送出去,而作为服务端的Netty为了及时性得禁止这个操作)。
1.3 Channel的分类
为了更直观的展示Channel我们先用一幅图来表示Channel的层级关系,这里我只关注了Nio的Channel结构,如下图:
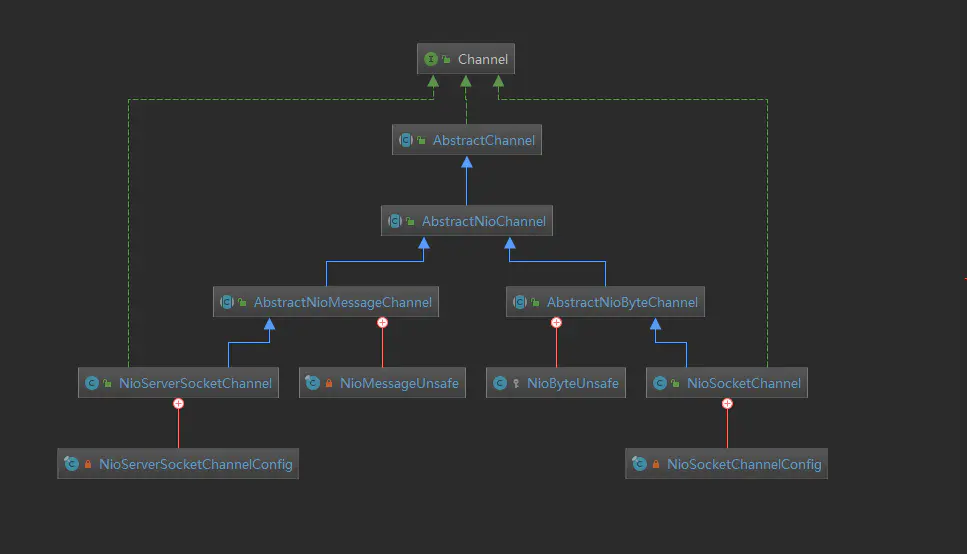
- channel :顶级抽象,主要是网络socket的读、写、连接绑定的操作。
- AbstractChannel :这个抽象类实现了Channel接口,并对子类的Chann进行抽象,具体的我们可以看里面的源码:
public abstract class AbstractChannel extends DefaultAttributeMap implements Channel {
    private static final InternalLogger logger = InternalLoggerFactory.getInstance(AbstractChannel.class);

    private static final ClosedChannelException FLUSH0_CLOSED_CHANNEL_EXCEPTION = ThrowableUtil.unknownStackTrace(
            new ClosedChannelException(), AbstractUnsafe.class, "flush0()");
    private static final ClosedChannelException ENSURE_OPEN_CLOSED_CHANNEL_EXCEPTION = ThrowableUtil.unknownStackTrace(
            new ClosedChannelException(), AbstractUnsafe.class, "ensureOpen(...)");
    private static final ClosedChannelException CLOSE_CLOSED_CHANNEL_EXCEPTION = ThrowableUtil.unknownStackTrace(
            new ClosedChannelException(), AbstractUnsafe.class, "close(...)");
    private static final ClosedChannelException WRITE_CLOSED_CHANNEL_EXCEPTION = ThrowableUtil.unknownStackTrace(
            new ClosedChannelException(), AbstractUnsafe.class, "write(...)");
    private static final NotYetConnectedException FLUSH0_NOT_YET_CONNECTED_EXCEPTION = ThrowableUtil.unknownStackTrace(
            new NotYetConnectedException(), AbstractUnsafe.class, "flush0()");

    private final Channel parent;
    private final ChannelId id;
    private final Unsafe unsafe;
    private final DefaultChannelPipeline pipeline;
    private final VoidChannelPromise unsafeVoidPromise = new VoidChannelPromise(this, false);
    private final CloseFuture closeFuture = new CloseFuture(this);

    private volatile SocketAddress localAddress;
    private volatile SocketAddress remoteAddress;
    private volatile EventLoop eventLoop;
    private volatile boolean registered;

    /** Cache for the string representation of this channel */
    private boolean strValActive;
    private String strVal;
复制代码
可以看到不管是前面的服务端channel还是客户端channel需要保存的id、unsafe、pipeline还有eventLoop都是这个类抽象的,这个类其实就是channel的一个骨架。
- AbstractNioChannel :这个类是对NioChannel的一个抽象,这个类主要是基于Selector来抽象的一个类,根据SelectionKey来进行一些IO的操作。
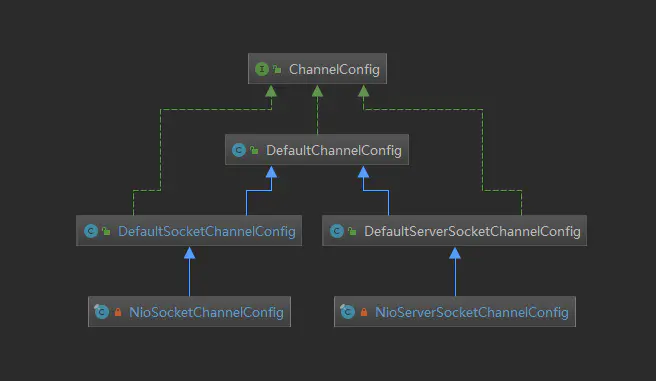
- NioServerSocketChannel 和 NioSocketChannel : 前一个是服务端channel后一个是客户端channel他们两个的区别是,传入的IO事件不一样。服务端channel传入的是 SelectionKey.OP_ACCEPT ,而客户端channel传入的是 SelectionKey.OP_READ 。另外不同的是unsafe,服务端是 NioMessageUnsafe ,表示读取一个连接,客户端是 NioByteUnsafe ,表示读取数据,最后还有不同的就是ChannelConfig不同,服务端的是 NioServerSocketChannelConfig ,客户端的是 NioSocketChannelConfig ,这个config主要是对socket的一些配置,下面我们看看这个config的继承关系图,具体的分析这里就不过多介绍。
1.4 分配线程及注册selector
这一小节的开始,我们得回到服务端Channe的初始化和启动那篇文章,我们看看 ServerBootstrap 的init方法,具体的源码如下:
@Override
    void init(Channel channel) throws Exception {
       ......
                ch.eventLoop().execute(new Runnable() {
                    @Override
                    public void run() {
                        pipeline.addLast(new ServerBootstrapAcceptor(
                                currentChildGroup, currentChildHandler, currentChildOptions, currentChildAttrs));
                    }
                });
            }
        });
    }
复制代码
这里的重点是最后这段代码,Netty会自动给我们添加一个 ServerBootstrapAcceptor 的连接处理器,那么现在就可以得出服务端Pipeline的构成就是Head+ServerBootstrapAcceptor+tail。这个添加tail的操作其实是在ServerBootstrap的 channelRead 方法中进行的,具体的源码如下:
@SuppressWarnings("unchecked")
        public void channelRead(ChannelHandlerContext ctx, Object msg) {
            final Channel child = (Channel) msg;

            child.pipeline().addLast(childHandler);

            for (Entry<ChannelOption<?>, Object> e: childOptions) {
                try {
                    if (!child.config().setOption((ChannelOption<Object>) e.getKey(), e.getValue())) {
                        logger.warn("Unknown channel option: " + e);
                    }
                } catch (Throwable t) {
                    logger.warn("Failed to set a channel option: " + child, t);
                }
            }

            for (Entry<AttributeKey<?>, Object> e: childAttrs) {
                child.attr((AttributeKey<Object>) e.getKey()).set(e.getValue());
            }

            try {
                childGroup.register(child).addListener(new ChannelFutureListener() {
                    @Override
                    public void operationComplete(ChannelFuture future) throws Exception {
                        if (!future.isSuccess()) {
                            forceClose(child, future.cause());
                        }
                    }
                });
            } catch (Throwable t) {
                forceClose(child, t);
            }
        }
复制代码
这里的代码我们先聚焦在 child.pipeline().addLast(childHandler) ,这一行代码,这里的 childHandler 对应的就是服务端demo中的 ChannelInitializer ,这个Handler暴露了一个 initChannel 方法,我们可以在这个方法中添加自定义的Handler。 接下来 我们聚焦到下面两个for循环,主要是设置 childOptions 和 childAttrs ,这里的设置项都是从channelConfig中的到的,childOptions主要是跟底层Tcp的读写相关的操作,childAttrs主要在客户端channel绑定一些自定义属性,比如绑定一些秘钥相关的信息。 最后 ,在try-catch块中,主要的就是选择NioEventLoop并注册Selector。最后的Channel的读事件就和先前扥西服务店channel的逻辑差不多这里就不过多介绍了。
二 Pipeline
这一节我们主要讲 Pipeline 的相关知识,Pipeline是Netty非常重要的一块。这章节我主要还是分为以下几个方面:pipeline的初始化、添加和删除ChannelHandler和事件的异常传播,下面我们进行具体的分析。
2.1 pipeline的初始化
其实Pipeline是在创建Channel的时候创建的,而Pipeline的节点是用一个 ChannelHandlerContext 的数据结构实现的,具体的下面我们进行详细的分析。首先看创建,不管是服务端Channel还是客户端Channel最后都会调用到父类 AbstractChannel 的构造方法,而Pipeline就是在里面创建的,具体的我们看如下源码:
protected AbstractChannel(Channel parent, ChannelId id) {
        this.parent = parent;
        this.id = id;
        unsafe = newUnsafe();
        pipeline = newChannelPipeline();
    }
复制代码
有这里可以看到pipeline是用 newChannelPipeline 这个方法创建的,具体的我们进入这个方法看看吧,具体的源码如下所示:
/**
  * AbstractChannel.java 113行起
  */
    protected DefaultChannelPipeline newChannelPipeline() {
        return new DefaultChannelPipeline(this);
    }
复制代码
我们继续跟进 DefaultChannelPipeline 的源码,如下所示:
/**
* DefaultChannelPipeline.java 87行起
*/
   protected DefaultChannelPipeline(Channel channel) {
        this.channel = ObjectUtil.checkNotNull(channel, "channel");
        succeededFuture = new SucceededChannelFuture(channel, null);
        voidPromise =  new VoidChannelPromise(channel, true);

        tail = new TailContext(this);
        head = new HeadContext(this);

        head.next = tail;
        tail.prev = head;
    }
复制代码
可以看到这里默认会创建两个节点 TailContext 和 HeadContext ,然后通过next和prev将两个节点构成一个双向链表。不管是TailContext还是HeadContext他们都是继承与 ChannelHandlerContext ,我们这里可以看看这个接口,具体的源码如下:
public interface ChannelHandlerContext extends AttributeMap, ChannelInboundInvoker, ChannelOutboundInvoker {

    /**
     * Return the {@link Channel} which is bound to the {@link ChannelHandlerContext}.
     */
    Channel channel();

    /**
     * Returns the {@link EventExecutor} which is used to execute an arbitrary task.
     */
    EventExecutor executor();

    /**
     * The unique name of the {@link ChannelHandlerContext}.The name was used when then {@link ChannelHandler}
     * was added to the {@link ChannelPipeline}. This name can also be used to access the registered
     * {@link ChannelHandler} from the {@link ChannelPipeline}.
     */
    String name();

    /**
     * The {@link ChannelHandler} that is bound this {@link ChannelHandlerContext}.
     */
    ChannelHandler handler();

    /**
     * Return {@code true} if the {@link ChannelHandler} which belongs to this context was removed
     * from the {@link ChannelPipeline}. Note that this method is only meant to be called from with in the
     * {@link EventLoop}.
     */
    boolean isRemoved();

    ......
}
复制代码
ChannelHandlerContext主要继承 AttributeMap 、 ChannelInboundInvoker 和 ChannelOutboundInvoker 三个接口。而AttributeMap主要是存储一些属性值,并且还可以判断是否有key对应的属性值,ChannelInboundInvoker主要是抽象了 In bound 事件(主要是指读事件,注册或者active事件)传播的一些方法,呢么ChannelOutboundInvoker主要是主要是抽象了 Out bound 事件(主要是指写事件)传播的一些方法。然后我们看看里面的一些方法,channel()方法主要是记录当前节点在哪一个channel中,executor()方法主要是记录是哪一个NioEventLoop会执行到这个节点,最后就是name()和handler()这两个方法只要就是记录业务逻辑器和业务逻辑器的名称。另外有上面的代码可知,Pipeline中有两大哨兵, head 和 tail ,这里我们简单的分析一下他们两个,先看看 TailContext 和 HeadContext 这两个的具体实现,源码如下:
/**
* DefaultChannelPipeline.java 1174行起
*/
   final class TailContext extends AbstractChannelHandlerContext implements ChannelInboundHandler {

        TailContext(DefaultChannelPipeline pipeline) {
            super(pipeline, null, TAIL_NAME, true, false);
            setAddComplete();
        }
......
}
复制代码
/**
* DefaultChannelPipeline.java 1128行起
*/
  final class HeadContext extends AbstractChannelHandlerContext
            implements ChannelOutboundHandler, ChannelInboundHandler {

        private final Unsafe unsafe;

        HeadContext(DefaultChannelPipeline pipeline) {
            super(pipeline, null, HEAD_NAME, false, true);
            unsafe = pipeline.channel().unsafe();
            setAddComplete();
        }
......
}
复制代码
分析上面的代码可以知道Tail和Head都继承至 AbstractChannelHandlerContext 这证明他们两个都是Pipeline的一个节点,我们有分析他们两个构造方法的super方法,tail:super(pipeline, null, TAIL_NAME, true, false)、head:super(pipeline, null, HEAD_NAME, false, true)看他们两个最后的两个参数传的不一样,我们分析一下他们的父类构造函数方法,具体的源码如下:
/**
* AbstractChannelHandlerContext.java 96行起
*/
AbstractChannelHandlerContext(DefaultChannelPipeline pipeline, EventExecutor executor, String name,
                                  boolean inbound, boolean outbound) {
        this.name = ObjectUtil.checkNotNull(name, "name");
        this.pipeline = pipeline;
        this.executor = executor;
        this.inbound = inbound;
        this.outbound = outbound;
        // Its ordered if its driven by the EventLoop or the given Executor is an instanceof OrderedEventExecutor.
        ordered = executor == null || executor instanceof OrderedEventExecutor;
    }
复制代码
可以看到里面大概就是赋值一个名字,传一个pipeline、nio的处理器另外的就是两个标识,这里tail表示他是一个 inbound 事件,head则是相反的。另外他们两个不同的是head的读写事件传播都是委托到一个 Unsafe 来处理的,这里具体的细节我就不分析了。
2.2 pipeline添加节点
这一小节我们主要是分析向pipeline中添加handler,实则是分析 addLast 方法,具体的我们先回到,最初我们的服务端demo中添加handler的代码块,具体的源码如下:
b.group(bossGroup, workerGroup)
                    .channel(NioServerSocketChannel.class)
                    .childOption(ChannelOption.TCP_NODELAY, true)
                    .childAttr(AttributeKey.newInstance("childAttr"), "childAttrValue")
                    .handler(new ServerHandler())
                    .childHandler(new ChannelInitializer<SocketChannel>() {
                        @Override
                        public void initChannel(SocketChannel ch) {
                            ch.pipeline().addLast(new AuthHandler());
                            //..
                        }
                    });

复制代码
这里看到我们添加自定义的handler是在 initChannel 方法中先得到pipeline然后调用addLast方法添加的节点,这个方法我先大体的介绍一下做的事情,主要就是先判断是否有重复节点,创建节点并添加至链表最后回调添加完成时间,具体的实现,下面详细分析。先看源码,如下:
/**
* DefaultChannelPipeline.java 378行起
*/
public final ChannelPipeline addLast(ChannelHandler... handlers) {
        return addLast(null, handlers);
    }

    @Override
    public final ChannelPipeline addLast(EventExecutorGroup executor, ChannelHandler... handlers) {
        if (handlers == null) {
            throw new NullPointerException("handlers");
        }

        for (ChannelHandler h: handlers) {
            if (h == null) {
                break;
            }
            addLast(executor, null, h);
        }

        return this;
    }
复制代码
看上面的代码可以知道, addLast 方法传入Handler时是一个可变参数,可以传入多个Handler,另外传入的 executor 为空,最后会一个一个去循环调用 addLast 添加handler,下面我们具体的分析一下这个方法,源码如下:
/**
* DefaultChannelPipeline.java 195行起
*/
  @Override
    public final ChannelPipeline addLast(EventExecutorGroup group, String name, ChannelHandler handler) {
        final AbstractChannelHandlerContext newCtx;
        synchronized (this) {
            checkMultiplicity(handler);

            newCtx = newContext(group, filterName(name, handler), handler);

            addLast0(newCtx);

            // If the registered is false it means that the channel was not registered on an eventloop yet.
            // In this case we add the context to the pipeline and add a task that will call
            // ChannelHandler.handlerAdded(...) once the channel is registered.
            if (!registered) {
                newCtx.setAddPending();
                callHandlerCallbackLater(newCtx, true);
                return this;
            }

            EventExecutor executor = newCtx.executor();
            if (!executor.inEventLoop()) {
                newCtx.setAddPending();
                executor.execute(new Runnable() {
                    @Override
                    public void run() {
                        callHandlerAdded0(newCtx);
                    }
                });
                return this;
            }
        }
        callHandlerAdded0(newCtx);
        return this;
    }
复制代码
到了这个方法才是真正的添加handler节点的代码,首先看到 checkMultiplicity() 这个方法,这个方法就是判断是否有重复节点,具体的代码逻辑我们跟进去看看,源码如下:
/**
* DefaultChannelPipeline.java 583行起
*/
 private static void checkMultiplicity(ChannelHandler handler) {
        if (handler instanceof ChannelHandlerAdapter) {
            ChannelHandlerAdapter h = (ChannelHandlerAdapter) handler;
            if (!h.isSharable() && h.added) {
                throw new ChannelPipelineException(
                        h.getClass().getName() +
                        " is not a @Sharable handler, so can't be added or removed multiple times.");
            }
            h.added = true;
        }
    }
复制代码
这个方法首先会判断传入的Handler是否是一个 ChannelHandlerAdapter 的一个实例,然后会判断这个Handler是否是一个共享的handler,另外判断是否是添加过得,这两个条件只要不满足一个就会抛出异常。下面我们继续分析checkMultiplicity()方法下面的良好代码,主要就是创建节点添加至链表,具体的源码如下:
newCtx = newContext(group, filterName(name, handler), handler);

    addLast0(newCtx);
复制代码
首先我们看看 newContext 这个方法创建节点,这里的 group 由先前的分析可知道是null,然后我们看看 filterName 这个方法,主要是选定一个名字,具体的源码如下:
/**
* DefaultChannelPipeline.java 289行起
*/
 private String filterName(String name, ChannelHandler handler) {
        if (name == null) {
            return generateName(handler);
        }
        checkDuplicateName(name);
        return name;
    }
复制代码
这里如果传进来的name是null,那么会调用 generateName 这个方法创建一个name并返回,反之会调用 checkDuplicateName 方法来核对时候存在此名字,如果存在则抛出异常,反之返回传进来的name。 newContext 方法的参数分析完了,我们继续看看这个方法的具体实现,具体源码如下:
/**
* DefaultChannelPipeline.java 110行起
*/
 private AbstractChannelHandlerContext newContext(EventExecutorGroup group, String name, ChannelHandler handler) {
        return new DefaultChannelHandlerContext(this, childExecutor(group), name, handler);
    }
复制代码
由这里可见就是创建了一个ChannelHandlerContext节点,那我们继续分析下一行代码 addLast0(newCtx) ,具体源码如下:
/**
* DefaultChannelPipeline.java 230行起
*/
 private void addLast0(AbstractChannelHandlerContext newCtx) {
        AbstractChannelHandlerContext prev = tail.prev;
        newCtx.prev = prev;
        newCtx.next = tail;
        prev.next = newCtx;
        tail.prev = newCtx;
    }
复制代码
这个方法的代码逻辑很简单,就是一个普通的链表插入操作,这里只是要注意的是插入的位置是尾结点的前面一个节点。上面分析了,那么就剩最后一步回调添加成功的方法,终点的代码逻辑其实在 callHandlerAdded0(newCtx) ,这行代码中,下面我们具体的分析一下这个方法,具体源码如下:
/**
* DefaultChannelPipeline.java 595行起
*/
 private void callHandlerAdded0(final AbstractChannelHandlerContext ctx) {
        try {
            ctx.handler().handlerAdded(ctx);
            ctx.setAddComplete();
        } catch (Throwable t) {
            boolean removed = false;
            try {
                remove0(ctx);
                try {
                    ctx.handler().handlerRemoved(ctx);
                } finally {
                    ctx.setRemoved();
                }
                removed = true;
            } catch (Throwable t2) {
                if (logger.isWarnEnabled()) {
                    logger.warn("Failed to remove a handler: " + ctx.name(), t2);
                }
            }

            if (removed) {
                fireExceptionCaught(new ChannelPipelineException(
                        ctx.handler().getClass().getName() +
                        ".handlerAdded() has thrown an exception; removed.", t));
            } else {
                fireExceptionCaught(new ChannelPipelineException(
                        ctx.handler().getClass().getName() +
                        ".handlerAdded() has thrown an exception; also failed to remove.", t));
            }
        }
    }
复制代码
这个代码的逻辑就是,先调用handler的回调方法- handlerAdded ,然后会调用, setAddComplete 方法,标记被添加了。到这里我们把 addLast 方法分析完了,下面我们看看用户代码中的 initChannel 什么时候被调用的吧,其实前面我们在分析服务端启动的时候,讲到添加一个 ChannelInitializer 的handler,添加过后也会调用一个 handlerAdded ,具体的我们看看这个方法的源码,如下:
@Override
/**
* ChannelInitializer.java 98行起
*/
    public void handlerAdded(ChannelHandlerContext ctx) throws Exception {
        if (ctx.channel().isRegistered()) {
            // This should always be true with our current DefaultChannelPipeline implementation.
            // The good thing about calling initChannel(...) in handlerAdded(...) is that there will be no ordering
            // suprises if a ChannelInitializer will add another ChannelInitializer. This is as all handlers
            // will be added in the expected order.
            initChannel(ctx);
        }
    }

    @SuppressWarnings("unchecked")
    private boolean initChannel(ChannelHandlerContext ctx) throws Exception {
        if (initMap.putIfAbsent(ctx, Boolean.TRUE) == null) { // Guard against re-entrance.
            try {
                initChannel((C) ctx.channel());
            } catch (Throwable cause) {
                // Explicitly call exceptionCaught(...) as we removed the handler before calling initChannel(...).
                // We do so to prevent multiple calls to initChannel(...).
                exceptionCaught(ctx, cause);
            } finally {
                remove(ctx);
            }
            return true;
        }
        return false;
    }
复制代码
默认情况下 isRegistered 会返回一个true,然后会调用到 initChannel 方法,这个方法首先判断这段代码是否被执行过,如果没被执行过会调用 initChannel() ,代用完成后会调用 remove 把这个节点给删除掉。这里的initChannel()是个抽象方法,实际上就是我们用户代码添加handler的地方。在这里用户添加handler的逻辑就分析完了,其实大体的逻辑就是将ChannelHandler替换成一个ChannelHandlerContext,然后插入到链表中,下一节我们分析怎样删除ChannelHandler。
2.3 pipeline删除节点
先说一下这个删除节点的场景吧,就拿上面我贴出的用户代码,我在pipeline中添加了一个 AuthHandler ,这个Handler主要就是一个权限控制,具体的我们看看这个Handler的实现源码吧,如下:
public class AuthHandler extends SimpleChannelInboundHandler<ByteBuf> {
    @Override
    public void channelRead(ChannelHandlerContext ctx, Object msg) throws Exception {
        //
    }

    @Override
    protected void channelRead0(ChannelHandlerContext ctx, ByteBuf password) throws Exception {
        if (paas(password)) {
            ctx.pipeline().remove(this);
        } else {
            ctx.close();
        }
    }

    private boolean paas(ByteBuf password) {
        return false;
    }
}
复制代码
这里主要就是先判断密码是否正确,如果正确就把这个handler给删除,不正确就关闭事件传播。好了有了场景的需求,我们这里就具体的分析一下删除的逻辑吧,这里先大概讲一下,首先会找到节点,然后链表删除节点,最后回调删除Handler事件方法。下面具体分析 remove 方法,具体源码如下:
/**
* DefaultChannelPipeline.java 427行起
*/
 @Override
    public final ChannelPipeline remove(ChannelHandler handler) {
        remove(getContextOrDie(handler));
        return this;
    }
复制代码
在这里我们可以看到先是调用了 getContextOrDie 这个方法,得到要删除的节点,这个方法的名字也很意思要么找到节点要么抛出异常,其实这个方法的内部实现机制就是遍历所有的节点,找到此节点。下面我们继续分析 remove 方法,具体的源码如下:
/**
* DefaultChannelPipeline.java 443行起
*/
  private AbstractChannelHandlerContext remove(final AbstractChannelHandlerContext ctx) {
        assert ctx != head && ctx != tail;

        synchronized (this) {
            remove0(ctx);

            // If the registered is false it means that the channel was not registered on an eventloop yet.
            // In this case we remove the context from the pipeline and add a task that will call
            // ChannelHandler.handlerRemoved(...) once the channel is registered.
            if (!registered) {
                callHandlerCallbackLater(ctx, false);
                return ctx;
            }

            EventExecutor executor = ctx.executor();
            if (!executor.inEventLoop()) {
                executor.execute(new Runnable() {
                    @Override
                    public void run() {
                        callHandlerRemoved0(ctx);
                    }
                });
                return ctx;
            }
        }
        callHandlerRemoved0(ctx);
        return ctx;
    }
复制代码
这里面主要的一个方法是 remove0 方法,这个方法就是在链表中删除节点,具体的源码如下:
/**
* DefaultChannelPipeline.java 472行起
*/
 private static void remove0(AbstractChannelHandlerContext ctx) {
        AbstractChannelHandlerContext prev = ctx.prev;
        AbstractChannelHandlerContext next = ctx.next;
        prev.next = next;
        next.prev = prev;
    }
复制代码
上面的代码逻辑很清晰了,就是一个简单的链表删除操作。下面我们继续分析 remove 方法,其实下面最重要的就是一个 callHandlerRemoved0 方法,这个方法的具体逻辑我们跟进去看看,具体的源码如下:
/**
* DefaultChannelPipeline.java 627行起
*/
 private void callHandlerRemoved0(final AbstractChannelHandlerContext ctx) {
        // Notify the complete removal.
        try {
            try {
                ctx.handler().handlerRemoved(ctx);
            } finally {
                ctx.setRemoved();
            }
        } catch (Throwable t) {
            fireExceptionCaught(new ChannelPipelineException(
                    ctx.handler().getClass().getName() + ".handlerRemoved() has thrown an exception.", t));
        }
    }
复制代码
其实这里也可以看出,最后就是一个删除回调函数 handlerRemoved ,好了删除节点的代码逻辑就分析到这里。
2.4 inBound事件和outBound的传播
这节的开始我们先分析一下ChannelHandler的类继承关系,下面先用一张图来表示:

ChannelHandler是逻辑处理的一个抽象,他的直接实现是一个 ChannelHandlerAdapter ,然后有两个子接口一个是 ChannelInBoundHandler ,另一个是 ChannelOutBoundHandler 然后下面我们经常用的两个就是 ChannelInBoundHandlerAdapter 和 ChannelOutBoundHandlerAdapter ,这一小节我主要分析的就是 ChannelInBoundHandlerAdapter 。 首先这里我们先看看ChannelHandler的方法有哪些,具体的源码如下:
public interface ChannelHandler {

    /**
     * Gets called after the {@link ChannelHandler} was added to the actual context and it's ready to handle events.
     */
    void handlerAdded(ChannelHandlerContext ctx) throws Exception;

    /**
     * Gets called after the {@link ChannelHandler} was removed from the actual context and it doesn't handle events
     * anymore.
     */
    void handlerRemoved(ChannelHandlerContext ctx) throws Exception;

    /**
     * Gets called if a {@link Throwable} was thrown.
     *
     * @deprecated is part of {@link ChannelInboundHandler}
     */
    @Deprecated
    void exceptionCaught(ChannelHandlerContext ctx, Throwable cause) throws Exception;

    /**
     * Indicates that the same instance of the annotated {@link ChannelHandler}
     * can be added to one or more {@link ChannelPipeline}s multiple times
     * without a race condition.
     * <p>
     * If this annotation is not specified, you have to create a new handler
     * instance every time you add it to a pipeline because it has unshared
     * state such as member variables.
     * <p>
     * This annotation is provided for documentation purpose, just like
     * <a href="http://www.javaconcurrencyinpractice.com/annotations/doc/">the JCIP annotations</a>.
     */
    @Inherited
    @Documented
    @Target(ElementType.TYPE)
    @Retention(RetentionPolicy.RUNTIME)
    @interface Sharable {
        // no value
    }
}
复制代码
首先就是 handlerAdded 和 handlerRemoved 这两个方法,在前面我们分析过什么时候被调用,这里就不说明了。然后是 exceptionCaught 这个方法,是在出现异常的时候一些异常的回调,最后就是 Sharable 这个就表示是否能被多个 pipeline 共享。
2.4.1 ChannelInBoundHandler
这里我们分析一下 ChannelInBoundHandler 在ChannelHandler上做了哪些扩展,具体的源码如下:
public interface ChannelInboundHandler extends ChannelHandler {

    /**
     * The {@link Channel} of the {@link ChannelHandlerContext} was registered with its {@link EventLoop}
     */
    void channelRegistered(ChannelHandlerContext ctx) throws Exception;

    /**
     * The {@link Channel} of the {@link ChannelHandlerContext} was unregistered from its {@link EventLoop}
     */
    void channelUnregistered(ChannelHandlerContext ctx) throws Exception;

    /**
     * The {@link Channel} of the {@link ChannelHandlerContext} is now active
     */
    void channelActive(ChannelHandlerContext ctx) throws Exception;

    /**
     * The {@link Channel} of the {@link ChannelHandlerContext} was registered is now inactive and reached its
     * end of lifetime.
     */
    void channelInactive(ChannelHandlerContext ctx) throws Exception;

    /**
     * Invoked when the current {@link Channel} has read a message from the peer.
     */
    void channelRead(ChannelHandlerContext ctx, Object msg) throws Exception;

    /**
     * Invoked when the last message read by the current read operation has been consumed by
     * {@link #channelRead(ChannelHandlerContext, Object)}.  If {@link ChannelOption#AUTO_READ} is off, no further
     * attempt to read an inbound data from the current {@link Channel} will be made until
     * {@link ChannelHandlerContext#read()} is called.
     */
    void channelReadComplete(ChannelHandlerContext ctx) throws Exception;

    /**
     * Gets called if an user event was triggered.
     */
    void userEventTriggered(ChannelHandlerContext ctx, Object evt) throws Exception;

    /**
     * Gets called once the writable state of a {@link Channel} changed. You can check the state with
     * {@link Channel#isWritable()}.
     */
    void channelWritabilityChanged(ChannelHandlerContext ctx) throws Exception;

    /**
     * Gets called if a {@link Throwable} was thrown.
     */
    @Override
    @SuppressWarnings("deprecation")
    void exceptionCaught(ChannelHandlerContext ctx, Throwable cause) throws Exception;
}
复制代码
首先是 channelRegistered 和 channelUnregistered 这两个方法,这两个方法是ChanHandler注册在NioEventLoop对应的 Future 上时的回调。然后是 channelActive 和 channelInactive 这两个方法,这两个方法是Channel在激活或失效之后回调,然后就是 channelRead 和 channelReadComplete 这两个方法,一个是读到数据或建立连接是的回调另一个是完成度或者连接后的回调。下面 userEventTriggered 表示用户可以触发一些自定义的事件,紧跟着下面 channelWritabilityChanged 表示通道可写状态的一些改变的回调,最后 exceptionCaught 方法,就是异常捕获的回调。
2.4.2 ChannelOutBoundHandler
这里我们分析一下 ChannelInBoundHandler 在ChannelHandler上做了哪些扩展,具体的源码如下:
public class ChannelOutboundHandlerAdapter extends ChannelHandlerAdapter implements ChannelOutboundHandler {

    /**
     * Calls {@link ChannelHandlerContext#bind(SocketAddress, ChannelPromise)} to forward
     * to the next {@link ChannelOutboundHandler} in the {@link ChannelPipeline}.
     *
     * Sub-classes may override this method to change behavior.
     */
    @Override
    public void bind(ChannelHandlerContext ctx, SocketAddress localAddress,
            ChannelPromise promise) throws Exception {
        ctx.bind(localAddress, promise);
    }

    /**
     * Calls {@link ChannelHandlerContext#connect(SocketAddress, SocketAddress, ChannelPromise)} to forward
     * to the next {@link ChannelOutboundHandler} in the {@link ChannelPipeline}.
     *
     * Sub-classes may override this method to change behavior.
     */
    @Override
    public void connect(ChannelHandlerContext ctx, SocketAddress remoteAddress,
            SocketAddress localAddress, ChannelPromise promise) throws Exception {
        ctx.connect(remoteAddress, localAddress, promise);
    }

    /**
     * Calls {@link ChannelHandlerContext#disconnect(ChannelPromise)} to forward
     * to the next {@link ChannelOutboundHandler} in the {@link ChannelPipeline}.
     *
     * Sub-classes may override this method to change behavior.
     */
    @Override
    public void disconnect(ChannelHandlerContext ctx, ChannelPromise promise)
            throws Exception {
        ctx.disconnect(promise);
    }

    /**
     * Calls {@link ChannelHandlerContext#close(ChannelPromise)} to forward
     * to the next {@link ChannelOutboundHandler} in the {@link ChannelPipeline}.
     *
     * Sub-classes may override this method to change behavior.
     */
    @Override
    public void close(ChannelHandlerContext ctx, ChannelPromise promise)
            throws Exception {
        ctx.close(promise);
    }

    /**
     * Calls {@link ChannelHandlerContext#deregister(ChannelPromise)} to forward
     * to the next {@link ChannelOutboundHandler} in the {@link ChannelPipeline}.
     *
     * Sub-classes may override this method to change behavior.
     */
    @Override
    public void deregister(ChannelHandlerContext ctx, ChannelPromise promise) throws Exception {
        ctx.deregister(promise);
    }

    /**
     * Calls {@link ChannelHandlerContext#read()} to forward
     * to the next {@link ChannelOutboundHandler} in the {@link ChannelPipeline}.
     *
     * Sub-classes may override this method to change behavior.
     */
    @Override
    public void read(ChannelHandlerContext ctx) throws Exception {
        ctx.read();
    }

    /**
     * Calls {@link ChannelHandlerContext#write(Object, ChannelPromise)} to forward
     * to the next {@link ChannelOutboundHandler} in the {@link ChannelPipeline}.
     *
     * Sub-classes may override this method to change behavior.
     */
    @Override
    public void write(ChannelHandlerContext ctx, Object msg, ChannelPromise promise) throws Exception {
        ctx.write(msg, promise);
    }

    /**
     * Calls {@link ChannelHandlerContext#flush()} to forward
     * to the next {@link ChannelOutboundHandler} in the {@link ChannelPipeline}.
     *
     * Sub-classes may override this method to change behavior.
     */
    @Override
    public void flush(ChannelHandlerContext ctx) throws Exception {
        ctx.flush();
    }
}

复制代码
首先是一个 bind 方法,主要是端口的绑定,这个我们在服务端启动的时候遇到过。接下来是 connect 和 disconnect 这两个方法,表示打开一个连接和关闭一个连接的操作。后面还有 close 表示关闭操作, deregister 方法表示取消注册, read 和 write ,两个方法表示读写数据,最后就是一个 flush 方法,表示刷新事件。下面我们具体分析一下inBound和outBound方法。
2.4.3 inBound事件传播
这里我们用一幅图来表示inBound和outBound事件的传播,具体的如下图:

先看inBound事件的传播,handler之间的传播信息通过 fireXXX 方法:其区别是从哪个节点开始传播,例如 ctx.fireChannelRead(msg) 从头节点 HeadContext 开始传播,**ctx.pipeline().fireChannelRead(msg)**从当前节点往下传播事件。这里我先给出一段代码,方便分析,具体源码如下:
public class InBoundHandlerA extends ChannelInboundHandlerAdapter {
    @Override
    public void channelRead(ChannelHandlerContext ctx, Object msg) throws Exception {
        System.out.println("InBoundHandlerA: " + msg);

        //调用通道的fireChannelRead方法是从头节点HeadContext开始传播
        ctx.pipeline().fireChannelRead(msg);

        //调用数据节点的传播方法是从当前节点往下传播事件
        ctx.fireChannelRead(msg);
    }
}
复制代码
其实他们两个的区别可以用下面一幅图,来区别,具体如下:
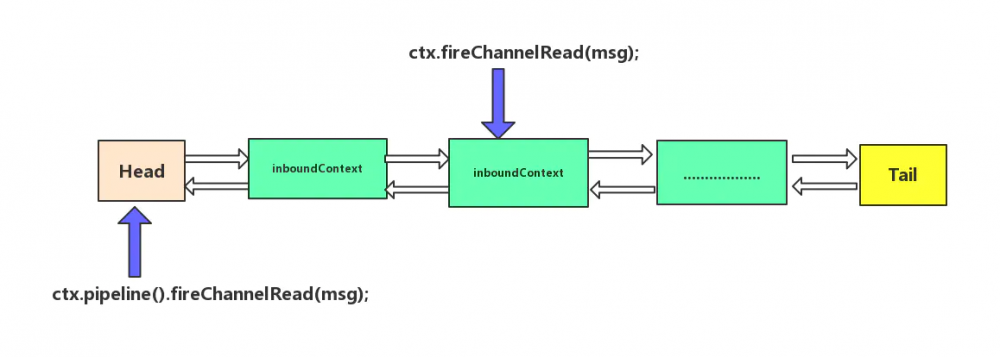
下面我们详细的分析一下,首先是 ctx.pipeline().fireChannelRead(msg) ,先获取当前context的pipeline对象, 然后通过pipeline对象调用自身的fireChannelRead方法进行传播,下面我们跟进 fireChannelRead 方法,因为默认创建的DefaultChannelpipeline,则会调用到DefaultChannelpipeline的fireChannelRead方法,具体的源码如下:
public final ChannelPipeline fireChannelRead(Object msg) {
    AbstractChannelHandlerContext.invokeChannelRead(head, msg);
    return this;
}
复制代码
然后我们跟进 invokeChannelRead 方法,具体的源码如下:
/**
* AbstractChannelHandlerContext.java 355行
*/
static void invokeChannelRead(final AbstractChannelHandlerContext next, Object msg) {
        final Object m = next.pipeline.touch(ObjectUtil.checkNotNull(msg, "msg"), next);
        EventExecutor executor = next.executor();
        if (executor.inEventLoop()) {
            next.invokeChannelRead(m);
        } else {
            executor.execute(new Runnable() {
                @Override
                public void run() {
                    next.invokeChannelRead(m);
                }
            });
        }
    }
复制代码
这里的m通常就是我们传入的msg, 而next, 由上面可知目前是head节点, 然后再判断是否为当前eventLoop线程, 如果不是则将方法包装成task交给eventLoop线程处理。具体的我们继续跟进到 invokeChannelRead 方法,具体如下:
/**
* AbstractChannelHandlerContext.java 370行
*/
private void invokeChannelRead(Object msg) {
        if (invokeHandler()) {
            try {
                ((ChannelInboundHandler) handler()).channelRead(this, msg);
            } catch (Throwable t) {
                notifyHandlerException(t);
            }
        } else {
            fireChannelRead(msg);
        }
    }
复制代码
invokeHandler()会判断当前handler是否已添加, 如果添加, 则执行当前handler的chanelRead方法, 通过fireChannelRead方法传递事件的过程中, 其实就是找到相关handler执行其channelRead方法, 由于我们在这里的handler就是head节点, 所以我们跟到HeadContext的channelRead方法中,HeadContext在前面我们分析过,下面我们看看他的channelRead方法,具体的源码如下:
public void channelRead(ChannelHandlerContext ctx, Object msg) throws Exception {
    ctx.fireChannelRead(msg);
}
复制代码
可以看到这个方法有回到了,前面的第二种方式的事件传播,及从当前节点向下传播,下面我们具体的分析 ctx.fireChannelRead(msg) 的方式,这里我们跟进 fireChannelRead 方法,具体源码如下:
/**
* AbstractChannelHandlerContext.java 350行起
*/
    @Override
    public ChannelHandlerContext fireChannelRead(final Object msg) {
        invokeChannelRead(findContextInbound(), msg);
        return this;
    }
复制代码
这里会调用一个 findContextInbound() 方法,通过inbound属性轮询出下一个ChannelInboundHandler,下面的操作又和上面的一样了。这里做个总结吧,两种方式都是逐个往下传递并触发用户回调函数,最后传到尾节点TailContext,最后会调用一个 onUnhandledInboundException 的方法,这里就不具体的分析了。下面我们开始分析,outBound事件。
2.4.3 outBound事件传播
outbound事件的传播和 inbound 事件有相似之处 ChannelOutboundHandler 的执行顺序正好和 ChannelInboundHandler 相反,是 倒序 的。这里我们分析 write 事件为主,首先我们先给出一段例子程序。
public class OutBoundHandlerA extends ChannelOutboundHandlerAdapter {
    @Override
    public void write(ChannelHandlerContext ctx, Object msg, ChannelPromise promise) throws Exception {
        System.out.println("OutBoundHandlerA: " + msg);
        ctx.write(msg, promise);
        ctx.channel().write(msg,promise);
    }
}
复制代码
这里与前面对应的就是 ctx.channel().write(msg,promise) 就是从tail节点开始向head节点传播, ctx.write(msg, promise) 就是从当前节点向head节点传播。这里我们分析**ctx.channel().write(msg,promise)**这个方法,首先跟进write方法,最后会调用的tail的write方法,具体的源码如下:
/**
* DefaultChannelPipeline.java 1016行起
*/
  @Override
    public final ChannelFuture write(Object msg) {
        return tail.write(msg);
    }

    @Override
    public final ChannelFuture write(Object msg, ChannelPromise promise) {
        return tail.write(msg, promise);
    }
复制代码
我们继续跟进代码.最终调用到 AbstractChannelHandlerContext 中下面的write()方法,具体的源码如下:
/**
* AbstractChannelHandlerContext.java 819行起
*/
   private void write(Object msg, boolean flush, ChannelPromise promise) {
        AbstractChannelHandlerContext next = findContextOutbound();
        final Object m = pipeline.touch(msg, next);
        EventExecutor executor = next.executor();
        if (executor.inEventLoop()) {
            if (flush) {
                next.invokeWriteAndFlush(m, promise);
            } else {
                next.invokeWrite(m, promise);
            }
        } else {
            AbstractWriteTask task;
            if (flush) {
                task = WriteAndFlushTask.newInstance(next, m, promise);
            }  else {
                task = WriteTask.newInstance(next, m, promise);
            }
            safeExecute(executor, task, promise, m);
        }
    }
复制代码
上面的代码主要做两部分,第一调用 findContextOutbound 方法找到下一个节点,第二 ChannelOutboundHandlerContext 判断是否需要flush,选择执行write回调方法之后是否执行flush回调方法。这里我们可以简单的看一下 findContextOutbound 方法,具体的源码如下:
/**
* AbstractChannelHandlerContext.java 953行起
*/
 private AbstractChannelHandlerContext findContextOutbound() {
        AbstractChannelHandlerContext ctx = this;
        do {
            ctx = ctx.prev;
        } while (!ctx.outbound);
        return ctx;
    }
复制代码
从上面可以知道这里就是一个双向链表找前置链表的操作,就这样子事件向前传播,最后invokeWriteAndFlush执行完write回调方法之后执行flush回调方法。
private void invokeWriteAndFlush(Object msg, ChannelPromise promise) {
        if (invokeHandler()) {
            invokeWrite0(msg, promise);
            invokeFlush0();
        } else {
            writeAndFlush(msg, promise);
        }
    }

    private void invokeFlush0() {
        try {
            ((ChannelOutboundHandler) handler()).flush(this);
        } catch (Throwable t) {
            notifyHandlerException(t);
        }
    }
复制代码
这里跟踪源码,可以发现无论是从tail节点开始还是从当前节点开始调用write方法,最终都会到head节点。而头节点正是使用unsafe来具体完成这些操作的。具体的源码如下:
/**
* DefaultChannelPipeline.java 1289行起
*/
        @Override
        public void write(ChannelHandlerContext ctx, Object msg, ChannelPromise promise) throws Exception {
            unsafe.write(msg, promise);
        }

        @Override
        public void flush(ChannelHandlerContext ctx) throws Exception {
            unsafe.flush();
        }
复制代码
在这里我就将pipeline的事件传播讲完了,当然还有一个异常的传播,这里大概的提一下,异常传播遵循的是Handler的添加顺序来传播的和in和out事件传播没关系。
正文到此结束
- 本文标签: executor 服务器 Android tk https REST ask 数据 queue 需求 id remote Select 线程 总结 ACE NSA cache ssh CTO synchronized git list DDL UI message 代码 服务端 端口 Document find final Word Bootstrap ORM java CEO 构造方法 ip value src 配置 trigger GitHub IO tab 遍历 tar volatile 删除 IDE ioc rmi TCP 权限控制 db key 详细分析 map IOS Netty NIO 源码 Java 9 参数 http PaaS 处理器 时间 bug node 实例 Connection cat 文章 管理
- 版权声明: 本文为互联网转载文章,出处已在文章中说明(部分除外)。如果侵权,请联系本站长删除,谢谢。
- 本文海报: 生成海报一 生成海报二
热门推荐


相关文章

近期评论
-
收到
-
https://www.liuhaihua.cn/archives/40657.html 这篇博客中的图片打不开了
-
不会英语啊。
-
-
-
https://pplx.ai/floraliu4199466 这个链接打不开是什么原因?
-
-
-
-
来看看,最近更新了一波,顺着友联过来的,几年过去了,网站越搞越好,厉害
Loading...
![[HBLOG]公众号](https://www.liuhaihua.cn/img/qrcode_gzh.jpg)

