Spring MVC 源码解析(二)— 容器初始化
1、什么是 servlet 容器
servlet 我们可以把它理解成是基于 java 语言的 web 组件,每一个 servlet 都有自己的生命周期包括 init() 、 service() 、 destroy() 而这些都是通过 servlet container 管理的。客户端通过servlet 容器实现的 request/response paradigm(请求/应答模式)与servlet进行交互。Servlet Container 是 Web 服务器或者应用服务器的一部分,用于提供基于请求/响应发送模式的网络服务,解码基于 MIME(全称是"Multipurpose Internet Mail Extensions",中译为"多用途互联网邮件扩展",指的是一系列的电子邮件技术规范) 的请求,并且格式化基于 MIME 的响应。Servlet 容器可以嵌入到宿主的 Web 服务器中,或者通过 Web 服务器的本地扩展 API 单独作为附加组件安装。Servelt 容器也可能内嵌或安装到启用 Web 功能的应用服务器中。目前 Spring boot 就内嵌了 tomcat、jetty等web容器。
2、Servlet 容器初始化时 Spring Mvc 都做了什么
在web.xml的文件中可看到如下配置:
<listener>
    <listener-class>org.springframework.web.context.ContextLoaderListener</listener-class>
</listener>
这个配置的意思是在 servlet 容器中增加一个监听器,当容器初始化的时候会抛出 ServletContextEvent 事件,监听器监听到该事件就会调用 ContextLoaderListener.contextInitialized(ServletContextEvent event) 方法来初始化 Spring mvc rootContext
/**
	 * Initialize the root web application context.
	 */
	@Override
	public void contextInitialized(ServletContextEvent event) {
		initWebApplicationContext(event.getServletContext());
	}
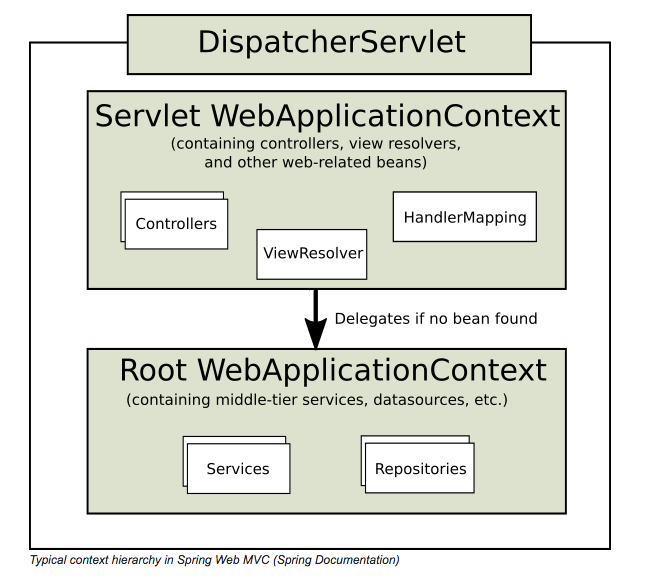
3、Spring Mvc 容器结构
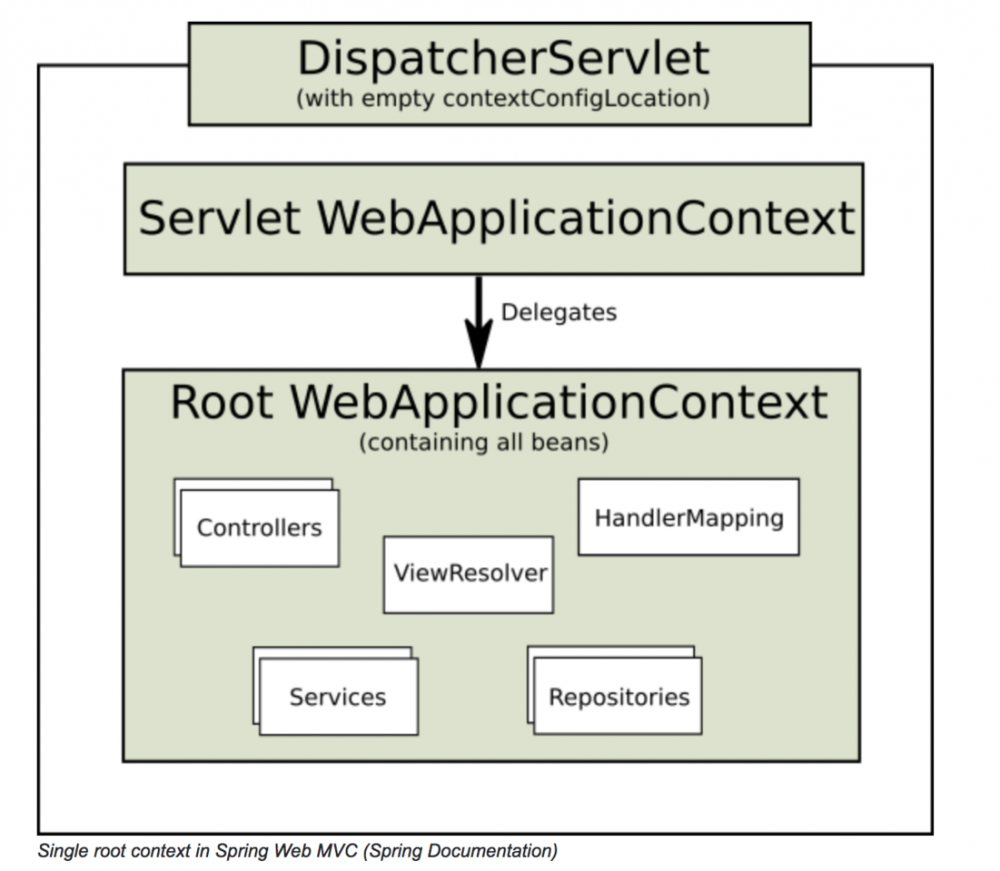
Spring Mvc 的容器是分层的,当我们的 web 应用有多个 servlet 的时候,一些公共的资源(bean)就可以放在 root WebApplicationContext 中 比如 dataSource 、 service 等,在 Spring Mvc 中 每一 servlet 都有对应的属于自己的一个 servlet WebApplicationContext 这些 Controllers 、 ViewResolver 等就可以放到与之相关连的 WebapplicationContext 中:
servlet 时,当然可以把所以的
bean 都交由
root WebApplicationContext 来管理,这样
Spring Mvc
就会通过代理的形式生成一个空的与之对应的容器。
4、java 配置容器
servlet 3.0 以后支持用过 java 代码来配置容器, servlet 提供了一个接口:
public interface ServletContainerInitializer {

    /**
     * Receives notification during startup of a web application of the classes
     * within the web application that matched the criteria defined via the
     * {@link javax.servlet.annotation.HandlesTypes} annotation.
     *
     * @param c     The (possibly null) set of classes that met the specified
     *              criteria
     * @param ctx   The ServletContext of the web application in which the
     *              classes were discovered
     *
     * @throws ServletException If an error occurs
     */
    void onStartup(Set<Class<?>> c, ServletContext ctx) throws ServletException;
}
servlet 容器在启动的时候回到 classpath 下扫描这个接口的实现。 spring Mvc 分装了一层代理实现了这个接口:
@Override
	public void onStartup(Set<Class<?>> webAppInitializerClasses, ServletContext servletContext)
			throws ServletException {

		List<WebApplicationInitializer> initializers = new LinkedList<WebApplicationInitializer>();

		if (webAppInitializerClasses != null) {
			for (Class<?> waiClass : webAppInitializerClasses) {
				// Be defensive: Some servlet containers provide us with invalid classes,
				// no matter what @HandlesTypes says...
				if (!waiClass.isInterface() && !Modifier.isAbstract(waiClass.getModifiers()) &&
						WebApplicationInitializer.class.isAssignableFrom(waiClass)) {
					try {
						initializers.add((WebApplicationInitializer) waiClass.newInstance());
					}
					catch (Throwable ex) {
						throw new ServletException("Failed to instantiate WebApplicationInitializer class", ex);
					}
				}
			}
		}

		if (initializers.isEmpty()) {
			servletContext.log("No Spring WebApplicationInitializer types detected on classpath");
			return;
		}

		servletContext.log(initializers.size() + " Spring WebApplicationInitializers detected on classpath");
		AnnotationAwareOrderComparator.sort(initializers);
		for (WebApplicationInitializer initializer : initializers) {
			initializer.onStartup(servletContext);
		}
	}
在实际使用中只要实现 Spring Mvc 为我们提供的接口即可;
public interface WebApplicationInitializer {

	/**
	 * Configure the given {@link ServletContext} with any servlets, filters, listeners
	 * context-params and attributes necessary for initializing this web application. See
	 * examples {@linkplain WebApplicationInitializer above}.
	 * @param servletContext the {@code ServletContext} to initialize
	 * @throws ServletException if any call against the given {@code ServletContext}
	 * throws a {@code ServletException}
	 */
	void onStartup(ServletContext servletContext) throws ServletException;

}
我们可以通过这个接口来完成servlet 容器 以及 Spring Mvc 容器的初始化工作,这样做就可以将项目中的配置文件彻底消灭掉。
5、如何消灭配置文件
去除 web.xml
<web-app id="WebApp_ID" version="2.4"
         xmlns="http://java.sun.com/xml/ns/j2ee"
         xmlns:xsi="http://www.w3.org/2001/XMLSchema-instance"
         xsi:schemaLocation="http://java.sun.com/xml/ns/j2ee
   http://java.sun.com/xml/ns/j2ee/web-app_2_4.xsd
http://java.sun.com/xml/ns/j2ee ">

    <servlet>
        <servlet-name>demo</servlet-name>
        <servlet-class>org.springframework.web.servlet.DispatcherServlet</servlet-class>
        <load-on-startup>1</load-on-startup>
        <init-param>
            <param-name>contextConfigLocation</param-name>
            <param-value>/WEB-INF/spring-mvc-servlet.xml</param-value>
        </init-param>
    </servlet>

    <servlet-mapping>
        <servlet-name>demo</servlet-name>
        <url-pattern>/*</url-pattern>
    </servlet-mapping>

    <!-- 如果不想用默认的配置文件名,可以在这里指定. 核心文件名规则:xxx-servlet.xml,xxx是<servlet-name>的名字 -->
    <context-param>
        <param-name>contextConfigLocation</param-name>
        <param-value>/WEB-INF/spring-mvc-servlet.xml</param-value>
    </context-param>
    <!-- Spring ContextLoaderListener -->
    <listener>
        <listener-class>org.springframework.web.context.ContextLoaderListener</listener-class>
    </listener>

    <!-- Post请求中文乱码 -->
    <filter>
        <filter-name>CharacterEncoding</filter-name>
        <filter-class>org.springframework.web.filter.CharacterEncodingFilter</filter-class>
        <init-param>
            <param-name>encoding</param-name>
            <param-value>UTF-8</param-value>
        </init-param>
        <init-param>
            <param-name>forceEncoding</param-name>
            <param-value>true</param-value>
        </init-param>
    </filter>
    <filter-mapping>
        <filter-name>CharacterEncoding</filter-name>
        <url-pattern>/*</url-pattern>
    </filter-mapping>
</web-app>
通过java 代码可以将其改造为:
public class DemoServletinitializer implements WebApplicationInitializer {

    @Override
    public void onStartup(ServletContext servletContext) throws ServletException {

        //初始化root WebApplicationContext
        AnnotationConfigWebApplicationContext rootContext = new AnnotationConfigWebApplicationContext();
        rootContext.register(DemoRootApplicationContextConfiguration.class);
        servletContext.addListener(new ContextLoaderListener(rootContext));

        //初始化 servlet WebApplicationContext
        AnnotationConfigWebApplicationContext webApplicationContext = new AnnotationConfigWebApplicationContext();
        webApplicationContext.register(DemoWebMvcConfiguration.class);

        //注册 servlet
        ServletRegistration.Dynamic registration = servletContext.addServlet("demo", new DispatcherServlet(webApplicationContext));
        registration.setLoadOnStartup(1);
        registration.addMapping("/");

        //注册 filter
        FilterRegistration.Dynamic characterEncoding = servletContext.addFilter("characterEncoding", CharacterEncodingFilter.class);
        characterEncoding.setInitParameter("encoding", "UTF-8");
        characterEncoding.setInitParameter("forceEncoding", "true");

    }
}
去除 xxx-servlet.xml
<?xml version="1.0" encoding="UTF-8"?>
<beans xmlns="http://www.springframework.org/schema/beans"
       xmlns:xsi="http://www.w3.org/2001/XMLSchema-instance"
       xmlns:context="http://www.springframework.org/schema/context"
       xmlns:mvc="http://www.springframework.org/schema/mvc"
       xsi:schemaLocation="http://www.springframework.org/schema/beans
      http://www.springframework.org/schema/beans/spring-beans.xsd
      http://www.springframework.org/schema/context
      http://www.springframework.org/schema/context/spring-context.xsd
      http://www.springframework.org/schema/mvc
      http://www.springframework.org/schema/mvc/spring-mvc-3.0.xsd">

    <context:component-scan base-package="demo" />


    <mvc:annotation-driven />

    <!-- 启用注解配置 -->
    <context:annotation-config />

    <bean class="org.springframework.web.servlet.view.ContentNegotiatingViewResolver">
        <property name="defaultViews">
            <list>
                <bean class="org.springframework.web.servlet.view.json.MappingJackson2JsonView">
                    <property name="extractValueFromSingleKeyModel" value="true" />
                </bean>
            </list>
        </property>
    </bean>

    <mvc:interceptors>
        <bean class="demo.DemoInterceptor"/>
    </mvc:interceptors>

</beans>
等价于java 配置: Root WebAppicationContext 配置
@Configuration
@ComponentScan("demo")
public class DemoRootApplicationContextConfiguration {

    @Bean
    public ContentNegotiatingViewResolver contentNegotiatingViewResolver() {
        ContentNegotiatingViewResolver viewResolver = new ContentNegotiatingViewResolver();
        viewResolver.setDefaultViews(Lists.<View>newArrayList(mappingJackson2JsonView()));
        return viewResolver;
    }

    @Bean
    public MappingJackson2JsonView mappingJackson2JsonView() {
        MappingJackson2JsonView jsonView = new MappingJackson2JsonView();
        jsonView.setExtractValueFromSingleKeyModel(true);
        return jsonView;
    }

    @Bean
    public DataSource dataSource() {
        // add data source config
        return null;
    }
}
servlet WebApplicationContext 配置
@ComponentScan("demo")
@Configuration
@EnableWebMvc
public class DemoWebMvcConfiguration extends WebMvcConfigurerAdapter {

    @Override
    public void addInterceptors(InterceptorRegistry registry) {
        registry.addInterceptor(new DemoInterceptor());
    }

    @Bean
    public InternalResourceViewResolver internalResourceViewResolver() {
        InternalResourceViewResolver viewResolver = new InternalResourceViewResolver();
        viewResolver.setPrefix("/WEB-INF/jsp/");
        viewResolver.setSuffix(".jsp");
        return viewResolver;
    }
}
这样就可以将web.xml、xxx-servlet去除掉了,再也不用看到烦人的配置文件了。 当然 spring Mvc 还提供了一些抽象类来简化配置工作,这里为了更方便的解释java 配置的过程所以没有直接使用。对这一部分有兴趣的同学可以自己查看 AbstractAnnotationConfigDispatcherServletInitializer 源码。
正文到此结束
- 本文标签: UI key 生命 mail 互联网 Spring Boot 代码 schema root Property ip 配置 XML http jetty tar id API dataSource web 监听器 tomcat 安装 json DDL 源码 IO 管理 list java Listeners servlet map 解析 src classpath js bean IDE value spring ACE cat 乱码 App example 服务器 https Service
- 版权声明: 本文为互联网转载文章,出处已在文章中说明(部分除外)。如果侵权,请联系本站长删除,谢谢。
- 本文海报: 生成海报一 生成海报二
热门推荐


相关文章

近期评论
-
谢谢
-
https://www.newcmy.com/register?aff=HBVX建议您试试草莓云机场,可以流畅观看youtube和tiktok,上reddit/x也没有问题,还有各种ai优化节点。
-
-
-
想购买您这个站,我的联系方式QQ741756694微信同步 能卖联系
-
-
-
-
-
https://www.liuhaihua.cn/archives/40657.html 这篇博客中的图片打不开了
Loading...
![[HBLOG]公众号](https://www.liuhaihua.cn/img/qrcode_gzh.jpg)

