Spring Boot 实战全面解析
简介
Spring Boot 其实是一些库的集合,任意项目都可以使用它快速构建系统,更加敏捷地开发Spring应用程序,专注于应用程序的功能,不用在Spring的配置上多花功夫,甚至完全不用配置。
Idea 安装和使用
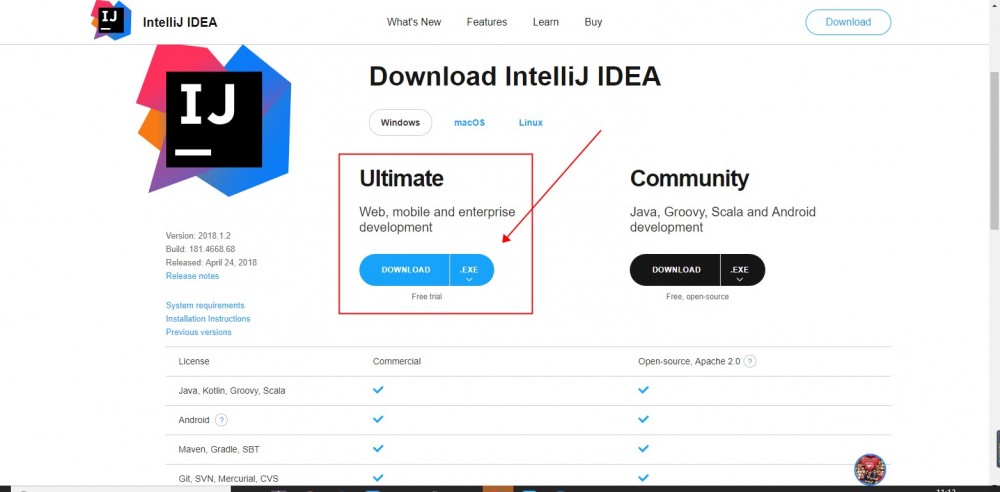
Idea下载 如图:
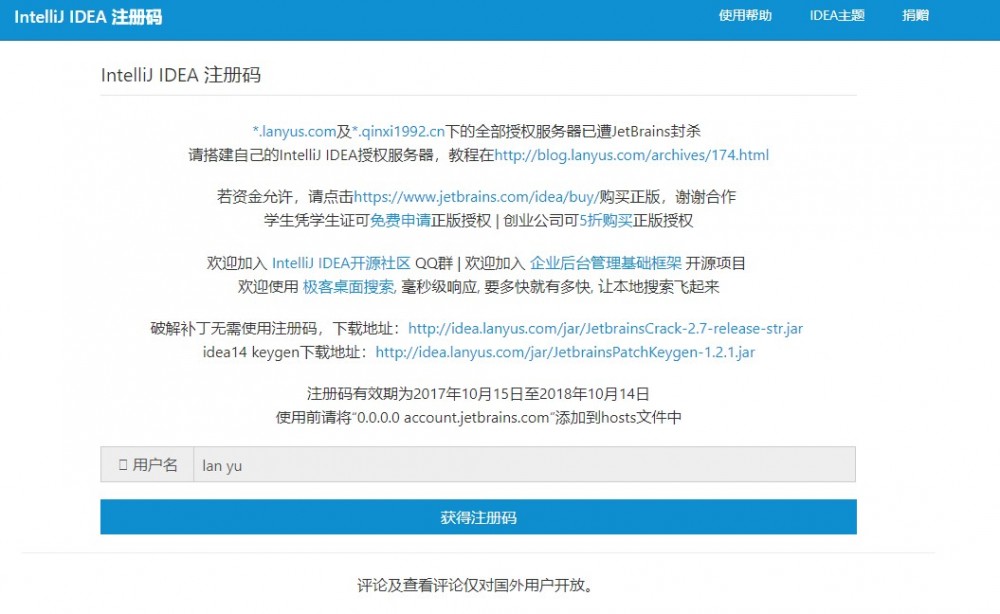
Idea 破解: 方法一 , 方法二 !
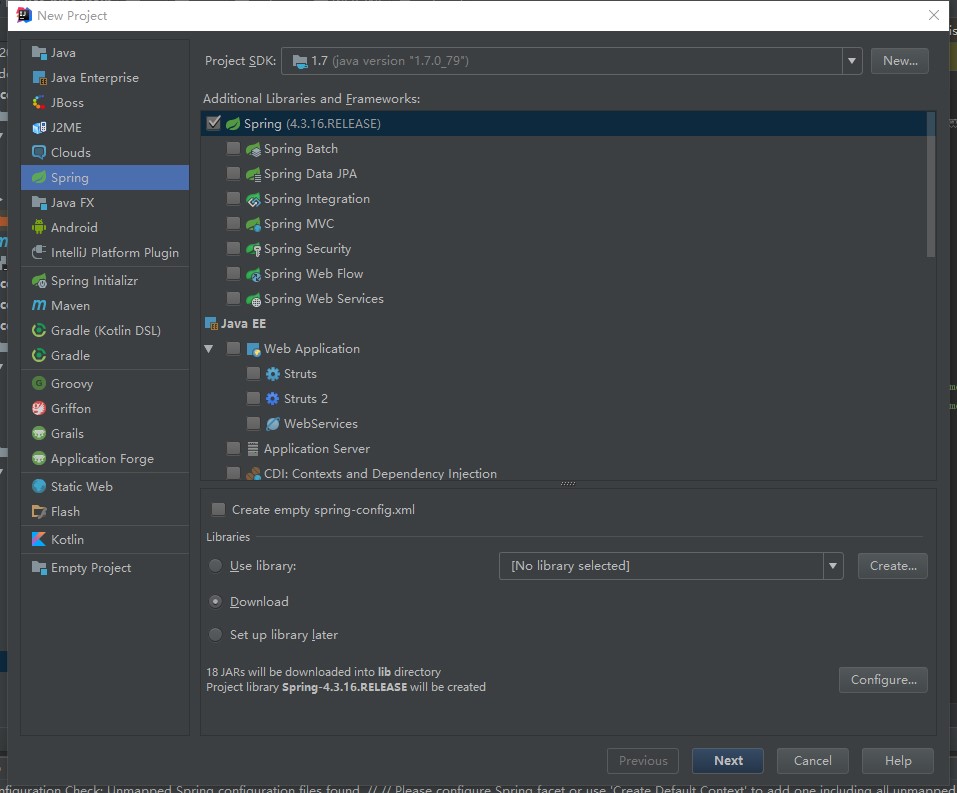
Idea Spring 项目如图:
添加相关依赖
主要涉及的文件:
pom.xml : 主要描述了项目的maven坐标,依赖关系,开发者需要遵循的规则,缺陷管理系统,组织和licenses,以及其他所有的项目相关因素,是项目级别的配置文件。
ApplicationContext.xml : spring 全局配置文件,用来控制spring 特性的。
dispatcher-servlet.xml : spring mvc里面的,控制器、拦截uri转发view。
web.xml : 站台的名称和说明、针对环境参数(Context)做初始化工作、Servlet的名称和映射、Session的设定、Tag library的对映、JSP网页设定、Mime Type处理、错误处理、利用JDNI取得站台资源。
RESTfull API 快速搭建
打开IntelliJ新建工程,选择Java Enterprise -> Web Application,如图:
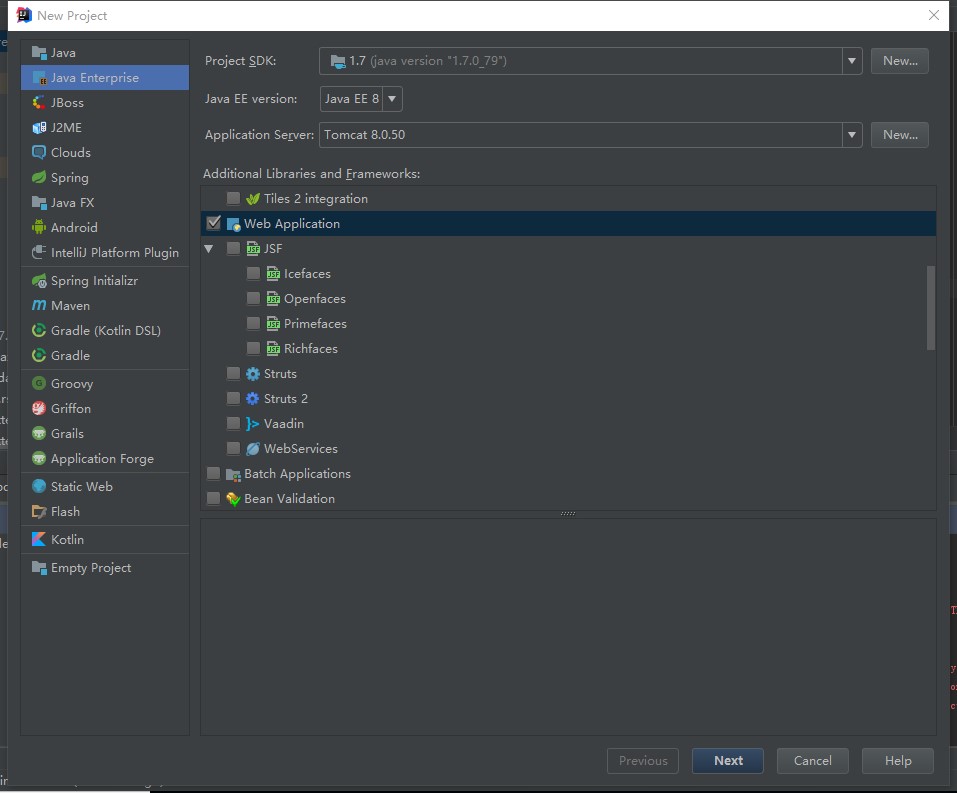
由于RESTful Web Service 库暂未导入,一直报错,所以使用Web Application 代替。
添加Rest环境支持:在工程根目录下创建pom.xml,然后加入代码如下
<?xml version="1.0" encoding="UTF-8"?>
<project xmlns="http://maven.apache.org/POM/4.0.0"
         xmlns:xsi="http://www.w3.org/2001/XMLSchema-instance"
         xsi:schemaLocation="http://maven.apache.org/POM/4.0.0 http://maven.apache.org/xsd/maven-4.0.0.xsd">
    <modelVersion>4.0.0</modelVersion>
    <groupId>com.banketree</groupId>
    <artifactId>demo</artifactId>
    <version>1.0-SNAPSHOT</version>
    <dependencies>
        <dependency>
            <groupId>org.glassfish.jersey.containers</groupId>
            <artifactId>jersey-container-servlet</artifactId>
            <version>2.22.2</version>
        </dependency>
    </dependencies>
</project>
右键pom.xml,在菜单中选择Add as Maven Project !
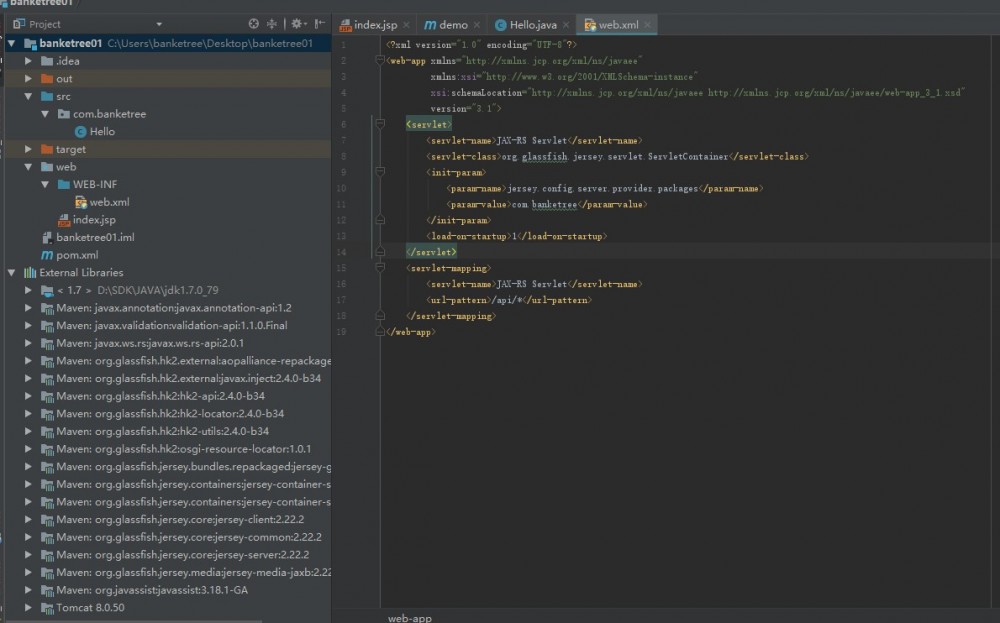
项目如图:
运行配置,添加Tomcat server
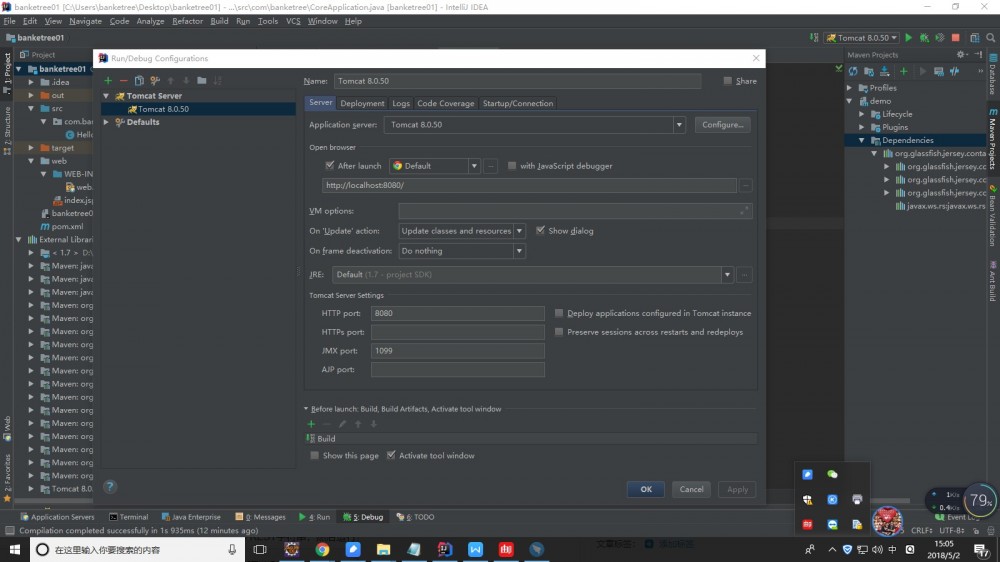
运行 , 浏览器自动打开http://localhost:8080/并显示出你的jsp网页
添加Hello.java
package com.banketree;

import javax.ws.rs.GET;
import javax.ws.rs.Path;
import javax.ws.rs.Produces;
import javax.ws.rs.core.MediaType;

@Path("/hello")
public class Hello {
    // This method is called if TEXT_PLAIN is request
    @GET
    @Produces(MediaType.TEXT_PLAIN)
    public String sayPlainTextHello() {
        return "Hello Jersey";
    }

    // This method is called if XML is request
    @GET
    @Produces(MediaType.TEXT_XML)
    public String sayXMLHello() {
        return "<?xml version=/"1.0/"?>" + "<hello> Hello Jersey" + "</hello>";
    }

    // This method is called if HTML is request
    @GET
    @Produces(MediaType.TEXT_HTML)
    public String sayHtmlHello() {
        return "<html> " + "<title>" + "Hello Jersey" + "</title>"
                + "<body><h1>" + "Hello Jersey" + "</body></h1>" + "</html> ";
    }
}
修改web/WEB-INF/web.xml内容如下
<?xml version="1.0" encoding="UTF-8"?>
<web-app xmlns="http://xmlns.jcp.org/xml/ns/javaee"
         xmlns:xsi="http://www.w3.org/2001/XMLSchema-instance"
         xsi:schemaLocation="http://xmlns.jcp.org/xml/ns/javaee http://xmlns.jcp.org/xml/ns/javaee/web-app_3_1.xsd"
         version="3.1">
    <servlet>
        <servlet-name>JAX-RS Servlet</servlet-name>
        <servlet-class>org.glassfish.jersey.servlet.ServletContainer</servlet-class>
        <init-param>
            <param-name>jersey.config.server.provider.packages</param-name>
            <param-value>com.banketree</param-value>
        </init-param>
        <load-on-startup>1</load-on-startup>
    </servlet>
    <servlet-mapping>
        <servlet-name>JAX-RS Servlet</servlet-name>
        <url-pattern>/api/*</url-pattern>
    </servlet-mapping>
</web-app>
运行,访问http://localhost:8080/api/hello,看到Hello Jersey。

运行项目:
1、直接运行 main方法或者使用maven命令 “spring-boot:run”
2、java –jar roncoo-education-0.0.1-SNAPSHOT.jar
打包命令: clean package
配置文件详解和多环境使用
一.配置文件的生效顺序,会对值进行覆盖
1. @TestPropertySource 注解
2. 命令行参数
3. Java系统属性(System.getProperties())
4. 操作系统环境变量
5. 只有在random.*里包含的属性会产生一个RandomValuePropertySource
6. 在打包的jar外的应用程序配置文件(application.properties,包含YAML和profile变量)
7. 在打包的jar内的应用程序配置文件(application.properties,包含YAML和profile变量)
8. 在@Configuration类上的@PropertySource注解
9. 默认属性(使用SpringApplication.setDefaultProperties指定)
二.配置随机值
roncoo.secret=${random.value}
roncoo.number=${random.int}
roncoo.bignumber=${random.long}
roncoo.number.less.than.ten=${random.int(10)}
roncoo.number.in.range=${random.int[1024,65536]}
读取使用注解:@Value(value = "${roncoo.secret}")
注:出现黄点提示,是要提示配置元数据,可以不配置
三.属性占位符
当application.properties里的值被使用时,它们会被存在的Environment过滤,所以你能够引用先前定义的值(比如,系统属性)。
roncoo.name=www.roncoo.com
roncoo.desc=${roncoo.name} is a domain name
四.Application属性文件,按优先级排序,位置高的将覆盖位置低的
1. 当前目录下的一个/config子目录
2. 当前目录
3. 一个classpath下的/config包
4. classpath根路径(root)
这个列表是按优先级排序的(列表中位置高的将覆盖位置低的)
五. 配置应用端口和其他配置的介绍
#端口配置:
server.port=8090
#时间格式化
spring.jackson.date-format=yyyy-MM-dd HH:mm:ss
#时区设置
spring.jackson.time-zone=Asia/Chongqing
六. 使用YAML代替Properties
注意写法:冒号后要加个空格
#自定义配置
roncoo:
  secret: ${random.value}
  number: ${random.int}
  name: www.roncoo.com
  desc: ${roncoo.name} is a domain name

#端口
server:
  port: 8090


#spring jsckson
spring:
  jackson:
    date-format: yyyy-MM-dd HH:mm:ss
    time-zone: Asia/Chongqing
多环境配置
Properties多环境配置
1. 配置激活选项
spring.profiles.active=dev
2.添加其他配置文件

YAML多环境配置
1.配置激活选项
spring:
profiles:
active: dev
2.在配置文件添加三个英文状态下的短横线即可区分
spring:
profiles: dev
命令运行:java -jar myapp.jar --spring.profiles.active=dev
日志配置 logback和log4j2
日志框架
Java Util Logging 、Log4J2 、Logback
默认是使用logback
配置方式:默认配置文件配置和引用外部配置文件配置
一、默认配置文件配置
不建议使用:不够灵活,对log4j2等不够友好
# 日志文件名,比如:roncoo.log,或者是 /var/log/roncoo.log
logging.file=roncoo.log
# 日志级别配置,比如: logging.level.org.springframework=DEBUG
logging.level.*=info
logging.level.org.springframework=DEBUG
二、引用外部配置文件
logback配置方式:
spring boot默认会加载classpath:logback-spring.xml或者classpath:logback-spring.groovy
使用自定义配置文件,配置方式为:
logging.config=classpath:logback-roncoo.xml
注意:不要使用logback这个来命名,否则spring boot将不能完全实例化
1.使用基于spring boot的配置
<?xml version="1.0" encoding="UTF-8"?>
<configuration>
<include resource="org/springframework/boot/logging/logback/base.xml"/>
<logger name="org.springframework.web" level="DEBUG"/>
</configuration>
log4j配置(去除logback的依赖包,添加log4j2的依赖包)
<exclusions>
				<exclusion>
					<groupId>org.springframework.boot</groupId>
					<artifactId>spring-boot-starter-logging</artifactId>
				</exclusion>
			</exclusions>
<!-- 使用log4j2 -->
		<dependency>
			<groupId>org.springframework.boot</groupId>
			<artifactId>spring-boot-starter-log4j2</artifactId>
		</dependency>
……
三.比较
性能比较:Log4J2 和 Logback 都优于 log4j(不推荐使用)
配置方式:Logback最简洁,spring boot默认,推荐使用
logback:
<?xml version="1.0" encoding="UTF-8"?>
<configuration>

	<!-- 文件输出格式 -->
	<property name="PATTERN" value="%-12(%d{yyyy-MM-dd HH:mm:ss.SSS}) |-%-5level [%thread] %c [%L] -| %msg%n" />
	<!-- test文件路径 -->
	<property name="TEST_FILE_PATH" value="c:/opt/roncoo/logs" />
	<!-- pro文件路径 -->
	<property name="PRO_FILE_PATH" value="/opt/roncoo/logs" />

	<!-- 开发环境 -->
	<springProfile name="dev">
		<appender name="CONSOLE" class="ch.qos.logback.core.ConsoleAppender">
			<encoder>
				<pattern>${PATTERN}</pattern>
			</encoder>
		</appender>

		<logger name="com.roncoo.education" level="debug"/>

		<root level="info">
			<appender-ref ref="CONSOLE" />
		</root>
	</springProfile>

	<!-- 测试环境 -->
	<springProfile name="test">
		<!-- 每天产生一个文件 -->
		<appender name="TEST-FILE" class="ch.qos.logback.core.rolling.RollingFileAppender">
			<!-- 文件路径 -->
			<file>${TEST_FILE_PATH}</file>
			<rollingPolicy class="ch.qos.logback.core.rolling.TimeBasedRollingPolicy">
				<!-- 文件名称 -->
				<fileNamePattern>${TEST_FILE_PATH}/info.%d{yyyy-MM-dd}.log</fileNamePattern>
				<!-- 文件最大保存历史数量 -->
				<MaxHistory>100</MaxHistory>
			</rollingPolicy>

			<layout class="ch.qos.logback.classic.PatternLayout">
				<pattern>${PATTERN}</pattern>
			</layout>
		</appender>

		<root level="info">
			<appender-ref ref="TEST-FILE" />
		</root>
	</springProfile>

	<!-- 生产环境 -->
	<springProfile name="prod">
		<appender name="PROD_FILE" class="ch.qos.logback.core.rolling.RollingFileAppender">
			<file>${PRO_FILE_PATH}</file>
			<rollingPolicy class="ch.qos.logback.core.rolling.TimeBasedRollingPolicy">
				<fileNamePattern>${PRO_FILE_PATH}/warn.%d{yyyy-MM-dd}.log</fileNamePattern>
				<MaxHistory>100</MaxHistory>
			</rollingPolicy>
			<layout class="ch.qos.logback.classic.PatternLayout">
				<pattern>${PATTERN}</pattern>
			</layout>
		</appender>

		<root level="warn">
			<appender-ref ref="PROD_FILE" />
		</root>
	</springProfile>
</configuration>
log4j2
<?xml version="1.0" encoding="utf-8"?>
<configuration>
	<properties>
		<!-- 文件输出格式 -->
		<property name="PATTERN">%d{yyyy-MM-dd HH:mm:ss.SSS} |-%-5level [%thread] %c [%L] -| %msg%n</property>
	</properties>

	<appenders>
		<Console name="CONSOLE" target="system_out">
			<PatternLayout pattern="${PATTERN}" />
		</Console>
	</appenders>

	<loggers>
		<logger name="com.roncoo.education" level="debug" />
		<root level="info">
			<appenderref ref="CONSOLE" />
		</root>
	</loggers>

</configuration>
web开发
Spring boot 在spring默认基础上,自动配置添加了以下特性:
1.包含了ContentNegotiatingViewResolver和BeanNameViewResolver beans。
2.对静态资源的支持,包括对WebJars的支持。
3.自动注册Converter,GenericConverter,Formatter beans。
4.对HttpMessageConverters的支持。
5.自动注册MessageCodeResolver。
6.对静态index.html的支持。
7.对自定义Favicon的支持。
8.主动使用ConfigurableWebBindingInitializer bean
支持的模板引擎:
FreeMarker
Thymeleaf
Velocity (1.4版本之后弃用,Spring Framework 4.3版本之后弃用)
Groovy
Mustache
注:jsp应该尽量避免使用,原因如下:
1.jsp只能打包为:war格式,不支持jar格式,只能在标准的容器里面跑(tomcat,jetty都可以)
2.内嵌的Jetty目前不支持JSPs
3.Undertow不支持jsps
4.jsp自定义错误页面不能覆盖spring boot 默认的错误页面
1、模板引擎
FreeMarker
添加依赖
<dependency>
			<groupId>org.springframework.boot</groupId>
			<artifactId>spring-boot-starter-freemarker</artifactId>
		</dependency>
<!DOCTYPE html>
<html>
<head lang="en">
	<title>Spring Boot Demo - FreeMarker</title>

	<link href="/css/index.css" rel="stylesheet" />

</head>
<body>
	<center>
		<img src="/images/logo.png" />
		<h1 id="title">${title}</h1>
	</center>

	<script type="text/javascript" src="/webjars/jquery/2.1.4/jquery.min.js"></script>

	<script>
		$(function(){
			$('#title').click(function(){
				alert('点击了');
			});
		})
	</script>
</body>
</html>
Thymeleaf
<dependency>
		<groupId>org.springframework.boot</groupId>
		<artifactId>spring-boot-starter-thymeleaf</artifactId>
		</dependency>
……
jsp
<dependency>
			<groupId>org.apache.tomcat.embed</groupId>
			<artifactId>tomcat-embed-jasper</artifactId>
			<scope>provided</scope>
		</dependency>
		<dependency>
			<groupId>javax.servlet</groupId>
			<artifactId>jstl</artifactId>
		</dependency>
<%@ taglib prefix="spring" uri="http://www.springframework.org/tags"%>
<%@ taglib prefix="c" uri="http://java.sun.com/jsp/jstl/core"%>

<!DOCTYPE html>
<html>
<head lang="en">
	<title>Spring Boot Demo - FreeMarker</title>

	<link href="/static/css/index.css" rel="stylesheet" />

</head>
<body>
	<img src="/static/images/logo.png" alt="logo"/>
	<h1 id="title">${title}</h1>

	<c:url value="http://www.roncoo.com" var="url"/>
	<spring:url value="http://www.roncoo.com" htmlEscape="true" var="springUrl" />

	Spring URL: ${springUrl}
	<br>
	JSTL URL: ${url}

	<!-- <script type="text/javascript" src="/static/webjars/jquery/2.1.4/jquery.min.js"></script>
	<script>
		$(function(){
			$('#title').click(function(){
				alert('点击了');
			});
		})
	</script> -->
</body>
</html>
……
2、错误处理
方法一:Spring Boot 将所有的错误默认映射到/error, 实现ErrorController
@Controller
@RequestMapping(value = "error")
public class BaseErrorController implements ErrorController {
private static final Logger logger = LoggerFactory.getLogger(BaseErrorController.class);
	@Override
	public String getErrorPath() {
		logger.info("出错啦!进入自定义错误控制器");
		return "error/error";
	}
	@RequestMapping
	public String error() {
		return getErrorPath();
	}
}
方法二:添加自定义的错误页面
2.1 html静态页面:在resources/public/error/ 下定义
如添加404页面: resources/public/error/404.html页面,中文注意页面编码

2.2 模板引擎页面:在templates/error/下定义
如添加5xx页面: templates/error/5xx.ftl
注:templates/error/ 这个的优先级比较 resources/public/error/高
方法三:使用注解@ControllerAdvice
/**
	 * 统一异常处理
	 *
	 * @param exception
	 *            exception
	 * @return
	 */
	@ExceptionHandler({ RuntimeException.class })
	@ResponseStatus(HttpStatus.OK)
	public ModelAndView processException(RuntimeException exception) {
		logger.info("自定义异常处理-RuntimeException");
		ModelAndView m = new ModelAndView();
		m.addObject("roncooException", exception.getMessage());
		m.setViewName("error/500");
		return m;
	}


	/**
	 * 统一异常处理
	 *
	 * @param exception
	 *            exception
	 * @return
	 */
	@ExceptionHandler({ Exception.class })
	@ResponseStatus(HttpStatus.OK)
	public ModelAndView processException(Exception exception) {
		logger.info("自定义异常处理-Exception");
		ModelAndView m = new ModelAndView();
		m.addObject("roncooException", exception.getMessage());
		m.setViewName("error/500");
		return m;
	}
3、Servlets, Filters, listeners 三大组件
Servlet:
Servlet是用来处理客户端请求的动态资源,也就是当我们在浏览器中键入一个地址回车跳转后,请求就会被发送到对应的Servlet上进行处理。
Servlet的任务有:

接收请求数据:我们都知道客户端请求会被封装成HttpServletRequest对象,里面包含了请求头、参数等各种信息。
处理请求:通常我们会在service、doPost或者doGet方法进行接收参数,并且调用业务层(service)的方法来处理请求。
完成响应:处理完请求后,我们一般会转发(forward)或者重定向(redirect)到某个页面,转发是HttpServletRequest中的方法,
重定向是HttpServletResponse中的方法,两者是有很大区别的。
Servlet的创建:Servlet可以在第一次接收请求时被创建,也可以在在服务器启动时就被创建,这需要在web.xml的< servlet>中添加一条配置信息
 < load-on-startup>5< /load-on-startup>,当值为0或者大于0时,表示容器在应用启动时就加载这个servlet,当是一个负数时或者没有指定时,
则指示容器在该servlet被请求时才加载。

Servlet的生命周期方法:

> void init(ServletConfig)

servlet的初始化方法,只在创建servlet实例时候调用一次,Servlet是单例的,整个服务器就只创建一个同类型Servlet

> void service(ServletRequest,ServletResponse)

servlet的处理请求方法,在servle被请求时,会被马上调用,每处理一次请求,就会被调用一次。ServletRequest类为请求类,ServletResponse类为响应类

> void destory()

servlet销毁之前执行的方法,只执行一次,用于释放servlet占有的资源,通常Servlet是没什么可要释放的,所以该方法一般都是空的

Servlet的其他重要方法:

> ServletConfig getServletConfig()

获取servlet的配置信息的方法,所谓的配置信息就是WEB-INF目录下的web.xml中的servlet标签里面的信息

> String getServletInfo()

获取servlet的信息方法

Servlet的配置:

  <servlet>
    <servlet-name>LoginServlet</servlet-name>
    <servlet-class>com.briup.estore.web.servlet.LoginServlet</servlet-class>
  </servlet>
  <servlet-mapping>
    <servlet-name>LoginServlet</servlet-name>
    <url-pattern>/login</url-pattern>
  </servlet-mapping>
……
Filter:
filter与servlet在很多的方面极其相似,但是也有不同,例如filter和servlet一样都又三个生命周期方法,同时他们在web.xml中的配置文件也是差不多的、
 但是servlet主要负责处理请求,而filter主要负责拦截请求,和放行。

filter四种拦截方式

REQUEST:直接访问目标资源时执行过滤器。包括:在地址栏中直接访问、表单提交、超链接、重定向,只要在地址栏中可以看到目标资源的路径,就是REQUEST;
FORWARD:转发访问执行过滤器。包括RequestDispatcher#forward()方法、< jsp:forward>标签都是转发访问;
INCLUDE:包含访问执行过滤器。包括RequestDispatcher#include()方法、< jsp:include>标签都是包含访问;
ERROR:当目标资源在web.xml中配置为< error-page>中时,并且真的出现了异常,转发到目标资源时,会执行过滤器。
url-mapping的写法
匹配规则有三种:

精确匹配 —— 如/foo.htm,只会匹配foo.htm这个URL
路径匹配 —— 如/foo/*,会匹配以foo为前缀的URL
后缀匹配 —— 如*.htm,会匹配所有以.htm为后缀的URL
< url-pattern>的其他写法,如/foo/ ,/.htm ,/foo 都是不对的。
执行filter的顺序
如果有多个过滤器都匹配该请求,顺序决定于web.xml filter-mapping的顺序,在前面的先执行,后面的后执行
……
Listener:
Listener就是监听器,我们在JavaSE开发或者Android开发时,经常会给按钮加监听器,当点击这个按钮就会触发监听事件,调用onClick方法,
本质是方法回调。在JavaWeb的Listener也是这么个原理,但是它监听的内容不同,它可以监听Application、Session、Request对象,
当这些对象发生变化就会调用对应的监听方法。 应用域监听:
Ø ServletContext(监听Application)

¨ 生命周期监听:ServletContextListener,它有两个方法,一个在出生时调用,一个在死亡时调用;

void contextInitialized(ServletContextEvent sce):创建Servletcontext时

void contextDestroyed(ServletContextEvent sce):销毁Servletcontext时

¨ 属性监听:ServletContextAttributeListener,它有三个方法,一个在添加属性时调用,一个在替换属性时调用,最后一个是在移除属性时调用。

void attributeAdded(ServletContextAttributeEvent event):添加属性时;

void attributeReplaced(ServletContextAttributeEvent event):替换属性时;

void attributeRemoved(ServletContextAttributeEvent event):移除属性时;

Ø HttpSession(监听Session)

¨ 生命周期监听:HttpSessionListener,它有两个方法,一个在出生时调用,一个在死亡时调用;

voidsessionCreated(HttpSessionEvent se):创建session时

void sessionDestroyed(HttpSessionEvent se):销毁session时

¨ 属性监听:HttpSessioniAttributeListener,它有三个方法,一个在添加属性时调用,一个在替换属性时调用,最后一个是在移除属性时调用。

void attributeAdded(HttpSessionBindingEvent event):添加属性时;

void attributeReplaced(HttpSessionBindingEvent event):替换属性时

void attributeRemoved(HttpSessionBindingEvent event):移除属性时

Ø ServletRequest(监听Request)

¨ 生命周期监听:ServletRequestListener,它有两个方法,一个在出生时调用,一个在死亡时调用;

voidrequestInitialized(ServletRequestEvent sre):创建request时

void requestDestroyed(ServletRequestEvent sre):销毁request时

¨ 属性监听:ServletRequestAttributeListener,它有三个方法,一个在添加属性时调用,一个在替换属性时调用,最后一个是在移除属性时调用。

voidattributeAdded(ServletRequestAttributeEvent srae):添加属性时

void attributeReplaced(ServletRequestAttributeEvent srae):替换属性时

void attributeRemoved(ServletRequestAttributeEvent srae):移除属性时

感知Session监听:
1:HttpSessionBindingListener监听
⑴在需要监听的实体类实现HttpSessionBindingListener接口
⑵重写valueBound()方法,这方法是在当该实体类被放到Session中时,触发该方法
⑶重写valueUnbound()方法,这方法是在当该实体类从Session中被移除时,触发该方法
2:HttpSessionActivationListener监听
⑴在需要监听的实体类实现HttpSessionActivationListener接口
⑵重写sessionWillPassivate()方法,这方法是在当该实体类被序列化时,触发该方法
⑶重写sessionDidActivate()方法,这方法是在当该实体类被反序列化时,触发该方法
spring boot 中的三种实现方式
方法一: 通过注册 ServletRegistrationBean、 FilterRegistrationBean 和 ServletListenerRegistrationBean 获得控制
public class CustomServlet extends HttpServlet {
/**
*
*/
private static final long serialVersionUID = 1L;
@Override
protected void doGet(HttpServletRequest request, HttpServletResponse response)
throws ServletException, IOException {
System.out.println("servlet get method");
doPost(request, response);
}
@Override
protected void doPost(HttpServletRequest request, HttpServletResponse response)
throws ServletException, IOException {
System.out.println("servlet post method");
response.getWriter().write("hello world");
}
}
public class CustomFilter implements Filter {
@Override
public void init(FilterConfig filterConfig) throws ServletException {
System.out.println("init filter");
}
@Override
public void doFilter(ServletRequest request, ServletResponse response, FilterChain chain)
throws IOException, ServletException {
System.out.println("do filter");
chain.doFilter(request, response);
}
@Override
public void destroy() {
System.out.println("destroy filter");
}
}
public class CustomListener implements ServletContextListener {
@Override
public void contextInitialized(ServletContextEvent sce) {
System.out.println("contextInitialized");
}
@Override
public void contextDestroyed(ServletContextEvent sce) {
System.out.println("contextDestroyed");
}
}
注册 bean
@Bean
public ServletRegistrationBean servletRegistrationBean() {
return new ServletRegistrationBean(new CustomServlet(), "/roncoo");
}
@Bean
public FilterRegistrationBean filterRegistrationBean() {
return new FilterRegistrationBean(new CustomFilter(), servletRegistrationBean());
}
@Bean
public ServletListenerRegistrationBean<CustomListener> servletListenerRegistrationBean() {
return new ServletListenerRegistrationBean<CustomListener>(new CustomListener());
}
方法二: 通过实现 ServletContextInitializer 接口直接注册
implements ServletContextInitializer {
@Override
public void onStartup(ServletContext servletContext) throws
ServletException {
servletContext.addServlet("customServlet", new
CustomServlet()).addMapping("/roncoo");
servletContext.addFilter("customFilter", new
CustomFilter())
.addMappingForServletNames(EnumSet.of(DispatcherType.REQUES
T), true, "customServlet");
servletContext.addListener(new CustomListener());
}
方法三: 在 SpringBootApplication 上使用@ServletComponentScan 注解后,直接通过@WebServlet、
@WebFilter、 @WebListener 注解自动注册
4、CORS支持
Cross-Origin Resource Sharing(CORS)跨来源资源共享是一份浏览器技术的规范,提供了 Web 服务从不同域传来沙盒脚本的方法,以避开浏览器的同源策略,是 JSONP 模式的现代版。与 JSONP 不同,CORS 除了 GET 要求方法以外也支持其他的 HTTP 要求。用 CORS 可以让网页设计师用一般的 XMLHttpRequest,这种方式的错误处理比 JSONP 要来的好。另一方面,JSONP 可以在不支持 CORS 的老旧浏览器上运作。现代的浏览器都支持 CORS。
一、 Web 开发经常会遇到跨域问题解决方案有: jsonp, iframe,CORS 等等
CORS 与 JSONP 相比
1、 JSONP 只能实现 GET 请求,而 CORS 支持所有类型的 HTTP 请求。
2、 使用 CORS,开发者可以使用普通的 XMLHttpRequest 发起请求和获得数据,比起 JSONP 有更好的
错误处理。
3、 JSONP 主要被老的浏览器支持,它们往往不支持 CORS,而绝大多数现代浏览器都已经支持了 CORS
浏览器支持情况
Chrome 3+
Firefox 3.5+
Opera 12+
Safari 4+
Internet Explorer 8+
二、 在 spring MVC 中可以配置全局的规则,也可以使用@CrossOrigin 注解进行细粒度的配置。
全局配置:
@Configuration
public class CustomCorsConfiguration {
@Bean
public WebMvcConfigurer corsConfigurer() {
return new WebMvcConfigurerAdapter() {
@Override
public void addCorsMappings(CorsRegistry registry) {
registry.addMapping("/api/**").allowedOrigins("http://localhost:8080");
}
};
}
}
或者是
/**
* 全局设置
*/
@Configuration
public class CustomCorsConfiguration2 extends WebMvcConfigurerAdapter {
@Override
public void addCorsMappings(CorsRegistry registry) {
registry.addMapping("/api/**").allowedOrigins("http://localhost:8080");
}
}
定义方法:
@RestController
@RequestMapping("/api")
public class ApiController {
@RequestMapping(value = "/get")
public HashMap<String, Object> get(@RequestParam String name) {
HashMap<String, Object> map = new HashMap<String, Object>();
map.put("title", "hello world");
map.put("name", name);
return map;
}
}
测试 js:
$.ajax({
url: "http://localhost:8081/api/get",
type: "POST",
data: {
name: "测试"
},
success: function(data, status, xhr) {
console.log(data);
alert(data.name);
}
});
细粒度配置
@RestController
@RequestMapping(value = "/api", method = RequestMethod.POST)
public class ApiController {
@CrossOrigin(origins = "http://localhost:8080")
@RequestMapping(value = "/get")
public HashMap<String, Object> get(@RequestParam String name) {
HashMap<String, Object> map = new HashMap<String, Object>();
map.put("title", "hello world");
map.put("name", name);
return map;
}
}
5、文件上传
Spring Boot 默认使用 springMVC 包装好的解析器进行上传
<form method="POST" enctype="multipart/form-data" action="/file/upload">
文件: <input type="file" name="roncooFile" />
<input type="submit" value="上传" />
</form>
@Controller
@RequestMapping(value = "/file")
public class FileController {
private static final Logger logger = LoggerFactory.getLogger(FileController.class);
@RequestMapping(value = "upload")
@ResponseBody
public String upload(@RequestParam("roncooFile") MultipartFile file) {
if (file.isEmpty()) {
return "文件为空";
}
// 获取文件名
String fileName = file.getOriginalFilename();
logger.info("上传的文件名为: " + fileName);
// 获取文件的后缀名
String suffixName = fileName.substring(fileName.lastIndexOf("."));
logger.info("上传的后缀名为: " + suffixName);
// 文件上传路径
String filePath = "d:/roncoo/ttt/";
// 解决中文问题, liunx 下中文路径,图片显示问题
// fileName = UUID.randomUUID() + suffixName;
File dest = new File(filePath + fileName);
// 检测是否存在目录
if (!dest.getParentFile().exists()) {
dest.getParentFile().mkdirs();
}
try {
file.transferTo(dest);
return "上传成功";
} catch (IllegalStateException e) {
e.printStackTrace();
} catch (IOException e) {
e.printStackTrace();
}
return "上传失败";
}
}

配置
spring.http.multipart.enabled=true #默认支持文件上传.
spring.http.multipart.file-size-threshold=0 #支持文件写入磁盘.
spring.http.multipart.location= # 上传文件的临时目录
spring.http.multipart.max-file-size=1Mb # 最大支持文件大小
spring.http.multipart.max-request-size=10Mb # 最大支持请求大小
数据库
1、SQL JdbcTemplate
配置数据源: 嵌入式数据库的支持: Spring Boot 可以自动配置 H2, HSQL and Derby 数据库, 不需要提供任何的
链接 URLs, 只需要加入相应的 jar 包, Spring boot 可以自动发现装配 。
<!-- 数据库 -->
<dependency>
<groupId>org.springframework.boot</groupId>
<artifactId>spring-boot-starter-jdbc</artifactId>
</dependency>
<dependency>
<groupId>mysql</groupId>
<artifactId>mysql-connector-java</artifactId>
<scope>runtime</scope>
</dependency>
mysql
spring.datasource.url=jdbc:mysql://localhost/spring_boot_demo?useUnicode=true&character
Encoding=utf-8
spring.datasource.username=root
spring.datasource.password=123456
spring.datasource.driver-class-name=com.mysql.jdbc.Driver
注:
1.可以不指定 driver-class-name, spring boot 会自动识别 url。
2.数据连接池默认使用 tomcat-jdbc
连接池的配置: spring.datasource.tomcat.*
JdbcTemplate 模板:
// 自动注册
@Autowired
private JdbcTemplate jdbcTemplate;
脚本:
CREATE TABLE `roncoo_user` (
`id` int(11) NOT NULL AUTO_INCREMENT,
`name` varchar(255) DEFAULT NULL,
`create_time` datetime DEFAULT NULL,
PRIMARY KEY (`id`)
) ENGINE=InnoDB AUTO_INCREMENT=1 DEFAULT CHARSET=utf8 COMMENT='用户表';
实体类:
public class RoncooUser {
private int id;
private String name;
private Date createTime;
public int getId() {
return id;
}
public void setId(int id) {
this.id = id;
}
public String getName() {
return name;
}
public void setName(String name) {
this.name = name;
}
public Date getCreateTime() {
return createTime;
}
public void setCreateTime(Date createTime) {
this.createTime = createTime;
}
@Override
public String toString() {
return "RoncooUser [id=" + id + ", name=" + name + ", createTime=" + createTime
+ "]";
}
}
接口 :
int insert(RoncooUser roncooUser);
int deleteById(int id);
int updateById(RoncooUser roncooUser);
RoncooUser selectById(int id);
实现类代码:
@Autowired
private JdbcTemplate jdbcTemplate;
@Override
public int insert(RoncooUser roncooUser) {
String sql = "insert into roncoo_user (name, create_time) values (?, ?)";
return jdbcTemplate.update(sql, roncooUser.getName(),
roncooUser.getCreateTime());
}
@Override
public int deleteById(int id) {
String sql = "delete from roncoo_user where id=?";
return jdbcTemplate.update(sql, id);
}
@Override
public int updateById(RoncooUser roncooUser) {
String sql = "update roncoo_user set name=?, create_time=? where id=?";
return jdbcTemplate.update(sql, roncooUser.getName(),
roncooUser.getCreateTime(), roncooUser.getId());
}
@Override
public RoncooUser selectById(int id) {
String sql = "select * from roncoo_user where id=?";
return jdbcTemplate.queryForObject(sql, new RowMapper<RoncooUser>() {
@Override
public RoncooUser mapRow(ResultSet rs, int rowNum) throws SQLException {
RoncooUser roncooUser = new RoncooUser();
roncooUser.setId(rs.getInt("id"));
roncooUser.setName(rs.getString("name"));
roncooUser.setCreateTime(rs.getDate("create_time"));
return roncooUser;
}
}, id);
}
封装 spring jdbc, 带分页:
/**
* 获取当前事务最后一次更新的主键值
*/
public Long getLastId() {
return jdbcTemplate.queryForObject("select last_insert_id() as id", Long.class);
}
/**
* 获取对象信息
*/
public <T> T queryForObject(String sql, Class<T> clazz, Object... args) {
Assert.hasText(sql, "sql 语句不能为空");
return jdbcTemplate.queryForObject(sql, new BeanPropertyRowMapper<T>(clazz), args);
}
/**
* 获取对象集合信息
*/
public <T> List<T> queryForObjectList(String sql, Class<T> clazz, Object... args) {
Assert.hasText(sql, "sql 语句不能为空");
return jdbcTemplate.query(sql, args, new BeanPropertyRowMapper<T>(clazz));
}
/**
* 分页, jdbcTemplate 不支持 like 自定义,只能拼装
*/
public Page<Map<String, Object>> queryForPage(String sql, int pageCurrent, int
pageSize, Object... args) {
Assert.hasText(sql, "sql 语句不能为空");
Assert.isTrue(pageCurrent >= 1, "pageNo 必须大于等于 1");
String sqlCount = Sql.countSql(sql);
int count = jdbcTemplate.queryForObject(sqlCount, Integer.class, args);
pageCurrent = Sql.checkPageCurrent(count, pageSize, pageCurrent);
pageSize = Sql.checkPageSize(pageSize);
int totalPage = Sql.countTotalPage(count, pageSize);
String sqlList = sql + Sql.limitSql(count, pageCurrent, pageSize);
List<Map<String, Object>> list = jdbcTemplate.queryForList(sqlList, args);
return new Page<Map<String, Object>>(count, totalPage, pageCurrent, pageSize,
list);
}
/**
* 分页, jdbcTemplate 不支持 like 是定义,只能拼装
*/
public <T> Page<T> queryForPage(String sql, int pageCurrent, int pageSize, Class<T>
clazz, Object... args) {
Assert.hasText(sql, "sql 语句不能为空");
Assert.isTrue(pageCurrent >= 1, "pageNo 必须大于等于 1");
Assert.isTrue(clazz != null, "clazz 不能为空");
String sqlCount = Sql.countSql(sql);
int count = jdbcTemplate.queryForObject(sqlCount, Integer.class, args);
pageCurrent = Sql.checkPageCurrent(count, pageSize, pageCurrent);
pageSize = Sql.checkPageSize(pageSize);
int totalPage = Sql.countTotalPage(count, pageSize);
String sqlList = sql + Sql.limitSql(count, pageCurrent, pageSize);
List<T> list = jdbcTemplate.query(sqlList, new BeanPropertyRowMapper<T>(clazz),
args);
return new Page<T>(count, totalPage, pageCurrent, pageSize, list);
}
……
2、SQL Spring-data-jpa
依赖
<!-- 数据库 -->
<dependency>
<groupId>org.springframework.boot</groupId>
<artifactId>spring-boot-starter-data-jpa</artifactId>
</dependency>
<dependency>
<groupId>mysql</groupId>
<artifactId>mysql-connector-java</artifactId>
<scope>runtime</scope>
</dependency>
配置
# JPA
spring.jpa.hibernate.ddl-auto= update
#显示 sql 语句
spring.jpa.show-sql=true
实体类
@Entity
public class RoncooUserLog {
@Id
@GeneratedValue
private Integer id;
@Column
private Date createTime;
@Column
private String userName;
@Column
private String userIp;
……
定义接口(继承 JpaRepository)
public interface RoncooUserLogDao extends JpaRepository<RoncooUserLog, Integer>{
}
3、SQL 事务处理
事务有四个特性: ACID
原子性(Atomicity):事务是一个原子操作,由一系列动作组成。事务的原子性确保动作要么全部完成,
要么完全不起作用。
一致性(Consistency):一旦事务完成(不管成功还是失败),系统必须确保它所建模的业务处于一致的状
态,而不会是部分完成部分失败。在现实中的数据不应该被破坏。
隔离性(Isolation):可能有许多事务会同时处理相同的数据,因此每个事务都应该与其他事务隔离开来,
防止数据损坏。
持久性(Durability):一旦事务完成,无论发生什么系统错误,它的结果都不应该受到影响,这样就能从
任何系统崩溃中恢复过来。通常情况下,事务的结果被写到持久化存储器中。
传播行为
当事务方法被另一个事务方法调用时,必须指定事务应该如何传播。例如:方法可能继续在现有事务中运
行,也可能开启一个新事务,并在自己的事务中运行。
Spring 定义了七种传播行为:
PROPAGATION_REQUIRED 表示当前方法必须运行在事务中。如果当前事务存在,方法将会在该事务中运
行。否则,会启动一个新的事务, Spring 默认使用
PROPAGATION_SUPPORTS 表示当前方法不需要事务上下文,但是如果存在当前事务的话,那么该方法会
在这个事务中运行
PROPAGATION_MANDATORY 表示该方法必须在事务中运行,如果当前事务不存在,则会抛出一个异常
PROPAGATION_REQUIRED_NEW 表示当前方法必须运行在它自己的事务中。一个新的事务将被启动。如果
存在当前事务,在该方法执行期间,当前事务会被挂起。如果使用 JTATransactionManager 的话,则需要
访问 TransactionManager
PROPAGATION_NOT_SUPPORTED 表示该方法不应该运行在事务中。如果存在当前事务,在该方法运行期
间,当前事务将被挂起。如果使用 JTATransactionManager 的话,则需要访问 TransactionManager
PROPAGATION_NEVER 表示当前方法不应该运行在事务上下文中。如果当前正有一个事务在运行,则会抛
出异常
PROPAGATION_NESTED 表示如果当前已经存在一个事务,那么该方法将会在嵌套事务中运行。嵌套的事务
可以独立于当前事务进行单独地提交或回滚。如果当前事务不存在,那么其行为与
PROPAGATION_REQUIRED 一样。注意各厂商对这种传播行为的支持是有所差异的。可以参考资源管理器的
文档来确认它们是否支持嵌套事务。
隔离级别
隔离级别定义了一个事务可能受其他并发事务影响的程度。
ISOLATION_DEFAULT 使用后端数据库默认的隔离级别, Spring 默认使用, mysql 默认的隔离级别为:
Repeatable Read(可重复读)
ISOLATION_READ_UNCOMMITTED 读未提交, 最低的隔离级别,允许读取尚未提交的数据变更,可能会导致
脏读、幻读或不可重复读ISOLATION_READ_COMMITTED 读已提交, 允许读取并发事务已经提交的数据,可以阻止脏读,但是幻读 或不可重复读仍有可能发生ISOLATION_REPEATABLE_READ 可重复读, 对同一字段的多次读取结果都是一致的,除非数据是被本身事务自己所修改,可以阻止脏读和不可重复读,但幻读仍有可能发生ISOLATION_SERIALIZABLE 可串行化, 最高的隔离级别,完全服从 ACID 的隔离级别,确保阻止脏读、不可重复读以及幻读,也是最慢的事务隔离级别,因为它通常是通过完全锁定事务相关的数据库表来实现的脏读(Dirty reads) ——脏读发生在一个事务读取了另一个事务改写但尚未提交的数据时。如果改写再稍后被回滚了,那么第一个事务获取的数据就是无效的。
不可重复读(Nonrepeatable read) ——不可重复读发生在一个事务执行相同的查询两次或两次以上,但是每次都得到不同的数据时。这通常是因为另一个并发事务在两次查询期间进行了更新。
幻读(Phantom read) ——幻读与不可重复读类似。它发生在一个事务(T1)读取了几行数据,接着另一个并发事务(T2)插入了一些数据时。在随后的查询中,第一个事务(T1)就会发现多了一些原本不存在的记录。
属性说明 @Transactional
a、 isolation:用于指定事务的隔离级别。默认为底层事务的隔离级别。
b、 noRollbackFor:指定遇到指定异常时强制不回滚事务。
c、 noRollbackForClassName:指定遇到指定多个异常时强制不回滚事务。该属性可以指定多个异常类
名。
d、 propagation:指定事务的传播属性。
e、 readOnly:指定事务是否只读。 表示这个事务只读取数据但不更新数据,这样可以帮助数据库引擎优
化事务。若真的是一个只读取的数据库应设置 readOnly=true
f、 rollbackFor:指定遇到指定异常时强制回滚事务。
g、 rollbackForClassName:指定遇到指定多个异常时强制回滚事务。该属性可以指定多个异常类名。
h、 timeout:指定事务的超时时长。
注意:
1.mysql 为例, 存储引擎不能使用 MyISAM,应该使用 InnoDB
实现代码
@Service
public class UserService {
@Autowired
private RoncooUserDao roncooUserDao;
@Autowired
private RoncooUserLogDao roncooUserLogDao;
/**
* 用户注册
*
*/
@Transactional
public String register(String name, String ip) {
// 1.添加用户
RoncooUser roncooUser = new RoncooUser();
roncooUser.setName(name);
roncooUser.setCreateTime(new Date());
roncooUserDao.insert(roncooUser);
// 测试使用
boolean flag = true;
if (flag) {
throw new RuntimeException();
}
// 2.添加注册日志
RoncooUserLog roncooUserLog = new RoncooUserLog();
roncooUserLog.setUserName(name);
roncooUserLog.setUserIp(ip);
roncooUserLog.setCreateTime(new Date());
roncooUserLogDao.save(roncooUserLog);
return "success";
}
}
4、SQL h2嵌入式数据库
添加依赖
<dependency>
<groupId>com.h2database</groupId>
<artifactId>h2</artifactId>
<scope>runtime</scope>
</dependency>
配置
spring.datasource.url=jdbc:h2:~/test;AUTO_SERVER=TRUE;DB_CLOSE
_ON_EXIT=FALSE
spring.datasource.username=sa
spring.datasource.password=
注:
1."~"这个符号代表的就是当前登录到操作系统的用户对应的用户目录
2.账号密码我们指定之后, 就会自动创建
指定路径:
spring.datasource.url=jdbc:h2:file:D:/roncoo_h2/roncoo_spring_
boot;AUTO_SERVER=TRUE;DB_CLOSE_ON_EXIT=FALSE
内存模式:
spring.datasource.url=jdbc:h2:mem:test
控制台
路径: http://localhost:8080/h2-console
5、NoSQL redis
redis windows 版本下载
添加依赖
<dependency>
<groupId>org.springframework.boot</groupId>
<artifactId>spring-boot-starter-data-redis</artifactId>
</dependency>
配置文件
#redis
spring.redis.host=localhost
spring.redis.port=6379
#spring.redis.password=123456
#spring.redis.database=0
#spring.redis.pool.max-active=8
#spring.redis.pool.max-idle=8
#spring.redis.pool.max-wait=-1
#spring.redis.pool.min-idle=0
#spring.redis.timeout=0
测试
@Component
public class RoncooRedisComponent {
@Autowired
private StringRedisTemplate stringRedisTemplate;
public void set(String key, String value) {
ValueOperations<String, String> ops = this.stringRedisTemplate.opsForValue();
if (!this.stringRedisTemplate.hasKey(key)) {
ops.set(key, value);
System.out.println("set key success");
} else {
// 存在则打印之前的 value 值
System.out.println("this key = " + ops.get(key));
}
}
public String get(String key) {
return this.stringRedisTemplate.opsForValue().get(key);
}
public void del(String key) {
this.stringRedisTemplate.delete(key);
}
}
@Autowired
private RoncooRedisComponent roncooRedisComponent;
@Test
public void set() {
roncooRedisComponent.set("roncoo", "hello world");
}
@Test
public void get() {
System.out.println(roncooRedisComponent.get("roncoo"));
}
@Test
public void del() {
roncooRedisComponent.del("roncoo");
}
6、NoSQL mongodb
安装: mongodb 下载链接
下载版本: mongodb-win32-x86_64-2008plus-ssl-3.2.9-signed.msi
安装出现 2502、 2503 错误 解决办法
启动命令: mongod.exe --dbpath d:/roncoo_mongodb/
指定路径: --dbpath
注: 要先创建文件夹
添加依赖
<!-- mongodb -->
<dependency>
<groupId>org.springframework.boot</groupId>
<artifactId>spring-boot-starter-data-mongodb</artifactId>
</dependency>
配置文件
# MONGODB (MongoProperties)
spring.data.mongodb.uri=mongodb://localhost/test
spring.data.mongodb.port=27017
#spring.data.mongodb.authentication-database=
#spring.data.mongodb.database=test
#spring.data.mongodb.field-naming-strategy=
#spring.data.mongodb.grid-fs-database=
#spring.data.mongodb.host=localhost
#spring.data.mongodb.password=
#spring.data.mongodb.repositories.enabled=true
#spring.data.mongodb.username=
代码
@Component
public class RoncooMongodbComponent {
@Autowired
private MongoTemplate mongoTemplate;
public void insert(RoncooUser roncooUser) {
mongoTemplate.insert(roncooUser);
}
public void deleteById(int id) {
Criteria criteria = Criteria.where("id").in(id);
Query query = new Query(criteria);
mongoTemplate.remove(query, RoncooUser.class);
}
public void updateById(RoncooUser roncooUser) {
Criteria criteria = Criteria.where("id").in(roncooUser.getId());
Query query = new Query(criteria);
Update update = new Update();
update.set("name", roncooUser.getName());
update.set("createTime", roncooUser.getCreateTime());
mongoTemplate.updateMulti(query, update, RoncooUser.class);
}
public RoncooUser selectById(int id) {
Criteria criteria = Criteria.where("id").in(id);
Query query = new Query(criteria);
return mongoTemplate.findOne(query, RoncooUser.class);
}
}
设置日志打印:
<logger name="org.springframework.data.mongodb.core.MongoTemplate" level="debug"/>
@Autowired
private RoncooMongodbComponent roncooMongodbComponent;
@Test
public void set() {
RoncooUser roncooUser = new RoncooUser();
roncooUser.setId(1);
roncooUser.setName("无境1");
roncooUser.setCreateTime(new Date());
roncooMongodbComponent.insert(roncooUser);
}
@Test
public void select() {
System.out.println(roncooMongodbComponent.selectById(1));
}
@Test
public void update() {
RoncooUser roncooUser = new RoncooUser();
roncooUser.setId(1);
roncooUser.setName("测试修改");
roncooUser.setCreateTime(new Date());
roncooMongodbComponent.updateById(roncooUser);
System.out.println(roncooMongodbComponent.selectById(1));
}
@Test
public void delete() {
roncooMongodbComponent.deleteById(1);
}
四、 使用: MongoRepository
import org.springframework.data.domain.Page;
import org.springframework.data.domain.Pageable;
import org.springframework.data.mongodb.repository.MongoRepository;
import com.roncoo.example.bean.RoncooUserLog;
public interface RoncooUserLogMongoDao extends MongoRepository<RoncooUserLog, Integer>{
RoncooUserLog findByUserName(String string);
RoncooUserLog findByUserNameAndUserIp(String string, String ip);
Page<RoncooUserLog> findByUserName(String string, Pageable pageable);
}
测试
@Autowired
private RoncooUserLogMongoDao roncooUserLogMongoDao;
@Test
public void insert() {
RoncooUserLog entity = new RoncooUserLog();
entity.setId(1);
entity.setUserName("无境");
entity.setUserIp("192.168.0.1");
entity.setCreateTime(new Date());
roncooUserLogMongoDao.save(entity);
}
@Test
public void delete() {
roncooUserLogMongoDao.delete(1);
}
@Test
public void update() {
RoncooUserLog entity = new RoncooUserLog();
entity.setId(1);
entity.setUserName("无境2");
entity.setUserIp("192.168.0.1");
entity.setCreateTime(new Date());
roncooUserLogMongoDao.save(entity);
}
@Test
public void select() {
RoncooUserLog result = roncooUserLogMongoDao.findOne(1);
System.out.println(result);
}
@Test
public void select2() {
RoncooUserLog result = roncooUserLogMongoDao.findByUserName("
无境2");
System.out.println(result);
}
// 分页
@Test
public void queryForPage() {
Pageable pageable = new PageRequest(0, 20, new Sort(new
Order(Direction.DESC, "id")));
// Page<RoncooUserLog> result =
roncooUserLogDao.findByUserName("无境2", pageable);
Page<RoncooUserLog> result =
roncooUserLogMongoDao.findAll(pageable);
System.out.println(result.getContent());
}
7、Caching-EhCache
Spring boot 支持的缓存:
Generic、JCache (JSR-107)、EhCache 2.x、Hazelcast、Infinispan、Couchbase、Redis、Caffeine、Guava、Simple
添加依赖
<!-- caching -->
<dependency>
<groupId>org.springframework.boot</groupId>
<artifactId>spring-boot-starter-cache</artifactId>
</dependency>
<dependency>
<groupId>net.sf.ehcache</groupId>
<artifactId>ehcache</artifactId>
</dependency>
配置信息
spring.cache.type=ehcache
spring.cache.ehcache.config=classpath:config/ehcache.xml
ehcache.xml
<ehcache xmlns:xsi="http://www.w3.org/2001/XMLSchema-instance"
xsi:noNamespaceSchemaLocation="ehcache.xsd">
<cache name="roncooCache"
eternal="false"
maxEntriesLocalHeap="0"
timeToIdleSeconds="50"></cache>
<!-- eternal: true表示对象永不过期,此时会忽略timeToIdleSeconds和
timeToLiveSeconds属性,默认为false -->
<!-- maxEntriesLocalHeap:堆内存中最大缓存对象数, 0没有限制 -->
<!-- timeToIdleSeconds: 设定允许对象处于空闲状态的最长时间,以秒为
单位。当对象自从最近一次被访问后,如果处于空闲状态的时间超过了
timeToIdleSeconds属性值,这个对象就会过期, EHCache将把它从缓存中清空。
只有当eternal属性为false,该属性才有效。如果该属性值为0,则表示对象可以
无限期地处于空闲状态 -->
</ehcache>
注解
@EnableCaching: 启用缓存注解
接口
public interface RoncooUserLogCache {
/**
* 查询
*
* @param id
* @return
*/
RoncooUserLog selectById(Integer id);
/**
* 更新
*
* @param roncooUserLog
* @return
*/
RoncooUserLog updateById(RoncooUserLog roncooUserLog);
/**
* 删除
*
* @param id
* @return
*/
String deleteById(Integer id);
}
实现
@CacheConfig(cacheNames = "roncooCache")
@Repository
public class RoncooUserLogCacheImpl implements
RoncooUserLogCache {
@Autowired
private RoncooUserLogDao roncooUserLogDao;
@Cacheable(key = "#p0")
@Override
public RoncooUserLog selectById(Integer id) {
System.out.println("查询功能,缓存找不到,直接读库, id=" +
id);
return roncooUserLogDao.findOne(id);
}
@CachePut(key = "#p0")
@Override
public RoncooUserLog updateById(RoncooUserLog
roncooUserLog) {
System.out.println("更新功能,更新缓存,直接写库, id=" +
roncooUserLog);
return roncooUserLogDao.save(roncooUserLog);
}
@CacheEvict(key = "#p0")
@Override
public String deleteById(Integer id) {
System.out.println("删除功能,删除缓存,直接写库, id=" + id);
return "清空缓存成功";
}
}
注解说明:
@CacheConfig: 缓存配置
@Cacheable: 应用到读取数据的方法上,即可缓存的方法,如查找方法:先从缓存中读取,如果没有再调
用方法获取数据,然后把数据添加到缓存中。 适用于查找
@CachePut: 主要针对方法配置,能够根据方法的请求参数对其结果进行缓存,和 @Cacheable 不同的
是,它每次都会触发真实方法的调用。 适用于更新和插入
@CacheEvict: 主要针对方法配置,能够根据一定的条件对缓存进行清空。 适用于删除
测试
@RequestMapping(value = "/select", method = RequestMethod.GET)
public RoncooUserLog get(@RequestParam(defaultValue = "1") Integer id) {
return RoncooUserLogCache.selectById(id);
}
@RequestMapping(value = "/update", method = RequestMethod.GET)
public RoncooUserLog update(@RequestParam(defaultValue = "1") Integer id) {
RoncooUserLog bean = RoncooUserLogCache.selectById(id);
bean.setUserName("测试");
bean.setCreateTime(new Date());
RoncooUserLogCache.updateById(bean);
return bean;
}
@RequestMapping(value = "/del", method = RequestMethod.GET)
public String del(@RequestParam(defaultValue = "1") Integer id) {
return RoncooUserLogCache.deleteById(id);
}
8、Caching-Redis
添加依赖
<!-- redis -->
<dependency>
<groupId>org.springframework.boot</groupId>
<artifactId>spring-boot-starter-redis</artifactId>
</dependency>
配置文件
spring.cache.type=redis
缓存使用优先级问题
1.默认按照 spring boot 的加载顺序来实现
2.配置文件优先于默认
自定义缓存管理器
/**
* redis 自定义缓存管理器
*/
@Configuration
public class RedisCacheConfiguration extends CachingConfigurerSupport {
/**
* 自定义缓存管理器.
*
* @param redisTemplate
* @return
*/
@Bean
public CacheManager cacheManager(RedisTemplate<?, ?> redisTemplate) {
RedisCacheManager cacheManager = new RedisCacheManager(redisTemplate);
// 设置默认的过期时间
cacheManager.setDefaultExpiration(20);
Map<String, Long> expires = new HashMap<String, Long>();
// 单独设置
expires.put("roncooCache", 200L);
cacheManager.setExpires(expires);
return cacheManager;
}
自定义 key 的生成策略
/**
* 自定义 key. 此方法将会根据类名+方法名+所有参数的值生成唯一的一个 key,即使@Cacheable 中
的 value 属性一样, key 也会不一样。
*/
@Override
public KeyGenerator keyGenerator() {
return new KeyGenerator() {
@Override
public Object generate(Object o, Method method, Object... objects) {
StringBuilder sb = new StringBuilder();
sb.append(o.getClass().getName());
sb.append(method.getName());
for (Object obj : objects) {
sb.append(obj.toString());
}
return sb.toString();
}
};
}
}
消息服务
Spring Boot支持的jms有:ActiveMQ、Artemis、HornetQ
1、异步消息服务 JMS(ActiveMQ)
添加依赖
<!-- jms -->
		<dependency>
			<groupId>org.springframework.boot</groupId>
			<artifactId>spring-boot-starter-activemq</artifactId>
			</dependency>
配置信息
# ACTIVEMQ (ActiveMQProperties)
spring.activemq.in-memory=true
#spring.activemq.broker-url=
#spring.activemq.password=
#spring.activemq.user=
#spring.activemq.packages.trust-all=false
#spring.activemq.packages.trusted=
#spring.activemq.pool.configuration.*=
#spring.activemq.pool.enabled=false
#spring.activemq.pool.expiry-timeout=0
#spring.activemq.pool.idle-timeout=30000
#spring.activemq.pool.max-connections=1
启动注解
@EnableJms 添加在main方法里面
/**
 * jms 队列配置
 */
@Configuration
public class JmsConfiguration {

	@Bean
	public Queue queue() {
		return new ActiveMQQueue("roncoo.queue");
	}

}

代码
/**
 */
@Component
public class RoncooJmsComponent {

	@Autowired
	private JmsMessagingTemplate jmsMessagingTemplate;

	@Autowired
	private Queue queue;

	public void send(String msg) {
		this.jmsMessagingTemplate.convertAndSend(this.queue, msg);
	}

	@JmsListener(destination = "roncoo.queue")
	public void receiveQueue(String text) {
		System.out.println("接受到:" + text);
	}

}
测试
@Autowired
	private RoncooJmsComponent roncooJmsComponent;

	@Test
	public void send() {
		roncooJmsComponent.send("hello world");
	}
2、异步消息服务 AMQP(RabbitMQ)
RabbitMQ下载地址
erlang 下载地址
添加依赖
<!-- amqp -->
		<dependency>
			<groupId>org.springframework.boot</groupId>
			<artifactId>spring-boot-starter-amqp</artifactId>
			</dependency>
配置信息
# RABBIT (RabbitProperties)
#spring.rabbitmq.host=localhost
#spring.rabbitmq.port=5672
#spring.rabbitmq.password=
#spring.rabbitmq.username=
1.启用注解: @EnableRabbit
2.配置
/**
 * amqp 队列配置
 */
@Configuration
public class AmqpConfiguration {

	@Bean
	public Queue queue() {
		return new Queue("roncoo.queue");
	}

}

3.
/**
 */
@Component
public class RoncooAmqpComponent {

	@Autowired
	private AmqpTemplate amqpTemplate;

	public void send(String msg) {
		this.amqpTemplate.convertAndSend("roncoo.queue", msg);
	}

	@RabbitListener(queues = "roncoo.queue")
	public void receiveQueue(String text) {
		System.out.println("接受到:" + text);
	}

}
测试
@Autowired
	private RoncooAmqpComponent roncooAmqpComponent;

	@Test
	public void send() {
		roncooAmqpComponent.send("hello world2");
	}
代理调用REST服务
添加依赖
<dependency>
			<groupId>org.apache.httpcomponents</groupId>
			<artifactId>httpclient</artifactId>
</dependency>
代码
/**
 */
@RestController
@RequestMapping(value = "/rest", method = RequestMethod.POST)
public class RestRoncooController {

	@Autowired
	private RoncooUserLogCache RoncooUserLogCache;

	@RequestMapping(value = "/update")
	public RoncooUserLog update(@RequestBody JsonNode jsonNode) {
		System.out.println("jsonNode=" + jsonNode);
		RoncooUserLog bean = RoncooUserLogCache.selectById(jsonNode.get("id").asInt(1));
		if(bean == null){
			bean = new RoncooUserLog();
		}
		bean.setUserName("测试");
		bean.setCreateTime(new Date());
		bean.setUserIp("192.168.1.1");
		RoncooUserLogCache.updateById(bean);
		return bean;
	}

	@RequestMapping(value = "/update/{id}", method = RequestMethod.GET)
	public RoncooUserLog update2(@PathVariable(value = "id") Integer id) {
		RoncooUserLog bean = RoncooUserLogCache.selectById(id);
		if(bean == null){
			bean = new RoncooUserLog();
		}
		bean.setUserName("测试");
		bean.setCreateTime(new Date());
		bean.setUserIp("192.168.1.1");
		RoncooUserLogCache.updateById(bean);
		return bean;
	}

}
测试
@Autowired
	private RestTemplateBuilder restTemplateBuilder;

	/**
	 * get请求
	 */
	@Test
	public void getForObject() {
		RoncooUserLog bean = restTemplateBuilder.build().getForObject("http://localhost:8080/rest/update/{id}", RoncooUserLog.class, 6);
		System.out.println(bean);
		Map<String,Object> map = new HashMap<String,Object>();
		map.put("id", 7);
		bean = restTemplateBuilder.build().postForObject("http://localhost:8080/rest/update", map, RoncooUserLog.class);
		System.out.println(bean);
	}

代理实现:
static class ProxyCustomizer implements RestTemplateCustomizer {
		@Override
		public void customize(RestTemplate restTemplate) {
			String proxyHost = "59.33.46.187";
			int proxyPort = 6969;

			HttpHost proxy = new HttpHost(proxyHost, proxyPort);
			HttpClient httpClient = HttpClientBuilder.create().setRoutePlanner(new DefaultProxyRoutePlanner(proxy) {
				@Override
				public HttpHost determineProxy(HttpHost target, HttpRequest request, HttpContext context) throws HttpException {

					return super.determineProxy(target, request, context);
				}
			}).build();
			HttpComponentsClientHttpRequestFactory httpComponentsClientHttpRequestFactory = new HttpComponentsClientHttpRequestFactory(httpClient);
			httpComponentsClientHttpRequestFactory.setConnectTimeout(10000);
			httpComponentsClientHttpRequestFactory.setReadTimeout(60000);
			restTemplate.setRequestFactory(httpComponentsClientHttpRequestFactory);
		}
	}

代理测试:

String result = restTemplateBuilder.additionalCustomizers(new ProxyCustomizer()).build().getForObject("http://www.roncoo.com", String.class);
		System.out.println(result);
在线代理:
http://ip.zdaye.com/
多账号轮询发送邮件
添加依赖
<!-- mail -->
		<dependency>
			<groupId>org.springframework.boot</groupId>
			<artifactId>spring-boot-starter-mail</artifactId>
			</dependency>
配置
# mail
spring.mail.host: smtp.exmail.qq.com
spring.mail.username:fengyw@roncoo.com,service@roncoo.com,education@roncoo.com
spring.mail.password:
spring.mail.properties.mail.smtp.auth: true
# 企业qq的邮箱或者是163这类,不建议使用私人qq
代码
实现多账号
/**
 * 实现多账号,轮询发送
 */
@Configuration
@EnableConfigurationProperties(MailProperties.class)
public class RoncooJavaMailSenderImpl extends JavaMailSenderImpl implements JavaMailSender {

	private ArrayList<String> usernameList;
	private ArrayList<String> passwordList;
	private int currentMailId = 0;

	private final MailProperties properties;

	public RoncooJavaMailSenderImpl(MailProperties properties) {
		this.properties = properties;

		// 初始化账号
		if (usernameList == null)
			usernameList = new ArrayList<String>();
		String[] userNames = this.properties.getUsername().split(",");
		if (userNames != null) {
			for (String user : userNames) {
				usernameList.add(user);
			}
		}

		// 初始化密码
		if (passwordList == null)
			passwordList = new ArrayList<String>();
		String[] passwords = this.properties.getPassword().split(",");
		if (passwords != null) {
			for (String pw : passwords) {
				passwordList.add(pw);
			}
		}
	}

	@Override
	protected void doSend(MimeMessage[] mimeMessage, Object[] object) throws MailException {

		super.setUsername(usernameList.get(currentMailId));
		super.setPassword(passwordList.get(currentMailId));

		// 设置编码和各种参数
		super.setHost(this.properties.getHost());
		super.setDefaultEncoding(this.properties.getDefaultEncoding().name());
		super.setJavaMailProperties(asProperties(this.properties.getProperties()));
		super.doSend(mimeMessage, object);

		// 轮询
		currentMailId = (currentMailId + 1) % usernameList.size();
	}

	private Properties asProperties(Map<String, String> source) {
		Properties properties = new Properties();
		properties.putAll(source);
		return properties;
	}

	@Override
	public String getUsername() {
		return usernameList.get(currentMailId);
	}

}

实现发送功能
/**
 */
@Component
public class RoncooJavaMailComponent {
	private static final String template = "mail/roncoo.ftl";

	@Autowired
	private FreeMarkerConfigurer freeMarkerConfigurer;
	@Autowired
	private RoncooJavaMailSenderImpl javaMailSender;

	public void sendMail(String email) {
		Map<String, Object> map = new HashMap<String, Object>();
		map.put("email", email);
		try {
			String text = getTextByTemplate(template, map);
			send(email, text);
		} catch (IOException | TemplateException e) {
			e.printStackTrace();
		} catch (MessagingException e) {
			e.printStackTrace();
		}
	}

	private String getTextByTemplate(String template, Map<String, Object> model) throws TemplateNotFoundException, MalformedTemplateNameException, ParseException, IOException, TemplateException {
		return FreeMarkerTemplateUtils.processTemplateIntoString(freeMarkerConfigurer.getConfiguration().getTemplate(template), model);
	}

	private String send(String email, String text) throws MessagingException, UnsupportedEncodingException {
		MimeMessage message = javaMailSender.createMimeMessage();
		MimeMessageHelper helper = new MimeMessageHelper(message, true, "UTF-8");
		InternetAddress from = new InternetAddress();
		from.setAddress(javaMailSender.getUsername());
		from.setPersonal("测试", "UTF-8");
		helper.setFrom(from);
		helper.setTo(email);
		helper.setSubject("测试邮件");
		helper.setText(text, true);
		javaMailSender.send(message);
		return text;
	}

}
测试
flt代码:
<!DOCTYPE html>
<html lang="en">
<head>
<meta http-equiv="Content-Type" content="text/html; charset=UTF-8" />
</head>
<body>
	<div style="width: 600px; text-align: left; margin: 0 auto;">
		<h1 style="color: #005da7;">测试</h1>
		<div style="border-bottom: 5px solid #005da7; height: 2px; width: 100%;"></div>
		<div style="border: 1px solid #005da7; font-size: 16px; line-height: 50px; padding: 20px;">
			<div>${email},您好!</div>
			<div>
				这是个测试
			</div>

			<div style="border-bottom: 2px solid #005da7; height: 2px; width: 100%;"></div>
			<div>扫一扫,关注测试微信公共号,里面更多精彩推荐</div>
			<div>
			</div>
			<div>
				想了解更多信息,请访问 <a href="http://www.roncoo.com">http://www.roncoo.com</a>
			</div>
		</div>
	</div>
</body>
</html>

html代码:
<input type="text" name="email" id="email" />
	<button id="send">发送邮件</button>

	js代码:
$(function(){
			$('#send').click(function(){
				var email = $('#email').val();
				$.ajax({
					url:'/api/mail',
					type:'post',
					data:{'email':email},
					success:function(msg){
						alert(msg);
					}
				});
			});
		})

	java代码:
@Autowired
	private RoncooJavaMailComponent component;

@RequestMapping(value = "mail")
	public String mail(String email) {
		component.sendMail(email);
		return "success";
	}
Spring Session 实现集群
session集群的解决方案:
1.扩展指定server
利用 Servlet容器提供的插件功能,自定义HttpSession的创建和管理策略,并通过配置的方式替换掉默认的策略。缺点:耦合Tomcat/Jetty等Servlet容器,不能随意更换容器。
2.利用Filter
利用 HttpServletRequestWrapper,实现自己的 getSession()方法,接管创建和管理Session数据的工作。spring-session就是通过这样的思路实现的。
Spring Boot中spring session支持方式:
JDBC、MongoDB、Redis、Hazelcast、HashMap
添加依赖
<!-- spring session -->
		<dependency>
			<groupId>org.springframework.session</groupId>
			<artifactId>spring-session</artifactId>
			</dependency>
<!-- redis -->
		<dependency>
			<groupId>org.springframework.boot</groupId>
			<artifactId>spring-boot-starter-redis</artifactId>
		</dependency>
配置信息
# spring session使用存储类型
#spring.session.store-type=redis
# spring session刷新模式:默认on-save
#spring.session.redis.flush-mode=on-save
#spring.session.redis.namespace=
# session超时时间,单位秒
#server.session.timeout=30

#redis
#spring.redis.host=localhost
#spring.redis.port=6379
#spring.redis.password=123456
#spring.redis.database=0
#spring.redis.pool.max-active=8
#spring.redis.pool.max-idle=8
#spring.redis.pool.max-wait=-1
#spring.redis.pool.min-idle=0
#spring.redis.timeout=0
测试
@RequestMapping(value = "/index")
	public String index(ModelMap map, HttpSession httpSession) {
		map.put("title", "第一个应用:sessionID=" + httpSession.getId());
		System.out.println("sessionID=" + httpSession.getId());
		return "index";
	}
远程调试
什么是远程调试:本地调用非本地的环境进行调试。
原理:两个VM之间通过socket协议进行通信,然后以达到远程调试的目的。
ps:如果 Java 源代码与目标应用程序不匹配,调试特性将不能正常工作。
java启动命令:
-Xdebug -Xrunjdwp:server=y,transport=dt_socket,address=8000,suspend=n

比如:java -Xdebug -Xrunjdwp:server=y,transport=dt_socket,address=8000,suspend=n –jar  spring-boot-demo-24-1-0.0.1-SNAPSHOT.jar
HTTP的监控
三种方式监控应用http
1. 通过 HTTP(最简单方便)
2. 通过 JMX
3. 通过远程 shell
添加依赖
<!-- actuator -->
<dependency>
        <groupId>org.springframework.boot</groupId>
        <artifactId>spring-boot-starter-actuator</artifactId>
</dependency>
<!-- security -->
		<dependency>
			<groupId>org.springframework.boot</groupId>
			<artifactId>spring-boot-starter-security</artifactId>
	</dependency>
端点(通过执行器端点可以监控应用及与应用进行交互)
1.端点暴露的方式取决于你采用的监控方式。如果使用HTTP监控,端点的ID映射到一个URL。例如,默认情况下,health端点将被映射到/health。
2.端点会默认有敏感度,根据不同的敏感度是否需要提供用户密码认证
3.如果没启用web安全,则敏感度高的会禁用
4.可以通过配置文件进行配置敏感度
5.默认情况下,除了shutdown外的所有端点都是启用的。
配置
#端点的配置
endpoints.sensitive=true
endpoints.shutdown.enabled=true

#保护端点
security.basic.enabled=true
security.user.name=roncoo
security.user.password=roncoo
management.security.roles=SUPERUSER

#自定义路径
security.basic.path=/manage
management.context-path=/manage
备注
度量: http://localhost:8080/manage/metrics
追踪: http://localhost:8080/manage/trace
集成Mybatis
添加依赖
<!-- mybatis -->
<dependency>
<groupId>org.mybatis.spring.boot</groupId>
<artifactId>mybatis-spring-boot-starter</artifactId>
<version>1.1.1</version>
</dependency>
版本说明: 最新 mybatis-spring-boot-starter 的版本为 1.2.0-SNAPSHOT, 依赖的是 spring
boot 的 1.4.1,但是还不是 released 版本。 教程的版本为 1.1.1 依赖的 spring boot 的版本为
1.3.3.RELEASE, 兼容 spring boot 1.4.x。
GitHub: https://github.com/mybatis/spring-boot-starter
配置
#mysql
spring.datasource.url=jdbc:mysql://localhost/spring_boot_demo?
useUnicode=true&characterEncoding=utf-8
spring.datasource.username=root
spring.datasource.password=123456
spring.datasource.driver-class-name=com.mysql.jdbc.Driver
创建 bean
public class RoncooUser implements Serializable {
private Integer id;
private String name;
private Date createTime;
private static final long serialVersionUID = 1L;
……
创建
mapper
@Mapper
public interface RoncooUserMapper {
@Insert(value = "insert into roncoo_user (name,
create_time) values (#{name,jdbcType=VARCHAR},
#{createTime,jdbcType=TIMESTAMP})")
int insert(RoncooUser record);
@Select(value = "select id, name, create_time from
roncoo_user where id = #{id,jdbcType=INTEGER}")
@Results(value = { @Result(column = "create_time", property
= "createTime", jdbcType = JdbcType.TIMESTAMP) })
RoncooUser selectByPrimaryKey(Integer id);
}
测试
@RunWith(SpringRunner.class)
@SpringBootTest
public class SpringBootDemo281ApplicationTests {
@Autowired
private RoncooUserMapper mapper;
@Test
public void insert() {
RoncooUser roncooUser = new RoncooUser();
roncooUser.setName("测试");
roncooUser.setCreateTime(new Date());
int result = mapper.insert(roncooUser);
System.out.println(result);
}
@Test
public void select() {
RoncooUser result = mapper.selectByPrimaryKey(2);
System.out.println(result);
}
}
基于 mybatis xml 的集成
#mybatis
mybatis.mapper-locations: classpath:mybatis/*.xml
#mybatis.type-aliases-package: com.roncoo.example.bean
@Mapper
public interface RoncooUserMapper {
int insert(RoncooUser record);
RoncooUser selectByPrimaryKey(Integer id);
}
<?xml version="1.0" encoding="UTF-8" ?>
<!DOCTYPE mapper PUBLIC "-//mybatis.org//DTD Mapper 3.0//EN"
"http://mybatis.org/dtd/mybatis-3-mapper.dtd" >
<mapper
namespace="com.roncoo.example.mapper.RoncooUserMapper" >
<resultMap id="BaseResultMap"
type="com.roncoo.example.bean.RoncooUser" >
<id column="id" property="id" jdbcType="INTEGER" />
<result column="name" property="name" jdbcType="VARCHAR" />
<result column="create_time" property="createTime"
jdbcType="TIMESTAMP" />
</resultMap>
<sql id="Base_Column_List" >
id, name, create_time
</sql>
<select id="selectByPrimaryKey" resultMap="BaseResultMap"
parameterType="java.lang.Integer" >
select
<include refid="Base_Column_List" />
from roncoo_user
where id = #{id,jdbcType=INTEGER}
</select>
<insert id="insert"
parameterType="com.roncoo.example.bean.RoncooUser" >
insert into roncoo_user (id, name, create_time)
values (#{id,jdbcType=INTEGER}, #{name,jdbcType=VARCHAR},
#{createTime,jdbcType=TIMESTAMP})
</insert>
</mapper>
如何快速批量生成 bean, mapper, xml?
使用 mybatis generator, 龙果开源了 roncoo-mybatis-generator, 集成了多个插件
GitHub: https://github.com/roncoo/roncoo-mybatis-generator
集成Druid
Druid是Java语言中最好的数据库连接池。Druid能够提供强大的监控和扩展功能。
添加依赖
<dependency>
<groupId>com.alibaba</groupId>
<artifactId>druid</artifactId>
<version>1.0.26</version>
</dependency>
配置
spring.datasource.type=com.alibaba.druid.pool.DruidDataSource
#spring.datasource.type=org.apache.tomcat.jdbc.pool.DataSource
spring.datasource.url=jdbc:mysql://localhost/spring_boot_demo?useUnicode=true&characterEncod
ing=utf-8
spring.datasource.username=root
spring.datasource.password=123456
spring.datasource.driver-class-name=com.mysql.jdbc.Driver
注意: 关于 spring.datasource.type 的说明
旧版本不支持这个属性, 1.3.x 开始支持,但是 1.4.0 不支持, 1.4.1 重新支持。
添加 druid 的支持类
@Configuration
public class DruidConfiguration {
@ConditionalOnClass(DruidDataSource.class)
@ConditionalOnProperty(name = "spring.datasource.type", havingValue =
"com.alibaba.druid.pool.DruidDataSource", matchIfMissing = true)
static class Druid extends DruidConfiguration {
@Bean
@ConfigurationProperties("spring.datasource.druid")
public DruidDataSource dataSource(DataSourceProperties properties) {
DruidDataSource druidDataSource = (DruidDataSource)
properties.initializeDataSourceBuilder().type(DruidDataSource.class).build();
DatabaseDriver databaseDriver =
DatabaseDriver.fromJdbcUrl(properties.determineUrl());
String validationQuery = databaseDriver.getValidationQuery();
if (validationQuery != null) {
druidDataSource.setValidationQuery(validationQuery);
}
return druidDataSource;
}
}
}
配置 servlet
@WebServlet(urlPatterns = { "/druid/*" }, initParams =
{ @WebInitParam(name = "loginUsername", value = "roncoo"),
@WebInitParam(name = "loginPassword", value = "roncoo") })
public class DruidStatViewServlet extends StatViewServlet {
private static final long serialVersionUID = 1L;
}
配置 filter
@WebFilter(filterName = "druidWebStatFilter", urlPatterns =
"/*", initParams = { @WebInitParam(name = "exclusions", value
= "*.js,*.gif,*.jpg,*.bmp,*.png,*.css,*.ico,/druid/*") })
public class DruidWebStatFilter extends WebStatFilter {
} #
初始化连接大小
spring.datasource.druid.initial-size=8
#最小空闲连接数
spring.datasource.druid.min-idle=5
#最大连接数
spring.datasource.druid.max-active=10
#查询超时时间
spring.datasource.druid.query-timeout=6000
#事务查询超时时间
spring.datasource.druid.transaction-query-timeout=6000
#关闭空闲连接超时时间
spring.datasource.druid.remove-abandoned-timeout=1800
测试: http://localhost:8080/druid/index.html
sql 监控配置
#filter类名:stat,config,encoding,logging
spring.datasource.druid.filters=stat
spring 监控配置
@ImportResource(locations = { "classpath:druid-bean.xml" })
集成Swagger
Swagger 是一个规范和完整的框架,用于生成、描述、调用和可视化 RESTful 风格的 Web 服务。
http://swagger.io/
Springfox 的前身是 swagger-springmvc,是一个开源的 API doc 框架,可以将我们的 Controller 的
方法以文档的形式展现,基于 Swagger。
http://springfox.github.io/springfox/添加jar
<!-- Swagger -->
<dependency>
<groupId>io.springfox</groupId>
<artifactId>springfox-swagger-ui</artifactId>
<version>2.6.0</version>
</dependency>
<dependency>
<groupId>io.springfox</groupId>
<artifactId>springfox-swagger2</artifactId>
<version>2.6.0</version>
</dependency>
配置
/**
* SwaggerConfig
*/
@Configuration
@EnableSwagger2
public class Swagger2Configuration {
/**
*
* @return
*/
@Bean
public Docket accessToken() {
return new Docket(DocumentationType.SWAGGER_2).groupName("api")// 定义组
.select() // 选择那些路径和 api 会生成 document
.apis(RequestHandlerSelectors.basePackage("com.roncoo.example.controller")) // 拦截的包
路径
.paths(regex("/api/.*"))// 拦截的接口路径
.build() // 创建
.apiInfo(apiInfo()); // 配置说明
}
private ApiInfo apiInfo() {
return new ApiInfoBuilder()//
.title("龙果学院")// 标题
.description("spring boot 全集")// 描述
.termsOfServiceUrl("http://www.roncoo.com")//
.contact(new Contact("wujing", "http://www.roncoo.com",
"297115770@qq.com"))// 联系
// .license("Apache License Version 2.0")// 开源协议
// .licenseUrl("https://github.com/springfox/springfox/blob/master/LICENSE")// 地址
.version("1.0")// 版本
.build();
}
}
测试
http://localhost:8080/swagger-ui.html
自定义(注解的使用)
@ApiIgnore
忽略暴露的 api
@ApiOperation(value = "查找", notes = "根据用户 ID 查找用户")
添加说明
其他注解:
@Api: 用在类上,说明该类的作用
@ApiImplicitParams: 用在方法上包含一组参数说明
@ApiResponses: 用于表示一组响应
@ApiResponse: 用在@ApiResponses 中,一般用于表达一个错误的响应信息
code:数字,例如 400
message:信息,例如"请求参数没填好"
response:抛出异常的类
@ApiModel: 描述一个 Model 的信息(这种一般用在 post 创建的时候,使用@RequestBody 这样的场
景,请求参数无法使用@ApiImplicitParam 注解进行描述的时候)
@ApiModelProperty: 描述一个 model 的属性
@Scheduled创建定时任务
我们在编写Spring Boot应用中经常会遇到这样的场景,比如:我需要定时地发送一些短信、邮件之类的操作,也可能会定时地检查和监控一些标志、参数等。
创建定时任务
在Spring Boot中编写定时任务是非常简单的事,下面通过实例介绍如何在Spring Boot中创建定时任务,实现每过5秒输出一下当前时间。
在Spring Boot的主类中加入@EnableScheduling注解,启用定时任务的配置
@SpringBootApplication
@EnableScheduling
public class Application {

	public static void main(String[] args) {
		SpringApplication.run(Application.class, args);
	}

}
创建定时任务实现类
@Component
public class ScheduledTasks {

    private static final SimpleDateFormat dateFormat = new SimpleDateFormat("HH:mm:ss");

    @Scheduled(fixedRate = 5000)
    public void reportCurrentTime() {
        System.out.println("现在时间:" + dateFormat.format(new Date()));
    }

}
运行程序,控制台中可以看到类似如下输出,定时任务开始正常运作了。
现在时间:10:40:09
现在时间:10:40:14
现在时间:10:40:19
现在时间:10:40:24
现在时间:10:40:29522
现在时间:10:40:34
@Scheduled详解
在上面的入门例子中,使用了@Scheduled(fixedRate = 5000) 注解来定义每过5秒执行的任务,对于@Scheduled的使用可以总结如下几种方式:

@Scheduled(fixedRate = 5000) :上一次开始执行时间点之后5秒再执行
@Scheduled(fixedDelay = 5000) :上一次执行完毕时间点之后5秒再执行
@Scheduled(initialDelay=1000, fixedRate=5000) :第一次延迟1秒后执行,之后按fixedRate的规则每5秒执行一次
@Scheduled(cron="*/5 * * * * *") :通过cron表达式定义规则
@Async实现异步调用
什么是“异步调用”?
“异步调用”对应的是“同步调用”,同步调用指程序按照定义顺序依次执行,每一行程序都必须等待上一行程序执行完成之后才能执行;异步调用指程序在顺序执行时,不等待异步调用的语句返回结果就执行后面的程序。
同步调用
下面通过一个简单示例来直观的理解什么是同步调用:
定义Task类,创建三个处理函数分别模拟三个执行任务的操作,操作消耗时间随机取(10秒内)
@Component
public class Task {

    public static Random random =new Random();

    public void doTaskOne() throws Exception {
        System.out.println("开始做任务一");
        long start = System.currentTimeMillis();
        Thread.sleep(random.nextInt(10000));
        long end = System.currentTimeMillis();
        System.out.println("完成任务一,耗时:" + (end - start) + "毫秒");
    }

    public void doTaskTwo() throws Exception {
        System.out.println("开始做任务二");
        long start = System.currentTimeMillis();
        Thread.sleep(random.nextInt(10000));
        long end = System.currentTimeMillis();
        System.out.println("完成任务二,耗时:" + (end - start) + "毫秒");
    }

    public void doTaskThree() throws Exception {
        System.out.println("开始做任务三");
        long start = System.currentTimeMillis();
        Thread.sleep(random.nextInt(10000));
        long end = System.currentTimeMillis();
        System.out.println("完成任务三,耗时:" + (end - start) + "毫秒");
    }

}
在单元测试用例中,注入Task对象,并在测试用例中执行doTaskOne、doTaskTwo、doTaskThree三个函数。
@RunWith(SpringJUnit4ClassRunner.class)
@SpringApplicationConfiguration(classes = Application.class)
public class ApplicationTests {

	@Autowired
	private Task task;

	@Test
	public void test() throws Exception {
		task.doTaskOne();
		task.doTaskTwo();
		task.doTaskThree();
	}

}
执行单元测试,可以看到类似如下输出:
开始做任务一
完成任务一,耗时:4256毫秒
开始做任务二
完成任务二,耗时:4957毫秒
开始做任务三
完成任务三,耗时:7173毫秒
任务一、任务二、任务三顺序的执行完了,换言之doTaskOne、doTaskTwo、doTaskThree三个函数顺序的执行完成。
异步调用
上述的同步调用虽然顺利的执行完了三个任务,但是可以看到执行时间比较长,若这三个任务本身之间不存在依赖关系,可以并发执行的话,同步调用在执行效率方面就比较差,可以考虑通过异步调用的方式来并发执行。
在Spring Boot中,我们只需要通过使用@Async注解就能简单的将原来的同步函数变为异步函数,Task类改在为如下模式:
@Component
public class Task {

    @Async
    public void doTaskOne() throws Exception {
        // 同上内容,省略
    }

    @Async
    public void doTaskTwo() throws Exception {
        // 同上内容,省略
    }

    @Async
    public void doTaskThree() throws Exception {
        // 同上内容,省略
    }
}
为了让@Async注解能够生效,还需要在Spring Boot的主程序中配置@EnableAsync,如下所示:
@SpringBootApplication
@EnableAsync
public class Application {

	public static void main(String[] args) {
		SpringApplication.run(Application.class, args);
	}

}
此时可以反复执行单元测试,您可能会遇到各种不同的结果,比如:
没有任何任务相关的输出
有部分任务相关的输出
乱序的任务相关的输出
原因是目前doTaskOne、doTaskTwo、doTaskThree三个函数的时候已经是异步执行了。主程序在异步调用之后,主程序并不会理会这三个函数是否执行完成了,由于没有其他需要执行的内容,所以程序就自动结束了,导致了不完整或是没有输出任务相关内容的情况。
注: @Async所修饰的函数不要定义为static类型,这样异步调用不会生效
异步回调
为了让doTaskOne、doTaskTwo、doTaskThree能正常结束,假设我们需要统计一下三个任务并发执行共耗时多少,这就需要等到上述三个函数都完成调动之后记录时间,并计算结果。
那么我们如何判断上述三个异步调用是否已经执行完成呢?我们需要使用Future<T>来返回异步调用的结果,就像如下方式改造doTaskOne函数:
@Async
public Future<String> doTaskOne() throws Exception {
    System.out.println("开始做任务一");
    long start = System.currentTimeMillis();
    Thread.sleep(random.nextInt(10000));
    long end = System.currentTimeMillis();
    System.out.println("完成任务一,耗时:" + (end - start) + "毫秒");
    return new AsyncResult<>("任务一完成");
}
按照如上方式改造一下其他两个异步函数之后,下面我们改造一下测试用例,让测试在等待完成三个异步调用之后来做一些其他事情。
@Test
public void test() throws Exception {

	long start = System.currentTimeMillis();

	Future<String> task1 = task.doTaskOne();
	Future<String> task2 = task.doTaskTwo();
	Future<String> task3 = task.doTaskThree();

	while(true) {
		if(task1.isDone() && task2.isDone() && task3.isDone()) {
			// 三个任务都调用完成,退出循环等待
			break;
		}
		Thread.sleep(1000);
	}

	long end = System.currentTimeMillis();

	System.out.println("任务全部完成,总耗时:" + (end - start) + "毫秒");

}
看看我们做了哪些改变:
在测试用例一开始记录开始时间
在调用三个异步函数的时候,返回Future<String>类型的结果对象
在调用完三个异步函数之后,开启一个循环,根据返回的Future<String>对象来判断三个异步函数是否都结束了。若都结束,就结束循环;若没有都结束,就等1秒后再判断。
跳出循环之后,根据结束时间 - 开始时间,计算出三个任务并发执行的总耗时。
执行一下上述的单元测试,可以看到如下结果:
开始做任务一
开始做任务二
开始做任务三
完成任务三,耗时:37毫秒
完成任务二,耗时:3661毫秒
完成任务一,耗时:7149毫秒
任务全部完成,总耗时:8025毫秒
可以看到,通过异步调用,让任务一、二、三并发执行,有效的减少了程序的总运行时间。
Spring Security进行安全控制
在编写Web应用时,经常需要对页面做一些安全控制,比如:对于没有访问权限的用户需要转到登录表单页面。要实现访问控制的方法多种多样,可以通过Aop、拦截器实现,也可以通过框架实现(如:Apache Shiro、Spring Security)。
Web层实现请求映射
@Controller
public class HelloController {

    @RequestMapping("/")
    public String index() {
        return "index";
    }

    @RequestMapping("/hello")
    public String hello() {
        return "hello";
    }
}
/:映射到index.html
/hello:映射到hello.html
实现映射的页面
src/main/resources/templates/index.html
<!DOCTYPE html>
<html xmlns="http://www.w3.org/1999/xhtml" xmlns:th="http://www.thymeleaf.org" xmlns:sec="http://www.thymeleaf.org/thymeleaf-extras-springsecurity3">
    <head>
        <title>Spring Security入门</title>
    </head>
    <body>
        <h1>欢迎使用Spring Security!</h1>
        <p>点击 <a th:href="@{/hello}">这里</a> 打个招呼吧</p>
    </body>
</html>
src/main/resources/templates/hello.html
<!DOCTYPE html>
<html xmlns="http://www.w3.org/1999/xhtml" xmlns:th="http://www.thymeleaf.org"
      xmlns:sec="http://www.thymeleaf.org/thymeleaf-extras-springsecurity3">
    <head>
        <title>Hello World!</title>
    </head>
    <body>
        <h1>Hello world!</h1>
    </body>
</html>
可以看到在index.html中提供到/hello的链接,显然在这里没有任何安全控制,所以点击链接后就可以直接跳转到hello.html页面。
整合Spring Security
在这一节,我们将对/hello页面进行权限控制,必须是授权用户才能访问。当没有权限的用户访问后,跳转到登录页面。
添加依赖
在pom.xml中添加如下配置,引入对Spring Security的依赖。
<dependencies>
    ...
        <dependency>
            <groupId>org.springframework.boot</groupId>
            <artifactId>spring-boot-starter-security</artifactId>
        </dependency>
    ...
</dependencies>
Spring Security配置
创建Spring Security的配置类WebSecurityConfig,具体如下:
@Configuration
@EnableWebSecurity
public class WebSecurityConfig extends WebSecurityConfigurerAdapter {

    @Override
    protected void configure(HttpSecurity http) throws Exception {
        http
            .authorizeRequests()
                .antMatchers("/", "/home").permitAll()
                .anyRequest().authenticated()
                .and()
            .formLogin()
                .loginPage("/login")
                .permitAll()
                .and()
            .logout()
                .permitAll();
    }

    @Autowired
    public void configureGlobal(AuthenticationManagerBuilder auth) throws Exception {
        auth
            .inMemoryAuthentication()
                .withUser("user").password("password").roles("USER");
    }

}
通过@EnableWebSecurity注解开启Spring Security的功能
继承WebSecurityConfigurerAdapter,并重写它的方法来设置一些web安全的细节
configure(HttpSecurity http)方法
通过authorizeRequests()定义哪些URL需要被保护、哪些不需要被保护。例如以上代码指定了/和/home不需要任何认证就可以访问,其他的路径都必须通过身份验证。
通过formLogin()定义当需要用户登录时候,转到的登录页面。
configureGlobal(AuthenticationManagerBuilder auth)方
新增登录请求与页面
在完成了Spring Security配置之后,我们还缺少登录的相关内容。
HelloController中新增/login请求映射至login.html
@Controller
public class HelloController {

    // 省略之前的内容...

    @RequestMapping("/login")
    public String login() {
        return "login";
    }

}
新增登录页面:src/main/resources/templates/login.html
<!DOCTYPE html>
<html xmlns="http://www.w3.org/1999/xhtml"
      xmlns:th="http://www.thymeleaf.org"
      xmlns:sec="http://www.thymeleaf.org/thymeleaf-extras-springsecurity3">
    <head>
        <title>Spring Security Example </title>
    </head>
    <body>
        <div th:if="${param.error}">
            用户名或密码错
        </div>
        <div th:if="${param.logout}">
            您已注销成功
        </div>
        <form th:action="@{/login}" method="post">
            <div><label> 用户名 : <input type="text" name="username"/> </label></div>
            <div><label> 密  码 : <input type="password" name="password"/> </label></div>
            <div><input type="submit" value="登录"/></div>
        </form>
    </body>
</html>
可以看到,实现了一个简单的通过用户名和密码提交到/login的登录方式。
根据配置,Spring Security提供了一个过滤器来拦截请求并验证用户身份。如果用户身份认证失败,页面就重定向到/login?error,并且页面中会展现相应的错误信息。若用户想要注销登录,可以通过访问/login?logout请求,在完成注销之后,页面展现相应的成功消息。
到这里,我们启用应用,并访问http://localhost:8080/,可以正常访问。但是访问http://localhost:8080/hello的时候被重定向到了http://localhost:8080/login页面,因为没有登录,用户没有访问权限,通过输入用户名user和密码password进行登录后,跳转到了Hello World页面,再也通过访问http://localhost:8080/login?logout,就可以完成注销操作。
为了让整个过程更完成,我们可以修改hello.html,让它输出一些内容,并提供“注销”的链接。
<!DOCTYPE html>
<html xmlns="http://www.w3.org/1999/xhtml" xmlns:th="http://www.thymeleaf.org"
      xmlns:sec="http://www.thymeleaf.org/thymeleaf-extras-springsecurity3">
    <head>
        <title>Hello World!</title>
    </head>
    <body>
        <h1 th:inline="text">Hello [[${#httpServletRequest.remoteUser}]]!</h1>
        <form th:action="@{/logout}" method="post">
            <input type="submit" value="注销"/>
        </form>
    </body>
</html>
注意事项
注意:
1. 去除不需要的 jar
开发工具 jar: spring-boot-devtools
2. 监控一定要做好权限控制或者去除
控制 jar: spring-boot-starter-actuator
druid 的监控
swagger 的接口
3、 打包, 跳过测试
maven: clean package -Dmaven.test.skip=true
脚本:
#!/bin/sh

## chang here
SERVICE_DIR=/roncoo/spring-boot-demo
SERVICE_NAME=spring-boot-demo-31-1-0.0.1-SNAPSHOT
SPRING_PROFILES_ACTIVE=dev

## java env
export JAVA_HOME=/opt/jdk1.7.0_79
export JRE_HOME=${JAVA_HOME}/jre

case "$1" in
	start)
		procedure=`ps -ef | grep -w "${SERVICE_NAME}" |grep -w "java"| grep -v "grep" | awk '{print $2}'`
		if [ "${procedure}" = "" ];
		then
			echo "start ..."
			if [ "$2" != "" ];
			then
				SPRING_PROFILES_ACTIVE=$2
			fi
			echo "spring.profiles.active=${SPRING_PROFILES_ACTIVE}"
			exec nohup ${JRE_HOME}/bin/java -Xms128m -Xmx512m -jar ${SERVICE_DIR}/${SERVICE_NAME}/.jar --spring.profiles.active=${SPRING_PROFILES_ACTIVE} >/dev/null 2>&1 &
			echo "start success"
		else
			echo "${SERVICE_NAME} is start"
		fi
		;;

	stop)
		procedure=`ps -ef | grep -w "${SERVICE_NAME}" |grep -w "java"| grep -v "grep" | awk '{print $2}'`
		if [ "${procedure}" = "" ];
		then
			echo "${SERVICE_NAME} is stop"
		else
			kill -9 ${procedure}
			sleep 1
			argprocedure=`ps -ef | grep -w "${SERVICE_NAME}" |grep -w "java"| grep -v "grep" | awk '{print $2}'`
			if [ "${argprocedure}" = "" ];
			then
				echo "${SERVICE_NAME} stop success"
			else
				kill -9 ${argprocedure}
				echo "${SERVICE_NAME} stop error"
			fi
		fi
		;;

	restart)
		$0 stop
		sleep 1
		$0 start $2
		;;

	*)
		echo "usage: $0 [start|stop|restart] [dev|test|prod]"
		;;
esac
1.使用基于spring boot的配置
<?xml version="1.0" encoding="UTF-8"?>
<configuration>
<include resource="org/springframework/boot/logging/logback/base.xml"/>
<logger name="org.springframework.web" level="DEBUG"/>
</configuration>
log4j配置(去除logback的依赖包,添加log4j2的依赖包)
<exclusions>
				<exclusion>
					<groupId>org.springframework.boot</groupId>
					<artifactId>spring-boot-starter-logging</artifactId>
				</exclusion>
			</exclusions>
<!-- 使用log4j2 -->
		<dependency>
			<groupId>org.springframework.boot</groupId>
			<artifactId>spring-boot-starter-log4j2</artifactId>
		</dependency>
正文到此结束
- 本文标签: API logo Spring Security 参数 git Enterprise message MongoDB root 权限控制 provider cat Action XML windows client map AOP 插件 servlet http IDE Listeners 时间 java 专注 开发 tar Atom DOM 测试 ArrayList dataSource apr ORM Chrome db entity UI mysql Spring Boot 分页 awk ACE RESTful ActiveMQ Android web token 开源 数据库 Property json tab build NOSQL IO 文件上传 mail ask redis JPA 代码 spring 一致性 操作系统 Security Document 协议 session 企业 集群 业务层 list node src jquery id mybatis ip Word 管理 JMS HTML apache mongo 总结 description Freemarker 实例 authenticate example sql 图片 SpringMVC jetty DDL 数据 GitHub rmi rabbitmq dependencies js 远程调试 Transport parse ssl HashMap Ajax 标题 bean value remote lib 配置 Master BaseResultMap shell 生命 NSA 监听器 App update 本质 final grep ODBC URLs 认证 传播行为 schema HBase cache 组织 pom 统计 调试 SDN 目录 springboot 主键值 https 下载 queue 解析 服务器 amqp 同步 功夫 Service key 端口 dist 安装 MQ REST tomcat 删除 CSS Logging CTO XEN bug 锁 find JavaScript Select classpath 存储引擎 Connection 安全 mapper 敏捷 maven core 开发者
- 版权声明: 本文为互联网转载文章,出处已在文章中说明(部分除外)。如果侵权,请联系本站长删除,谢谢。
- 本文海报: 生成海报一 生成海报二
热门推荐


相关文章

近期评论
-
谢谢
-
https://www.newcmy.com/register?aff=HBVX建议您试试草莓云机场,可以流畅观看youtube和tiktok,上reddit/x也没有问题,还有各种ai优化节点。
-
-
-
想购买您这个站,我的联系方式QQ741756694微信同步 能卖联系
-
-
-
-
-
https://www.liuhaihua.cn/archives/40657.html 这篇博客中的图片打不开了
Loading...
![[HBLOG]公众号](https://www.liuhaihua.cn/img/qrcode_gzh.jpg)

