MVC高级特性 & REST服务 & Security企业级认证授权 & 优雅编码(一)
本文中所有实例代码已托管码云: gitee.com/zhenganwen/…
文末有惊喜!
开发环境
JDK1.8
Maven
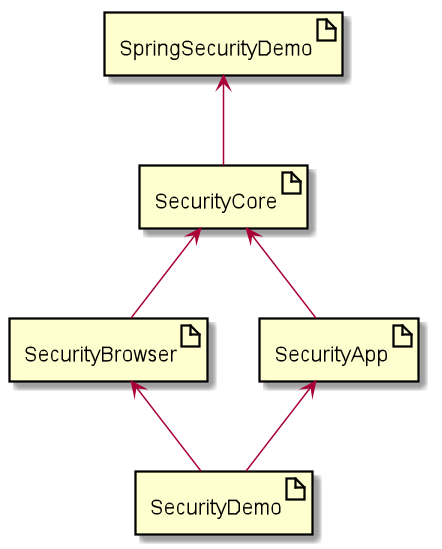
项目结构
-
spring-security-demo父工程,用于整个项目的依赖
-
security-core安全认证核心模块,
security-browser和security-app都基于其来构建 -
security-browserPC端浏览器授权,主要通过
Session -
security-app移动端授权
-
security-demo应用
security-browser和security-app
依赖
spring-security-demo
添加 spring 依赖自动兼容依赖和编译插件
<packaging>pom</packaging>

<dependencyManagement>
    <dependencies>
        <dependency>
            <groupId>io.spring.platform</groupId>
            <artifactId>platform-bom</artifactId>
            <version>Brussels-SR4</version>
            <type>pom</type>
            <scope>import</scope>
        </dependency>
        <dependency>
            <groupId>org.springframework.cloud</groupId>
            <artifactId>spring-cloud-dependencies</artifactId>
            <version>Dalston.SR2</version>
            <type>pom</type>
            <scope>import</scope>
        </dependency>
    </dependencies>
</dependencyManagement>

<build>
    <plugins>
        <plugin>
            <groupId>org.apache.maven.plugins</groupId>
            <artifactId>maven-compiler-plugin</artifactId>
            <version>2.3.2</version>
            <configuration>
                <source>1.8</source>
                <target>1.8</target>
                <encoding>UTF-8</encoding>
            </configuration>
        </plugin>
    </plugins>
</build>
复制代码
security-core
添加持久化、 OAuth 认证、 social 认证以及 commons 工具类等依赖,一些依赖只是先加进来以备后用
<dependencies>
    <dependency>
        <groupId>org.springframework.cloud</groupId>
        <artifactId>spring-cloud-starter-oauth2</artifactId>
    </dependency>
    <dependency>
        <groupId>org.springframework.boot</groupId>
        <artifactId>spring-boot-starter-data-redis</artifactId>
    </dependency>
    <dependency>
        <groupId>org.springframework.boot</groupId>
        <artifactId>spring-boot-starter-jdbc</artifactId>
    </dependency>
    <dependency>
        <groupId>mysql</groupId>
        <artifactId>mysql-connector-java</artifactId>
    </dependency>
    <dependency>
        <groupId>org.springframework.social</groupId>
        <artifactId>spring-social-config</artifactId>
    </dependency>
    <dependency>
        <groupId>org.springframework.social</groupId>
        <artifactId>spring-social-core</artifactId>
    </dependency>
    <dependency>
        <groupId>org.springframework.social</groupId>
        <artifactId>spring-social-security</artifactId>
    </dependency>
    <dependency>
        <groupId>org.springframework.social</groupId>
        <artifactId>spring-social-web</artifactId>
    </dependency>
    <dependency>
        <groupId>commons-lang</groupId>
        <artifactId>commons-lang</artifactId>
    </dependency>
    <dependency>
        <groupId>commons-collections</groupId>
        <artifactId>commons-collections</artifactId>
    </dependency>
    <dependency>
        <groupId>commons-beanutils</groupId>
        <artifactId>commons-beanutils</artifactId>
    </dependency>
    <dependency>
        <groupId>org.projectlombok</groupId>
        <artifactId>lombok</artifactId>
        <version>1.16.22</version>
        <scope>compile</scope>
    </dependency>
</dependencies>
复制代码
security-browser
添加 security-core 和集群管理依赖
<dependencies>
    <dependency>
        <groupId>top.zhenganwen</groupId>
        <artifactId>security-core</artifactId>
        <version>1.0-SNAPSHOT</version>
    </dependency>
    <dependency>
        <groupId>org.springframework.session</groupId>
        <artifactId>spring-session</artifactId>
    </dependency>
</dependencies>
复制代码
security-app
添加 security-core
<dependencies>
    <dependency>
        <groupId>top.zhenganwen</groupId>
        <artifactId>security-core</artifactId>
        <version>1.0-SNAPSHOT</version>
    </dependency>
</dependencies>
复制代码
security-demo
暂时引用 security-browser 做PC端的验证
<artifactId>security-demo</artifactId>
<dependencies>
    <dependency>
        <groupId>top.zhenganwen</groupId>
        <artifactId>security-browser</artifactId>
        <version>1.0-SNAPSHOT</version>
    </dependency>
</dependencies>
复制代码
配置
在 security-demo 中添加启动类如下
package top.zhenganwen.securitydemo;

import org.springframework.boot.SpringApplication;
import org.springframework.boot.autoconfigure.SpringBootApplication;
import org.springframework.web.bind.annotation.RequestMapping;
import org.springframework.web.bind.annotation.RestController;

/**
 * @author zhenganwen
 * @date 2019/8/18
 * @desc SecurityDemoApplication
 */
@SpringBootApplication
@RestController
public class SecurityDemoApplication {
    public static void main(String[] args) {
        SpringApplication.run(SecurityDemoApplication.class, args);
    }

    @RequestMapping("/hello")
    public String hello() {
        return "hello spring security";
    }
}
复制代码
根据报错信息添加 mysql 连接信息
spring.datasource.driver-class-name=com.mysql.jdbc.Driver
spring.datasource.url=jdbc:mysql://127.0.0.1:3306/test?useUnicode=yes&characterEncoding=UTF-8&useSSL=false
spring.datasource.username=root
spring.datasource.password=123456
复制代码
暂时用不到 session 集群共享和 redis ,先禁用掉
spring.session.store-type=none
复制代码
@SpringBootApplication(exclude = {RedisAutoConfiguration.class,RedisRepositoriesAutoConfiguration.class})
@RestController
public class SecurityDemoApplication {
复制代码
然后发现能够启动成功了,然而访问 /hello 去发现提示我们要登录,这是 Spring Security 的默认认证策略在起作用,我们也先禁用它
security.basic.enabled = false
复制代码
重启访问 /hello ,页面显示 hello spring security ,环境搭建成功
Restful
Restful VS 传统
Restful 是一种HTTP接口编写风格,而不是一种标准或规定。使用 Restful 风格和传统方式的区别主要如下
- URL
- 传统方式一般通过在
URL中添加表明接口行为的字符串和查询参数,如/user/get?username=xxx -
Restful风格则推荐一个URL代表一个系统资源,/user/1应表示访问系统中id为1的用户
- 传统方式一般通过在
- 请求方式
- 传统方式一般通过
get提交,弊端是get提交会将请求参数附在URL上,而URL有长度限制,并且若不特殊处理,参数在URL上是明文显示的,不安全。对上述两点有要求的请求会使用post提交 -
Restful风格推崇使用提交方式描述请求行为,如POST、DELETE、PUT、GET应对应增、删、改、查类型的请求
- 传统方式一般通过
- 通讯媒介
- 传统方式中,对请求的响应结果是一个页面,如此针对不同的终端需要开发多个系统,且前后端逻辑耦合
-
Restful风格提倡使用JSON作为前后端通讯媒介,前后端分离;通过响应状态码来标识响应结果类型,如200表示请求被成功处理,404表示没有找到相应资源,500表示服务端处理异常。
Restful 详解参考: www.runoob.com/w3cnote/res…
SpringMVC高级特性与REST服务
Jar包方式运行
上述搭建的环境已经能通过IDE运行并访问 /hello ,但是生产环境一般是将项目打成一个可执行的 jar 包,能够通过 java -jar 直接运行。
此时如果我们右键父工程运行 maven 命令 clean package 你会发现 security-demo/target 中生成的 jar 只有 7KB ,这是因为 maven 默认的打包方式是不会将其依赖的 jar 进来并且设置 springboot 启动类的。这时我们需要在 security-demo 的 pom 中添加一个打包插件
<build>
    <plugins>
        <plugin>
            <groupId>org.springframework.boot</groupId>
            <artifactId>spring-boot-maven-plugin</artifactId>
            <version>1.3.3.RELEASE</version>
            <executions>
                <execution>
                    <goals>
                        <goal>repackage</goal>
                    </goals>
                </execution>
            </executions>
        </plugin>
    </plugins>
    <!-- 生成的jar文件名 -->
    <finalName>demo</finalName>
</build>
复制代码
这样再执行 clean package 就会发现 target 下生产了一个 demo.jar 和 demo.jar.original ,其中 demo.jar 是可执行的,而 demo.jar.original 是保留了 maven 默认打包方式
使用MockMVC编写接口测试用例
秉着测试先行的原则(提倡先写测试用例再写接口,验证程序按照我们的想法运行),我们需要借助 spring-boot-starter-test 测试框架和其中相关的 MockMvc API。 mock 为打桩的意思,意为使用测试用例将程序打造牢固。
首先在 security-demo 中添加测试依赖
<dependency>
    <groupId>org.springframework.boot</groupId>
    <artifactId>spring-boot-starter-test</artifactId>
</dependency>
复制代码
然后在 src/test/java 中新建测试类如下
package top.zhenganwen.securitydemo;

import org.junit.Before;
import org.junit.Test;
import org.junit.runner.RunWith;
import org.springframework.beans.factory.annotation.Autowired;
import org.springframework.boot.test.context.SpringBootTest;
import org.springframework.http.MediaType;
import org.springframework.test.context.junit4.SpringRunner;
import org.springframework.test.web.servlet.MockMvc;
import org.springframework.test.web.servlet.setup.MockMvcBuilders;
import org.springframework.web.context.WebApplicationContext;

import static org.springframework.test.web.servlet.request.MockMvcRequestBuilders.get;
import static org.springframework.test.web.servlet.result.MockMvcResultMatchers.jsonPath;
import static org.springframework.test.web.servlet.result.c.status;

/**
 * @author zhenganwen
 * @date 2019/8/18
 * @desc SecurityDemoApplicationTest
 */
@RunWith(SpringRunner.class)
@SpringBootTest
public class SecurityDemoApplicationTest {

    @Autowired
    WebApplicationContext webApplicationContext;

    private MockMvc mockMvc;

    @Before
    public void before() {
        mockMvc = MockMvcBuilders.webAppContextSetup(webApplicationContext).build();
    }

    @Test
    public void hello() throws Exception {
        mockMvc.perform(get("/hello").contentType(MediaType.APPLICATION_JSON_UTF8))
                .andExpect(status().isOk())
                .andExpect(jsonPath("$").value("hello spring security"));
    }
}
复制代码
因为是测试HTTP接口,因此需要注入web容器 WebApplicationContext 。其中 get() 、 status() 、 jsonPath() 都是静态导入的方法,测试代码的意思是通过 GET 提交方式请求 /hello ( get("/hello") )并附加请求头为 Content-Type: application/json (这样参数就会以 json 的方式附在请求体中,是的没错, GET 请求也是可以附带请求体的!)
andExpect(status().isOk()) 期望响应状态码为 200 (参见HTTP状态码), andExpect((jsonPath("$").value("hello spring security")) 期望响应的 JSON 数据是一个字符串且内容为 hello spring security (该方法依赖 JSON 解析框架 jsonpath , $ 表示 JSON 本体在Java中对应的数据类型对象,更多API详见: github.com/search?q=js…
其中比较重要的API为 MockMvc 、 MockMvcRequestBuilders 、 MockMvcRequestBuilders
-
MockMvc,调用perform指定接口地址 -
MockMvcRequestBuilders,构建请求(包括请求路径、提交方式、请求头、请求体等) -
MockMvcRequestBuilders,断言响应结果,如响应状态码、响应体
MVC注解细节
@RestController
用于标识一个 Controller 为 Restful Controller ,其中方法的返回结果会被 SpringMVC 自动转换为 JSON 并设置响应头为 Content-Type=application/json
@RequestMapping
用于将URL映射到方法上,并且 SpringMVC 会自动将请求参数按照按照参数名对应关系绑定到方法入参上
package top.zhenganwen.securitydemo.dto;

import lombok.Data;

import java.io.Serializable;

/**
 * @author zhenganwen
 * @date 2019/8/18
 * @desc User
 */
@Data
@AllArgsConstructor
@NoArgsConstructor
public class User implements Serializable {

    private String username;
    private String password;
}

复制代码
package top.zhenganwen.securitydemo.web.controller;

import org.springframework.web.bind.annotation.GetMapping;
import org.springframework.web.bind.annotation.RestController;
import top.zhenganwen.securitydemo.dto.User;

import java.util.Arrays;
import java.util.List;

/**
 * @author zhenganwen
 * @date 2019/8/18
 * @desc UserController
 */
@RestController
public class UserController {

    @GetMapping("/user")
    public List<User> query(String username) {
        System.out.println(username);
        List<User> users = Arrays.asList(new User(), new User(), new User());
        return users;
    }
}
复制代码
package top.zhenganwen.securitydemo.web.controller;

import org.junit.Before;
import org.junit.Test;
import org.junit.runner.RunWith;
import org.springframework.beans.factory.annotation.Autowired;
import org.springframework.boot.test.context.SpringBootTest;
import org.springframework.http.MediaType;
import org.springframework.test.context.junit4.SpringRunner;
import org.springframework.test.web.servlet.MockMvc;
import org.springframework.test.web.servlet.setup.MockMvcBuilders;
import org.springframework.web.context.WebApplicationContext;

import static org.springframework.test.web.servlet.request.MockMvcRequestBuilders.get;
import static org.springframework.test.web.servlet.result.MockMvcResultMatchers.jsonPath;
import static org.springframework.test.web.servlet.result.MockMvcResultMatchers.status;

/**
 * @author zhenganwen
 * @date 2019/8/18
 * @desc UserControllerTest
 */
@RunWith(SpringRunner.class)
@SpringBootTest
public class UserControllerTest {

    @Autowired
    private WebApplicationContext webApplicationContext;

    private MockMvc mockMvc;

    @Before
    public void setUp() throws Exception {
        mockMvc = MockMvcBuilders.webAppContextSetup(webApplicationContext).build();
    }

    @Test
    public void query() throws Exception {
        mockMvc.perform(get("/user").
                contentType(MediaType.APPLICATION_JSON_UTF8)
                .param("username", "tom"))
                .andExpect(status().isOk())
                .andExpect(jsonPath("$.length()").value(3));
    }
}
复制代码
通过 MockMvcRequestBuilders.param 可以为请求附带URL形式参数。
指定提交方式
如果没有通过 method 属性指定提交方式,那么所有的提交方式都会被受理,但如果设置 @RequestMapping(method = RequestMethod.GET) ,那么只有 GET 请求会被受理,其他提交方式都会导致 405 unsupported request method
@RequestParam
必填参数
上例代码,如果请求不附带参数 username ,那么 Controller 的参数就会被赋予数据类型默认值。如果你想请求必须携带该参数,否则不予处理,那么就可以使用 @RequestParam 并指定 required=true (不指定也可以,默认就是)
Controller
@GetMapping("/user")
public List<User> query(@RequestParam String username) {
    System.out.println(username);
    List<User> users = Arrays.asList(new User(), new User(), new User());
    return users;
}
复制代码
ControllerTest
@Test
public void testBadRequest() throws Exception {
    mockMvc.perform(get("/user").
                    contentType(MediaType.APPLICATION_JSON_UTF8))
        .andExpect(status().is4xxClientError());
}
复制代码
因为请求没有附带参数 username ,所以会报错 400 bad request ,我们可以使用 is4xxClientError() 对响应状态码为 400 的请求进行断言
参数名映射
SpringMVC 默认是按参数名相同这一规则映射参数值得,如果你想将请求中参数 username 的值绑定到方法参数 userName 上,可以通过 name 属性或 value 属性
@GetMapping("/user")
public List<User> query(@RequestParam(name = "username") String userName) {
    System.out.println(userName);
    List<User> users = Arrays.asList(new User(), new User(), new User());
    return users;
}

@GetMapping("/user")
public List<User> query(@RequestParam("username") String userName) {
    System.out.println(userName);
    List<User> users = Arrays.asList(new User(), new User(), new User());
    return users;
}
复制代码
@Test
public void testParamBind() throws Exception {
    mockMvc.perform(get("/user").
                    contentType(MediaType.APPLICATION_JSON_UTF8)
                    .param("username", "tom"))
        .andExpect(status().isOk())
        .andExpect(jsonPath("$.length()").value(3));
}
复制代码
默认参数值
如果希望不强制请求携带某参数,但又希望方法参数在没有接收到参数值时能有个默认值(例如 “” 比 null 更不容易报错),那么可以通过 defaultValue 属性
@GetMapping("/user")
public List<User> query(@RequestParam(required = false,defaultValue = "") String userName) {
    Objects.requireNonNull(userName);
    List<User> users = Arrays.asList(new User(), new User(), new User());
    return users;
}
复制代码
@Test
public void testDefaultValue() throws Exception {
    mockMvc.perform(get("/user").
                    contentType(MediaType.APPLICATION_JSON_UTF8))
        .andExpect(status().isOk())
        .andExpect(jsonPath("$.length()").value(3));
}
复制代码
Bean绑定
如果请求附带的参数较多,并且各参数都隶属于某个对象的属性,那么将它们一一写在方法参列比较冗余,我们可以将它们统一封装到一个数据传输对象( Data Transportation Object DTO )中,如
package top.zhenganwen.securitydemo.dto;

import lombok.Data;

/**
 * @author zhenganwen
 * @date 2019/8/19
 * @desc UserCondition
 */
@Data
public class UserQueryConditionDto {

    private String username;
    private String password;
    private String phone;
}
复制代码
然后在方法入参填写该对象即可, SpringMVC 会帮我们实现请求参数到对象属性的绑定(默认绑定规则是参数名一致)
@GetMapping("/user")
public List<User> query(@RequestParam("username") String userName, UserQueryConditionDto userQueryConditionDto) {
    System.out.println(userName);
    System.out.println(ReflectionToStringBuilder.toString(userQueryConditionDto, ToStringStyle.MULTI_LINE_STYLE));
    List<User> users = Arrays.asList(new User(), new User(), new User());
    return users;
}
复制代码
ReflectionToStringBuilder 反射工具类能够在对象没有重写 toString 方法时通过反射帮我们查看对象的属性。
@Test
public void testDtoBind() throws Exception {
    mockMvc.perform(get("/user").
                    contentType(MediaType.APPLICATION_JSON_UTF8)
                    .param("username", "tom")
                    .param("password", "123456")
                    .param("phone", "12345678911"))
        .andExpect(status().isOk())
        .andExpect(jsonPath("$.length()").value(3));
}
复制代码
Bean绑定不影响@RequestParam绑定
并且不用担心会和 @RequestParam 冲突,输出如下
tom
top.zhenganwen.securitydemo.dto.UserQueryConditionDto@440ef8d[
  username=tom
  password=123456
  phone=12345678911
]
复制代码
Bean绑定优先于基本类型参数绑定
但是,如果不给 userName 添加 @RequestParam 注解,那么它接收到的将是一个 null
null
top.zhenganwen.securitydemo.dto.UserQueryConditionDto@440ef8d[
  username=tom
  password=123456
  phone=12345678911
]
复制代码
分页参数绑定
spring-data 家族(如 spring-boot-data-redis )帮我们封装了一个分页DTO Pageable ,会将我们传递的分页参数 size (每页行数)、 page (当前页码)、 sort (排序字段和排序策略)自动绑定到自动注入的 Pageable 实例中
@GetMapping("/user")
public List<User> query(String userName, UserQueryConditionDto userQueryConditionDto, Pageable pageable) {
    System.out.println(userName);
    System.out.println(ReflectionToStringBuilder.toString(userQueryConditionDto, ToStringStyle.MULTI_LINE_STYLE));
    System.out.println(pageable.getPageNumber());
    System.out.println(pageable.getPageSize());
    System.out.println(pageable.getSort());
    List<User> users = Arrays.asList(new User(), new User(), new User());
    return users;
}
复制代码
@Test
public void testPageable() throws Exception {
    mockMvc.perform(get("/user").
                    contentType(MediaType.APPLICATION_JSON_UTF8)
                    .param("username", "tom")
                    .param("password", "123456")
                    .param("phone", "12345678911")
                    .param("page", "2")
                    .param("size", "30")
                    .param("sort", "age,desc"))
        .andExpect(status().isOk())
        .andExpect(jsonPath("$.length()").value(3));
}
复制代码
null
top.zhenganwen.securitydemo.dto.UserQueryConditionDto@24e5389c[
  username=tom
  password=123456
  phone=12345678911
]
2
30
age: DESC
复制代码
@PathVariable
变量占位
最常见的 Restful URL ,像 GET /user/1 获取 id 为 1 的用户的信息,这时我们在编写接口时需要将路径中的 1 替换成一个占位符如 {id} ,根据实际的URL请求动态的绑定到方法参数 id 上
@GetMapping("/user/{id}")
public User info(@PathVariable("id") Long id) {
    System.out.println(id);
    return new User("jack","123");
}
复制代码
@Test
public void testPathVariable() throws Exception {
    mockMvc.perform(get("/user/1").
                    contentType(MediaType.APPLICATION_JSON_UTF8))
        .andExpect(status().isOk())
        .andExpect(jsonPath("$.username").value("jack"));
}

1
复制代码
当方法参数名和URL占位符变量名一致时,可以省去 @PathVariable 的 value 属性
正则匹配
有时我们需要对URL的匹配做细粒度的控制,例如 /user/1 会匹配到 /user/{id} ,而 /user/xxx 则不会匹配到 /user/{id}
@GetMapping("/user/{id://d+}")
public User getInfo(@PathVariable("id") Long id) {
    System.out.println(id);
    return new User("jack","123");
}
复制代码
@Test
public void testRegExSuccess() throws Exception {
    mockMvc.perform(get("/user/1").
                    contentType(MediaType.APPLICATION_JSON_UTF8))
        .andExpect(status().isOk());
}

@Test
public void testRegExFail() throws Exception {
    mockMvc.perform(get("/user/abc").
                    contentType(MediaType.APPLICATION_JSON_UTF8))
        .andExpect(status().is4xxClientError());
}
复制代码
@JsonView
应用场景
有时我们需要对响应对象的某些字段进行过滤,例如查询所有用户时不显示 password 字段,根据 id 查询用户时则显示 password 字段,这时可以通过 @JsonView 注解实现此类功能
使用方法
1、声明视图接口,每个接口代表响应数据时对象字段可见策略
这里视图指的就是一种字段包含策略,后面添加 @JsonView 时会用到
@Data
@AllArgsConstructor
@NoArgsConstructor
public class User implements Serializable {

    /**
     * 普通视图,返回用户基本信息
     */
    public interface UserOrdinaryView {

    }

    /**
     * 详情视图,除了普通视图包含的字段,还返回密码等详细信息
     */
    public interface UserDetailsView extends UserOrdinaryView{

    }

    private String username;

    private String password;
}
复制代码
视图和视图之间可以存在继承关系,继承视图后会继承该视图包含的字段
2、在响应对象的字段上添加视图,表示该字段包含在该视图中
@Data
@AllArgsConstructor
@NoArgsConstructor
public class User implements Serializable {

    /**
     * 普通视图,返回用户基本信息
     */
    public interface UserOrdinaryView {

    }

    /**
     * 详情视图,除了普通视图包含的字段,还返回密码等详细信息
     */
    public interface UserDetailsView extends UserOrdinaryView{

    }

    @JsonView(UserOrdinaryView.class)
    private String username;

    @JsonView(UserDetailsView.class)
    private String password;
}
复制代码
3、在Controller方法上添加视图,表示该方法返回的对象数据仅显示该视图包含的字段
@GetMapping("/user")
@JsonView(User.UserBasicView.class)
public List<User> query(String userName, UserQueryConditionDto userQueryConditionDto, Pageable pageable) {
    System.out.println(userName);
    System.out.println(ReflectionToStringBuilder.toString(userQueryConditionDto, ToStringStyle.MULTI_LINE_STYLE));
    System.out.println(pageable.getPageNumber());
    System.out.println(pageable.getPageSize());
    System.out.println(pageable.getSort());
    List<User> users = Arrays.asList(new User("tom","123"), new User("jack","456"), new User("alice","789"));
    return users;
}

@GetMapping("/user/{id://d+}")
@JsonView(User.UserDetailsView.class)
public User getInfo(@PathVariable("id") Long id) {
    System.out.println(id);
    return new User("jack","123");
}
复制代码
测试
@Test
public void testUserBasicViewSuccess() throws Exception {
    MvcResult mvcResult = mockMvc.perform(get("/user").
                                          contentType(MediaType.APPLICATION_JSON_UTF8))
        .andExpect(status().isOk())
        .andReturn();
    System.out.println(mvcResult.getResponse().getContentAsString());
}

[{"username":"tom"},{"username":"jack"},{"username":"alice"}]

@Test
public void testUserDetailsViewSuccess() throws Exception {
    MvcResult mvcResult = mockMvc.perform(get("/user/1").
                                          contentType(MediaType.APPLICATION_JSON_UTF8))
        .andExpect(status().isOk())
        .andReturn();
    System.out.println(mvcResult.getResponse().getContentAsString());
}

{"username":"jack","password":"123"}
复制代码
阶段性重构
重构需要 小步快跑 ,即每写完一部分功能都要回头来看一下有哪些需要优化的地方
代码中两个方法都的 RequestMapping 都用了 /user ,我们可以将其提至类上以供复用
@RestController
@RequestMapping("/user")
public class UserController {

    @GetMapping
    @JsonView(User.UserBasicView.class)
    public List<User> query(String userName, UserQueryConditionDto userQueryConditionDto, Pageable pageable) {
        System.out.println(userName);
        System.out.println(ReflectionToStringBuilder.toString(userQueryConditionDto, ToStringStyle.MULTI_LINE_STYLE));
        System.out.println(pageable.getPageNumber());
        System.out.println(pageable.getPageSize());
        System.out.println(pageable.getSort());
        List<User> users = Arrays.asList(new User("tom","123"), new User("jack","456"), new User("alice","789"));
        return users;
    }

    @GetMapping("/{id://d+}")
    @JsonView(User.UserDetailsView.class)
    public User getInfo(@PathVariable("id") Long id) {
        System.out.println(id);
        return new User("jack","123");
    }
}
复制代码
虽然是一个很细节的问题,但是一定要有这个思想和习惯
别忘了重构后重新运行一遍所有的测试用例,确保重构没有更改程序行为
处理请求体
@RequestBody映射请求体到Java方法的参数
SpringMVC 默认不会解析请求体中的参数并绑定到方法参数
@PostMapping
public void createUser(User user) {
    System.out.println(user);
}
复制代码
@Test
public void testCreateUser() throws Exception {
    mockMvc.perform(post("/user").
                    contentType(MediaType.APPLICATION_JSON_UTF8)
                    .content("{/"username/":/"jack/",/"password/":/"123/"}"))
        .andExpect(status().isOk());
}

User(id=null, username=null, password=null)
复制代码
使用 @RequestBody 可以将请求体中的 JSON 数据解析成Java对象并绑定到方法入参
@PostMapping
public void createUser(@RequestBody User user) {
    System.out.println(user);
}
复制代码
@Test
public void testCreateUser() throws Exception {
    mockMvc.perform(post("/user").
                    contentType(MediaType.APPLICATION_JSON_UTF8)
                    .content("{/"username/":/"jack/",/"password/":/"123/"}"))
        .andExpect(status().isOk());
}

User(id=null, username=jack, password=123)
复制代码
日期类型参数处理
如果需要将时间类型数据绑定到 Bean 的 Date 字段上,网上常见的解决方案是加一个 json 消息转换器进行格式化,这样的话就将日期的显示逻辑写死在后端的。
比较好的做法应该是后端只保存时间戳,传给前端时也只传时间戳,将格式化显示的责任交给前端,前端爱怎么显示怎么显示
@PostMapping
public void createUser(@RequestBody User user) {
    System.out.println(user);
}
复制代码
@Test
public void testDateBind() throws Exception {
    Date date = new Date();
    System.out.println(date.getTime());
    mockMvc.perform(post("/user").
                    contentType(MediaType.APPLICATION_JSON_UTF8)
                    .content("{/"username/":/"jack/",/"password/":/"123/",/"birthday/":/"" + date.getTime() + "/"}"))
        .andExpect(status().isOk());
}

1566212381139
User(id=null, username=jack, password=123, birthday=Mon Aug 19 18:59:41 CST 2019)
复制代码
@Valid注解验证请求参数的合法性
抽离校验逻辑
在 Controller 方法中,我们经常需要对请求参数进行合法性校验后再执行处理逻辑,传统的写法是使用 if 判断
@PostMapping
public void createUser(@RequestBody User user) {
    if (StringUtils.isBlank(user.getUsername())) {
        throw new IllegalArgumentException("用户名不能为空");
    }
    if (StringUtils.isBlank(user.getPassword())) {
        throw new IllegalArgumentException("密码不能为空");
    }
    System.out.println(user);
}
复制代码
但是如果其他地方也需要校验就需要编写重复的代码,一旦校验逻辑发生改变就需要改变多处,并且如果有所遗漏还会给程序埋下隐患。有点重构意识的可能会将每个校验逻辑单独封装一个方法,但仍显冗余。
SpringMVC Restful 则推荐使用 @Valid 来实现参数的校验,并且未通过校验的会响应 400 bad request 给前端,以状态码表示处理结果(及请求格式不对),而不是像上述代码一样直接抛异常导致前端收到的状态码是 500
首先我们要使用 hibernate-validator 校验框架提供的一些约束注解来约束 Bean 字段
@NotBlank
@JsonView(UserBasicView.class)
private String username;

@NotBlank
@JsonView(UserDetailsView.class)
private String password;
复制代码
仅添加这些注解, SpringMVC 是不会帮我们校验的
@PostMapping
public void createUser(@RequestBody User user) {
    System.out.println(user);
}
复制代码
@Test
public void testConstraintValidateFail() throws Exception {
    mockMvc.perform(post("/user").
                    contentType(MediaType.APPLICATION_JSON_UTF8)
                    .content("{/"username/":/"/"}"))
        .andExpect(status().isOk());
}

User(id=null, username=, password=null, birthday=null)
复制代码
我们还要在需要校验的 Bean 前添加 @Valid 注解,这样 SpringMVC 会根据我们在该 Bean 中添加的约束注解进行校验,在校验不通过时响应 400 bad request
@PostMapping
public void createUser(@Valid @RequestBody User user) {
    System.out.println(user);
}
复制代码
@Test
public void testConstraintValidateSuccess() throws Exception {
    mockMvc.perform(post("/user").
                    contentType(MediaType.APPLICATION_JSON_UTF8)
                    .content("{/"username/":/"/"}"))
        .andExpect(status().is4xxClientError());
}
复制代码
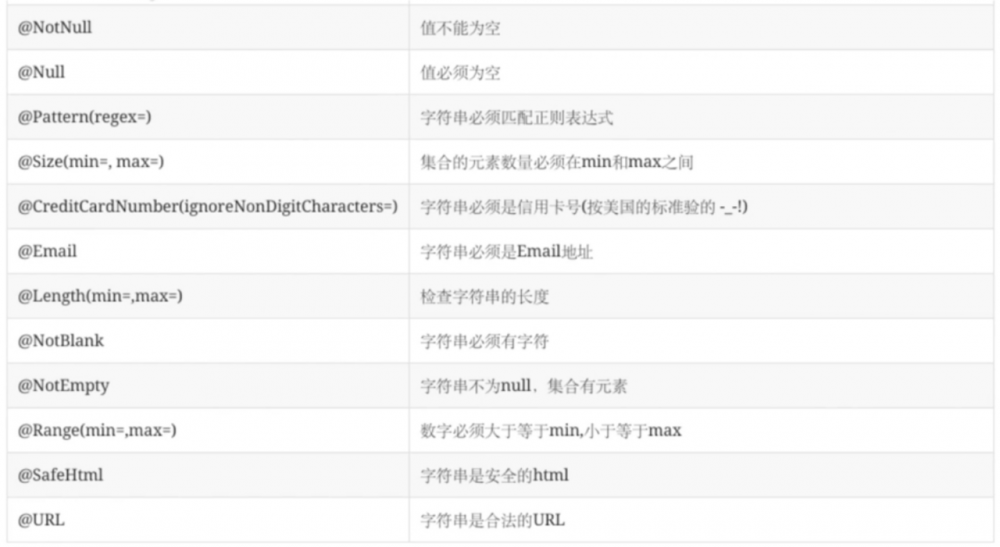
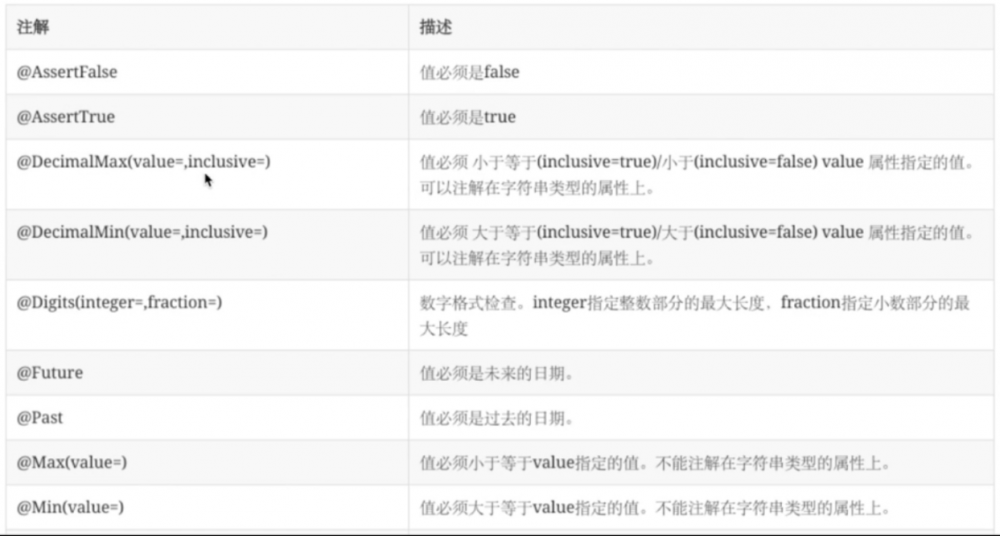
约束注解
hibernate-validator 提供的约束注解如下
例如,创建用户时限制请求参数中的 birthday 的值是一个过去时间
首先在 Bean 的字段添加约束注解
@Past
private Date birthday;
复制代码
然后在要验证的 Bean 前添加 @Valid 注解
@PostMapping
public void createUser(@Valid @RequestBody User user) {
    System.out.println(user);
}
复制代码
@Test
public void testValidatePastTimeSuccess() throws Exception {
    // 获取一年前的时间点
    Date date = new Date(LocalDateTime.now().plusYears(-1).atZone(ZoneId.systemDefault()).toInstant().toEpochMilli());
    mockMvc.perform(post("/user").
                    contentType(MediaType.APPLICATION_JSON_UTF8)
                    .content("{/"username/":/"jack/",/"password/":/"123/",/"birthday/":/"" + date.getTime() + "/"}"))
        .andExpect(status().isOk());
}

@Test
public void testValidatePastTimeFail() throws Exception {
    // 获取一年后的时间点
    Date date = new Date(LocalDateTime.now().plusYears(1).atZone(ZoneId.systemDefault()).toInstant().toEpochMilli());
    mockMvc.perform(post("/user").
                    contentType(MediaType.APPLICATION_JSON_UTF8)
                    .content("{/"username/":/"jack/",/"password/":/"123/",/"birthday/":/"" + date.getTime() + "/"}"))
        .andExpect(status().is4xxClientError());
}
复制代码
复用校验逻辑
这样,如果我们需要对修改用户的方法添加校验,只需添加 @Valid 即可
@PutMapping("/{id}")
public void update(@Valid @RequestBody User user, @PathVariable Long id) {
    System.out.println(user);
    System.out.println(id);
}
复制代码
@Test
public void testUpdateSuccess() throws Exception {
    mockMvc.perform(put("/user/1").
                    contentType(MediaType.APPLICATION_JSON_UTF8)
                    .content("{/"username/":/"jack/",/"password/":/"789/"}"))
        .andExpect(status().isOk());
}

User(id=null, username=jack, password=789, birthday=null)
1

@Test
public void testUpdateFail() throws Exception {
    mockMvc.perform(put("/user/1").
                    contentType(MediaType.APPLICATION_JSON_UTF8)
                    .content("{/"username/":/"jack/",/"password/":/" /"}"))
        .andExpect(status().is4xxClientError());
}
复制代码
约束逻辑只需在 Bean 中通过约束注解声明一次,其他任何需要使用到该约束校验的地方只需添加 @Valid 即可
BindingResult处理校验结果
上述处理方式还是不够完美,我们只是通过响应状态码告诉前端请求数据格式不对,但是没有明确指明哪里不对,我们需要给前端一些更明确的信息
上例中,如果没有通过校验,那么方法就不会被执行而直接返回了,我们想要插入一些提示信息都没有办法编写。这时可以使用 BindingResult ,它能够帮助我们获取校验失败信息并返回给前端,同时响应状态码会变为200
@PostMapping
public void createUser(@Valid @RequestBody User user,BindingResult errors) {
    if (errors.hasErrors()) {
        errors.getAllErrors().stream().forEach(error -> System.out.println(error.getDefaultMessage()));
    }
    System.out.println(user);
}

@PutMapping("/{id}")
public void update(@PathVariable Long id,@Valid @RequestBody User user, BindingResult errors) {
    if (errors.hasErrors()) {
        errors.getAllErrors().stream().forEach(error -> System.out.println(error.getDefaultMessage()));
    }
    System.out.println(user);
    System.out.println(id);
}
复制代码
@Test
public void testBindingResult() throws Exception {
    Date date = new Date(LocalDateTime.now().plusYears(-1).atZone(ZoneId.systemDefault()).toInstant().toEpochMilli());
    mockMvc.perform(post("/user").
                    contentType(MediaType.APPLICATION_JSON_UTF8)
                    .content("{/"username/":/"jack/",/"password/":null,/"birthday/":/"" + date.getTime() + "/"}"))
        .andExpect(status().isOk());
}

may not be empty
User(id=null, username=jack, password=null, birthday=Sun Aug 19 20:44:02 CST 2018)

@Test
public void testBindingResult2() throws Exception {
    Date date = new Date(LocalDateTime.now().plusYears(-1).atZone(ZoneId.systemDefault()).toInstant().toEpochMilli());
    mockMvc.perform(put("/user/1").
                    contentType(MediaType.APPLICATION_JSON_UTF8)
                    .content("{/"username/":/"jack/",/"password/":null,/"birthday/":/"" + date.getTime() + "/"}"))
        .andExpect(status().isOk());
}

may not be empty
User(id=null, username=jack, password=null, birthday=Sun Aug 19 20:42:56 CST 2018)
1
复制代码
值得注意的是, BindingResult 必须和 @Valid 一起使用,并且在参列中的位置必须紧跟在 @Valid 修饰的参数后面,否则会出现如下令人困惑的结果
@PutMapping("/{id}")
public void update(@Valid @RequestBody User user, @PathVariable Long id, BindingResult errors) {
    if (errors.hasErrors()) {
        errors.getAllErrors().stream().forEach(error -> System.out.println(error.getDefaultMessage()));
    }
    System.out.println(user);
    System.out.println(id);
}
复制代码
上述代码中,在校验的 Bean 和 BindingResult 之间插入了一个 id ,你会发现 BindingResult 不起作用了
@Test
public void testBindingResult2() throws Exception {
    Date date = new Date(LocalDateTime.now().plusYears(-1).atZone(ZoneId.systemDefault()).toInstant().toEpochMilli());
    mockMvc.perform(put("/user/1").
                    contentType(MediaType.APPLICATION_JSON_UTF8)
                    .content("{/"username/":/"jack/",/"password/":null,/"birthday/":/"" + date.getTime() + "/"}"))
        .andExpect(status().isOk());
}

java.lang.AssertionError: Status
Expected :200
Actual   :400
复制代码
校验
自定义消息
现在我们可以通过 BindingResult 得到校验失败信息了
@PutMapping("/{id://d+}")
public void update(@PathVariable Long id, @Valid @RequestBody User user, BindingResult errors) {
    if (errors.hasErrors()) {
        errors.getAllErrors().stream().forEach(error -> {
            FieldError fieldError = (FieldError) error;
            System.out.println(fieldError.getField() + " " + fieldError.getDefaultMessage());
        });
    }
    System.out.println(user);
}
复制代码
@Test
public void testBindingResult3() throws Exception {
    Date date = new Date(LocalDateTime.now().plusYears(-1).atZone(ZoneId.systemDefault()).toInstant().toEpochMilli());
    mockMvc.perform(put("/user/1").
                    contentType(MediaType.APPLICATION_JSON_UTF8)
                    .content("{/"username/":/" /",/"password/":null,/"birthday/":/"" + date.getTime() + "/"}"))
        .andExpect(status().isOk());
}

password may not be empty
username may not be empty
User(id=null, username= , password=null, birthday=Sun Aug 19 20:56:35 CST 2018)
复制代码
但是默认的消息提示不太友好并且还需要我们自己拼接,这时我们需要自定义消息提示,只需要使用约束注解的 message 属性指定验证未通过的提示消息即可
@NotBlank(message = "用户名不能为空")
@JsonView(UserBasicView.class)
private String username;

@NotBlank(message = "密码不能为空")
@JsonView(UserDetailsView.class)
private String password;
复制代码
@Test
public void testBindingResult3() throws Exception {
    Date date = new Date(LocalDateTime.now().plusYears(-1).atZone(ZoneId.systemDefault()).toInstant().toEpochMilli());
    mockMvc.perform(put("/user/1").
                    contentType(MediaType.APPLICATION_JSON_UTF8)
                    .content("{/"username/":/" /",/"password/":null,/"birthday/":/"" + date.getTime() + "/"}"))
        .andExpect(status().isOk());
}

password 密码不能为空
username 用户名不能为空
User(id=null, username= , password=null, birthday=Sun Aug 19 21:03:18 CST 2018)
复制代码
自定义校验注解
虽然 hibernate-validator 提供了一些常用的约束注解,但是对于复杂的业务场景还是需要我们自定义一个约束注解,毕竟有时仅仅是非空或格式合法的校验是不够的,可能我们需要去数据库查询进行校验
下面我们就参考已有的约束注解照葫芦画瓢自定义一个“用户名不可重复”的约束注解
1、新建约束注解类
我们希望该注解标注在 Bean 的某些字段上,使用 @Target({FIELD}) ;此外,要想该注解在运行期起作用,还要添加 @Retention(RUNTIME)
package top.zhenganwen.securitydemo.annotation.valid;

import javax.validation.Constraint;
import javax.validation.Payload;
import java.lang.annotation.Retention;
import java.lang.annotation.Target;

import static java.lang.annotation.ElementType.FIELD;
import static java.lang.annotation.RetentionPolicy.RUNTIME;

/**
 * @author zhenganwen
 * @date 2019/8/20
 * @desc Unrepeatable
 */
@Target({FIELD})
@Retention(RUNTIME)
public @interface Unrepeatable {

}

复制代码
参考已有的约束注解如 NotNull 、 NotBlank ,它们都有三个方法
String message() default "{org.hibernate.validator.constraints.NotBlank.message}";

Class<?>[] groups() default { };

Class<? extends Payload>[] payload() default { };
复制代码
于是我们也声明这三个方法
@Target({FIELD})
@Retention(RUNTIME)
public @interface Unrepeatable {
    String message() default "用户名已被注册";

    Class<?>[] groups() default { };

    Class<? extends Payload>[] payload() default { };
}
复制代码
2、编写校验逻辑类
依照已有注解,它们都还有一个注解 @Constraint
@Documented
@Constraint(validatedBy = { })
@Target({ METHOD, FIELD, ANNOTATION_TYPE, CONSTRUCTOR, PARAMETER })
@Retention(RUNTIME)
@ReportAsSingleViolation
@NotNull
public @interface NotBlank {
复制代码
按住 Ctrl 点击 validateBy 属性进行查看,发现它需要一个 ConstraintValidator 的实现类,现在我们需要编写一个 ConstraintValidator 自定义校验逻辑并通过 validatedBy 属性将其绑定到我们的 Unrepeatable 注解上
package top.zhenganwen.securitydemo.annotation.valid;

import org.springframework.beans.factory.annotation.Autowired;
import top.zhenganwen.securitydemo.service.UserService;

import javax.validation.ConstraintValidator;
import javax.validation.ConstraintValidatorContext;

/**
 * @author zhenganwen
 * @date 2019/8/20
 * @desc UsernameUnrepeatableValidator
 */
public class UsernameUnrepeatableValidator implements ConstraintValidator<Unrepeatable,String> {

    @Autowired
    private UserService userService;

    @Override
    public void initialize(Unrepeatable unrepeatableAnnotation) {
        System.out.println(unrepeatableAnnotation);
        System.out.println("UsernameUnrepeatableValidator initialized===================");
    }

    @Override
    public boolean isValid(String value, ConstraintValidatorContext context) {
        System.out.println("the request username is " + value);
        boolean ifExists = userService.checkUsernameIfExists( value);
        // 如果用户名存在,则拒绝请求并提示用户名已被注册,否则处理请求
        return ifExists == true ? false : true;
    }
}
复制代码
其中, ConstraintValidator<A,T> 泛型 A 指定为要绑定到的注解, T 指定要校验字段的类型; isValid 用来编写自定义校验逻辑,如查询数据库是否存在该用户名的记录,返回 true 表示校验通过, false 校验失败
@ComponentScan 扫描范围内的 ConstraintValidator 实现类会被 Spring 注入到容器中,因此你无须在该类上标注 Component 即可在类中注入其他 Bean ,例如本例中注入了一个 UserService
package top.zhenganwen.securitydemo.service;

import org.springframework.stereotype.Service;

import java.util.Objects;

/**
 * @author zhenganwen
 * @date 2019/8/20
 * @desc UserService
 */
@Service
public class UserService {

    public boolean checkUsernameIfExists(String username) {
        // select count(username) from user where username=?
        // as if username "tom" has been registered
        if (Objects.equals(username, "tom")) {
            return true;
        }
        return false;
    }
}
复制代码
3、在约束注解上指定校验类
通过 validatedBy 属性指定该注解绑定的一系列校验类(这些校验类必须是 ConstraintValidator<A,T> 的实现类
@Target({FIELD})
@Retention(RUNTIME)
@Constraint(validatedBy = { UsernameUnrepeatableValidator.class})
public @interface Unrepeatable {
    String message() default "用户名已被注册";

    Class<?>[] groups() default { };

    Class<? extends Payload>[] payload() default { };
}
复制代码
4、测试
@PostMapping
public void createUser(@Valid @RequestBody User user,BindingResult errors) {
    if (errors.hasErrors()) {
        errors.getAllErrors().stream().forEach(error -> System.out.println(error.getDefaultMessage()));
    }
    System.out.println(user);
}
复制代码
@Test
public void testCreateUserWithNewUsername() throws Exception {
    Date date = new Date(LocalDateTime.now().plusYears(-1).atZone(ZoneId.systemDefault()).toInstant().toEpochMilli());
    mockMvc.perform(post("/user").
                    contentType(MediaType.APPLICATION_JSON_UTF8)
                    .content("{/"username/":/"alice/",/"password/":/"123/",/"birthday/":/"" + date.getTime() + "/"}"))
        .andExpect(status().isOk());
}

the request username is alice
User(id=null, username=alice, password=123, birthday=Mon Aug 20 08:25:11 CST 2018)


@Test
public void testCreateUserWithExistedUsername() throws Exception {
    Date date = new Date(LocalDateTime.now().plusYears(-1).atZone(ZoneId.systemDefault()).toInstant().toEpochMilli());
    mockMvc.perform(post("/user").
                    contentType(MediaType.APPLICATION_JSON_UTF8)
                    .content("{/"username/":/"tom/",/"password/":/"123/",/"birthday/":/"" + date.getTime() + "/"}"))
        .andExpect(status().isOk());
}

the request username is tom
用户名已被注册
User(id=null, username=tom, password=123, birthday=Mon Aug 20 08:25:11 CST 2018)
复制代码
删除用户
@Test
public void testDeleteUser() throws Exception {
    mockMvc.perform(delete("/user/1").
                    contentType(MediaType.APPLICATION_JSON_UTF8))
        .andExpect(status().isOk());
}

java.lang.AssertionError: Status
Expected :200
Actual   :405
复制代码
测试先行,即先写测试用例后写功能代码,即使我们知道没有编写该功能测试肯定不会通过,但测试代码也是需要检验的,确保测试逻辑的正确性
Restful 提倡以响应状态码来表示请求处理结果,例如200表示删除成功,若没有特别要求需要返回某些信息,那么无需添加响应体
@DeleteMapping("/{id://d+}")
public void delete(@PathVariable Long id) {
    System.out.println(id);
    // delete user
}
复制代码
@Test
public void testDeleteUser() throws Exception {
    mockMvc.perform(delete("/user/1").
                    contentType(MediaType.APPLICATION_JSON_UTF8))
        .andExpect(status().isOk());
}

1
复制代码
错误处理
SpringBoot默认的错误处理机制
区分客户端进行响应
当请求处理发生错误时, SpringMVC 根据客户端的类型会有不同的响应结果,例如浏览器访问 localhost:8080/xxx 会返回如下错误页面
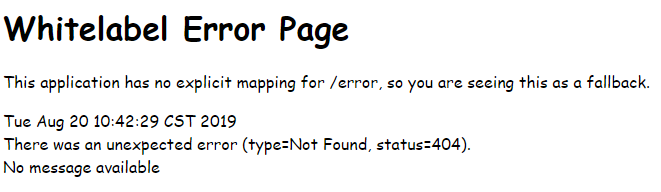
而使用 Postman 请求则会得到如下响应
{
    "timestamp": 1566268880358,
    "status": 404,
    "error": "Not Found",
    "message": "No message available",
    "path": "/xxx"
}
复制代码
该机制对应的源码在 BasicErrorController 中(发生 4xx 或 500 异常时,会将请求转发到 /error ,由 BasicErrorController 决定异常响应逻辑)
@RequestMapping(produces = "text/html")
public ModelAndView errorHtml(HttpServletRequest request,
                              HttpServletResponse response) {
    HttpStatus status = getStatus(request);
    Map<String, Object> model = Collections.unmodifiableMap(getErrorAttributes(
        request, isIncludeStackTrace(request, MediaType.TEXT_HTML)));
    response.setStatus(status.value());
    ModelAndView modelAndView = resolveErrorView(request, response, status, model);
    return (modelAndView == null ? new ModelAndView("error", model) : modelAndView);
}

@RequestMapping
@ResponseBody
public ResponseEntity<Map<String, Object>> error(HttpServletRequest request) {
    Map<String, Object> body = getErrorAttributes(request,
                                                  isIncludeStackTrace(request, MediaType.ALL));
    HttpStatus status = getStatus(request);
    return new ResponseEntity<Map<String, Object>>(body, status);
}
复制代码
如果是浏览器发出的请求,它的请求头会附带 Accept: text/html... ,而 Postman 发出的请求则是 Accept: */* ,因此前者会执行 errorHtml 响应错误页面,而 error 会收集异常信息以 map 的形式返回
自定义错误页面
对于客户端是浏览器的错误响应,例如404/500,我们可以在 src/main/resources/resources/error 文件夹下编写自定义错误页面, SpringMVC 会在发生相应异常时返回该文件夹下的 404.html 或 500.html
创建 src/main/resources/resources/error 文件夹并添加 404.html 和 500.html
<!DOCTYPE html>
<html lang="en">
<head>
    <meta charset="UTF-8">
    <title>页面找不到了</title>
</head>
<body>
抱歉,页面找不到了!
</body>
</html>
复制代码
<!DOCTYPE html>
<html lang="en">
<head>
    <meta charset="UTF-8">
    <title>服务异常</title>
</head>
<body>
服务端内部错误
</body>
</html>
复制代码
模拟处理请求时发生异常
@GetMapping("/{id://d+}")
@JsonView(User.UserDetailsView.class)
public User getInfo(@PathVariable("id") Long id) {
    throw new RuntimeException("id不存在");
    //        System.out.println(id);
    //        return new User(1L, "jack", "123");
    //        return null;
}
复制代码
访问 localhost:8080/xxx 显示 404.html 页面,访问 localhost:8080/user/1 显示 500.html 页面
值得注意的是,自定义异常页面并不会导致非浏览器请求也会响应该页面
自定义异常处理
对于 4XX 的客户端错误, SpringMVC 会直接返回错误响应和不会执行 Controller 方法;对于 500 的服务端抛出异常,则会收集异常类的 message 字段值返回
默认异常响应结果
例如客户端错误, GET /user/1
{
    "timestamp": 1566270327128,
    "status": 500,
    "error": "Internal Server Error",
    "exception": "java.lang.RuntimeException",
    "message": "id不存在",
    "path": "/user/1"
}
复制代码
例如服务端错误
@PostMapping
public void createUser(@Valid @RequestBody User user) {
    System.out.println(user);
}
复制代码
POST	localhost:8080/user
Body	{}
复制代码
{
    "timestamp": 1566272056042,
    "status": 400,
    "error": "Bad Request",
    "exception": "org.springframework.web.bind.MethodArgumentNotValidException",
    "errors": [
        {
            "codes": [
                "NotBlank.user.username",
                "NotBlank.username",
                "NotBlank.java.lang.String",
                "NotBlank"
            ],
            "arguments": [
                {
                    "codes": [
                        "user.username",
                        "username"
                    ],
                    "arguments": null,
                    "defaultMessage": "username",
                    "code": "username"
                }
            ],
            "defaultMessage": "用户名不能为空",
            "objectName": "user",
            "field": "username",
            "rejectedValue": null,
            "bindingFailure": false,
            "code": "NotBlank"
        },
        {
            "codes": [
                "NotBlank.user.password",
                "NotBlank.password",
                "NotBlank.java.lang.String",
                "NotBlank"
            ],
            "arguments": [
                {
                    "codes": [
                        "user.password",
                        "password"
                    ],
                    "arguments": null,
                    "defaultMessage": "password",
                    "code": "password"
                }
            ],
            "defaultMessage": "密码不能为空",
            "objectName": "user",
            "field": "password",
            "rejectedValue": null,
            "bindingFailure": false,
            "code": "NotBlank"
        }
    ],
    "message": "Validation failed for object='user'. Error count: 2",
    "path": "/user"
}
复制代码
自定义异常响应结果
有时我们需要经常在处理请求时抛出异常以终止对该请求的处理,例如
package top.zhenganwen.securitydemo.web.exception.response;

import lombok.Data;

import java.io.Serializable;

/**
 * @author zhenganwen
 * @date 2019/8/20
 * @desc IdNotExistException
 */
@Data
public class IdNotExistException extends RuntimeException {

    private Serializable id;

    public IdNotExistException(Serializable id) {
        super("id不存在");
        this.id = id;
    }
}
复制代码
@GetMapping("/{id://d+}")
@JsonView(User.UserDetailsView.class)
public User getInfo(@PathVariable("id") Long id) {
    throw new IdNotExistException(id);
}
复制代码
GET /user/1
{
    "timestamp": 1566270990177,
    "status": 500,
    "error": "Internal Server Error",
    "exception": "top.zhenganwen.securitydemo.exception.response.IdNotExistException",
    "message": "id不存在",
    "path": "/user/1"
}
复制代码
SpringMVC 默认只会将异常的 message 返回,如果我们需要将 IdNotExistException 的 id 也返回以给前端更明确的提示,就需要我们自定义异常处理
- 自定义的异常处理类需要添加
@ControllerAdvice - 在处理异常的方法上使用
@ExceptionHandler声明该方法要截获哪些异常,所有的Controller若抛出这些异常中的一个则会转为执行该方法 - 捕获到的异常会作为方法的入参
- 方法返回的结果与
Controller方法返回的结果意义相同,如果需要返回json则需在方法上添加@ResponseBody注解,如果在类上添加该注解则表示每个方法都有该注解
package top.zhenganwen.securitydemo.web.exception.handler;

import org.springframework.web.bind.annotation.ControllerAdvice;
import org.springframework.web.bind.annotation.ExceptionHandler;
import org.springframework.web.bind.annotation.ResponseBody;
import top.zhenganwen.securitydemo.web.exception.response.IdNotExistException;

import java.util.HashMap;
import java.util.Map;

/**
 * @author zhenganwen
 * @date 2019/8/20
 * @desc UserControllerExceptionHandler
 */
@ControllerAdvice
@ResponseBody
public class UserControllerExceptionHandler {

    @ExceptionHandler(IdNotExistException.class)
    public Map<String, Object> handleIdNotExistException(IdNotExistException e) {
        Map<String, Object> jsonResult = new HashMap<>();
        jsonResult.put("message", e.getMessage());
        jsonResult.put("id", e.getId());
        return jsonResult;
    }
}

复制代码
重启后使用 Postman GET /user/1 得到响应如下
{
    "id": 1,
    "message": "id不存在"
}
复制代码
拦截
需求:记录所有请求 的处理时间
过滤器Filter
过滤器是 JavaEE 中的标准,是不依赖 SpringMVC 的,要想在 SpringMVC 中使用过滤器需要两步
1、实现 Filter 接口并注入到Spring容器
package top.zhenganwen.securitydemo.web.filter;

import org.springframework.stereotype.Component;

import javax.servlet.*;
import javax.servlet.http.HttpServletRequest;
import java.io.IOException;
import java.text.SimpleDateFormat;
import java.util.Date;

/**
 * @author zhenganwen
 * @date 2019/8/20
 * @desc TimeFilter
 */
@Component
public class TimeFilter implements Filter {

    // 在web容器启动时执行
    @Override
    public void init(FilterConfig filterConfig) throws ServletException {
        System.out.println("TimeFilter init");
    }

    // 在收到请求时执行,这时请求还未到达SpringMVC的入口DispatcherServlet
    // 单次请求只会执行一次(不论期间发生了几次请求转发)
    @Override
    public void doFilter(ServletRequest servletRequest, ServletResponse servletResponse, FilterChain filterChain) throws IOException,
            ServletException {
        HttpServletRequest request = (HttpServletRequest) servletRequest;
        SimpleDateFormat simpleDateFormat = new SimpleDateFormat("yyyy-MM-dd hh:mm:ss");

        String service = "【" + request.getMethod() + " " + request.getRequestURI() + "】";
        System.out.println("[TimeFilter] 收到服务调用:" + service);

        Date start = new Date();
        System.out.println("[TimeFilter] 开始执行服务" + service + simpleDateFormat.format(start));

        filterChain.doFilter(servletRequest, servletResponse);

        Date end = new Date();
        System.out.println("[TimeFilter] 服务" + service + "执行完毕 " + simpleDateFormat.format(end) +
                ",共耗时:" + (end.getTime() - start.getTime()) + "ms");
    }

    // 在容器销毁时执行
    @Override
    public void destroy() {
        System.out.println("TimeFilter destroyed");
    }
}
复制代码
2、配置 FilterRegistrationBean ,这一步相当于传统方式在 web.xml 中添加一个 <Filter> 节点
package top.zhenganwen.securitydemo.web.config;

import org.springframework.beans.factory.annotation.Autowired;
import org.springframework.boot.web.servlet.FilterRegistrationBean;
import org.springframework.context.annotation.Bean;
import org.springframework.context.annotation.Configuration;
import top.zhenganwen.securitydemo.web.filter.TimeFilter;

/**
 * @author zhenganwen
 * @date 2019/8/20
 * @desc WebConfig
 */
@Configuration
public class WebConfig {

    @Autowired
    TimeFilter timeFilter;

    // 添加这个bean相当于在web.xml中添加一个Fitler节点
    @Bean
    public FilterRegistrationBean registerTimeFilter() {
        FilterRegistrationBean filterRegistrationBean = new FilterRegistrationBean();
        filterRegistrationBean.setFilter(timeFilter);
        return filterRegistrationBean;
    }
}
复制代码
3、测试
访问 GET /user/1 ,控制台日志如下
@GetMapping("/{id://d+}")
@JsonView(User.UserDetailsView.class)
public User getInfo(@PathVariable("id") Long id) {
    //        throw new IdNotExistException(id);
    User user = new User();
    return user;
}
复制代码
[TimeFilter] 收到服务调用:【GET /user/1】
[TimeFilter] 开始执行服务【GET /user/1】2019-08-20 02:13:44
[TimeFilter] 服务【GET /user/1】执行完毕 2019-08-20 02:13:44,共耗时:4ms
复制代码
由于 Filter 是 JavaEE 中的标准,所以它仅依赖 servlet-api 而不依赖任何第三方类库,因此它自然也不知道 Controller 的存在,自然也就无法知道本次请求将被映射到哪个方法上, SpringMVC 通过引入拦截器弥补了这一缺点
通过 filterRegistrationBean.addUrlPattern 可以为过滤器添加拦截规则,默认的拦截规则是所有URL
@Bean
public FilterRegistrationBean registerTimeFilter() {
    FilterRegistrationBean filterRegistrationBean = new FilterRegistrationBean();
    filterRegistrationBean.setFilter(timeFilter);
    filterRegistrationBean.addUrlPatterns("/*");
    return filterRegistrationBean;
}
复制代码
拦截器Interceptor
拦截器与 Filter 的有如下不同之处
-
Filter是基于请求的,Interceptor是基于Controller的,一次请求可能会执行多个Controller(通过转发),因此一次请求只会执行一次Filter但可能执行多次Interceptor -
Interceptor是SpringMVC中的组件,因此它知道Controller的存在,能够获取相关信息(如该请求映射的方法,方法所在的bean等)
使用 SpringMVC 提供的拦截器也需要两步
1、实现 HandlerInterceptor 接口
package top.zhenganwen.securitydemo.web.interceptor;

import org.springframework.stereotype.Component;
import org.springframework.web.method.HandlerMethod;
import org.springframework.web.servlet.HandlerInterceptor;
import org.springframework.web.servlet.ModelAndView;

import javax.servlet.http.HttpServletRequest;
import javax.servlet.http.HttpServletResponse;
import java.text.SimpleDateFormat;
import java.util.Date;

/**
 * @author zhenganwen
 * @date 2019/8/20
 * @desc TimeInterceptor
 */
@Component
public class TimeInterceptor implements HandlerInterceptor {

    /**
     * 在Controller方法执行前被执行
     * @param httpServletRequest
     * @param httpServletResponse
     * @param handler 处理器(Controller方法的封装)
     * @return  true    会接着执行Controller方法
     *          false   不会执行Controller方法,直接响应200
     * @throws Exception
     */
    @Override
    public boolean preHandle(HttpServletRequest httpServletRequest, HttpServletResponse httpServletResponse, Object handler) throws Exception {
        HandlerMethod handlerMethod = (HandlerMethod) handler;
        String service = "【" + handlerMethod.getBean() + "#" + handlerMethod.getMethod().getName() + "】";
        Date start = new Date();
        System.out.println("[TimeInterceptor # preHandle] 服务" + service + "被调用 " + new SimpleDateFormat("yyyy-MM-dd hh:mm:ss").format(start));
        httpServletRequest.setAttribute("start", start.getTime());
        return true;
    }

    /**
     * 在Controller方法正常执行完毕后执行,如果Controller方法抛出异常则不会执行此方法
     * @param httpServletRequest
     * @param httpServletResponse
     * @param handler
     * @param modelAndView  Controller方法返回的视图
     * @throws Exception
     */
    @Override
    public void postHandle(HttpServletRequest httpServletRequest, HttpServletResponse httpServletResponse, Object handler, ModelAndView modelAndView) throws Exception {
        HandlerMethod handlerMethod = (HandlerMethod) handler;
        String service = "【" + handlerMethod.getBean() + "#" + handlerMethod.getMethod().getName() + "】";
        Date end = new Date();
        System.out.println("[TimeInterceptor # postHandle] 服务" + service + "调用结束 " + new SimpleDateFormat("yyyy-MM-dd hh:mm:ss").format(end)
                + " 共耗时:" + (end.getTime() - (Long) httpServletRequest.getAttribute("start")) + "ms");
    }

    /**
     * 无论Controller方法是否抛出异常,都会被执行
     * @param httpServletRequest
     * @param httpServletResponse
     * @param handler
     * @param e 如果Controller方法抛出异常则为对应抛出的异常,否则为null
     * @throws Exception
     */
    @Override
    public void afterCompletion(HttpServletRequest httpServletRequest, HttpServletResponse httpServletResponse, Object handler, Exception e) throws Exception {
        HandlerMethod handlerMethod = (HandlerMethod) handler;
        String service = "【" + handlerMethod.getBean() + "#" + handlerMethod.getMethod().getName() + "】";
        Date end = new Date();
        System.out.println("[TimeInterceptor # afterCompletion] 服务" + service + "调用结束 " + new SimpleDateFormat("yyyy-MM-dd hh:mm:ss").format(end)
                + " 共耗时:" + (end.getTime() - (Long) httpServletRequest.getAttribute("start")) + "ms");
        if (e != null) {
            System.out.println("[TimeInterceptor#afterCompletion] 服务" + service + "调用异常:" + e.getMessage());
        }
    }
}
复制代码
2、配置类继承WebMvcConfigureAdapter并重写addInterceptor方法添加自定义拦截器
@Configuration
public class WebConfig extends WebMvcConfigurerAdapter {

    @Autowired
    TimeFilter timeFilter;

    @Autowired
    TimeInterceptor timeInterceptor;

    @Bean
    public FilterRegistrationBean registerTimeFilter() {
        FilterRegistrationBean filterRegistrationBean = new FilterRegistrationBean();
        filterRegistrationBean.setFilter(timeFilter);
        filterRegistrationBean.addUrlPatterns("/*");
        return filterRegistrationBean;
    }

    @Override
    public void addInterceptors(InterceptorRegistry registry) {
        registry.addInterceptor(timeInterceptor);
    }
}
复制代码
多次调用 addInterceptor 可添加多个拦截器
3、测试
-
GET /user/1
[TimeFilter] 收到服务调用:【GET /user/1】
[TimeFilter] 开始执行服务【GET /user/1】2019-08-20 02:59:00
[TimeInterceptor # preHandle] 服务【top.zhenganwen.securitydemo.web.controller.UserController@2b6a0ea9#getInfo】被调用 2019-08-20 02:59:00
[TimeFilter] 服务【GET /user/1】执行完毕 2019-08-20 02:59:00,共耗时:2ms
复制代码
- 将
preHandle返回值改为true
[TimeFilter] 收到服务调用:【GET /user/1】
[TimeFilter] 开始执行服务【GET /user/1】2019-08-20 02:59:20
[TimeInterceptor # preHandle] 服务【top.zhenganwen.securitydemo.web.controller.UserController@2b6a0ea9#getInfo】被调用 2019-08-20 02:59:20
[TimeInterceptor # postHandle] 服务【top.zhenganwen.securitydemo.web.controller.UserController@2b6a0ea9#getInfo】调用结束 2019-08-20 02:59:20 共耗时:39ms
[TimeInterceptor # afterCompletion] 服务【top.zhenganwen.securitydemo.web.controller.UserController@2b6a0ea9#getInfo】调用结束 2019-08-20 02:59:20 共耗时:39ms
[TimeFilter] 服务【GET /user/1】执行完毕 2019-08-20 02:59:20,共耗时:42ms
复制代码
- 在Controller方法中抛出异常
@GetMapping("/{id://d+}")
@JsonView(User.UserDetailsView.class)
public User getInfo(@PathVariable("id") Long id) {
    throw new IdNotExistException(id);
    //        User user = new User();
    //        return user;
}
复制代码
[TimeFilter] 收到服务调用:【GET /user/1】
[TimeFilter] 开始执行服务【GET /user/1】2019-08-20 03:05:56
[TimeInterceptor # preHandle] 服务【top.zhenganwen.securitydemo.web.controller.UserController@2b6a0ea9#getInfo】被调用 2019-08-20 03:05:56
[TimeInterceptor # afterCompletion] 服务【top.zhenganwen.securitydemo.web.controller.UserController@2b6a0ea9#getInfo】调用结束 2019-08-20 03:05:56 共耗时:11ms
[TimeFilter] 服务【GET /user/1】执行完毕 2019-08-20 03:05:56,共耗时:14ms
复制代码
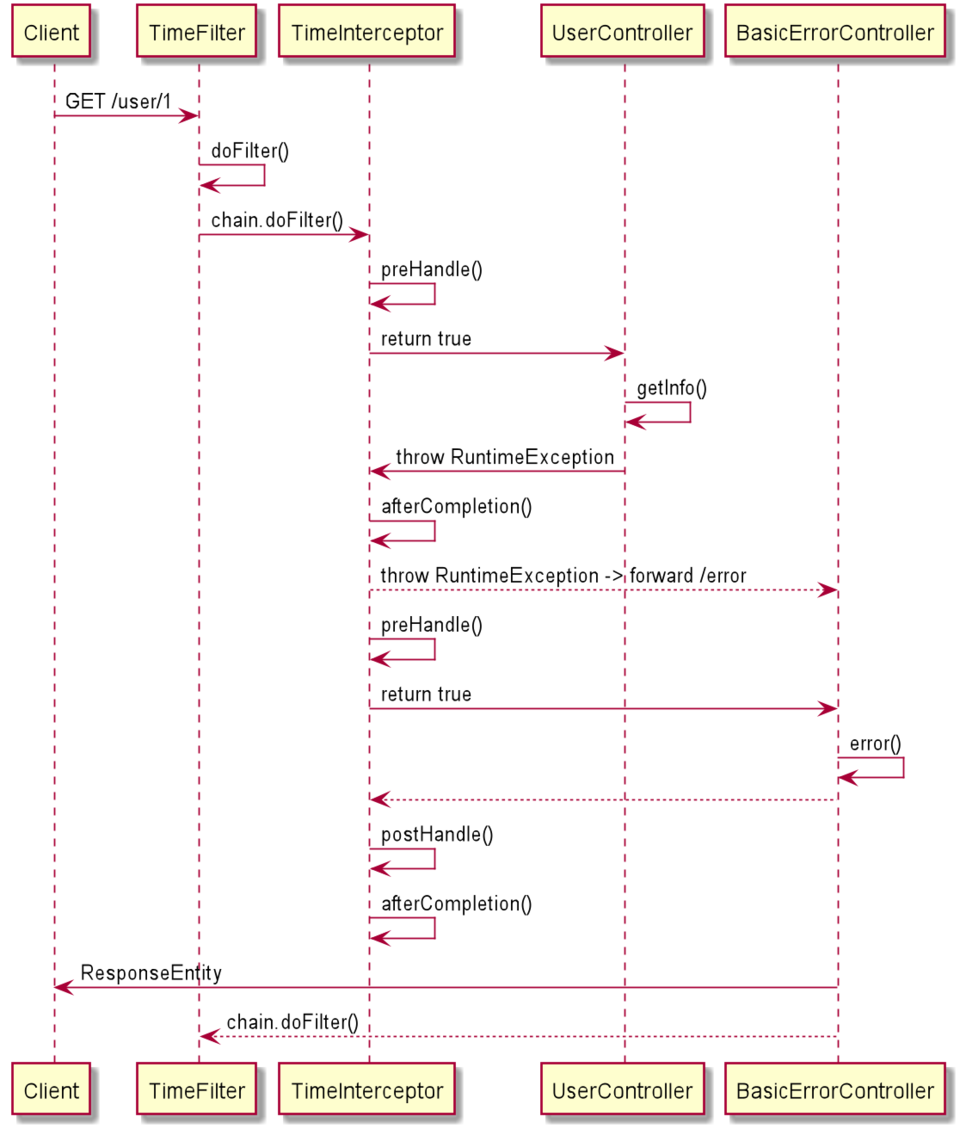
发现 afterCompletion 中的异常打印逻辑并未被执行,这是因为 IdNotExistException 被我们之前自定义的异常处理器处理掉了,没有抛出来。我们改为抛出 RuntimeException 再试一下
@GetMapping("/{id://d+}")
@JsonView(User.UserDetailsView.class)
public User getInfo(@PathVariable("id") Long id) {
    throw new RuntimeException("id not exist");
}
复制代码
[TimeFilter] 收到服务调用:【GET /user/1】
[TimeFilter] 开始执行服务【GET /user/1】2019-08-20 03:09:38
[TimeInterceptor # preHandle] 服务【top.zhenganwen.securitydemo.web.controller.UserController@2b6a0ea9#getInfo】被调用 2019-08-20 03:09:38
[TimeInterceptor # afterCompletion] 服务【top.zhenganwen.securitydemo.web.controller.UserController@2b6a0ea9#getInfo】调用结束 2019-08-20 03:09:38 共耗时:7ms
[TimeInterceptor#afterCompletion] 服务【top.zhenganwen.securitydemo.web.controller.UserController@2b6a0ea9#getInfo】调用异常:id not exist

java.lang.RuntimeException: id not exist
	at top.zhenganwen.securitydemo.web.controller.UserController.getInfo(UserController.java:42)
	...

[TimeInterceptor # preHandle] 服务【org.springframework.boot.autoconfigure.web.BasicErrorController@33f17289#error】被调用 2019-08-20 03:09:38
[TimeInterceptor # postHandle] 服务【org.springframework.boot.autoconfigure.web.BasicErrorController@33f17289#error】调用结束 2019-08-20 03:09:38 共耗时:7ms
[TimeInterceptor # afterCompletion] 服务【org.springframework.boot.autoconfigure.web.BasicErrorController@33f17289#error】调用结束 2019-08-20 03:09:38 共耗时:7ms
复制代码
方法调用时序图大致如下
切片Aspect
应用场景
Interceptor 仍然有它的局限性,即无法获取调用Controller方法的入参信息,例如我们需要对用户下单请求的订单物品信息记录日志以便为推荐系统提供数据,那么这时 Interceptor 就无能为力了
追踪源码 DispatcherServlet -> doService -> doDispatch 可发现 Interceptor 无法获取入参的原因:
if (!mappedHandler.applyPreHandle(processedRequest, response)) {
    return;
}

// Actually invoke the handler.
mv = ha.handle(processedRequest, response, mappedHandler.getHandler());
复制代码
mappedHandler.applyPreHandle 其实就是调用 HandlerInterceptor 的 preHandle 方法,而在此之后才调用 ha.handle(processedRequest, response, mappedHandler.getHandler()) 将请求参数 processedRequest 注入到 handler 入参上
使用方法
面向切面编程( Aspect-Oriented Program AOP )是基于动态代理的一种对象增强设计模式,能够实现在不修改现有代码的前提下添加可插拔的功能。
在 SpringMVC 中使用AOP我们需要三步
- 编写切片/切面类,将切入点和增强结合在一起
@Component
@Aspect
- 编写切入点,使用注解可以完成,切入点包含两部分:哪些方法需要增强以及增强的时机
- 切入时机
-
@Before,方法执行前 -
@AfterReturning,方法正常执行结束后 -
@AfterThrowing,方法抛出异常后 -
@After,方法正常执行结束return前,相当于在return前插入了一段finally -
@Around,可利用注入的入参ProceedingJoinPoint灵活的实现上述4种时机,它的作用与拦截器方法中的handler类似,只不过提供了更多有用的运行时信息
-
- 切入点,可以使用
execution表达式,具体详见: docs.spring.io/spring/docs…
- 切入时机
- 编写增强方法,
- 其中只有
@Around可以有入参,能拿到ProceedingJoinPoint实例 - 通过调用
ProceedingJoinPoint的point.proceed()能够调用对应的Controller方法并拿到返回值
- 其中只有
package top.zhenganwen.securitydemo.web.aspect;

import org.aspectj.lang.ProceedingJoinPoint;
import org.aspectj.lang.annotation.Around;
import org.aspectj.lang.annotation.Aspect;
import org.springframework.stereotype.Component;

import java.text.SimpleDateFormat;
import java.util.Arrays;
import java.util.Date;

/**
 * @author zhenganwen
 * @date 2019/8/20
 * @desc GlobalControllerAspect
 */
@Aspect
@Component
public class GlobalControllerAspect {

    // top.zhenganwen.securitydemo.web.controller包下的所有Controller的所有方法
    @Around("execution(* top.zhenganwen.securitydemo.web.controller.*.*(..))")
    public Object handleControllerMethod(ProceedingJoinPoint point) throws Throwable {

        // handler对应的方法签名(哪个类的哪个方法,参数列表是什么)
        String service = "【"+point.getSignature().toLongString()+"】";
        // 传入handler的参数值
        Object[] args = point.getArgs();

        SimpleDateFormat simpleDateFormat = new SimpleDateFormat("yyyy-MM-dd hh:mm:ss");
        Date start = new Date();
        System.out.println("[GlobalControllerAspect]开始调用服务" + service + " 请求参数: " + Arrays.toString(args) + ", " + simpleDateFormat.format(start));

        Object result = null;
        try {
            // 调用实际的handler并取得结果
            result = point.proceed();
        } catch (Throwable throwable) {
            System.out.println("[GlobalControllerAspect]调用服务" + service + "发生异常, message=" + throwable.getMessage());
            throw throwable;
        }

        Date end = new Date();
        System.out.println("[GlobalControllerAspect]服务" + service + "调用结束,响应结果为: " + result+", "+simpleDateFormat.format(end)+", 共耗时: "+(end.getTime()-start.getTime())+
                "ms");

        // 返回响应结果,不一定要和handler的处理结果一致
        return result;
    }
}
复制代码
测试
@GetMapping("/{id://d+}")
@JsonView(User.UserDetailsView.class)
public User getInfo(@PathVariable("id") Long id) {
    System.out.println("[UserController # getInfo]query user by id");
    return new User();
}
复制代码
GET /user/1
[TimeFilter] 收到服务调用:【GET /user/1】
[TimeFilter] 开始执行服务【GET /user/1】2019-08-20 05:21:48
[TimeInterceptor # preHandle] 服务【top.zhenganwen.securitydemo.web.controller.UserController@49433c98#getInfo】被调用 2019-08-20 05:21:48
[GlobalControllerAspect]开始调用服务【public top.zhenganwen.securitydemo.dto.User top.zhenganwen.securitydemo.web.controller.UserController.getInfo(java.lang.Long)】 请求参数: [1], 2019-08-20 05:21:48
[UserController # getInfo]query user by id
[GlobalControllerAspect]服务【public top.zhenganwen.securitydemo.dto.User top.zhenganwen.securitydemo.web.controller.UserController.getInfo(java.lang.Long)】调用结束,响应结果为: User(id=null, username=null, password=null, birthday=null), 2019-08-20 05:21:48, 共耗时: 0ms
[TimeInterceptor # postHandle] 服务【top.zhenganwen.securitydemo.web.controller.UserController@49433c98#getInfo】调用结束 2019-08-20 05:21:48 共耗时:4ms
[TimeInterceptor # afterCompletion] 服务【top.zhenganwen.securitydemo.web.controller.UserController@49433c98#getInfo】调用结束 2019-08-20 05:21:48 共耗时:4ms
[TimeFilter] 服务【GET /user/1】执行完毕 2019-08-20 05:21:48,共耗时:6ms
复制代码
[TimeFilter] 收到服务调用:【GET /user/1】
[TimeFilter] 开始执行服务【GET /user/1】2019-08-20 05:24:40
[TimeInterceptor # preHandle] 服务【top.zhenganwen.securitydemo.web.controller.UserController@49433c98#getInfo】被调用 2019-08-20 05:24:40
[GlobalControllerAspect]开始调用服务【public top.zhenganwen.securitydemo.dto.User top.zhenganwen.securitydemo.web.controller.UserController.getInfo(java.lang.Long)】 请求参数: [1], 2019-08-20 05:24:40
[UserController # getInfo]query user by id
[GlobalControllerAspect]调用服务【public top.zhenganwen.securitydemo.dto.User top.zhenganwen.securitydemo.web.controller.UserController.getInfo(java.lang.Long)】发生异常, message=id not exist
[TimeInterceptor # afterCompletion] 服务【top.zhenganwen.securitydemo.web.controller.UserController@49433c98#getInfo】调用结束 2019-08-20 05:24:40 共耗时:2ms
[TimeInterceptor#afterCompletion] 服务【top.zhenganwen.securitydemo.web.controller.UserController@49433c98#getInfo】调用异常:id not exist

java.lang.RuntimeException: id not exist
	at top.zhenganwen.securitydemo.web.controller.UserController.getInfo(UserController.java:42)
    ...

[TimeInterceptor # preHandle] 服务【org.springframework.boot.autoconfigure.web.BasicErrorController@445821a6#error】被调用 2019-08-20 05:24:40
[TimeInterceptor # postHandle] 服务【org.springframework.boot.autoconfigure.web.BasicErrorController@445821a6#error】调用结束 2019-08-20 05:24:40 共耗时:2ms
[TimeInterceptor # afterCompletion] 服务【org.springframework.boot.autoconfigure.web.BasicErrorController@445821a6#error】调用结束 2019-08-20 05:24:40 共耗时:3ms
复制代码
总结
请求过程

响应过程

文件上传下载及Mock测试
文件上传
老规矩,测试先行,不过使用 MockMvc 模拟文件上传请求还是有些不一样的,请求需要使用静态方法 fileUpload 且要设置 contentType 为 multipart/form-data
@Test
    public void upload() throws Exception {
        File file = new File("C://Users//zhenganwen//Desktop", "hello.txt");
        FileInputStream fis = new FileInputStream(file);
        byte[] content = new byte[fis.available()];
        fis.read(content);
        String fileKey = mockMvc.perform(fileUpload("/file")
                /**
                 * name         请求参数,相当于<input>标签的的`name`属性
                 * originalName 上传的文件名称
                 * contentType  上传文件需指定为`multipart/form-data`
                 * content      字节数组,上传文件的内容
                 */
                .file(new MockMultipartFile("file", "hello.txt", "multipart/form-data", content)))
                .andExpect(status().isOk())
                .andReturn().getResponse().getContentAsString();
        System.out.println(fileKey);
    }
复制代码
文件管理Controller
package top.zhenganwen.securitydemo.web.controller;

import org.springframework.web.bind.annotation.PostMapping;
import org.springframework.web.bind.annotation.RequestMapping;
import org.springframework.web.bind.annotation.RestController;
import org.springframework.web.multipart.MultipartFile;

import java.io.File;
import java.io.IOException;
import java.util.Date;

/**
 * @author zhenganwen
 * @date 2019/8/21
 * @desc FileController
 */
@RestController
@RequestMapping("/file")
public class FileController {

    public static final String FILE_STORE_FOLDER = "C://Users//zhenganwen//Desktop//";

    @PostMapping
    public String upload(MultipartFile file) throws IOException {

        System.out.println("[FileController]文件请求参数: " + file.getName());
        System.out.println("[FileController]文件名称: " + file.getName());
        System.out.println("[FileController]文件大小: "+file.getSize()+"字节");


        String fileKey = new Date().getTime() + "_" + file.getOriginalFilename();
        File storeFile = new File(FILE_STORE_FOLDER, fileKey);

        // 可以通过file.getInputStream将文件上传到FastDFS、云OSS等存储系统中
//        InputStream inputStream = file.getInputStream();
//        byte[] content = new byte[inputStream.available()];
//        inputStream.read(content);

        file.transferTo(storeFile);

        return fileKey;
    }
}
复制代码
测试结果
[FileController]文件请求参数: file
[FileController]文件名称: file
[FileController]文件大小: 12字节
1566349460611_hello.txt
复制代码
查看桌面发现多了一个 1566349460611_hello.txt 并且其中的内容为 hello upload
文件下载
引入 apache io 工具包
<dependency>
    <groupId>commons-io</groupId>
    <artifactId>commons-io</artifactId>
    <version>2.5</version>
</dependency>
复制代码
文件下载接口
@GetMapping("/{fileKey:.+}")
public void download(@PathVariable String fileKey, HttpServletResponse response) throws IOException {

    try (
        InputStream is = new FileInputStream(new File(FILE_STORE_FOLDER, fileKey));
        OutputStream os = response.getOutputStream()
    ) {
        // 下载需要设置响应头为 application/x-download
        response.setContentType("application/x-download");
        // 设置下载询问框中的文件名
        response.setHeader("Content-Disposition", "attachment;filename=" + fileKey);

        IOUtils.copy(is, os);
        os.flush();
    }
}
复制代码
测试:浏览器访问 http://localhost:8080/file/1566349460611_hello.txt
映射写成 /{fileKey:.+} 而不是 /{fileKey} 的原因是 SpringMVC 会忽略映射中 . 符号之后的字符。正则 .+ 表示匹配任意个非 /n 的字符,不加该正则的话,方法入参 fileKey 获取到的值将是 1566349460611_hello 而不是 1566349460611_hello.txt
异步处理REST服务
我们之前都是客户端每发送一个请求, tomcat 线程池就派一个线程进行处理,直到请求处理完成响应结果,该线程都是被占用的。一旦系统并发量上来了,那么 tomcat 线程池会显得分身乏力,这时我们可以采取异步处理的方式。
为避免前文添加的过滤器、拦截器、切片日志的干扰,我们暂时先注释掉
//@Component
public class TimeFilter implements Filter {
复制代码
突然发现实现过滤器好像继承了 Filter 接口并添加 @Component 就能生效,因为仅注释掉 WebConfig 中的 registerTimeFilter 方法,发现 TimeFilter 还是打印了日志
//@Configuration
public class WebConfig extends WebMvcConfigurerAdapter {
复制代码
//@Aspect
//@Component
public class GlobalControllerAspect {
复制代码
Callable异步处理
在 Controller 中,如果将一个 Callable 作为方法的返回值,那么 tomcat 线程池中的线程在响应结果时会新建一个线程执行该 Callable 并将其返回结果返回给客户端

package top.zhenganwen.securitydemo.web.controller;

import org.apache.commons.lang.RandomStringUtils;
import org.slf4j.Logger;
import org.slf4j.LoggerFactory;
import org.springframework.web.bind.annotation.PostMapping;
import org.springframework.web.bind.annotation.RequestMapping;
import org.springframework.web.bind.annotation.RestController;

import java.util.concurrent.Callable;
import java.util.concurrent.TimeUnit;


/**
 * @author zhenganwen
 * @date 2019/8/7
 * @desc AsyncController
 */
@RestController
@RequestMapping("/order")
public class AsyncOrderController {

    private Logger logger = LoggerFactory.getLogger(getClass());

    // 创建订单
    @PostMapping
    public Callable<String> createOrder() {
        // 生成12位单号
        String orderNumber = RandomStringUtils.randomNumeric(12);
        logger.info("[主线程]收到创建订单请求,订单号=>" + orderNumber);
        Callable<String> result = () -> {
            logger.info("[副线程]创建订单开始,订单号=>"+orderNumber);
            // 模拟创建订单逻辑
            TimeUnit.SECONDS.sleep(3);
            logger.info("[副线程]创建订单完成,订单号=>" + orderNumber+",返回结果给客户端");
            return orderNumber;
        };
        logger.info("[主线程]已将请求委托副线程处理(订单号=>" + orderNumber + "),继续处理其它请求");
        return result;
    }
}
复制代码
使用 Postman 测试结果如下

控制台日志:
2019-08-21 21:10:39.059  INFO 17044 --- [nio-8080-exec-2] t.z.s.w.controller.AsyncOrderController  : [主线程]收到创建订单请求,订单号=>719547514079
2019-08-21 21:10:39.059  INFO 17044 --- [nio-8080-exec-2] t.z.s.w.controller.AsyncOrderController  : [主线程]已将请求委托副线程处理(订单号=>719547514079),继续处理其它请求
2019-08-21 21:10:39.063  INFO 17044 --- [      MvcAsync1] t.z.s.w.controller.AsyncOrderController  : [副线程]创建订单开始,订单号=>719547514079
2019-08-21 21:10:42.064  INFO 17044 --- [      MvcAsync1] t.z.s.w.controller.AsyncOrderController  : [副线程]创建订单完成,订单号=>719547514079,返回结果给客户端
复制代码
观察可知主线程并没有执行 Callable 下单任务而直接跑去继续监听其他请求了,下单任务由 SpringMVC 新启了一个线程 MvcAsync1 执行, Postman 的响应时间也是在 Callable 执行完毕后得到了它的返回值。对于客户端来说,后端的异步处理是透明的,与同步时没有什么区别;但是对于后端来说, tomcat 监听请求的线程被占用的时间很短,大大提高了自身的并发能力
DeferredResult异步处理
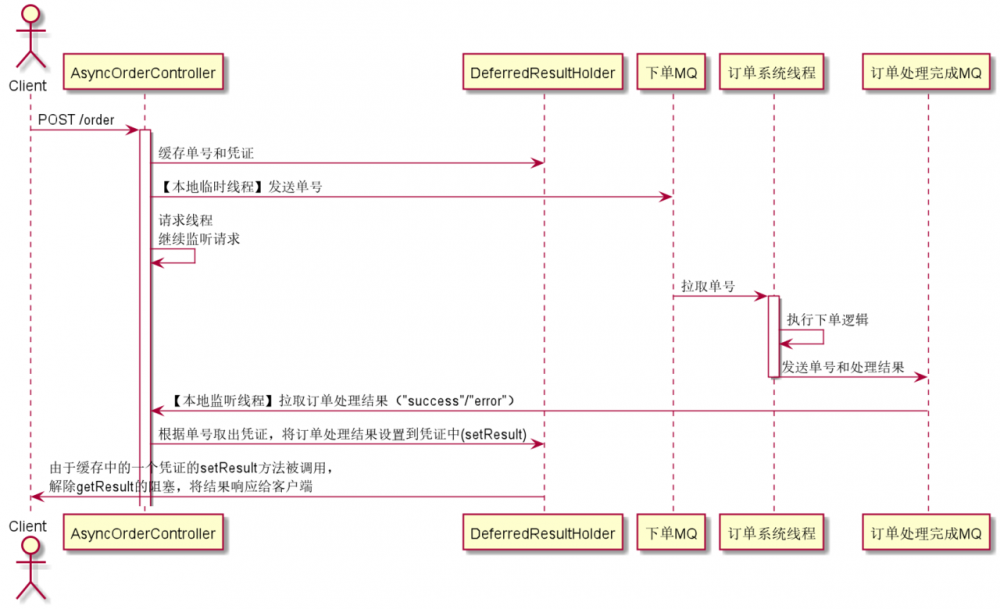
Callable 异步处理的缺陷是,只能通过在本地新建副线程的方式进行异步处理,但现在随着微服务架构的盛行,我们经常需要跨系统的异步处理。例如在秒杀系统中,并发下单请求量较大,如果后端对每个下单请求做同步处理(即在请求线程中处理订单)后再返回响应结果,会导致服务假死(发送下单请求没有任何响应);这时我们可能会利用消息中间件,请求线程只负责监听下单请求,然后发消息给MQ,让订单系统从MQ中拉取消息(如单号)进行下单处理并将处理结果返回给秒杀系统;秒杀系统独立设一个监听订单处理结果消息的线程,将处理结果返回给客户端。如图所示

要实现类似上述的效果,需要使用 Future 模式(可参考《Java多线程编程实战(设计模式篇)》),即我们可以设置一个处理结果凭证 DeferredResult ,如果我们直接调用它的 getResult 是获取不到处理结果的(会被阻塞,表现为虽然请求线程继续处理请求了,但是客户端仍在 pending ,只有当某个线程调用它的 setResult(result) ,才会将对应的 result 响应给客户端
本例中,为降低复杂性,使用本地内存中的 LinkedList 代替分布式消息中间件,使用本地新建线程代替订单系统线程,各类之间的关系如下
秒杀系统AsyncOrderController
package top.zhenganwen.securitydemo.web.async;

import org.apache.commons.lang.RandomStringUtils;
import org.slf4j.Logger;
import org.slf4j.LoggerFactory;
import org.springframework.beans.factory.annotation.Autowired;
import org.springframework.web.bind.annotation.PostMapping;
import org.springframework.web.bind.annotation.RequestMapping;
import org.springframework.web.bind.annotation.RestController;
import org.springframework.web.context.request.async.DeferredResult;

import java.util.concurrent.TimeUnit;


/**
 * @author zhenganwen
 * @date 2019/8/7
 * @desc AsyncController
 */
@RestController
@RequestMapping("/order")
public class AsyncOrderController {

    private Logger logger = LoggerFactory.getLogger(getClass());

    @Autowired
    private DeferredResultHolder deferredResultHolder;

    @Autowired
    private OrderProcessingQueue orderProcessingQueue;

    // 秒杀系统下单请求
    @PostMapping
    public DeferredResult<String> createOrder() {

        logger.info("【请求线程】收到下单请求");

        // 生成12位单号
        String orderNumber = RandomStringUtils.randomNumeric(12);

        // 创建处理结果凭证放入缓存,以便监听(订单系统向MQ发送的订单处理结果消息的)线程向凭证中设置结果,这会触发该结果响应给客户端
        DeferredResult<String> deferredResult = new DeferredResult<>();
        deferredResultHolder.placeOrder(orderNumber, deferredResult);

        // 异步向MQ发送下单消息,假设需要200ms
        new Thread(() -> {
            try {
                TimeUnit.MILLISECONDS.sleep(500);
                synchronized (orderProcessingQueue) {
                    while (orderProcessingQueue.size() >= Integer.MAX_VALUE) {
                        try {
                            orderProcessingQueue.wait();
                        } catch (Exception e) {
                        }
                    }
                    orderProcessingQueue.addLast(orderNumber);
                    orderProcessingQueue.notifyAll();
                }
                logger.info("向MQ发送下单消息, 单号: {}", orderNumber);
            } catch (InterruptedException e) {
                throw new RuntimeException(e);
            }
        }, "本地临时线程-向MQ发送下单消息")
        .start();

        logger.info("【请求线程】继续处理其它请求");

        // 并不会立即将deferredResult序列化成JSON并返回给客户端,而会等deferredResult的setResult被调用后,将传入的result转成JSON返回
        return deferredResult;
    }
}
复制代码
两个MQ
package top.zhenganwen.securitydemo.web.async;

import org.springframework.stereotype.Component;

import java.util.LinkedList;

/**
 * @author zhenganwen
 * @date 2019/8/22
 * @desc OrderProcessingQueue   下单消息MQ
 */
@Component
public class OrderProcessingQueue extends LinkedList<String> {
}
复制代码
package top.zhenganwen.securitydemo.web.async;

import org.springframework.stereotype.Component;

import java.util.LinkedList;

/**
 * @author zhenganwen
 * @date 2019/8/22
 * @desc OrderCompletionQueue   订单处理完成MQ
 */
@Component
public class OrderCompletionQueue extends LinkedList<OrderCompletionResult> {
}
复制代码
package top.zhenganwen.securitydemo.web.async;

import lombok.AllArgsConstructor;
import lombok.Data;
import lombok.NoArgsConstructor;

/**
 * @author zhenganwen
 * @date 2019/8/22
 * @desc OrderCompletionResult  订单处理完成结果信息,包括单号和是否成功
 */
@Data
@AllArgsConstructor
@NoArgsConstructor
public class OrderCompletionResult {
    private String orderNumber;
    private String result;
}
复制代码
凭证缓存
package top.zhenganwen.securitydemo.web.async;

import org.hibernate.validator.constraints.NotBlank;
import org.springframework.stereotype.Component;
import org.springframework.web.context.request.async.DeferredResult;

import javax.validation.constraints.NotNull;
import java.util.HashMap;
import java.util.Map;

/**
 * @author zhenganwen
 * @date 2019/8/22
 * @desc DeferredResultHolder   订单处理结果凭证缓存,通过凭证可以在未来的时间点获取处理结果
 */
@Component
public class DeferredResultHolder {

    private Map<String, DeferredResult<String>> holder = new HashMap<>();

    // 将订单处理结果凭证放入缓存
    public void placeOrder(@NotBlank String orderNumber, @NotNull DeferredResult<String> result) {
        holder.put(orderNumber, result);
    }

    // 向凭证中设置订单处理完成结果
    public void completeOrder(@NotBlank String orderNumber, String result) {
        if (!holder.containsKey(orderNumber)) {
            throw new IllegalArgumentException("orderNumber not exist");
        }
        DeferredResult<String> deferredResult = holder.get(orderNumber);
        deferredResult.setResult(result);
    }
}
复制代码
两个队列对应的两个监听
package top.zhenganwen.securitydemo.web.async;

import org.slf4j.Logger;
import org.slf4j.LoggerFactory;
import org.springframework.beans.factory.annotation.Autowired;
import org.springframework.context.ApplicationListener;
import org.springframework.context.event.ContextRefreshedEvent;
import org.springframework.stereotype.Component;

import java.util.concurrent.TimeUnit;

/**
 * @author zhenganwen
 * @date 2019/8/22
 * @desc OrderProcessResultListener
 */
@Component
public class OrderProcessingListener implements ApplicationListener<ContextRefreshedEvent> {

    private Logger logger = LoggerFactory.getLogger(getClass());

    @Autowired
    OrderProcessingQueue orderProcessingQueue;

    @Autowired
    OrderCompletionQueue orderCompletionQueue;

    @Autowired
    DeferredResultHolder deferredResultHolder;

    // spring容器启动或刷新时执行此方法
    @Override
    public void onApplicationEvent(ContextRefreshedEvent event) {

        // 本系统(秒杀系统)启动时,启动一个监听MQ下单完成消息的线程
        new Thread(() -> {

            while (true) {
                String finishedOrderNumber;
                OrderCompletionResult orderCompletionResult;
                synchronized (orderCompletionQueue) {
                    while (orderCompletionQueue.isEmpty()) {
                        try {
                            orderCompletionQueue.wait();
                        } catch (InterruptedException e) { }
                    }
                    orderCompletionResult = orderCompletionQueue.pollFirst();
                    orderCompletionQueue.notifyAll();
                }
                finishedOrderNumber = orderCompletionResult.getOrderNumber();
                logger.info("收到订单处理完成消息,单号为: {}", finishedOrderNumber);
                deferredResultHolder.completeOrder(finishedOrderNumber, orderCompletionResult.getResult());
            }

        },"本地监听线程-监听订单处理完成")
        .start();


        // 假设是订单系统监听MQ下单消息的线程
        new Thread(() -> {

            while (true) {
                String orderNumber;
                synchronized (orderProcessingQueue) {
                    while (orderProcessingQueue.isEmpty()) {
                        try {
                            orderProcessingQueue.wait();
                        } catch (InterruptedException e) {
                        }
                    }
                    orderNumber = orderProcessingQueue.pollFirst();
                    orderProcessingQueue.notifyAll();
                }

                logger.info("收到下单请求,开始执行下单逻辑,单号为: {}", orderNumber);
                boolean status;
                // 模拟执行下单逻辑
                try {
                    TimeUnit.SECONDS.sleep(2);
                    status = true;
                } catch (Exception e) {
                    logger.info("下单失败=>{}", e.getMessage());
                    status = false;
                }
                // 向 订单处理完成MQ 发送消息
                synchronized (orderCompletionQueue) {
                    orderCompletionQueue.addLast(new OrderCompletionResult(orderNumber, status == true ? "success" : "error"));
                    logger.info("发送订单完成消息, 单号: {}",orderNumber);
                    orderCompletionQueue.notifyAll();
                }
            }

        },"订单系统线程-监听下单消息")
        .start();
    }
}
复制代码
测试
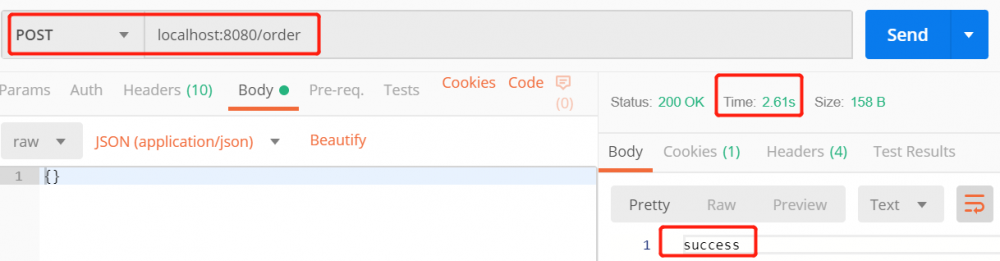
2019-08-22 13:22:05.520  INFO 21208 --- [nio-8080-exec-2] t.z.s.web.async.AsyncOrderController     : 【请求线程】收到下单请求
2019-08-22 13:22:05.521  INFO 21208 --- [nio-8080-exec-2] t.z.s.web.async.AsyncOrderController     : 【请求线程】继续处理其它请求
2019-08-22 13:22:06.022  INFO 21208 --- [  订单系统线程-监听下单消息] t.z.s.web.async.OrderProcessingListener  : 收到下单请求,开始执行下单逻辑,单号为: 104691998710
2019-08-22 13:22:06.022  INFO 21208 --- [地临时线程-向MQ发送下单消息] t.z.s.web.async.AsyncOrderController     : 向MQ发送下单消息, 单号: 104691998710
2019-08-22 13:22:08.023  INFO 21208 --- [  订单系统线程-监听下单消息] t.z.s.web.async.OrderProcessingListener  : 发送订单完成消息, 单号: 104691998710
2019-08-22 13:22:08.023  INFO 21208 --- [本地监听线程-监听订单处理完成] t.z.s.web.async.OrderProcessingListener  : 收到订单处理完成消息,单号为: 104691998710
复制代码
configu reSync异步处理拦截、超时、线程池配置
在我们之前扩展 WebMvcConfigureAdapter 的子类 WebConfig 中可以通过重写 configureAsyncSupport 方法对异步处理进行一些配置
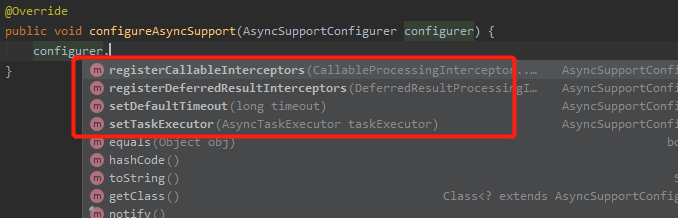
registerCallableInterceptors & registerDeferredResultInterceptors
我们之前通过重写 addInterceptors 方法注册的拦截器对 Callable 和 DeferredResult 两种异步处理是无效的,如果想为这两者配置拦截器需重写这两个方法
setDefaultTimeout
设置异步处理的超时时间,超过该时间就直接响应而不会等异步任务结束了
setTaskExecutor
SpringBoot 默认是通过新建线程的方式执行异步任务的,执行完后线程就被销毁了,要想通过复用线程(线程池)的方式执行异步任务,你可以通过此方法传入一个自定义的线程池
前后端分离
Swagger接口文档
swagger 项目能够根据我们所写的接口自动生成接口文档,方便我们前后端分离开发
依赖
<dependency>
    <groupId>io.springfox</groupId>
    <artifactId>springfox-swagger2</artifactId>
    <version>2.7.0</version>
</dependency>
<dependency>
    <groupId>io.springfox</groupId>
    <artifactId>springfox-swagger-ui</artifactId>
    <version>2.7.0</version>
</dependency>
复制代码
在启动类 SecurityDemoApplication 上添加 @@EnableSwagger2 注解开启接口文档自动生成开关,启动后访问 localhost:8080/swagger-ui.html
常用注解
-
@ApiOperation,注解在Controller方法上,用来描述方法的行为@GetMapping @JsonView(User.UserBasicView.class) @ApiOperation("用户查询服务") public List<User> query(String userName, UserQueryConditionDto userQueryConditionDto, Pageable pageable) { 复制代码 -
@ApiModelProperty,注解在Bean的字段上,用来描述字段的含义@Data public class UserQueryConditionDto { @ApiModelProperty("用户名") private String username; @ApiModelProperty("密码") private String password; @ApiModelProperty("电话号码") private String phone; } 复制代码 -
@ApiParam,注解在Controller方法参数上,用来描述参数含义@DeleteMapping("/{id://d+}") public void delete(@ApiParam("用户id") @PathVariable Long id) { System.out.println(id); } 复制代码
重启后接口文档会重新生成
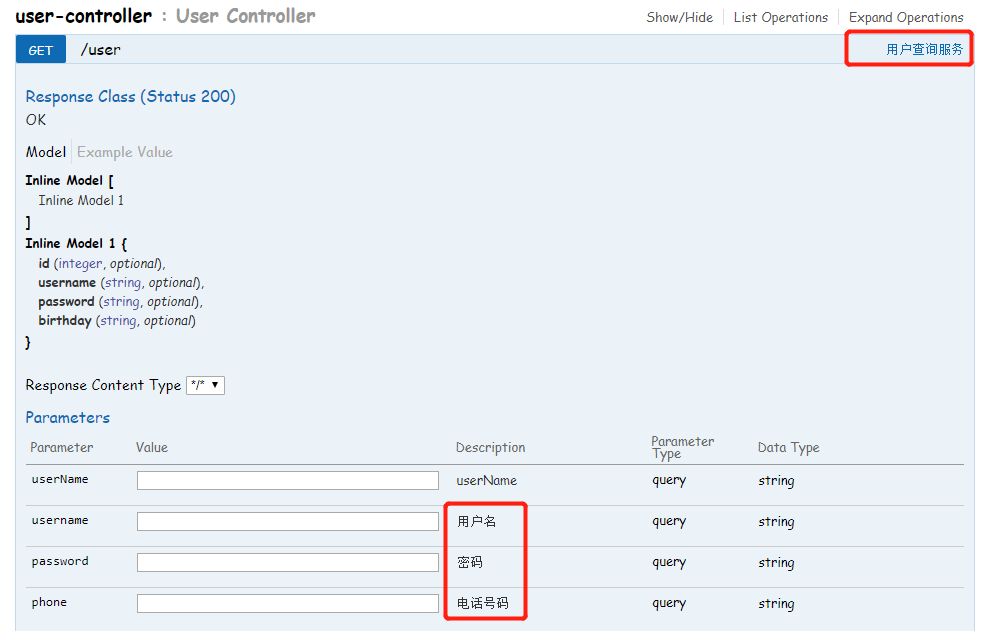

WireMock
为了方便前后端并行开发,我们可以使用 WireMock 作为虚拟接口服务器
在后端接口没开发完成时,前端可能会通过本地文件的方式伪造一些静态数据(例如JSON文件)作为请求的响应结果,这种方式在前端只有一种终端时是没问题的。但是当前端有多种,如PC、H5、APP、小程序等时,每种都去在自己的本地伪造数据,那么就显得有些重复,而且每个人按照自己的想法伪造数据可能会导致最终和真实接口无法无缝对接
这时 wiremock 的出现就解决了这一痛点, wiremock 是用 Java 开发的一个独立服务器,能够对外提供HTTP服务,我们可以通过 wiremock 客户端去编辑/配置 wiremock 服务器使它能像 web 服务一样提供各种各样的接口,而且无需重新部署
下载 & 启动wiremock服务
wiremock可以以 jar 方式运行,下载地址,下载完成后切换到其所在目录 cmd 执行以下命令启动 wiremock 服务器, --port= 指定运行端口
java -jar wiremock-standalone-2.24.1.jar --port=8062
复制代码
依赖
引入 wiremock 客户端依赖及其依赖的 httpclient
<dependency>
    <groupId>com.github.tomakehurst</groupId>
    <artifactId>wiremock</artifactId>
</dependency>
<dependency>
    <groupId>org.apache.httpcomponents</groupId>
    <artifactId>httpclient</artifactId>
</dependency>
复制代码
由于在父工程中已经使用了依赖自动兼容,所以无需指定版本号。接着通过客户端API去编辑 wiremock 服务器,为其添加接口
package top.zhenganwen.securitydemo.wiremock;

import static com.github.tomakehurst.wiremock.client.WireMock.*;

/**
 * @author zhenganwen
 * @date 2019/8/22
 * @desc MockServer
 */
public class MockServer {

    public static void main(String[] args) {
        configureFor("127.0.0.1",8062);
        removeAllMappings();    // 移除所有旧的配置

        // 添加配置,一个stub代表一个接口
        stubFor(
                get(urlEqualTo("/order/1")).
                        // 设置响应结果
                        willReturn(
                                aResponse()
                                        .withBody("{/"id/":1,/"orderNumber/":/"545616156/"}")
                                        .withStatus(200)
                        )
        );
    }
}
复制代码
你可以先将JSON数据存在 resources 中,然后通过 ClassPathResource#getFile 和 FileUtils#readLines 将数据读成字符串
访问 localhost:8062/order/1 :
{
    id: 1,
    orderNumber: "545616156"
}
复制代码
通过 WireMock API,你可以为虚拟服务器配置各种各样的接口服务
使用Spring Security开发基于表单的认证
Summary
Spring Security核心功能
- 认证(你是谁)
- 授权(你能干什么)
- 攻击防护(防止伪造身份,如果黑客能 伪造身份登录系统,上述两个功能就不起作用了)
本章内容
- Spring Security基本原理
- 实现用户名 + 密码认证
- 使用手机号 + 短信认证
Spring Security第一印象
Security 有一个默认的基础认证机制,我们注释掉配置项 security.basic.enabled=false (默认值为 true ),重启查看日志会发现一条信息
Using default security password: f84e3dea-d231-47a2-b20a-48bac8ed5f1e
复制代码
然后我们访问 GET /user ,弹出登录框让我们登录, security 默认内置了一个用户名为 user ,密码为上述日志中 Using default security password: f84e3dea-d231-47a2-b20a-48bac8ed5f1e 的用户(该密码每次重启都会重新生成),我们使用这两者登录表单后页面重新跳转到了我们要访问的服务
formLogin
从本节开始我们将在 security-browser 模块中编写我们的浏览器认证逻辑
我们可以通过添加配置类的方式(添加 Configuration ,并扩展 WebSecurityConfigureAdapter )来配置验证方式、验证逻辑等,如设置验证方式为表单验证:
package top.zhenganwen.securitydemo.browser.config;

import org.springframework.context.annotation.Configuration;
import org.springframework.security.config.annotation.web.builders.HttpSecurity;
import org.springframework.security.config.annotation.web.configuration.WebSecurityConfigurerAdapter;

/**
 * @author zhenganwen
 * @date 2019/8/22
 * @desc SecurityConfig
 */
@Configuration
public class SecurityBrowserConfig extends WebSecurityConfigurerAdapter {

    @Override
    protected void configure(HttpSecurity http) throws Exception {
        http
            //设置认证方式为表单登录,若未登录而访问受保护的URL则跳转到表单登录页(security帮我们写了一个默认的登录页)
            .formLogin()
            // 添加其他配置
            .and()
            // 验证方式配置结束,开始配置验证规则
            .authorizeRequests()
            // 设置任何请求都需要通过认证
            .anyRequest()
            .authenticated();
    }
}
复制代码
访问 /user ,跳转到默认的登录页 /login (该登录页和登录URL我们可以自定义),用户名 user ,密码还是日志中的,登录成功跳转到 /user
httpBasic
如果将认证方式由 formLogin 改为 httpBasic 就是 security 最默认的配置(相当于引入 security 依赖后什么都不配的效果),即弹出登录框
Spring Security基本原理
三种过滤器
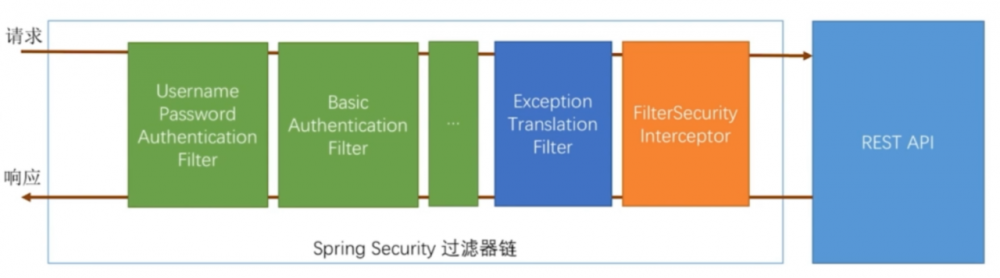
如图所示, Spring Security 的核心其实就是一串过滤器链,所以它是非侵入式可插拔的。过滤器链中的过滤器分3种:
-
认证过滤器
XxxAuthenticationFilter,如上图中标注为绿色的,它们的类名以AuthenticationFilter结尾,作用是将登录的信息保存起来。这些过滤器是根据我们的配置动态生效的,如我们之前调用formLogin()其实就是启用了UsernamePasswordAuthenticationFilter,调用httpBaisc()就是启用了BasicAuthenticationFilter后面最贴近
Controller的两个过滤器ExceptionTranslationFilter和FilterSecurityInterceptor包含了最核心的认证逻辑,默认是启用的,而且我们也无法禁用它们 -
FilterSecurityInterceptor,虽然命名以Interceptor结尾,但其实还是一个Filter,它是最贴近Controller的一个过滤器,它会根据我们配置的拦截规则(哪些URL需要登录后才能访问,哪些URL需要某些特定的权限才能访问等)对访问相应URL的请求进行拦截,以下是它的部分源码public void doFilter(ServletRequest request, ServletResponse response, FilterChain chain) throws IOException, ServletException { FilterInvocation fi = new FilterInvocation(request, response, chain); invoke(fi); } public void invoke(FilterInvocation fi) throws IOException, ServletException { ... InterceptorStatusToken token = super.beforeInvocation(fi); ... fi.getChain().doFilter(fi.getRequest(), fi.getResponse()); ... } 复制代码doFilter就是真正调用我们的Controller了(因为它是过滤器链的末尾),但在此之前它会调用beforeInvocation对请求进行拦截校验是否有相关的身份和权限,校验失败对应会抛出未经认证异常(Unauthenticated)和未经授权异常(Unauthorized),这些异常会被ExceptionTranslationFilter捕获到 -
ExceptionTranslationFilter,顾名思义就是解析异常的,其部分源码如下public void doFilter(ServletRequest req, ServletResponse res, FilterChain chain) throws IOException, ServletException { HttpServletRequest request = (HttpServletRequest) req; HttpServletResponse response = (HttpServletResponse) res; try { chain.doFilter(request, response); } catch (Exception ex) { // Try to extract a SpringSecurityException from the stacktrace ... } } 复制代码它调用
chain.doFilter其实就是去到了FilterSecurityInterceptor,它会对FilterSecurityInterceptor.doFilter中抛出的SpringSecurityException异常进行捕获并解析处理,例如FilterSecurityInterceptor抛出了Unauthenticated异常,那么ExceptionTranslationFilter就会重定向到登录页或是弹出登录框(取决于我们配置了什么认证过滤器),当我们成功登录后,认证过滤又会重定向到我们最初要访问的URL
断点调试
我们可以通过断点调试的方式来验证上述所说,将验证方式设为 formLogin ,然后在3个过滤器和 Controller 中分别打断点,重启服务访问 /user
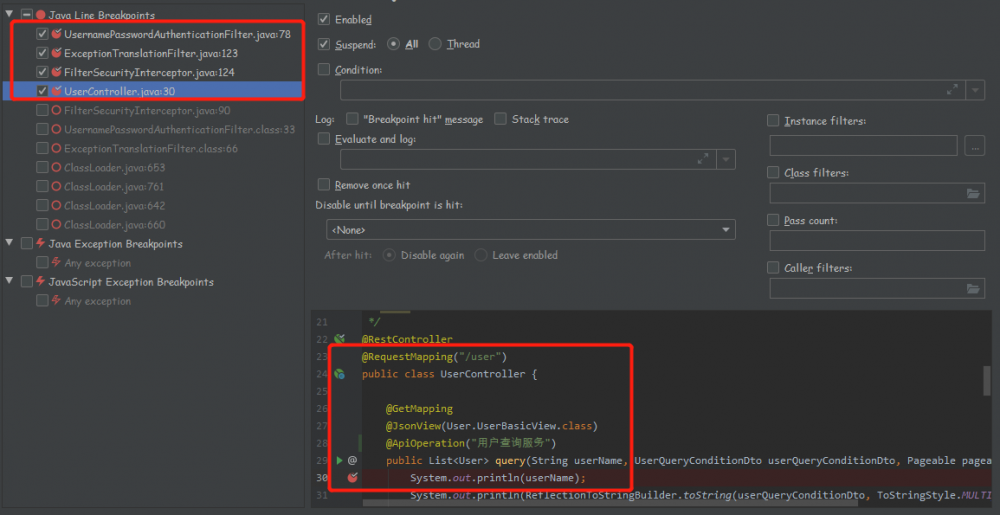
自定义用户认证逻辑
处理用户信息获取逻辑——UserDetailsService
到此为止我们登录都是通过 user 和启动日志生成的密码,这是 security 内置了一个 user 用户。实际项目中我们一般有一个专门存放用户的表,会通过 jdbc 或从其他存储系统读取用户信息,这时就需要我们自定义读取用户信息的逻辑,通过实现 UserDetailsService 接口即可告诉 security 从如何获取用户信息
package top.zhenganwen.securitydemo.browser.config;

import org.hibernate.validator.constraints.NotBlank;
import org.slf4j.Logger;
import org.slf4j.LoggerFactory;
import org.springframework.security.core.authority.AuthorityUtils;
import org.springframework.security.core.userdetails.UserDetails;
import org.springframework.security.core.userdetails.UserDetailsService;
import org.springframework.security.core.userdetails.UsernameNotFoundException;
import org.springframework.stereotype.Component;

import java.util.Objects;

/**
 * @author zhenganwen
 * @date 2019/8/23
 * @desc CustomUserDetailsService
 */
@Component
public class CustomUserDetailsService implements UserDetailsService {

    private Logger logger = LoggerFactory.getLogger(getClass());

    @Override
    public UserDetails loadUserByUsername(@NotBlank String username) throws UsernameNotFoundException {
        logger.info("登录用户名: " + username);
        // 实际项目中你可以调用Dao或Repository来查询用户是否存在
        if (Objects.equals(username, "admin") == false) {
            throw new UsernameNotFoundException("用户名不存在");
        }

        // 在查询到用户后需要将相关信息包装成一个UserDetails实例返回给security,这里的User是security提供的一个实现
        // 第三个参数需要传一个权限集合,这里使用了一个security提供的工具类将用分号分隔的权限字符串转成权限集合,本来应该从用户权限表查询的
        return new org.springframework.security.core.userdetails.User(
                "admin","123456", AuthorityUtils.commaSeparatedStringToAuthorityList("user,admin")
        );
    }
}
复制代码
重启服务后只能通过 admin,123456 来登录了
处理用户校验逻辑——UserDetails
我们来看一下 UserDetails 接口源码
public interface UserDetails extends Serializable {
    Collection<? extends GrantedAuthority> getAuthorities();

    // 用来和用户登录时填写的密码进行比对
    String getPassword();

    String getUsername();

    // 账户是否是非过期的
    boolean isAccountNonExpired();

    // 账户是否是非冻结的
    boolean isAccountNonLocked();

    // 密码是否是非过期的,有些安全性较高的系统需要账户每隔一段时间更换密码
    boolean isCredentialsNonExpired();

    // 账户是否可用,可以对应逻辑删除字段
    boolean isEnabled();
}
复制代码
在重写以 is 开头的四个方法时,如果无需相应判断,则返回 true 即可,例如对应用户表的实体类如下
@Data
public class User{
    private Long id;
    private String username;
    private String password;
    private String phone;
    private int deleted;			//0-"正常的",1-"已删除的"
    private int accountNonLocked;	 //0-"账号未被冻结",1-"账号已被冻结"
}
复制代码
为了方便,我们可以直接使用实体类实现 UserDetails 接口
@Data
public class User implements UserDetails{
    private Long id;
    private String uname;
    private String pwd;
    private String phone;
    private int deleted;
    private int accountNonLocked;

    public String getPassword(){
        return pwd;
    }

    public String getUsername(){
        return uname;
    }

    public boolean isAccountNonExpired(){
        return true;
    }

    public boolean isAccountNonLocked(){
        return accountNonLocked == 0;
    }

    public boolean isCredentialsNonExpired(){
        return true;
    }

    public boolean isEnabled(){
        return deleted == 0;
    }
}
复制代码
处理密码加密解密——PasswordEncoder
用户表中的密码字段一般不会存放密码的明文而是存放加密后的密文,这时我们就需要 PasswordEncoder 的支持了:
public interface PasswordEncoder {
	String encode(CharSequence rawPassword);
	boolean matches(CharSequence rawPassword, String encodedPassword);
}
复制代码
我们在插入用户到数据库时,需要调用 encode 对明文密码加密后再插入;在用户登录时, security 会调用 matches 将我们从数据库查出的密文面和用户提交的明文密码进行比对。
security 为我们提供了一个该接口的非对称加密(对同一明文密码,每次调用 encode 得到的密文都是不一样的,只有通过 matches 来比对明文和密文是否对应)实现类 BCryptPasswordEncoder ,我们只需配置一个该类的 Bean , security 就会认为我们返回的 UserDetails 的 getPassword 返回的密码是通过该 Bean 加密过的(所以在插入用户时要注意调用该 Bean 的 encode 对密码加密一下在插入数据库)
@Configuration
public class SecurityBrowserConfig extends WebSecurityConfigurerAdapter {

    @Bean
    public BCryptPasswordEncoder passwordEncoder() {
        return new BCryptPasswordEncoder();
    }
复制代码
@Component
public class CustomUserDetailsService implements UserDetailsService {

    @Autowired
    BCryptPasswordEncoder passwordEncoder;

    private Logger logger = LoggerFactory.getLogger(getClass());

    @Override
    public UserDetails loadUserByUsername(@NotBlank String username) throws UsernameNotFoundException {
        logger.info("登录用户名: " + username);
        // 实际项目中你可以调用Dao或Repository来查询用户是否存在
        if (Objects.equals(username, "admin") == false) {
            throw new UsernameNotFoundException("用户名不存在");
        }
        // 假设查出来的密码如下
        String pwd = passwordEncoder.encode("123456");

        return new org.springframework.security.core.userdetails.User(
                "admin", pwd, AuthorityUtils.commaSeparatedStringToAuthorityList("user,admin")
        );
    }
}
复制代码
BCryptPasswordEncoder 不一定只能用于密码的加密和校验,日常开发中涉及到加密的功能我们都能使用它的 encode 方法,也能使用 matches 方法比对某密文是否是某明文加密后的结果
个性化用户认证流程
自定义登录页面
在 formLogin() 后使用 loginPage() 就能指定登录的页面,同时要记得将该URL的拦截放开; UsernamePasswordAuthenticationFilter 默认拦截提交到 /login 的 POST 请求并获取登录信息,如果你想表单填写的 action 不为 /post ,那么可以配置 loginProcessingUrl 使 UsernamePasswordAuthenticationFilter 与之对应
@Configuration
public class SecurityBrowserConfig extends WebSecurityConfigurerAdapter {

    @Bean
    public BCryptPasswordEncoder passwordEncoder() {
        return new BCryptPasswordEncoder();
    }

    @Override
    protected void configure(HttpSecurity http) throws Exception {
        http
                //设置认证方式为表单登录,若未登录而访问受保护的URL则跳转到表单登录页(security帮我们写了一个默认的登录页)
                .formLogin()
                .loginPage("/sign-in.html").loginProcessingUrl("/auth/login")
                .and()
                // 验证方式配置结束,开始配置验证规则
                .authorizeRequests()
                    // 登录页面不需要拦截
                    .antMatchers("/sign-in.html").permitAll()
                    // 设置任何请求都需要通过认证
                    .anyRequest().authenticated();
    }
}
复制代码
自定义登录页: security-browser/src/main/resource/resources/sign-in.html
<!DOCTYPE html>
<html lang="en">
<head>
    <meta charset="UTF-8">
    <title>登录页面</title>
</head>
<body>
<form action="/auth/login" method="post">
    用户名: <input type="text" name="username">
    密码: <input type="password" name="password">
    <button type="submit">提交</button>
</form>
</body>
</html>
复制代码
重启后访问 GET /user ,调整到了我们写的登录页 sign-in.html ,填写 admin,123456 登录,发现还是报错如下
There was an unexpected error (type=Forbidden, status=403).
Invalid CSRF Token 'null' was found on the request parameter '_csrf' or header 'X-CSRF-TOKEN'.
复制代码
这是因为 security 默认启用了跨站伪造请求防护CSRF(例如使用HTTP客户端 Postman 也可以发出这样的登录请求),我们先禁用它
http
                .formLogin()
                .loginPage("/sign-in.html").loginProcessingUrl("/auth/login")
                .and()
                .authorizeRequests()
                    .antMatchers("/sign-in.html").permitAll()
                    .anyRequest().authenticated()
                .and()
                    .csrf().disable()
复制代码
再重启访问 GET /user ,跳转登录后,自动跳转回 /user ,自定义登录页成功
REST登录逻辑
由于我们是基于 REST 的服务,所以如果是非浏览器请求,我们应该返回401状态码告诉客户端需要认证,而不是重定向到登录页
这时我们就不能将 loginPage 写成登录页路径了,而应该重定向到一个 Controller ,由 Controller 判断用户是在浏览器访问页面时跳转过来的还是非浏览器如安卓访问REST服务时跳转过来,如果是前者那么就重定向到登录页,如果是后者就响应401状态码和JSON消息
package top.zhenganwen.securitydemo.browser;

import org.apache.commons.lang.StringUtils;
import org.slf4j.Logger;
import org.slf4j.LoggerFactory;
import org.springframework.http.HttpStatus;
import org.springframework.security.web.DefaultRedirectStrategy;
import org.springframework.security.web.RedirectStrategy;
import org.springframework.security.web.savedrequest.HttpSessionRequestCache;
import org.springframework.security.web.savedrequest.RequestCache;
import org.springframework.security.web.savedrequest.SavedRequest;
import org.springframework.web.bind.annotation.RequestMapping;
import org.springframework.web.bind.annotation.ResponseStatus;
import org.springframework.web.bind.annotation.RestController;
import top.zhenganwen.securitydemo.browser.support.SimpleResponseResult;

import javax.servlet.http.HttpServletRequest;
import javax.servlet.http.HttpServletResponse;
import java.io.IOException;

/**
 * @author zhenganwen
 * @date 2019/8/23
 * @desc AuthenticationController
 */
@RestController
public class BrowserSecurityController {

    private Logger logger = LoggerFactory.getLogger(getClass());

    // security会将跳转前的请求存储在session中
    private RequestCache requestCache = new HttpSessionRequestCache();

    private RedirectStrategy redirectStrategy = new DefaultRedirectStrategy();

    @RequestMapping("/auth/require")
    // 该注解可设置响应状态码
    @ResponseStatus(code = HttpStatus.UNAUTHORIZED)
    public SimpleResponseResult requireAuthentication(HttpServletRequest request, HttpServletResponse response) throws IOException {

        // 从session中取出跳转前用户访问的URL
        SavedRequest savedRequest = requestCache.getRequest(request, response);
        if (savedRequest != null) {
            String redirectUrl = savedRequest.getRedirectUrl();
            logger.info("引发跳转到/auth/login的请求是: {}", redirectUrl);
            if (StringUtils.endsWithIgnoreCase(redirectUrl, ".html")) {
                // 如果用户是访问html页面被FilterSecurityInterceptor拦截从而跳转到了/auth/login,那么就重定向到登录页面
                redirectStrategy.sendRedirect(request, response, "/sign-in.html");
            }
        }

        // 如果不是访问html而被拦截跳转到了/auth/login,则返回JSON提示
        return new SimpleResponseResult("用户未登录,请引导用户至登录页");
    }
}
复制代码
@Configuration
public class SecurityBrowserConfig extends WebSecurityConfigurerAdapter {

    @Bean
    public BCryptPasswordEncoder passwordEncoder() {
        return new BCryptPasswordEncoder();
    }

    @Override
    protected void configure(HttpSecurity http) throws Exception {
        http
                .formLogin()
                .loginPage("/auth/require").loginProcessingUrl("/auth/login")
                .and()
                .authorizeRequests()
                    .antMatchers("/auth/require").permitAll()
                    .antMatchers("/sign-in.html").permitAll()
                    .anyRequest().authenticated()
                .and()
                    .csrf().disable();
    }
}
复制代码
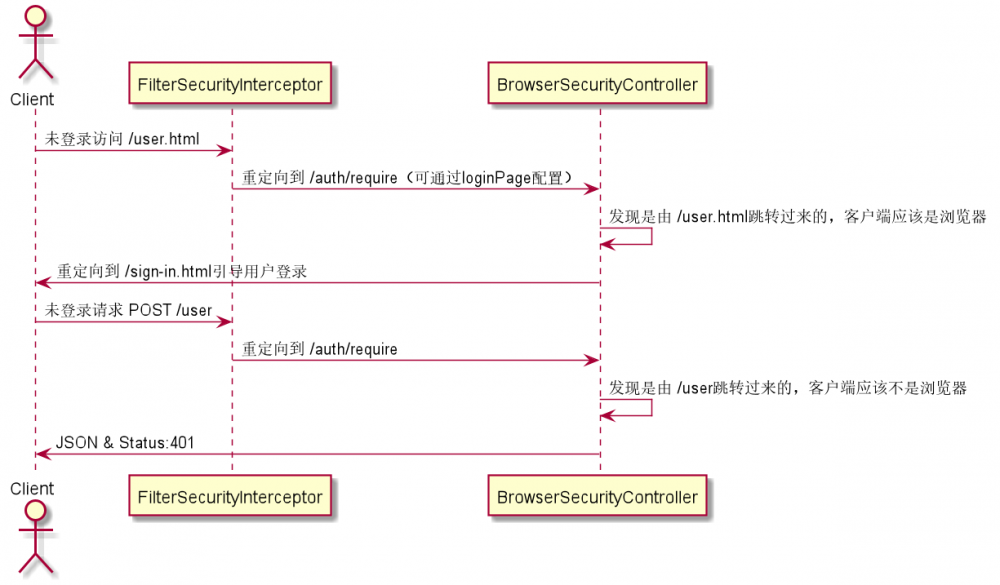
重构——配置代替hardcode
由于我们的 security-browser 模块是作为可复用模块来开发的,应该支持自定义配置,例如其他应用引入我们的 security-browser 模块之后,应该能配置他们自己的登录页,如果他们没有配置那就使用我们默认提供的 sign-in.html ,要想做到这点,我们需要提供一些配置项,例如别人引入我们的 security-browser 之后通过添加 demo.security.browser.loginPage=/login.html 就能将他们项目的 login.html 替换掉我们的 sign-in.html
由于后续 security-app 也可能会需要支持类似的配置,因此我们在 security-core 中定义一个总的配置类来封装各模块的不同配置项
security-core 中的类:
package top.zhenganwen.security.core.properties;

import lombok.Data;
import org.springframework.boot.context.properties.ConfigurationProperties;

/**
 * @author zhenganwen
 * @date 2019/8/23
 * @desc SecurityProperties 封装整个项目各模块的配置项
 */
@Data
@ConfigurationProperties(prefix = "demo.security")
public class SecurityProperties {
    private BrowserProperties browser = new BrowserProperties();
}
复制代码
package top.zhenganwen.security.core.properties;

import lombok.Data;

/**
 * @author zhenganwen
 * @date 2019/8/23
 * @desc BrowserProperties  封装security-browser模块的配置项
 */
@Data
public class BrowserProperties {
    private String loginPage = "/sign-in.html";	//提供一个默认的登录页
}
复制代码
package top.zhenganwen.security.core;

import org.springframework.boot.context.properties.EnableConfigurationProperties;
import org.springframework.context.annotation.Configuration;
import top.zhenganwen.security.core.properties.SecurityProperties;

/**
 * @author zhenganwen
 * @date 2019/8/23
 * @desc SecurityCoreConfig
 */
@Configuration
// 启用在启动时将application.properties中的demo.security前缀的配置项注入到SecurityProperties中
@EnableConfigurationProperties(SecurityProperties.class)
public class SecurityCoreConfig {
}
复制代码
然后在 security-browser 中将 SecurityProperties 注入进来,将重定向到登录页的逻辑依赖配置文件中的 demo.security.browser.loginPage
@RestController
public class BrowserSecurityController {

    private Logger logger = LoggerFactory.getLogger(getClass());
    private RequestCache requestCache = new HttpSessionRequestCache();
    private RedirectStrategy redirectStrategy = new DefaultRedirectStrategy();

    @Autowired
    private SecurityProperties securityProperties;

    @RequestMapping("/auth/require")
    @ResponseStatus(code = HttpStatus.UNAUTHORIZED)
    public SimpleResponseResult requireAuthentication(HttpServletRequest request, HttpServletResponse response) throws IOException {

        SavedRequest savedRequest = requestCache.getRequest(request, response);
        if (savedRequest != null) {
            String redirectUrl = savedRequest.getRedirectUrl();
            logger.info("引发跳转到/auth/login的请求是: {}", redirectUrl);
            if (StringUtils.endsWithIgnoreCase(redirectUrl, ".html")) {
                redirectStrategy.sendRedirect(request, response, securityProperties.getBrowser().getLoginPage());
            }
        }

        return new SimpleResponseResult("用户未登录,请引导用户至登录页");
    }
}
复制代码
将不拦截的登录页URL设置为动态的
@Configuration
public class SecurityBrowserConfig extends WebSecurityConfigurerAdapter {

    @Bean
    public BCryptPasswordEncoder passwordEncoder() {
        return new BCryptPasswordEncoder();
    }

    @Autowired
    private SecurityProperties securityProperties;

    @Override
    protected void configure(HttpSecurity http) throws Exception {
        http
                .formLogin()
                .loginPage("/auth/require").loginProcessingUrl("/auth/login")
                .and()
                .authorizeRequests()
                    .antMatchers("/auth/require").permitAll()
            		// 将不拦截的登录页URL设置为动态的
                    .antMatchers(securityProperties.getBrowser().getLoginPage()).permitAll()
                    .anyRequest().authenticated()
                .and()
                    .csrf().disable();
    }
}
复制代码
现在,我们将 security-demo 模块当做第三方应用,使用可复用的 security-browser
首先,要将 security-demo 模块的启动类 SecurityDemoApplication 移到 top.zhenganwen.securitydemo 包下,确保能够扫描到 security-core 下的 top.zhenganwen.securitydemo.core.SecurityCoreConfig 和 security-browser 下的 top.zhenganwen.securitydemo.browser.SecurityBrowserConfig
然后,在 security-demo 的 application.properties 中添加配置项 demo.security.browser.loginPage=/login.html 并在 resources 下新建 resources 文件夹和其中的 login.html :
<!DOCTYPE html>
<html lang="en">
<head>
    <meta charset="UTF-8">
    <title>Title</title>
</head>
<body>
<h1>Security Demo应用的登录页面</h1>
<form action="/auth/login" method="post">
    用户名: <input type="text" name="username">
    密码: <input type="password" name="password">
    <button type="submit">提交</button>
</form>
</body>
</html>
复制代码
重启服务,访问 /user.html 发现跳转到了 login.html ;注释掉 demo.security.browser.loginPage=/login.html ,再重启服务访问 /user.html 发现跳转到了 sign-in.html ,重构成功!
自定义登录成功处理——AuthenticationSuccessHandler
security 处理登录成功的逻辑默认是重定向到之前被拦截的请求,但是对于REST服务来说,前端可能是AJAX请求登录,希望获取的响应是用户的相关信息,这时你给他重定向显然不合适。要想自定义登录成功后的处理,我们需要实现 AuthenticationSuccessHandler 接口
package top.zhenganwen.securitydemo.browser.config;

import com.fasterxml.jackson.databind.ObjectMapper;
import org.slf4j.Logger;
import org.slf4j.LoggerFactory;
import org.springframework.beans.factory.annotation.Autowired;
import org.springframework.security.core.Authentication;
import org.springframework.security.web.authentication.AuthenticationSuccessHandler;
import org.springframework.stereotype.Component;

import javax.servlet.ServletException;
import javax.servlet.http.HttpServletRequest;
import javax.servlet.http.HttpServletResponse;
import java.io.IOException;

/**
 * @author zhenganwen
 * @date 2019/8/24
 * @desc CustomAuthenticationSuccessHandler
 */
@Component("customAuthenticationSuccessHandler")
public class CustomAuthenticationSuccessHandler implements AuthenticationSuccessHandler {

    private Logger logger = LoggerFactory.getLogger(getClass());

    @Autowired
    private ObjectMapper objectMapper;

    @Override
    public void onAuthenticationSuccess(HttpServletRequest request, HttpServletResponse response, Authentication authentication) throws IOException
            , ServletException {
        logger.info("用户{}登录成功", authentication.getName());
        response.setContentType("application/json;charset=utf-8");
        response.getWriter().write(objectMapper.writeValueAsString(authentication));
        response.getWriter().flush();
    }
}
复制代码
在登录成功后,我们会拿到一个 Authentication ,这也是 security 的一个核心接口,作用是封装用户的相关信息,这里我们将其转成JSON串响应给前端看一下它包含了哪些内容
我们还需要通过 successHandler() 将其配置到 HttpSecurity 中以使之生效(替代默认的登录成功处理逻辑):
@Configuration
public class SecurityBrowserConfig extends WebSecurityConfigurerAdapter {

    @Bean
    public BCryptPasswordEncoder passwordEncoder() {
        return new BCryptPasswordEncoder();
    }

    @Autowired
    private SecurityProperties securityProperties;

    @Autowired
    private AuthenticationSuccessHandler customAuthenticationSuccessHandler;

    @Override
    protected void configure(HttpSecurity http) throws Exception {
        http
                .formLogin()
                .loginPage("/auth/require").loginProcessingUrl("/auth/login")
                .successHandler(customAuthenticationSuccessHandler)
                .and()
                .authorizeRequests()
                    .antMatchers("/auth/require").permitAll()
                    .antMatchers(securityProperties.getBrowser().getLoginPage()).permitAll()
                    .anyRequest().authenticated()
                .and()
                .csrf().disable();
    }
}
复制代码
重启服务,访问 /login.html 并登录:
{
    authorities: [
        {
            authority: "admin"
        },
        {
            authority: "user"
        }
    ],
    details: {
        remoteAddress: "0:0:0:0:0:0:0:1",
        sessionId: "3BA37577BAC493D0FE1E07192B5524B1"
    },
    authenticated: true,
    principal: {
        password: null,
        username: "admin",
        authorities: [
            {
                authority: "admin"
            },
            {
                authority: "user"
            }
        ],
        accountNonExpired: true,
        accountNonLocked: true,
        credentialsNonExpired: true,
        enabled: true
    },
    credentials: null,
    name: "admin"
}
复制代码
可以发现 Authentication 包含了以下信息
-
authorities,权限,对应UserDetials中getAuthorities()的返回结果 -
details,回话,客户端的IP以及本次回话的SESSIONID -
authenticated,是否通过认证 -
principle,对应UserDetailsService中loadUserByUsername返回的UserDetails -
credentials,密码,security默认做了处理,不将密码返回给前端 -
name,用户名
这里因为我们是表单登录,所以返回的是以上信息,之后我们做第三方登录如微信、QQ,那么 Authentication 包含的信息就可能不一样了,也就是说重写的 onAuthenticationSuccess 方法的入参 Authentication 会根据登录方式的不同传给我们不同的 Authentication 实现类对象
自定义登录失败处理——AuthenticationFailureHandler
与登录成功处理对应,自然也可以自定义登录失败处理
package top.zhenganwen.securitydemo.browser.config;

import com.fasterxml.jackson.databind.ObjectMapper;
import org.slf4j.Logger;
import org.slf4j.LoggerFactory;
import org.springframework.beans.factory.annotation.Autowired;
import org.springframework.security.core.AuthenticationException;
import org.springframework.security.web.authentication.AuthenticationFailureHandler;
import org.springframework.stereotype.Component;

import javax.servlet.ServletException;
import javax.servlet.http.HttpServletRequest;
import javax.servlet.http.HttpServletResponse;
import java.io.IOException;

/**
 * @author zhenganwen
 * @date 2019/8/24
 * @desc CustomAuthenticationFailureHandler
 */
@Component("customAuthenticationFailureHandler")
public class CustomAuthenticationFailureHandler implements AuthenticationFailureHandler {

    private Logger logger = LoggerFactory.getLogger(getClass());

    @Autowired
    private ObjectMapper objectMapper;

    @Override
    public void onAuthenticationFailure(HttpServletRequest request, HttpServletResponse response, AuthenticationException exception) throws IOException, ServletException {
        logger.info("登录失败=>{}", exception.getMessage());
        response.setContentType("application/json;charset=utf-8");
        response.getWriter().write(objectMapper.writeValueAsString(exception));
        response.getWriter().flush();
    }
}
复制代码
@Configuration
public class SecurityBrowserConfig extends WebSecurityConfigurerAdapter {

    @Bean
    public BCryptPasswordEncoder passwordEncoder() {
        return new BCryptPasswordEncoder();
    }

    @Autowired
    private SecurityProperties securityProperties;

    @Autowired
    private AuthenticationSuccessHandler customAuthenticationSuccessHandler;

    @Autowired
    private AuthenticationFailureHandler customAuthenticationFailureHandler;

    @Override
    protected void configure(HttpSecurity http) throws Exception {
        http
                .formLogin()
                    .loginPage("/auth/require")
                    .loginProcessingUrl("/auth/login")
                    .successHandler(customAuthenticationSuccessHandler)
                    .failureHandler(customAuthenticationFailureHandler)
                .and()
                .authorizeRequests()
                    .antMatchers("/auth/require").permitAll()
                    .antMatchers(securityProperties.getBrowser().getLoginPage()).permitAll()
                    .anyRequest().authenticated()
                .and()
                .csrf().disable();
    }
}
复制代码
访问 /login.html 输入错误的密码登录:
{
    cause: null,
    stackTrace: [...],
    localizedMessage: "坏的凭证",
    message: "坏的凭证",
    suppressed: [ ]
}
复制代码
重构
为了使 security-browser 成为可复用的模块,我们应该将登录成功/失败处理策略抽离出去,让第三方应用自由选择,这时我们又可以新增一个配置项 demo.security.browser.loginProcessType
切换到 security-core :
package top.zhenganwen.security.core.properties;

/**
 * @author zhenganwen
 * @date 2019/8/24
 * @desc LoginProcessTypeEnum
 */
public enum LoginProcessTypeEnum {
	// 重定向到之前的请求页或登录失败页
    REDIRECT("redirect"),
    // 登录成功返回用户信息,登录失败返回错误信息
    JSON("json");

    private String type;

    LoginProcessTypeEnum(String type) {
        this.type = type;
    }
}
复制代码
@Data
public class BrowserProperties {
    private String loginPage = "/sign-in.html";
    private LoginProcessTypeEnum loginProcessType = LoginProcessTypeEnum.JSON;    //默认返回JSON信息
}
复制代码
重构登录成功/失败处理器,其中 SavedRequestAwareAuthenticationSuccessHandler 和 SimpleUrlAuthenticationFailureHandler 就是 security 提供的默认的登录成功(跳转到登录之前请求的页面)和登录失败(跳转到异常页)的处理器
package top.zhenganwen.securitydemo.browser.config;

import com.fasterxml.jackson.databind.ObjectMapper;
import org.slf4j.Logger;
import org.slf4j.LoggerFactory;
import org.springframework.beans.factory.annotation.Autowired;
import org.springframework.security.core.Authentication;
import org.springframework.security.web.authentication.SavedRequestAwareAuthenticationSuccessHandler;
import org.springframework.stereotype.Component;
import top.zhenganwen.security.core.properties.LoginProcessTypeEnum;
import top.zhenganwen.security.core.properties.SecurityProperties;

import javax.servlet.ServletException;
import javax.servlet.http.HttpServletRequest;
import javax.servlet.http.HttpServletResponse;
import java.io.IOException;

/**
 * @author zhenganwen
 * @date 2019/8/24
 * @desc CustomAuthenticationSuccessHandler
 */
@Component("customAuthenticationSuccessHandler")
public class CustomAuthenticationSuccessHandler extends SavedRequestAwareAuthenticationSuccessHandler {

    private Logger logger = LoggerFactory.getLogger(getClass());

    @Autowired
    private ObjectMapper objectMapper;

    @Autowired
    private SecurityProperties securityProperties;

    @Override
    public void onAuthenticationSuccess(HttpServletRequest request, HttpServletResponse response, Authentication authentication) throws IOException
            , ServletException {
        if (securityProperties.getBrowser().getLoginProcessType() == LoginProcessTypeEnum.REDIRECT) {
            // 重定向到缓存在session中的登录前请求的URL
            super.onAuthenticationSuccess(request, response, authentication);
            return;
        }
        logger.info("用户{}登录成功", authentication.getName());
        response.setContentType("application/json;charset=utf-8");
        response.getWriter().write(objectMapper.writeValueAsString(authentication));
        response.getWriter().flush();
    }
}
复制代码
package top.zhenganwen.securitydemo.browser.config;

import com.fasterxml.jackson.databind.ObjectMapper;
import org.slf4j.Logger;
import org.slf4j.LoggerFactory;
import org.springframework.beans.factory.annotation.Autowired;
import org.springframework.security.core.AuthenticationException;
import org.springframework.security.web.authentication.SimpleUrlAuthenticationFailureHandler;
import org.springframework.stereotype.Component;
import top.zhenganwen.security.core.properties.LoginProcessTypeEnum;
import top.zhenganwen.security.core.properties.SecurityProperties;

import javax.servlet.ServletException;
import javax.servlet.http.HttpServletRequest;
import javax.servlet.http.HttpServletResponse;
import java.io.IOException;

/**
 * @author zhenganwen
 * @date 2019/8/24
 * @desc CustomAuthenticationFailureHandler
 */
@Component("customAuthenticationFailureHandler")
public class CustomAuthenticationFailureHandler extends SimpleUrlAuthenticationFailureHandler {

    private Logger logger = LoggerFactory.getLogger(getClass());

    @Autowired
    private ObjectMapper objectMapper;

    @Autowired
    private SecurityProperties securityProperties;

    @Override
    public void onAuthenticationFailure(HttpServletRequest request, HttpServletResponse response, AuthenticationException exception) throws IOException, ServletException {
        if (securityProperties.getBrowser().getLoginProcessType() == LoginProcessTypeEnum.REDIRECT) {
            super.onAuthenticationFailure(request, response, exception);
            return;
        }
        logger.info("登录失败=>{}", exception.getMessage());
        response.setContentType("application/json;charset=utf-8");
        response.getWriter().write(objectMapper.writeValueAsString(exception));
        response.getWriter().flush();
    }
}
复制代码
访问 /login.html ,分别进行登录成功和登录失败测试,返回JSON响应
在 security-demo 中
-
application.properties中添加demo.security.browser.loginProcessType=redirect -
新建
/resources/resources/index.html<!DOCTYPE html> <html lang="en"> <head> <meta charset="UTF-8"> <title>Title</title> </head> <body> <h1>Spring Demo应用首页</h1> </body> </html> 复制代码 -
新建
/resources/resources/401.html<!DOCTYPE html> <html lang="en"> <head> <meta charset="UTF-8"> <title>Title</title> </head> <body> <h1>login fail!</h1> </body> </html> 复制代码
重启服务,登录成功跳转到 index.html ,登录失败跳转到 401.html
认证流程源码级详解
经过上述两节,我们已经会使用 security 的一些基础功能了,但都是碎片化的,对整体流程的把握还很模糊。知其然还要知其所以然,我们需要分析在登录时 security 都帮我们做了哪些事
认证处理流程
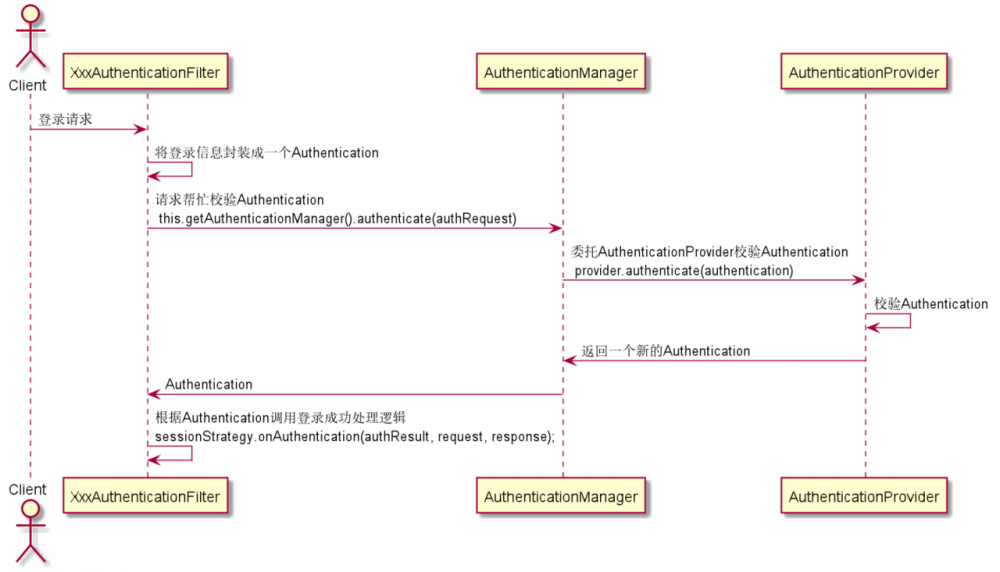
上图是登录处理的大致流程,登录请求的过滤器 XxxAutenticationFilter 在拦截到登录请求后会见登录信息封装成一个 authenticated=false 的 Authentication 传给 AuthenticationManager 让帮忙校验, AuthenticationManager 本身也不会做校验逻辑,会委托 AuthenticationProvider 帮忙校验, AuthenticationProvider 会在校验过程中抛出校验失败异常或校验通过返回一个新的带有 UserDetials 的 Authentication 返回,请求过滤器收到 XxxAuthenticationFilter 之后会调用登录成功处理器执行登录成功逻辑
我们以用户名密码表单登录方式来断点调试逐步分析一下校验流程,其他的登录方式也就大同小异了

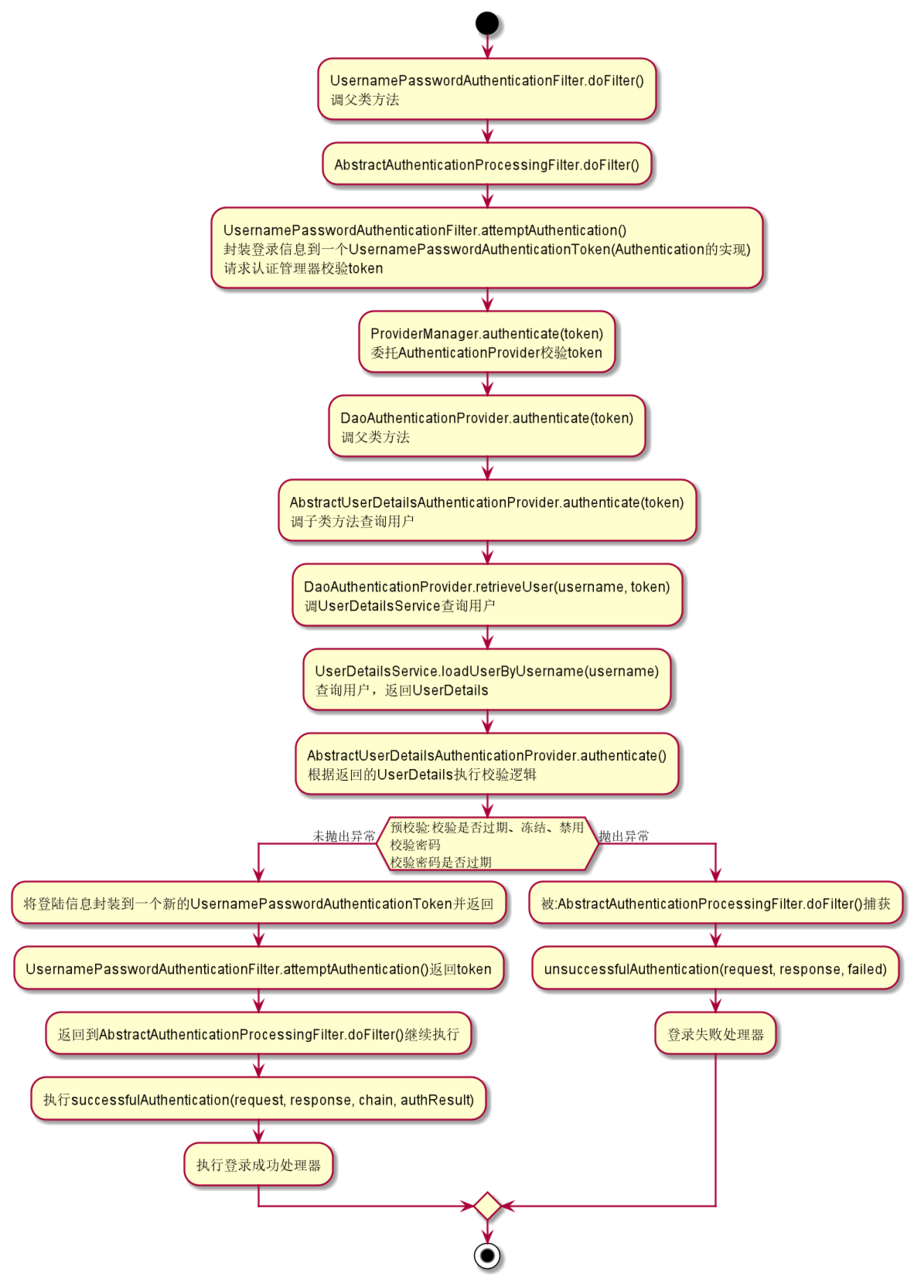
认证结果如何在多个请求之间共享
要想在多个请求之间共享数据,需要借助 session ,接下来我们看一下 security 将什么东西放到了 session 中,又在什么时候会从 session 读取
上节说道在 AbstractAuthenticationProcessingFilter 的``doFilter 方法中,校验成功之后会调用 successfulAuthentication(request, response, chain, authResult)`,我们来看一下这个方法干了些什么
protected void successfulAuthentication(HttpServletRequest request,
                                        HttpServletResponse response, FilterChain chain, Authentication authResult)
    throws IOException, ServletException {

    if (logger.isDebugEnabled()) {
        logger.debug("Authentication success. Updating SecurityContextHolder to contain: "
                     + authResult);
    }

    SecurityContextHolder.getContext().setAuthentication(authResult);
	...
    successHandler.onAuthenticationSuccess(request, response, authResult);
}
复制代码
可以发现,在调用登录成功处理器的处理逻辑之前,调用了一下 SecurityContextHolder.getContext().setAuthentication(authResult) ,查看可知 SecurityContextHolder.getContext() 就是获取当前线程绑定的 SecurityContext (可以看做是一个线程变量,作用域为线程的生命周期),而 SecurityContext 其实就是对 Authentication 的一层包装
public class SecurityContextHolder {
	private static SecurityContextHolderStrategy strategy;
	public static SecurityContext getContext() {
		return strategy.getContext();
	}
}
复制代码
final class ThreadLocalSecurityContextHolderStrategy implements SecurityContextHolderStrategy {
    private static final ThreadLocal<SecurityContext> contextHolder = new ThreadLocal<SecurityContext>();
	public SecurityContext getContext() {
		SecurityContext ctx = contextHolder.get();
		if (ctx == null) {
			ctx = createEmptyContext();
			contextHolder.set(ctx);
		}
		return ctx;
	}
}
复制代码
public interface SecurityContext extends Serializable {
	Authentication getAuthentication();
	void setAuthentication(Authentication authentication);
}
复制代码
public class SecurityContextImpl implements SecurityContext {

	private static final long serialVersionUID = SpringSecurityCoreVersion.SERIAL_VERSION_UID;

	public Authentication getAuthentication() {
		return authentication;
	}

	public int hashCode() {
		if (this.authentication == null) {
			return -1;
		}
		else {
			return this.authentication.hashCode();
		}
	}

	public void setAuthentication(Authentication authentication) {
		this.authentication = authentication;
	}

	...
}
复制代码
那么将 Authentication 保存到当前线程的 SecurityContext 中的用意是什么呢?
这就涉及到了另外一个特别的过滤器 SecurityContextPersistenceFilter ,它位于 security 的整个过滤器链的最前端:
private SecurityContextRepository repo;
// 请求到达的第一个过滤器
public void doFilter(ServletRequest req, ServletResponse res, FilterChain chain)
    throws IOException, ServletException {

    ...

    HttpRequestResponseHolder holder = new HttpRequestResponseHolder(request,response);
    // 从Session中获取SecurityContext,未登录时获取的则是空
    SecurityContext contextBeforeChainExecution = repo.loadContext(holder);

    try {
        // 将SecurityContext保存到当前线程的ThreadLocalMap中
        SecurityContextHolder.setContext(contextBeforeChainExecution);
	   // 执行后续过滤器和Controller方法
        chain.doFilter(holder.getRequest(), holder.getResponse());

    }
    // 在请求响应时经过的最后一个过滤器
    finally {
        // 从当前线程获取SecurityContext
        SecurityContext contextAfterChainExecution = SecurityContextHolder.getContext();
        SecurityContextHolder.clearContext();
        // 将SecurityContext持久化到Session
        repo.saveContext(contextAfterChainExecution, holder.getRequest(),holder.getResponse());
        ...
    }
}
复制代码
public class HttpSessionSecurityContextRepository implements SecurityContextRepository {
	...
	public SecurityContext loadContext(HttpRequestResponseHolder requestResponseHolder) {
		HttpServletRequest request = requestResponseHolder.getRequest();
		HttpServletResponse response = requestResponseHolder.getResponse();
		HttpSession httpSession = request.getSession(false);

		SecurityContext context = readSecurityContextFromSession(httpSession);
		...
		return context;
	}
    ...
}
复制代码
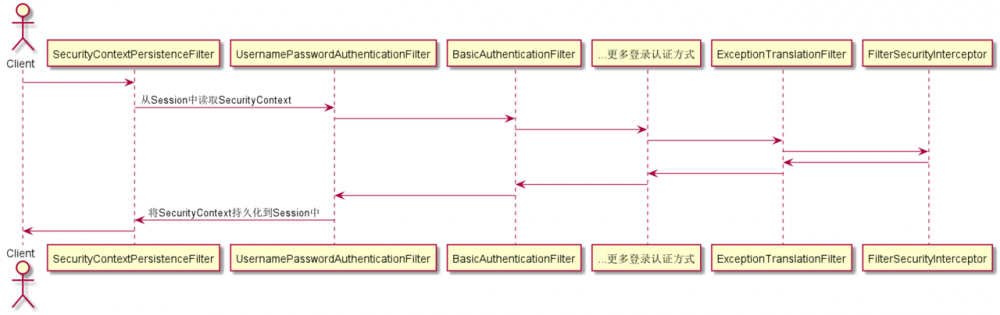
获取认证用户信息
在我们的代码中可以通过静态方法 SecurityContextHolder.getContext().getAuthentication 来获取用户信息,或者可以直接在 Controller 入参声明 Authentication , security 会帮我们自动注入,如果只想获取 Authentication 中的 UserDetails 对应的部分,则可使用 @AuthenticationPrinciple UserDetails currentUser
@GetMapping("/info1")
public Object info1() {
    return SecurityContextHolder.getContext().getAuthentication();
}
@GetMapping("/info2")
public Object info2(Authentication authentication) {
    return authentication;
}
复制代码
GET /user/info1
{
    authorities: [
        {
            authority: "admin"
        },
        {
            authority: "user"
        }
    ],
    details: {
        remoteAddress: "0:0:0:0:0:0:0:1",
        sessionId: "24AE70712BB99A969A5C56907C39C20E"
    },
    authenticated: true,
    principal: {
        password: null,
        username: "admin",
        authorities: [
            {
                authority: "admin"
            },
            {
                authority: "user"
            }
        ],
        accountNonExpired: true,
        accountNonLocked: true,
        credentialsNonExpired: true,
        enabled: true
    },
    credentials: null,
    name: "admin"
}
复制代码
@GetMapping("/info3")
public Object info3(@AuthenticationPrincipal UserDetails currentUser) {
    return currentUser;
}
复制代码
GET /user/info3
{
    password: null,
    username: "admin",
    authorities: [
        {
            authority: "admin"
        },
        {
            authority: "user"
        }
    ],
    accountNonExpired: true,
    accountNonLocked: true,
    credentialsNonExpired: true,
    enabled: true
}
复制代码
正文到此结束
- 本文标签: executor 注释 部署 dataSource id Select rmi http 数据库 queue 调试 LinkedList SpringMVC ssl ORM 多线程 stream 总结 端口 AOP App entity struct springboot XML update ACE 安全 处理器 IDE JDBC 分页 源码 cache 时间 rand 企业 pom 服务端 DOM 目录 W3C tar UI session BeanUtils 服务器 message bean FIT junit final cmd Collection CTO src ip validator Collections ssh Word 集群 Security redis synchronized REST classpath 自动生成 需求 CST Ajax maven 希望 Document 云 ask js 配置 HashMap list root 线程池 Service API 微服务 开发 tab IO CEO client tomcat 分布式 json java 生命 cat Persistence 数据 静态方法 插件 测试 plugin 代码 加密 同步 db MQ 解析 mysql DDL https map token value web 订单处理 Action RESTful zab dependencies authenticate NIO 设计模式 2019 build servlet Spring Security 实例 spring 删除 线程 Transport 黑客 equals 文件上传 编译 mapper GitHub 并发 provider remote FastDFS HTML core git bug key apache 下载 sql Property 管理 缓存 参数 认证
- 版权声明: 本文为互联网转载文章,出处已在文章中说明(部分除外)。如果侵权,请联系本站长删除,谢谢。
- 本文海报: 生成海报一 生成海报二
热门推荐


相关文章

近期评论
-
谢谢
-
https://www.newcmy.com/register?aff=HBVX建议您试试草莓云机场,可以流畅观看youtube和tiktok,上reddit/x也没有问题,还有各种ai优化节点。
-
-
-
想购买您这个站,我的联系方式QQ741756694微信同步 能卖联系
-
-
-
-
-
https://www.liuhaihua.cn/archives/40657.html 这篇博客中的图片打不开了
Loading...
![[HBLOG]公众号](https://www.liuhaihua.cn/img/qrcode_gzh.jpg)

