SpringMVC 学习笔记
一、MVC 模式
MVC: Model-View-Controller(模型-视图-控制器) 模式。这种模式用于应用程序的分层开发。
model(模型):用于存储数据及用户请求的业务逻辑;
view(视图):向控制器提交数据;显示模型中的数据;
Controller(控制器):根据视图层的请求判断交给哪个模型处理、处理后的结果交给哪个视图显示。

(图片来源:菜鸟教程)
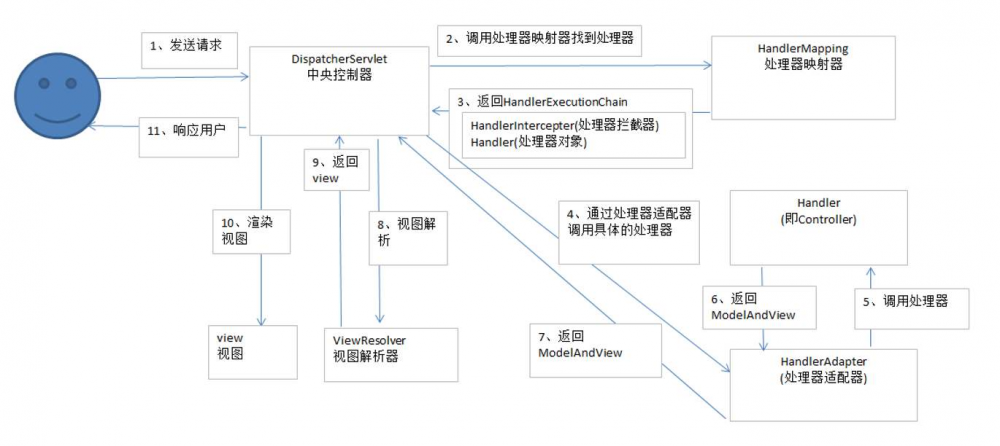
二、spring MVC 的工作流程
三、示例
先新建项目,用maven导入依赖。然后在web.xml文件中进行配置,部署DispatcherServlet(前端控制器)
<!DOCTYPE web-app PUBLIC
 "-//Sun Microsystems, Inc.//DTD Web Application 2.3//EN"
 "http://java.sun.com/dtd/web-app_2_3.dtd" >

<web-app xmlns="http://java.sun.com/xml/ns/javaee"
         xmlns:xsi="http://www.w3.org/2001/XMLSchema-instance"
         xsi:schemaLocation="http://java.sun.com/xml/ns/javaee
          http://java.sun.com/xml/ns/javaee/web-app_3_0.xsd"
         version="3.0">

   <display-name>Archetype Created Web Application</display-name>

    <!-- 前端控制器 -->
    <servlet>
        <servlet-name>dispatcherServlet</servlet-name>
        <servlet-class>org.springframework.web.servlet.DispatcherServlet</servlet-class>
        <!-- 加载 springmvc 配置文件 -->
        <init-param>
            <param-name>contextConfigLocation</param-name>
            <param-value>classpath:springmvc.xml</param-value>
        </init-param>
        <load-on-startup>1</load-on-startup>
    </servlet>
    <servlet-mapping>
        <servlet-name>dispatcherServlet</servlet-name>
        <url-pattern>/</url-pattern>
    </servlet-mapping>

    <!-- 解决中文乱码问题 -->
    <filter>
        <filter-name>characterEncodingFilter</filter-name>
        <filter-class>org.springframework.web.filter.CharacterEncodingFilter</filter-class>
        <init-param>
            <param-name>encoding</param-name>
            <param-value>UTF-8</param-value>
        </init-param>
    </filter>
    <filter-mapping>
        <filter-name>characterEncodingFilter</filter-name>
        <url-pattern>/*</url-pattern>
    </filter-mapping>
</web-app>
由于需要加载springmvc.xml文件,因此在 resources 文件夹中新建该文件,并进行配置
<?xml version="1.0" encoding="UTF-8"?>
<beans xmlns="http://www.springframework.org/schema/beans"
       xmlns:mvc="http://www.springframework.org/schema/mvc" xmlns:context="http://www.springframework.org/schema/context"
       xmlns:xsi="http://www.w3.org/2001/XMLSchema-instance"
       xsi:schemaLocation="
        http://www.springframework.org/schema/beans
        http://www.springframework.org/schema/beans/spring-beans.xsd
        http://www.springframework.org/schema/mvc
        http://www.springframework.org/schema/mvc/spring-mvc.xsd
        http://www.springframework.org/schema/context
        http://www.springframework.org/schema/context/spring-context.xsd">

  <!-- 开启注解扫描,扫描 Controller -->
    <context:component-scan base-package="com.max.ssm.controller">
        <context:include-filter type="annotation" expression="org.springframework.stereotype.Controller"/>
    </context:component-scan>

    <!-- 配置视图解析器对象 -->
    <bean id="internalResourceViewResolver" class="org.springframework.web.servlet.view.InternalResourceViewResolver">
     <!-- 前缀 -->
        <property name="prefix" value="/WEB-INF/pages/"/>
     <!-- 后缀 -->
        <property name="suffix" value=".jsp"/>
    </bean>

    <!-- 过滤静态文件
    <mvc:resources mapping="/css/" location="/css/**"/>
    <mvc:resources mapping="/image/" location="/image/**"/>
    <mvc:resources mapping="/js/" location="/js/**"/>

    -->
    <!-- 开启SpringMVC注解的支持 -->
    <mvc:annotation-driven />

</beans>
配置文件都写好后,由于视图解析器对象中设置了前后缀,因此在 WEB-INF 目录下创建 pages文件夹,然后写 index.jsp 文件
<%@ page contentType="text/html;charset=UTF-8" language="java" %>
<html>
<head>
    <title>Title</title>
</head>
<body>
    <a href="account/findAll">Click to other page</a>
</body>
</html>
超链接的路径有了,需要创建 Controller 文件
package com.max.ssm.controller;

import org.springframework.stereotype.Controller;
import org.springframework.web.bind.annotation.RequestMapping;
// @xxx 是Spring的注解,其中 RequestMapping 是映射器,与超链接路径一致
@Controller
@RequestMapping("/account")
public class AccountController {
    @RequestMapping("/findAll")
    public String findAll(){
        System.out.println("Find all the accounts");
        return "list";
    }
}
点击连接返回一个字符串“list”,需要一个新页面 list.jsp,文件名与返回值一致
<%@ page contentType="text/html;charset=UTF-8" language="java" %>
<html>
<head>
    <title>Title</title>
</head>
<body>
    What' s up?
</body>
</html>
这只是一个笔记而已,写得不详细,只是希望偶尔翻一翻把流程过一下当作复习。
正文到此结束
热门推荐


相关文章


Loading...
![[HBLOG]公众号](https://www.liuhaihua.cn/img/qrcode_gzh.jpg)

