spring cloud 2.x版本 Sleuth+Zipkin分布式链路追踪补充内容(rabbitmq日志收集)

前言
本文采用Spring cloud本文为2.1.8RELEASE,version=Greenwich.SR3
本文基于前两篇文章eureka-server、eureka-client、eureka-ribbon和spring-gateway的实现。
参考
- eureka-server
- eureka-client
- eureka-ribbon
- spring-gateway
概述
前一篇文章讲述了Sleuth链路追踪的http的日志收集的搭建过程,这篇文章补充一下rabbitmq日志收集机制的搭建过程。
http方式存在的问题,如果应用服务与zipkin服务端网络不通或者闪断的情况下,这种情况是无法正常收集的,而且zipkin默认是将数据存储在内存当中的,如果服务端重启或者宕机,数据就会丢失。
rabbitmq的方式完美的解决了这种问题(用消息中间件的好处我这里就不过多阐述)。
1. 对原有应用进行改造
1.1 增加pom依赖
在eureka-client、eureka-ribbon、spring-gateway对应的pom.xml增加如下依赖:
<dependency>
    <groupId>org.springframework.amqp</groupId>
    <artifactId>spring-rabbit</artifactId>
</dependency>
说明:
最新官网已经不推荐使用 spring-cloud-sleuth-stream ,而推荐使用 spring-rabbit 。
- 引用官网原文:
spring-cloud-sleuth-stream is deprecated and incompatible with these destinations.
1.2 修改application.yml文件
修改eureka-client、eureka-ribbon、spring-gateway应用对应的application.yml配置文件,参考如下配置:
spring:
  sleuth:
    sampler:
      probability: 1
    web:
      enabled: true
  zipkin:
    sender:
      type: rabbit
  rabbitmq:
    host: localhost
    port: 5672
    username: guest
    password: guest
要删除http方式的 zipkin.base-url: http://localhost:9411/ 配置。
1.3 启动服务
启动rabbitmq和zipkin服务,这里需要说明的是,启动zipkin服务输入如下命令启动:
-
-
$ java -jar zipkin.jar --zipkin.collector.rabbitmq.addresses=localhost,
-
默认guest账户。
-
-
$ java -jar zipkin.jar --zipkin.collector.rabbitmq.addresses=localhost --zipkin.collector.rabbitmq.username=xxx --zipkin.collector.rabbitmq.password=xxx,启动自定义用户名和密码。
-
然后顺序启动eureka-client、eureka-ribbon、spring-gateway应用服务。
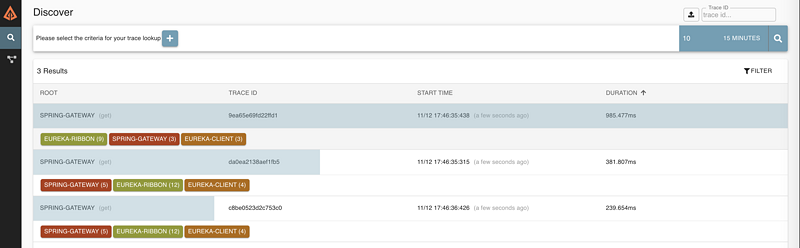
访问 http://localhost:8100/ribbon/sayHello , 可以多刷新几次,然后我们可以访问 http://localhost:9411/zipkin ,点击查询可以到和http方式相同的结果,如下图所示:
这时候我们访问rabbitmq的后台管理地址: http://localhost:15672 , 可以在管理页面中的Queues中看到如下显示:
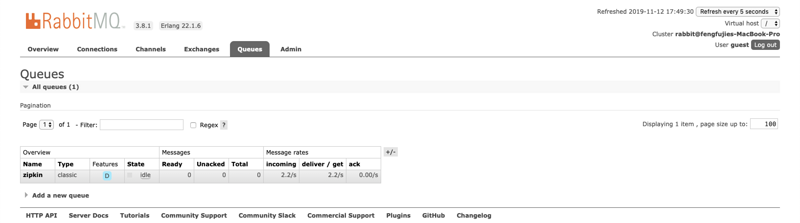 ,说明zipkin服务帮我创建了一个名称为zipkin的Queues。而Exchanges则默认使用的是
 AMQP default ,如下图所示:
、
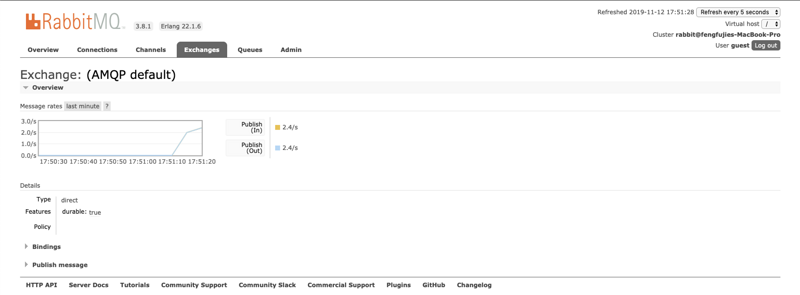
至此,Sleuth+ZipKin的rabbitmq的方式收集就搭建完成。
1.4 小结
Spring cloud Sleuth分布式链路追踪不仅支持rabbitmq,还支持kafaka,实现过程和rabbitmq完全相同,只有修改对应的依赖包和配置就可以了,这里就不在演示。
代码地址
gitHub地址
<center><font color=red>《Srping Cloud 2.X小白教程》目录</font></center>
- spring cloud 2.x版本 Eureka Server服务注册中心教程
- spring cloud 2.x版本 Eureka Client服务提供者教程
- spring cloud 2.x版本 Ribbon服务发现教程(内含集成Hystrix熔断机制)
- spring cloud 2.x版本 Feign服务发现教程(内含集成Hystrix熔断机制)
- spring cloud 2.x版本 Zuul路由网关教程
- spring cloud 2.x版本 config分布式配置中心教程
- spring cloud 2.x版本 Hystrix Dashboard断路器教程
- spring cloud 2.x版本 Gateway路由网关教程
- spring cloud 2.x版本 Gateway自定义过滤器教程
- spring cloud 2.x版本 Gateway熔断、限流教程
- spring cloud 2.x版本 Gateway动态路由教程
- spring cloud 2.x版本 Sleuth+Zipkin分布式链路追踪
- spring cloud 2.x版本 Sleuth+Zipkin分布式链路追踪补充内容(rabbitmq日志收集)
- 写作不易,转载请注明出处,喜欢的小伙伴可以关注公众号查看更多喜欢的文章。
- 联系方式:4272231@163.com

正文到此结束
- 本文标签: pom ribbon Dashboard 管理 http 目录 分布式 配置中心 stream App queue web Spring cloud 数据 注册中心 src id https 路由网关 限流 CTO 文章 zip Hystrix UI Spring Cloud Sleuth client 服务端 git zuul 服务注册 代码 Word java rabbitmq 配置 Sleuth Eureka MQ ip Feign Hystrix Dashboard GitHub 删除 spring zipkin cat amqp XML IO
- 版权声明: 本文为互联网转载文章,出处已在文章中说明(部分除外)。如果侵权,请联系本站长删除,谢谢。
- 本文海报: 生成海报一 生成海报二
热门推荐


相关文章

近期评论
-
ws0132613@gmail.comhttps://getmacos.com/gopanel/william smith
-
谢谢
-
https://www.newcmy.com/register?aff=HBVX建议您试试草莓云机场,可以流畅观看youtube和tiktok,上reddit/x也没有问题,还有各种ai优化节点。
-
-
-
想购买您这个站,我的联系方式QQ741756694微信同步 能卖联系
-
-
-
-
Loading...
![[HBLOG]公众号](https://www.liuhaihua.cn/img/qrcode_gzh.jpg)

