ElasticSearch7安装与SpringBoot集成
- 前往 官网下载 ,下载后直接解压
注:
1.当前的版本是7.5.1,后面安装的插件会依赖es的版本,也可根据需要指定版本
2.es推荐安装在docker中,为演示方便,直接使用了windows版本
- 进入解压目录elasticsearch-7.5.1,进入bin目录,双击elasticsearch.bat即可启动
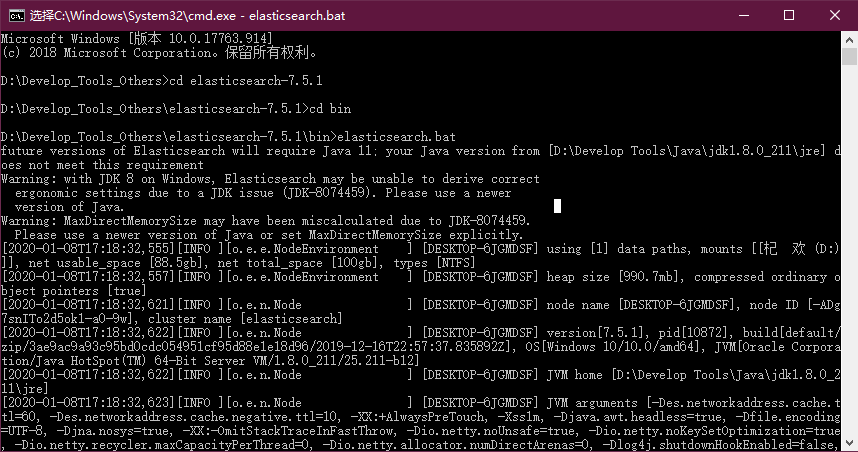
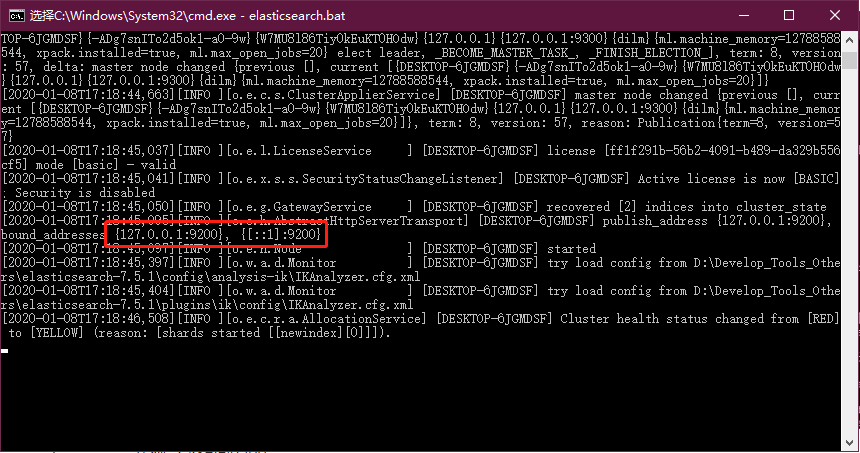
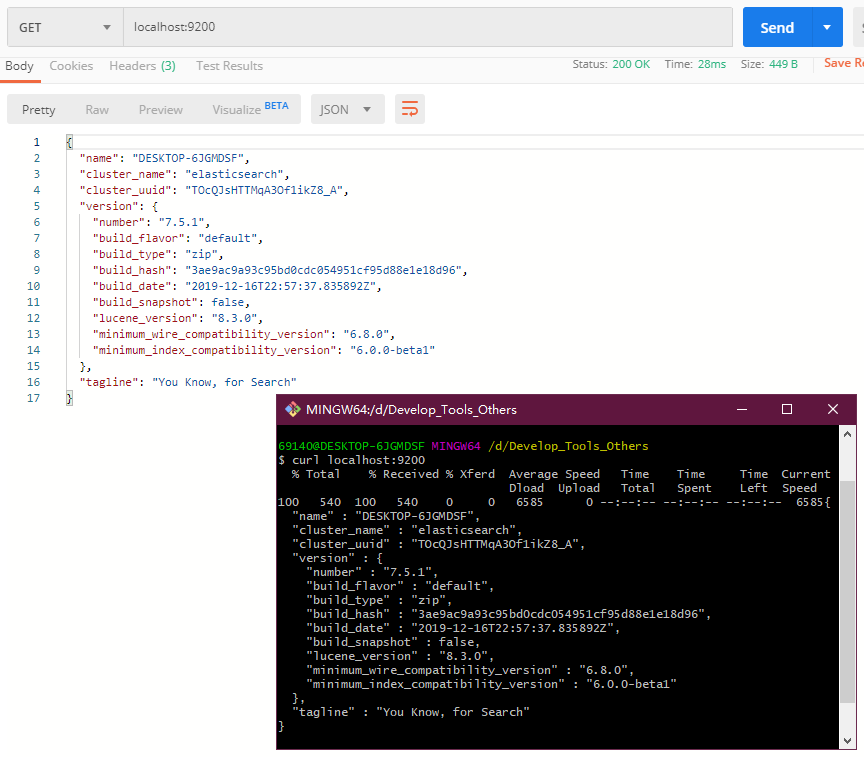
- 验证启动成功,直接在浏览器访问9200端口即可

- 或者其他工具访问一下
常用指令
启动成功后,通过postman就可以向es执行操作命令
1.添加或更新索引及其文档
方法一(推荐):PUT /{索引}/{文档}/{id}, id为必传,若没有该id则插入数据,已有id则更新数据(若只传入索引,则创建索引)
方法二:POST /{索引}/{文档}/{id}, id可省略,如不传则由es生成

2.获取所有文档
GET /{索引}/{文档}/_search
如: http://127.0.0.1:9200/newindex/newdoc/_search
3.获取指定id文档
GET /{索引}/{文档}/{id}
如: http://127.0.0.1:9200/newindex/newdoc/1
4.模糊查询
GET /{索引}/{文档}/_search?q=*关键词*
如: http://127.0.0.1:9200/newindex/newdoc/_search?q=*王*
5.删除文档
DELETE /{索引}/{文档}/{id}
如: http://127.0.0.1:9200/newindex/newdoc/1
更多语句可参考 官网
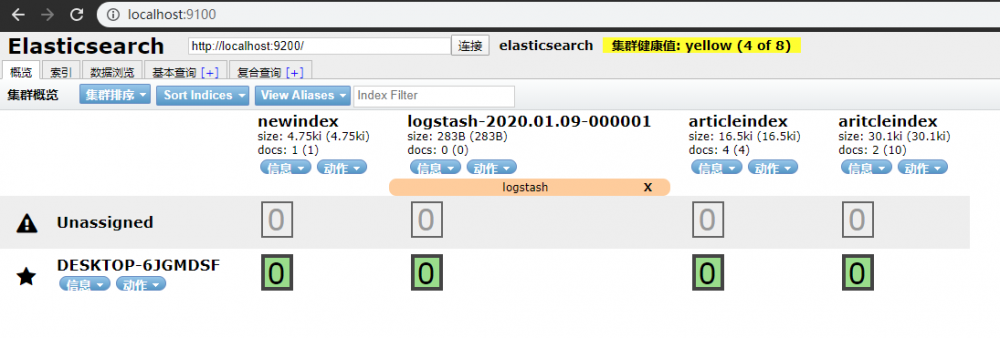
可视化工具
- 安装ElasticSearch-Head,下载源码
git clone https://github.com/mobz/elasticsearch-head.git
复制代码
- 全局安装grunt项目构建工具
npm install -g grunt-cli
复制代码
- 安装依赖
cd elasticsearch-head/
npm install
复制代码
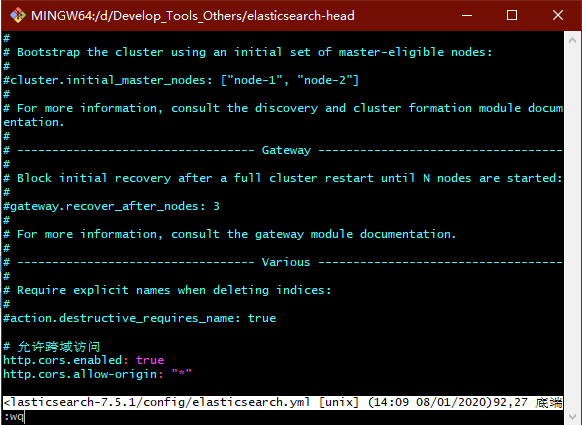
- 修改elasticsearch配置文件
vim ../elasticsearch-7.5.1/config/elasticsearch.yml
复制代码
- 追加跨域访问的配置,添加末尾即可
http.cors.enabled: true
http.cors.allow-origin: "*"
复制代码
- 启动ElasticSearch-Head
cd -	// 返回head根目录
grunt server
复制代码
- 浏览器访问查看:localhost:9100
IK分词器
下载
-
github下载 与或 直接下载压缩包 ,我选择了第二种
-
解压后,将解压的文件夹拷贝到elasticsearch-7.5.1/plugins目录下,文件夹重名为ik
-
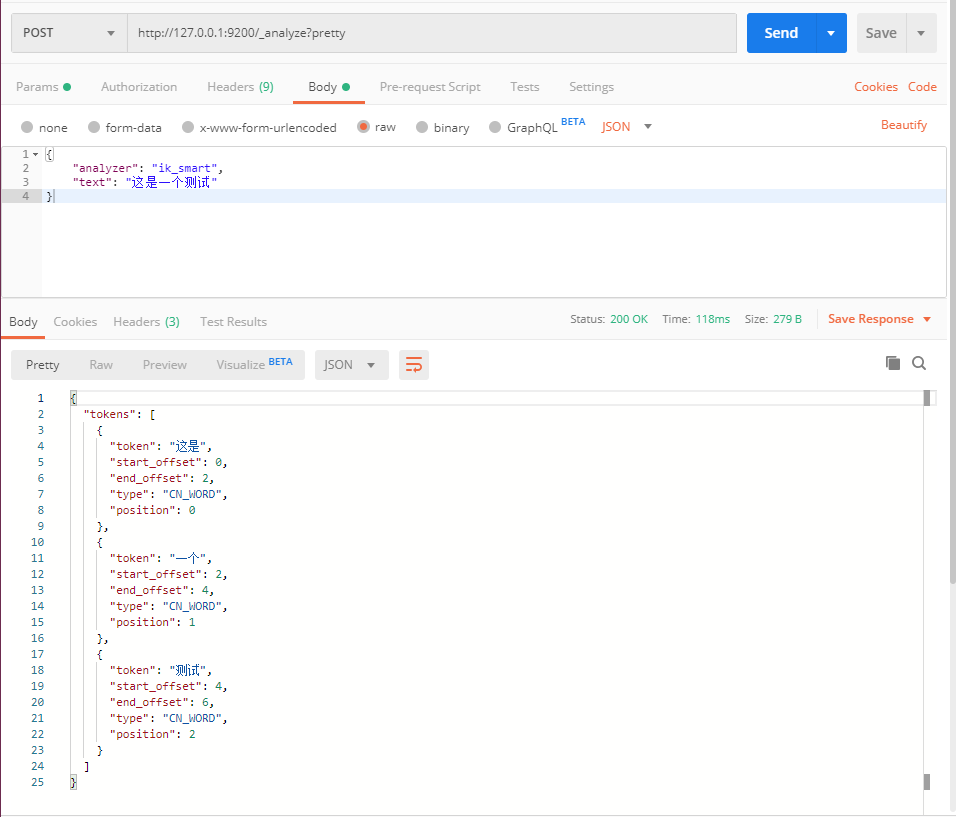
测试ik分词器的中文效果
扩展自定义分词器的内容
-
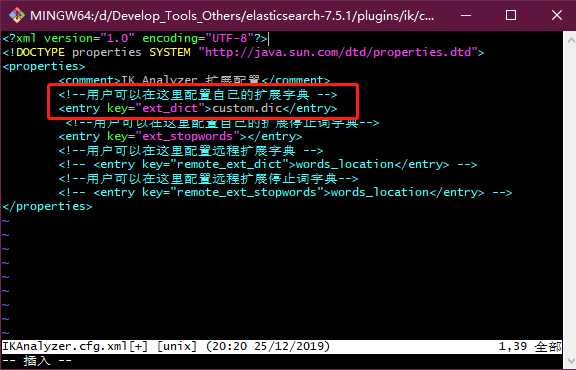
在/elasticsearch-7.5.1/plugins/ik/config目录下新建custom.dic;
-
添加自己的自定义的词汇;
-
修改同目录下的IKAnalyzer.cfg.xml文件,为<entry key="ext_dict">属性指定自定义的词典;

- 重启elasticsearch,效果如下:

整合SpringBoot
准备
- 添加依赖
Spring Data ElasticSearch
<dependency>
    <groupId>org.springframework.boot</groupId>
    <artifactId>spring-boot-starter-data-elasticsearch</artifactId>
</dependency>
复制代码
- 添加配置
spring:
  data:
    elasticsearch:
      cluster-nodes: 127.0.0.1:9300
复制代码
代码编写
- 新建实体类
@Data
@Accessors(chain = true)
@Document(indexName = "school", type = "student") // indexName为ES索引名,type为文档名
public class Student implements Serializable {

    // id标识
    // index=true代表是否开启索引,默认开启;
    // type字段类型
    // analyzer="ik_max_word"代表搜索的时候是如何分词匹配,为IK分词器最细颗粒度
    // searchAnalyzer = "ik_max_word"搜索分词的类型
    @Id
    private String id;

    @Field(type = FieldType.Keyword, analyzer = "ik_max_word", searchAnalyzer = "ik_max_word")
    private String name;

    private Integer age;

    @Field(type = FieldType.Double)
    private Double score;

    @Field(type = FieldType.Text, analyzer = "ik_max_word")
    private String info;
}
复制代码
- 分页实体
@Data
@Accessors(chain = true)
public class QueryPage {

    /**
     * 当前页
     */
    private Integer current;

    /**
     * 每页记录数
     */
    private Integer size;
}
复制代码
- 数据持久层
public interface EsRepository extends ElasticsearchRepository<Student, String> {

    /**
     * 根据学生姓名或信息模糊查询
     */
    Page<Student> findByNameAndInfoLike(String name, String info, Pageable pageable);
}
复制代码
- 业务层接口及其实现
public interface EsService {

    /**
     * 插入
     */
    void add(Student student);

    /**
     * 批量插入
     */
    void addAll(List<Student> student);

    /**
     * 模糊查询
     */
    Page<Student> search(String keyword, QueryPage queryPage);
}
复制代码
@Service
public class EsServiceImpl implements EsService {

    @Autowired
    private EsRepository esRepository;

    @Override
    public void add(Student student) {
        esRepository.save(student);
    }

    @Override
    public void addAll(List<Student> student) {
        esRepository.saveAll(student);
    }

    @Override
    public Page<Student> search(String keyword, QueryPage queryPage) {
        // es默认索引从0开始,mp默认从1开始
        PageRequest pageRequest = PageRequest.of(queryPage.getCurrent() - 1, queryPage.getSize());
        return esRepository.findByNameOrInfoLike(keyword, keyword, pageRequest);
    }
}
复制代码
- 编写测试类
@SpringBootTest
public class EsServiceImplTest {

    @Autowired
    private EsService esService;

    @Test
    public void insert() {
        List<Student> students = new ArrayList<>();
        for (int i = 10; i <= 12; i++) {
            Student student = new Student();
            student.setId(i + "").setAge(10 + i).setName("王二狗" + i).setScore(72.5 + i).setInfo("大王派我来巡山" + i);
            students.add(student);
        }
        esService.addAll(students);
    }

    @Test
    public void fuzzySearch() {
        QueryPage queryPage = new QueryPage();
        queryPage.setCurrent(1).setSize(5);
        Page<Student> list = esService.search("二狗2", queryPage);
        list.forEach(System.out::println);
    }
}
复制代码
MySql数据导入ElasticSearch
安装
- 官网下载 ,注意对应的es版本
配置
- 解压压缩包
- 拷贝
/logstash-7.5.1/config/logstash-sample.conf在当前目录,重命名为logstash.conf - 修改为如下配置
# Sample Logstash configuration for creating a simple
# Beats -> Logstash -> Elasticsearch pipeline.

input {
  jdbc {
	# MySql连接配置
    jdbc_connection_string => "jdbc:mysql://127.0.0.1:3306/springboot_es?characterEncoding=UTF8"
    jdbc_user => "root"
    jdbc_password => "1234"
    jdbc_driver_library => "D:/Develop_Tools_Others/logstash-7.5.1/mysql-connector-java-5.1.26.jar"
    jdbc_driver_class => "com.mysql.jdbc.Driver"
    jdbc_paging_enabled => "true"
    jdbc_page_size => "50000"
    # SQL查询语句,用于将查询到的数据导入到ElasticSearch
    statement => "select id,name,age,score,info from t_student"
    # 定时任务,各自表示:分 时 天 月 年 。全部为 * 默认每分钟执行
    schedule => "* * * * *"
  }
}
output {
  elasticsearch {
    hosts => "localhost:9200"
    # 索引名称
    index => "school"
	# 文档名称
    document_type => "student"
    # 自增ID编号
    document_id => "%{id}"
  }
  stdout {
    # JSON格式输出
    codec => json_lines
  }
}
复制代码
- 创建数据库springboot_es ,导入数据库脚本
SET NAMES utf8mb4;
SET FOREIGN_KEY_CHECKS = 0;

-- ----------------------------
-- Table structure for t_student
-- ----------------------------
DROP TABLE IF EXISTS `t_student`;
CREATE TABLE `t_student`  (
  `id` int(11) NOT NULL AUTO_INCREMENT COMMENT '主键',
  `name` varchar(50) CHARACTER SET utf8mb4 COLLATE utf8mb4_general_ci NULL DEFAULT NULL COMMENT '学生姓名',
  `age` int(11) NULL DEFAULT NULL COMMENT '年龄',
  `score` double(255, 0) NULL DEFAULT NULL COMMENT '成绩',
  `info` varchar(255) CHARACTER SET utf8mb4 COLLATE utf8mb4_general_ci NULL DEFAULT NULL COMMENT '信息',
  PRIMARY KEY (`id`) USING BTREE
) ENGINE = InnoDB AUTO_INCREMENT = 4 CHARACTER SET = utf8mb4 COLLATE = utf8mb4_general_ci ROW_FORMAT = Dynamic;

-- ----------------------------
-- Records of t_student
-- ----------------------------
INSERT INTO `t_student` VALUES (1, '小明', 18, 88, '好好学习');
INSERT INTO `t_student` VALUES (2, '小红', 17, 85, '天天向上');
INSERT INTO `t_student` VALUES (3, '王二狗', 30, 59, '无产阶级');

SET FOREIGN_KEY_CHECKS = 1;
复制代码
运行
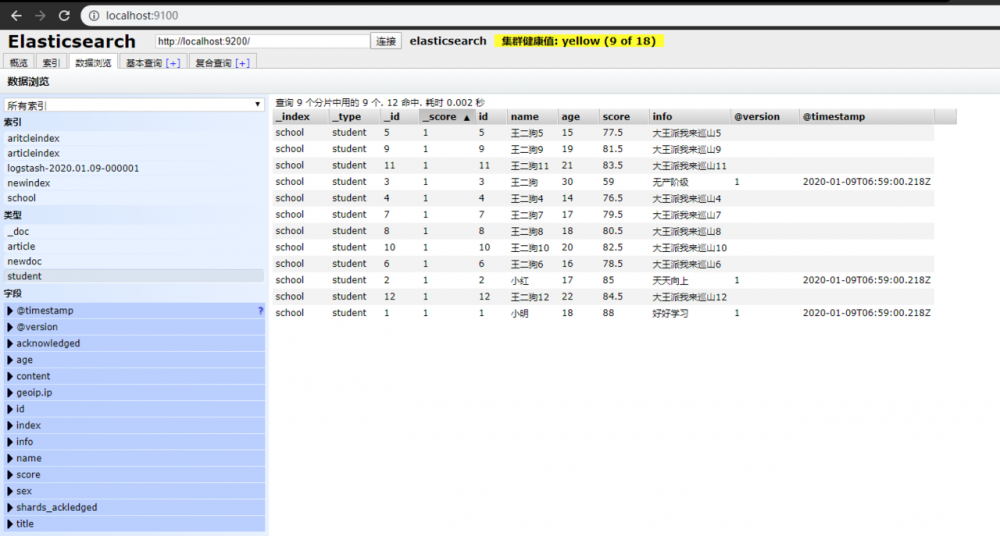
- 先启动ES,再启动Es-head
- 最后启动logstash,启动命令为:
D:/Develop_Tools_Others/logstash-7.5.1>./bin/logstash.bat -f ./config/logstash.conf
复制代码
- 访问localhost:9600,查看启动成功

- 查看控制台,是否同步数据

- 最后可产看es-head,查看同步的数据
正文到此结束
- 本文标签: struct http 安装 plugin Select zab mysql 同步 端口 tar ACE IDE Elasticsearch key root ip core sql ORM Document Statement 分页 windows js Word 数据 springboot XML java src 学生 业务层 CTO JDBC 插件 tab https 关键词 UI id Docker spring db lib 数据库 Service 代码 ArrayList list 源码 git 删除 配置 IO json tag 目录 Connection node find 下载 GitHub 索引 value 测试
- 版权声明: 本文为互联网转载文章,出处已在文章中说明(部分除外)。如果侵权,请联系本站长删除,谢谢。
- 本文海报: 生成海报一 生成海报二
热门推荐


相关文章


Loading...
![[HBLOG]公众号](https://www.liuhaihua.cn/img/qrcode_gzh.jpg)

