SpringCloud(一)入门-SpringCloud基本组件配置
分布式系统就是将一个大型程序系统分割成一个个小的可以独立运行的模块,分别部署在不同的机子上运行,通过远程调用的方式da来实现功能调用。把这种由多个子程序组成的系统称为分布式系统,这种系统的架构称为分布式架构。
在分布式架构中,也将每一个子程序称为服务,也称分布式架构称为面向服务(SOA)的架构
2.SpringCloud是什么?
SpringCloud是一个基于SpringBoot的分布式框架。
3.SpringCloud的作用是什么
SpringCloud的作用在于为实现分布式架构的系统提供了相当多的组件。是一个分布式的解决方案。
使用SpringCloud的诸多组件可以快速减少时间,减少各种开发公共代码的编写。
4.SpringCloud框架提供了什么组件?
- Eruka注册中心(可实现服务高可用)
- Ribbon负载均衡组件(可实现负载均衡)
- 注册中心,Zipkin监控组件(实现服务监控)
- gateway(网关组件)
- SpringCloudOatuh2(统一认证)
5.SpringCloud体系图
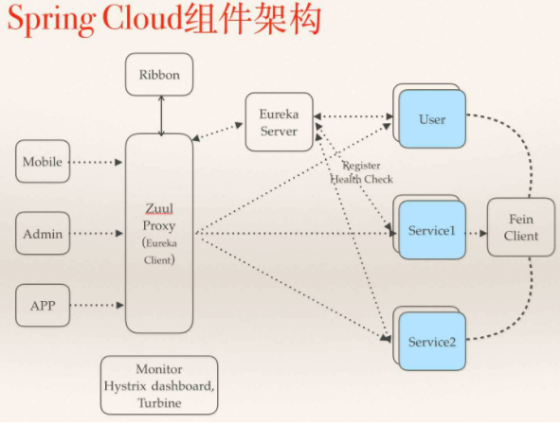
6.SpringCloud入门配置
基本配置思路:
SpringCloud组件很多,但是分析一下可以知道,SpringCloud组件不可能是任意子程序都是入口,总是会有特定的入口,SpringCloud分入口就是注册中心,所以先构建一个注册中心。
注册中心构建完了,就可以构建客户端与服务端。通过客户端远程调用服务端方法进而获得所需数据最后返回给前端。
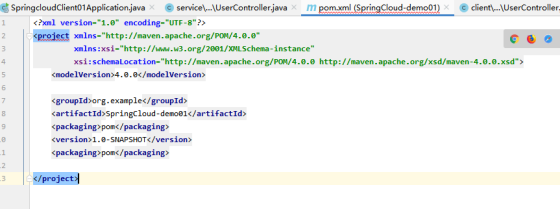
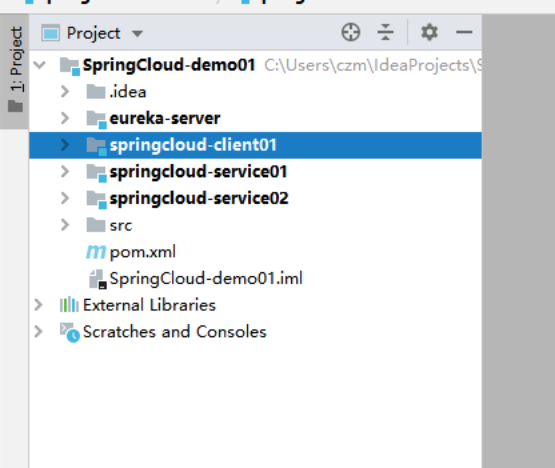
第一步:构建Maven项目
构建maven项目,pom文件设置为pom
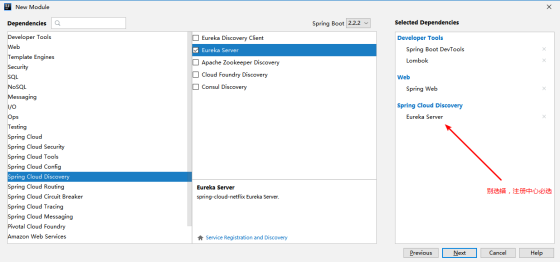
第二步:构建注册中心
右击项目,新建一个module项目,选择spring快速初始化

快速初始化springboot项目
新建项目完毕
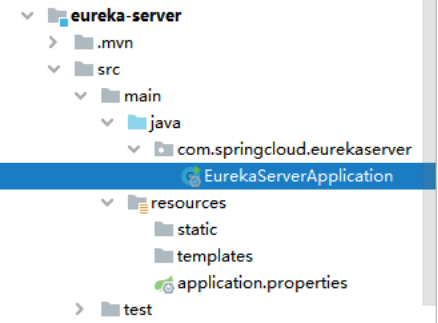
项目eureka-server主配置文件application配置
application
##配置端口
server.port=5121

##服务主机名
eureka.instance.hostname=localhost

##Eureka服务配置
##开放访问路径
eureka.client.service-url.defaultZone=http://${eureka.instance.hostname}:${server.port}/eureka
##设置自己不注册为服务器
eureka.client.register-with-eureka=false

复制代码
开启Eureka注解驱动
EurekaServerApplication
package com.springcloud.eurekaserver;

import org.springframework.boot.SpringApplication;
import org.springframework.boot.autoconfigure.SpringBootApplication;
import org.springframework.cloud.netflix.eureka.server.EnableEurekaServer;

@SpringBootApplication
@EnableEurekaServer //启动服务器
public class EurekaServerApplication {

    public static void main(String[] args) {
        SpringApplication.run(EurekaServerApplication.class, args);
    }

}

复制代码
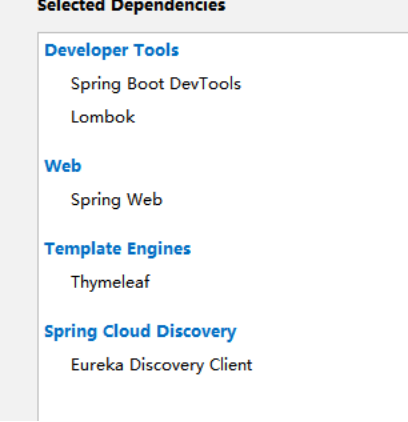
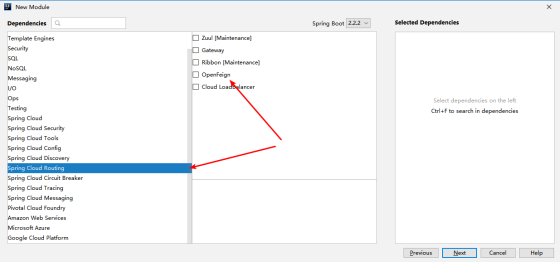
第三步:构建客户端
注意:springboot快速初始化要按以下选

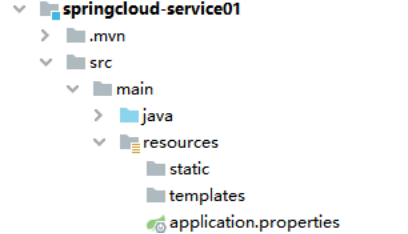
项目创建完毕

主配置文件配置
application
##端口
server.port=8090

##日志
logging.level.com.springcloud=debug


##指定应用名
spring.application.name=client01
##指定eureka的访问路径
eureka.client.service-url.defaultZone=http://localhost:5121/eureka

复制代码
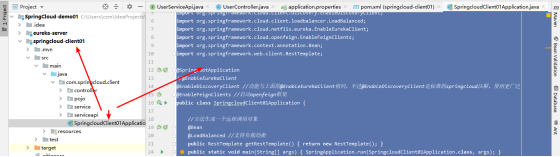
SpringBoot入口类开启注解驱动,并创建远程调用方法
package com.springcloud.client;

import org.springframework.boot.SpringApplication;
import org.springframework.boot.autoconfigure.SpringBootApplication;
import org.springframework.cloud.client.loadbalancer.LoadBalanced;
import org.springframework.cloud.netflix.eureka.EnableEurekaClient;
import org.springframework.context.annotation.Bean;
import org.springframework.web.client.RestTemplate;

@SpringBootApplication
@EnableEurekaClient
public class SpringcloudClient01Application {

    //方法生成一个远程调用对象
    @Bean
    @LoadBalanced //支持负载均衡
    public RestTemplate getRestTemplate(){
        return new RestTemplate();
    }

    public static void main(String[] args) {
        SpringApplication.run(SpringcloudClient01Application.class, args);
    }

}

复制代码
接着分别构建简单的controller,service与pojo
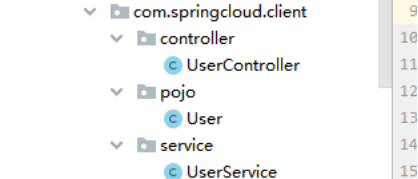
UserController
package com.springcloud.client.controller;


import com.springcloud.client.pojo.User;
import com.springcloud.client.service.UserService;
import lombok.extern.slf4j.Slf4j;
import org.springframework.beans.factory.annotation.Autowired;
import org.springframework.web.bind.annotation.RequestMapping;
import org.springframework.web.bind.annotation.RestController;

@RestController
@RequestMapping("/user")
@Slf4j
public class UserController {

    @Autowired
    private UserService userService;

    @RequestMapping("/save")
    public User save(User user){
        log.debug("springcloud-client01--保存用户"+user);
        User result = userService.save(user);
        return result;
    }
}

复制代码
UserService
package com.springcloud.client.service;

import com.springcloud.client.pojo.User;
import org.springframework.beans.factory.annotation.Autowired;
import org.springframework.http.ResponseEntity;
import org.springframework.stereotype.Service;
import org.springframework.web.client.RestTemplate;

@Service
public class UserService {

    @Autowired
    private RestTemplate restTemplate;

    public User save(User user){
        //发送远程调用请求,调用远程方法
        ResponseEntity<User> userResponseEntity = restTemplate.postForEntity("http://service01/user/save", user, User.class);
        return userResponseEntity.getBody();
    }
}

复制代码
User
package com.springcloud.client.pojo;

import lombok.Data;

import java.io.Serializable;

@Data
public class User implements Serializable {

    private Integer id;
    private String username;
    private String password;
}

复制代码
第四步:构建服务端
构建过程同上
注意:springboot快速初始化要按以下选
项目创建完毕
主配置文件配置
application
##端口
server.port=8080

##日志
logging.level.com.springcloud=debug


##指定应用名
spring.application.name=service01
##指定eureka的访问路径
eureka.client.service-url.defaultZone=http://localhost:5121/eureka
复制代码
SpringBoot入口类开启注解驱动
package com.springcloud.service;

import org.springframework.boot.SpringApplication;
import org.springframework.boot.autoconfigure.SpringBootApplication;
import org.springframework.cloud.netflix.eureka.EnableEurekaClient;

@SpringBootApplication
@EnableEurekaClient //同样是开启Eureka服务配置
public class SpringcloudService01Application {

    public static void main(String[] args) {
        SpringApplication.run(SpringcloudService01Application.class, args);
    }

}


复制代码
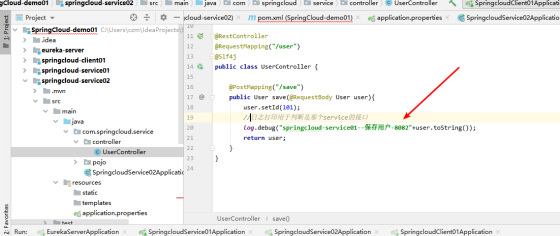
接着构建正常的controller,pojo用于回应客户端请求
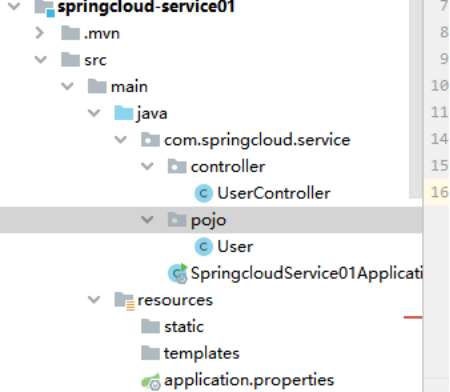
UserController
package com.springcloud.service.controller;


import com.springcloud.service.pojo.User;
import lombok.extern.slf4j.Slf4j;
import org.springframework.web.bind.annotation.PostMapping;
import org.springframework.web.bind.annotation.RequestBody;
import org.springframework.web.bind.annotation.RequestMapping;
import org.springframework.web.bind.annotation.RestController;

@RestController
@RequestMapping("/user")
@Slf4j
public class UserController {

    @PostMapping("/save")
    public User save(@RequestBody User user){
        user.setId(101);
        log.debug("springcloud-service01--保存用户"+user.toString());
        return user;
    }
}


复制代码
pojo
package com.springcloud.service.pojo;

import lombok.Data;

import java.io.Serializable;

@Data
public class User implements Serializable {

    private Integer id;
    private String username;
    private String password;
}


复制代码
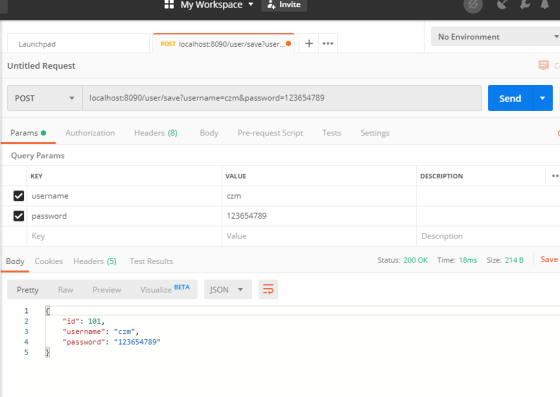
第五步:测试(postman)

测试成功
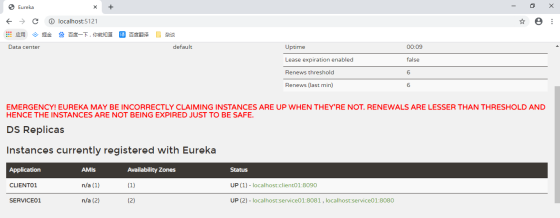
去localhost:5121观察是否添加客户端与服务端成功,能连上就证明注册中心已经构建成功
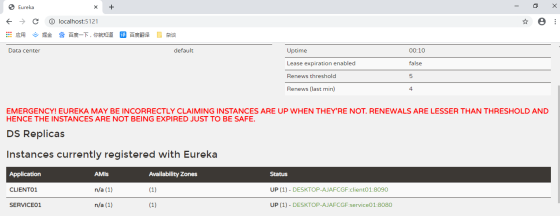
至此,基本配置已经完成
7.SpringCloud-OpenFeign
第一步:集成项目(导入依赖)
springcloud对远程调用OpenFeign进行了集成,可以在springboot的快速初始化中找到。
但是出于重新新建客户端需要时间的情况,选择在第6个入门配置的项目中进行修改,权当修改前同事代码。作用等同于初始化选择了OpenFeign。
在客户端pom中导入依赖

<!--OpenFeign-->
        <dependency>
            <groupId>org.springframework.cloud</groupId>
            <artifactId>spring-cloud-starter-openfeign</artifactId>
        </dependency>

复制代码
第二步:配置相关注解
SpringBoot入口类主配置文件开启OpenFeign驱动
package com.springcloud.client;

import org.springframework.boot.SpringApplication;
import org.springframework.boot.autoconfigure.SpringBootApplication;
import org.springframework.cloud.client.discovery.EnableDiscoveryClient;
import org.springframework.cloud.client.loadbalancer.LoadBalanced;
import org.springframework.cloud.netflix.eureka.EnableEurekaClient;
import org.springframework.cloud.openfeign.EnableFeignClients;
import org.springframework.context.annotation.Bean;
import org.springframework.web.client.RestTemplate;

@SpringBootApplication
//@EnableEurekaClient
@EnableDiscoveryClient //功能与上面的@EnableEurekaClient相同,不过@EnableDiscoveryClient是标准的springcloud注解,使用更广泛
@EnableFeignClients //启动openfeign框架
public class SpringcloudClient01Application {

    //方法生成一个远程调用对象
    @Bean
    @LoadBalanced //支持负载均衡
    public RestTemplate getRestTemplate(){
        return new RestTemplate();
    }
    public static void main(String[] args) {
        SpringApplication.run(SpringcloudClient01Application.class, args);
    }

}


复制代码
新建UserServiceApi接口取代原本的UserService类进行查询功能,并简单修改以下UserController
没错,就是用接口取代,这就是OpenFeign的优雅之处,不用写方法体,直接就可以远程调用
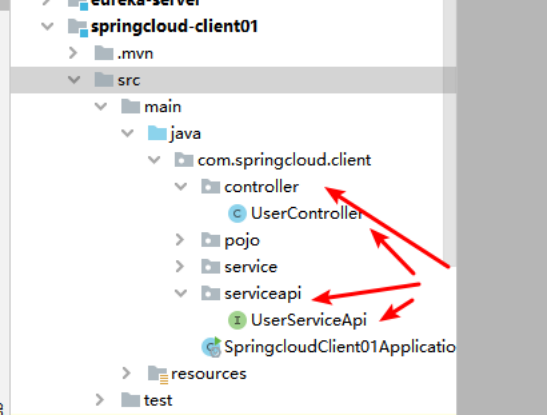
UserServiceApi
package com.springcloud.client.serviceapi;

import com.springcloud.client.pojo.User;
import org.springframework.cloud.openfeign.FeignClient;
import org.springframework.web.bind.annotation.RequestMapping;

@FeignClient(value = "service01")
@RequestMapping("/user")
public interface UserServiceApi {

    //远程调用服务端对应的端口
    @RequestMapping("/save")
    public User save(User user);
}


复制代码
UserController
package com.springcloud.client.controller;


import com.springcloud.client.pojo.User;
import com.springcloud.client.serviceapi.UserServiceApi;
import lombok.extern.slf4j.Slf4j;
import org.springframework.beans.factory.annotation.Autowired;
import org.springframework.web.bind.annotation.PostMapping;
import org.springframework.web.bind.annotation.RequestMapping;
import org.springframework.web.bind.annotation.RestController;

@RestController
@RequestMapping("/user")
@Slf4j
public class UserController {

    @Autowired
    private UserServiceApi userServiceApi;

    @PostMapping("/save")
    public User save(User user){
        log.debug("springcloud-client01--保存用户"+user);
        User result = userServiceApi.save(user);
        return result;
    }
}


复制代码
第三步:postman测试

后端客户端

后端服务端

调用成功,配置完成。
8.服务高可用配置(服务器)
第一步:拷贝一个服务器
拷贝一个服务器pringcloud-service01的module并复制改名为其它名字 springcloud-service02
注意,拷贝完之后springcloud-service02没有目录结构,要修改以下两个地方才算整合完毕


第二步:更改新服务器配置
不然会跟原本的服务器端口一样,会冲突,应用名不用改

第三步:Controller增加标识符,区分是哪个服务器在执行
日志打印中加上端口号
第四步:运行并测试
运行注册中心,服务端已经客户端

结果
三个服务已经接受到

用postman发送多次请求,观看两个服务端日志(5次访问)
后台服务端 springcloud-service01(2次)

后台服务端 springcloud-service02(3次)

高可用基本配置完毕,从结果来看,实现了服务器的负载均衡!
9.Eureka注册中心安全认证
第一步:在以上项目的基础上导入依赖
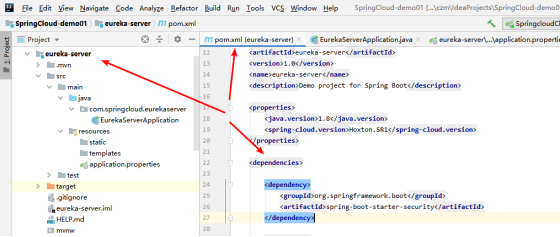
<dependency>
	<groupId>org.springframework.boot</groupId>
	<artifactId>spring-boot-starter-security</artifactId>
</dependency>

复制代码
第二步:注册中心Eureka配置禁用csrf机制,SpringBoot主配置文件参数配置
注册中心主入口类配置
package com.springcloud.eurekaserver;

import org.springframework.boot.SpringApplication;
import org.springframework.boot.autoconfigure.SpringBootApplication;
import org.springframework.cloud.netflix.eureka.server.EnableEurekaServer;
import org.springframework.security.config.annotation.web.builders.HttpSecurity;
import org.springframework.security.config.annotation.web.configuration.EnableWebSecurity;
import org.springframework.security.config.annotation.web.configuration.WebSecurityConfigurerAdapter;

@SpringBootApplication
@EnableEurekaServer //启动服务器
public class EurekaServerApplication {

    public static void main(String[] args) {
        SpringApplication.run(EurekaServerApplication.class, args);
    }


    //禁用csrf机制
    @EnableWebSecurity
    static class WebSecurityConfig extends WebSecurityConfigurerAdapter {
        @Override
        protected void configure(HttpSecurity http) throws Exception {
            http.csrf().ignoringAntMatchers("/eureka/**");
            super.configure(http);
        }
    }
}


复制代码
配置文件参数
##配置端口
server.port=5121

##服务主机名
eureka.instance.hostname=localhost

##Eureka服务配置
##开放访问路径
eureka.client.service-url.defaultZone=http://${eureka.instance.hostname}:${server.port}/eureka
##设置自己不注册为服务器
eureka.client.register-with-eureka=false


##认证信息
#配置Eureka安全认证
spring.security.user.name=root01
spring.security.user.password=root01

复制代码
第三步:注册中心中所有服务(子程序)的配置(eureka.client.service-url.defaultZone)
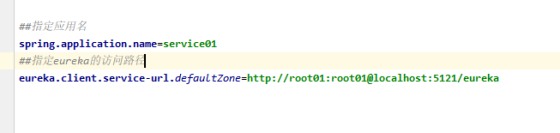
所有服务都要写成这个携带这账号密码的格式
第四步:测试
访问注册中心
结果:
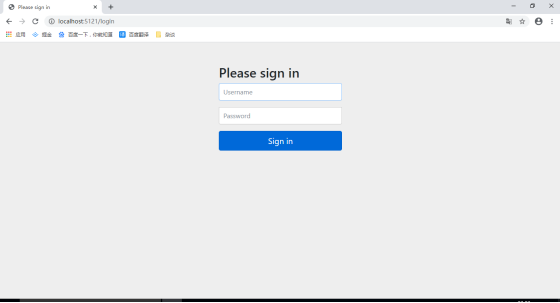
从这里可以看到,现在去注册中心已经需要密码了,输入账号密码进去观看服务是否正常
服务正常
接着客户端访问四次的结果
服务端1

服务端2

访问正常
至此,注册中心的安全配置完成。
问:在8中配置了双份实例服务器,实现了Eureka的高可用,有什么好处?
双份或者多份的实例服务器,有个大大的好处。
当一个服务器出问题,可以自动由另外一个服务器马上使用,或者说原本就是两台服务器在使用。
服务器与客户端等服务都可以配置双份,但有个很重要的东西还没配置双份,那就是注册中心。
由于注册中心是springcloud的出入口,一旦注册中心死掉,会导致所有程序都失效。所以一般会配置两个或多个注册中心,同理,也可以对各种服务配置两个或多个,同样可以提高程序的高可用与实现负载均衡。
10.配置一个相对完整的SpringCloud
实现需求:
两个实例服务器,两个实例客户端,三个注册中心(具有安全配置)
基本组件:
Eureka安全组件
Ribbon负载均衡
基本功能:
注册中心高可用
服务器负载均衡
Eureka安全配置
OpenFeign远程调用
理由:
多个服务器与客户端实现集群,三个注册中心两两关联形成高可用
第一步:拷贝多份eureka服务器,并修改各自的安全配置与应用服务名(Eureka的高可用)
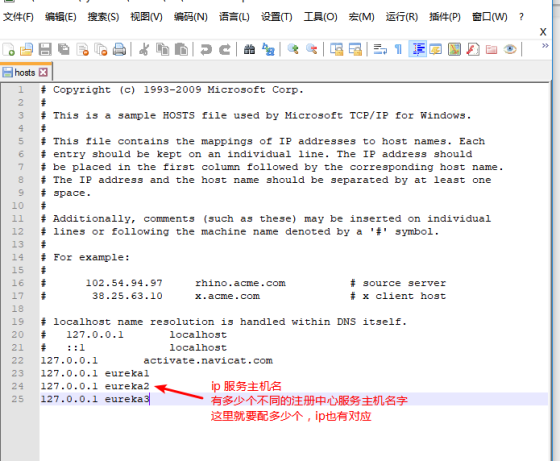
注意事项:
Eureka的高可用配置必须要先配置好双机热备。
修改host文件

配置完双机热备后配置Eureka参数
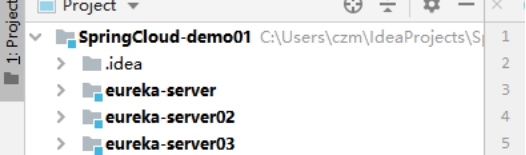
分别修改每个注册中心的pom文件中的artifactId与name,确保与文件名相同

修改配置文件参数
eureka-server
##配置端口
server.port=5121

##服务主机名
eureka.instance.hostname=eureka1

##Eureka服务配置
##开放访问路径
eureka.client.service-url.defaultZone=http://root02:root02@eureka2:5122/eureka,http://root03:root03@eureka3:5123/eureka
##设置自己不注册为服务器
eureka.client.register-with-eureka=false
##是否主动发现服务  false表示不发现
eureka.client.fetch-registry=false


##认证信息
#配置Eureka安全认证
spring.security.user.name=root01
spring.security.user.password=root01

复制代码
eureka-server02
##配置端口
server.port=5122

##服务主机名
eureka.instance.hostname=eureka2

##Eureka服务配置
##开放访问路径
eureka.client.service-url.defaultZone=http://root01:root01@eureka1:5121/eureka,http://root03:root03@eureka3:5123/eureka
##设置自己不注册为服务器
eureka.client.register-with-eureka=false
##是否主动发现服务  false表示不发现
eureka.client.fetch-registry=false


##认证信息
#配置Eureka安全认证
spring.security.user.name=root02
spring.security.user.password=root02

复制代码
eureka-server03
##配置端口
server.port=5123

##服务主机名
eureka.instance.hostname=eureka3

##Eureka服务配置
##开放访问路径
eureka.client.service-url.defaultZone=http://root01:root01@eureka1:5121/eureka,http://root02:root02@eureka2:5122/eureka
##设置自己不注册为服务器
eureka.client.register-with-eureka=false
##是否主动发现服务  false表示不发现
eureka.client.fetch-registry=false


##认证信息
#配置Eureka安全认证
spring.security.user.name=root03
spring.security.user.password=root03

复制代码
Eureka参数配置注意事项:
每台机器的开放访问路径需要配置其它Eureka的访问路径,两两配置。路径中必须携带账号与密码
第二步:拷贝客户端,改变文件名与pom名字,配置文件修改端口参数

同第一步,修改pom文件中的artifactId与name,确保与文件名相同
配置文件端口参数修改
springcloud-client01
##端口
server.port=8090

##日志
logging.level.com.springcloud=debug


##指定应用名
spring.application.name=client01
##指定eureka的访问路径
eureka.client.service-url.defaultZone=http://root01:root01@eureka1:5121/eureka,http://root02:root02@eureka2:5122/eureka,http://root03:root03@eureka3:5123/eureka


复制代码
springcloud-client02
##端口
server.port=8092

##日志
logging.level.com.springcloud=debug


##指定应用名
spring.application.name=client01
##指定eureka的访问路径
eureka.client.service-url.defaultZone=http://root01:root01@eureka1:5121/eureka,http://root02:root02@eureka2:5122/eureka,http://root03:root03@eureka3:5123/eureka


复制代码
注意事项:
值得注意的是指定Eureka的访问路径必须全部添加,意思就是有多少个注册中心就要配置多少个路径
正文到此结束
- 本文标签: build 测试 Security zipkin IDE zab java value 主机 maven MQ 安全 springcloud 需求 开发 服务器 Logging 负载均衡 高可用 数据 注册中心 spring 实例 entity db IO 集群 bug 代码 root 参数 ACE https 分布式 UI Netflix 目录 App src 端口 bean cat 分布式系统 API web REST Word ip id 配置 Feign CTO client 认证 Service tar springboot SOA 部署 zip Eureka http pom 服务端 map ribbon 时间
- 版权声明: 本文为互联网转载文章,出处已在文章中说明(部分除外)。如果侵权,请联系本站长删除,谢谢。
- 本文海报: 生成海报一 生成海报二
热门推荐


相关文章


Loading...
![[HBLOG]公众号](https://www.liuhaihua.cn/img/qrcode_gzh.jpg)

