MO_or使用Spring Boot整合Druid
一、导入的maven依赖
<!--整合druid-->
<dependency>
    <groupId>com.alibaba</groupId>
    <artifactId>druid</artifactId>
    <version>1.1.10</version>
</dependency>
<dependency>
    <groupId>org.springframework.boot</groupId>
    <artifactId>spring-boot-configuration-processor</artifactId>
    <optional>true</optional>
</dependency>
<!--整合druid-->
二、配置相关数据源
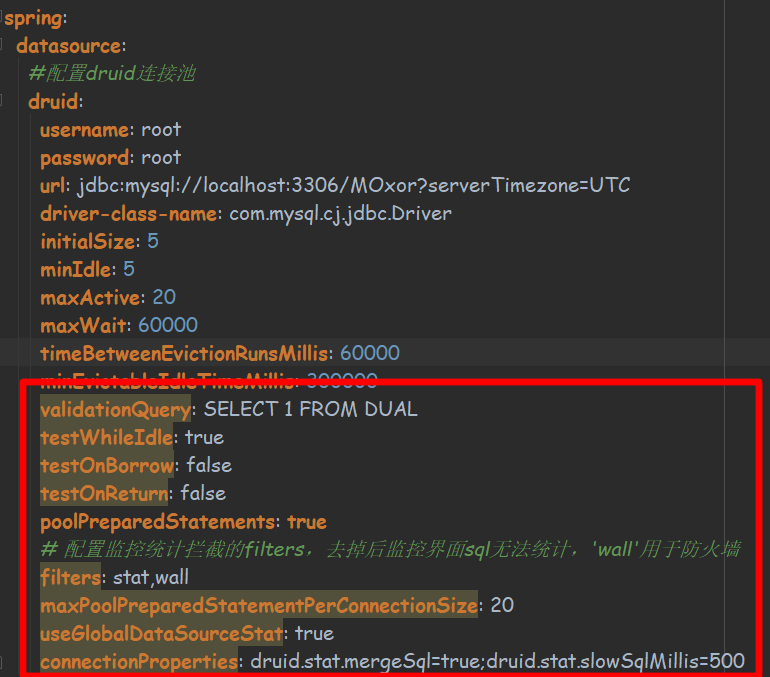
这里注意红框中的黄色背景参数,是因为实体类中没有对应的属性进行映射
以防部分参数未生效,所以实体类的属性需要一一对应数据源中的参数
下面是application.yml中的相关配置
spring:
  datasource:
    #配置druid连接池
    druid:
      username: root
      password: root
      url: jdbc:mysql://localhost:3306/MOxor?serverTimezone=UTC
      driver-class-name: com.mysql.cj.jdbc.Driver
      initialSize: 5
      minIdle: 5
      maxActive: 20
      maxWait: 60000
      timeBetweenEvictionRunsMillis: 60000
      minEvictableIdleTimeMillis: 300000
      validationQuery: SELECT 1 FROM DUAL
      testWhileIdle: true
      testOnBorrow: false
      testOnReturn: false
      poolPreparedStatements: true
      # 配置监控统计拦截的filters,去掉后监控界面sql无法统计,'wall'用于防火墙
      filters: stat,wall
      maxPoolPreparedStatementPerConnectionSize: 20
      useGlobalDataSourceStat: true
      connectionProperties: druid.stat.mergeSql=true;druid.stat.slowSqlMillis=500
下面是实体类DruidDataSourceProperties
@NoArgsConstructor
@AllArgsConstructor
@Getter
@Setter
@ToString
@ConfigurationProperties(prefix = "spring.datasource.druid") //扫描配置类的属性前缀
public class DruidDataSourceProperties {

    private String username;
    private String password;
    private String url;
    private String driverClassName;
    private Integer initialSize;
    private Integer maxActive;
    private Integer minIdle;
    private long maxWait;
    private boolean poolPreparedStatements;
    private Integer timeBetweenEvictionRunsMillis;
    private Integer minEvictableIdleTimeMillis;
    private String validationQuery;
    private boolean testWhileIdle;
    private boolean testOnBorrow;
    private boolean testOnReturn;
    private String filters;
    private Integer maxPoolPreparedStatementPerConnectionSize;
    private boolean useGlobalDataSourceStat;
    private String connectionProperties;

}
说明:
以下注解是lombok提供简化实体类创建get、set、toString、构造器的方法
@NoArgsConstructor
@AllArgsConstructor
@Getter
@Setter
@ToString
下面这个注解的作用是,简化application.yml参数与属性间映射关系,就不用在每个属性上使用@Value注解的形式了
@ConfigurationProperties(prefix = "spring.datasource.druid") //扫描配置类的属性前缀
三、自定义配置类
@Configuration
@EnableConfigurationProperties(value = DruidDataSourceProperties.class)
public class DruidDataSourceConfig {

    @Autowired
    private DruidDataSourceProperties druidDataSourceProperties;

    @Bean
    public DataSource dataSource() throws SQLException {
        System.out.println(druidDataSourceProperties);
        DruidDataSource druidDataSource = new DruidDataSource();
        druidDataSource.setUsername(druidDataSourceProperties.getUsername());
        druidDataSource.setPassword(druidDataSourceProperties.getPassword());
        druidDataSource.setUrl(druidDataSourceProperties.getUrl());
        druidDataSource.setDriverClassName(druidDataSourceProperties.getDriverClassName());
        druidDataSource.setInitialSize(druidDataSourceProperties.getInitialSize());
        druidDataSource.setMinIdle(druidDataSourceProperties.getMinIdle());
        druidDataSource.setFilters(druidDataSourceProperties.getFilters());
        druidDataSource.setMaxActive(druidDataSourceProperties.getMaxActive());
        druidDataSource.setMaxWait(druidDataSourceProperties.getMaxWait());
        druidDataSource.setPoolPreparedStatements(druidDataSourceProperties.isPoolPreparedStatements());
        return druidDataSource;
    }

    /**
     * 配置druid管理后台的servlet * @return
     */
    @Bean
    public ServletRegistrationBean statViewServlet() {
        ServletRegistrationBean bean = new ServletRegistrationBean(new StatViewServlet(), "/druid/*");
        Map<String, Object> initParameters = new HashMap<>();
        initParameters.put("loginUsername", "admin");
        initParameters.put("loginPassword", "123456");
        bean.setInitParameters(initParameters);
        return bean;
    }

    @Bean
    public FilterRegistrationBean filterRegistrationBean() {
        FilterRegistrationBean filterRegistrationBean = new FilterRegistrationBean(new WebStatFilter());
        filterRegistrationBean.setUrlPatterns(Arrays.asList("/*"));
        Map<String, Object> initParams = new HashMap<>();
        initParams.put("exclusions", "*.js,*.css,/druid/*");
        filterRegistrationBean.setInitParameters(initParams);
        return filterRegistrationBean;
    }

}
注意:
statViewServlet()与filterRegistrationBean()并非必须配置的方法
但这里十分推荐加上,因为配置后才能使用Druid的后台监控界面
但注意在application.yml中必须有filters: stat参数,且保证实体类中能正确映射,最后dataSource()中包含druidDataSource.setFilters
四、测试
@RestController
public class DruidTestController {

    @Autowired
    private JdbcTemplate jdbcTemplate;

    @RequestMapping("/testJdbc")
    public List<Map<String, Object>> testJdbcTemplate() {
        List<Map<String, Object>> testList = jdbcTemplate.queryForList("select * from test");
        return testList;
    }
}
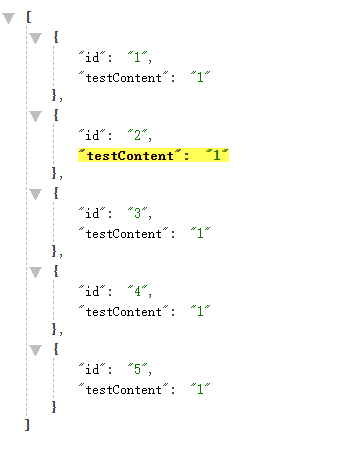
请求路径:http://localhost:8081/testJdbc
笔者这里使用的Chrome,结合FeHelper插件美化JSON格式数据,结果为:
通过路径:http://localhost:8081/druid
来看看druid的监控界面,账号密码为:
statViewServlet()中的loginUsername和loginPassword

进入界面选择“SQL监控”就可以监控刚才执行的SQL啦!

五、最后
若有不足,敬请指正
虚心若愚,求知若渴
正文到此结束
- 本文标签: root src js HashMap 管理 REST maven 下载 map druid json web lib Chrome, Spring Boot CSS 插件 db Word sql Statement Select spring Connection https id 数据 Chrome tab http cat JDBC App mysql dataSource struct IO UI list 测试 统计 连接池 CTO 参数 servlet bean 配置 UTC value
- 版权声明: 本文为互联网转载文章,出处已在文章中说明(部分除外)。如果侵权,请联系本站长删除,谢谢。
- 本文海报: 生成海报一 生成海报二
热门推荐


相关文章


Loading...
![[HBLOG]公众号](https://www.liuhaihua.cn/img/qrcode_gzh.jpg)

