来了铁子,看完别说不会了哦,SpringBoot【完结篇】!
大家好,我是小菜,一个渴望在互联网行业做到蔡不菜的小菜。可柔可刚,点赞则柔,白嫖则刚!
死鬼~看完记得给我来个三连哦!

“
本文主要介绍
SprinBoot
如有需要,可以参考
如有帮助,不忘 点赞 ❥
一、 缓存
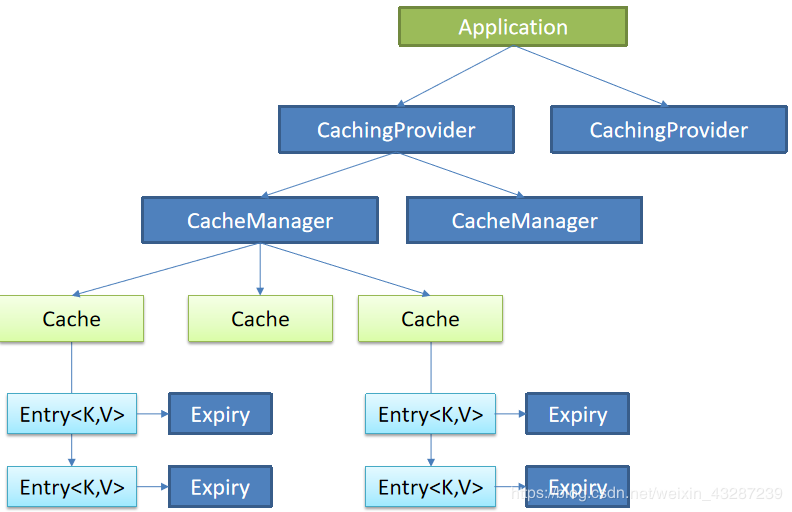
1)JSR107
Java Caching定义了5个核心接口,分别是 :
-
CachingProvider定义了创建、配置、获取、管理和控制多个CacheManager。一个应用可以在运行期访问多个CachingProvider。
-
CacheManager定义了创建、配置、获取、管理和控制多个唯一命名的Cache,这些Cache存在于CacheManager的上下文中。一个CacheManager仅被一个CachingProvider所拥有。
-
Cache是一个类似Map的数据结构并临时存储以Key为索引的值。一个Cache仅被一个CacheManager所拥有。
-
Entry是一个存储在Cache中的key-value对。
-
Expiry每一个存储在Cache中的条目有一个定义的有效期。一旦超过这个时间,条目为过期的状态。一旦过期,条目将不可访问、更新和删除。缓存有效期可以通过ExpiryPolicy设置。
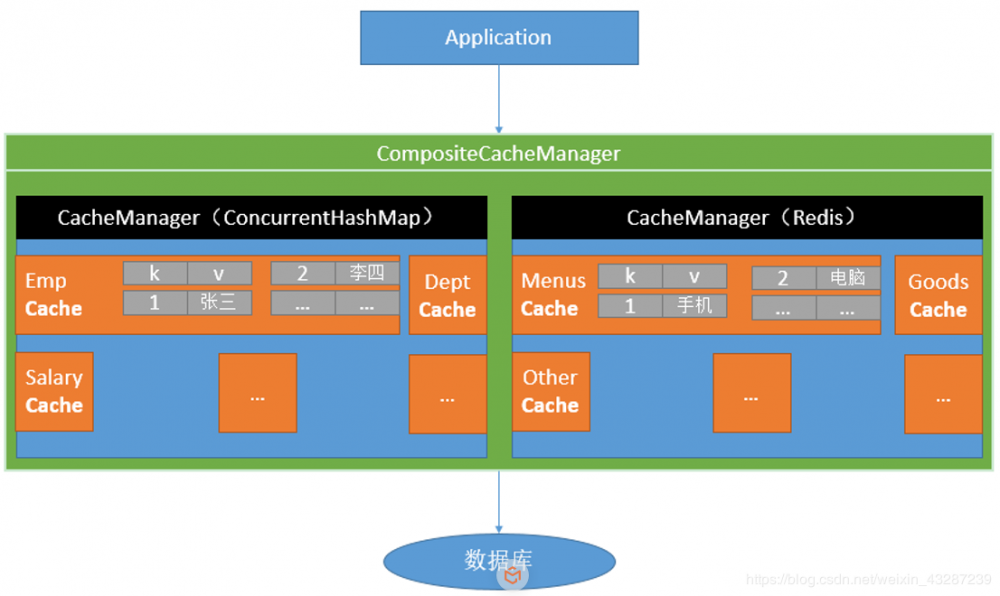
2)Spring缓存抽象
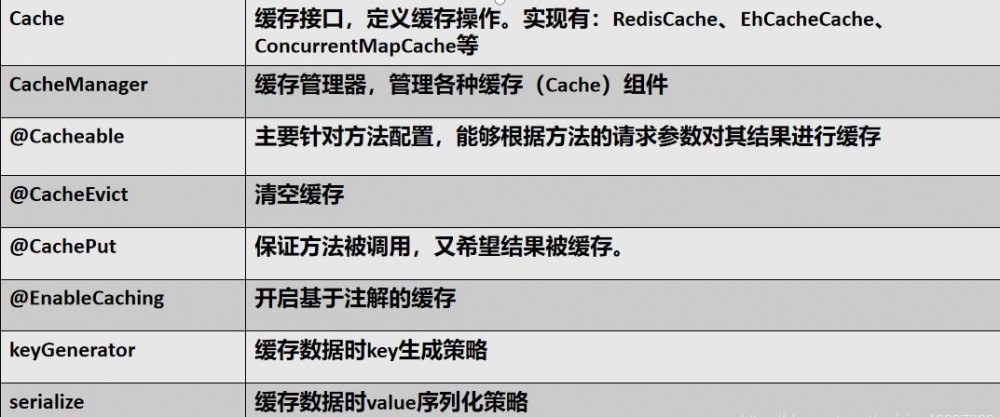
Spring从3.1开始定义了 org.springframework.cache.Cache 和 org.springframework.cache.CacheManager 接口来统一不同的缓存技术,并支持使用JCache(JSR-107)注解简化我们开发。
-
Cache接口为缓存的组件规范定义,包含缓存的各种操作集合 -
Cache接口下Spring提供了各种xxxCache的实现;如RedisCache,EhCacheCache,ConcurrentMapCache等 - 每次调用需要缓存功能的方法时,Spring会检查指定参数的指定的目标方法是否已经被调用过,如果有就直接从缓存中获取方法调用后的结果,如果没有就调用方法并缓存结果后返回给用户。下次调用直接从缓存中获取。
- 使用Spring缓存抽象时我们需要关注以下两点:
- 确定方法需要被缓存以及他们的缓存策略
- 从缓存中读取之前缓存存储的数据
3)几个重要缓存注解

4)缓存使用
- 引入
spring-boot-starter-cache模块
<dependency>
    <groupId>org.springframework.boot</groupId>
    <artifactId>spring-boot-starter-cache</artifactId>
</dependency>
复制代码
- 利用
@EnableCaching开启缓存
@MapperScan("cbuc.life.cache.mapper")
@SpringBootApplication
@EnableCaching
public class Springboot01CacheApplication {
    public static void main(String[] args) {
        SpringApplication.run(Springboot01CacheApplication.class, args);
    }
}
复制代码
- 注解使用
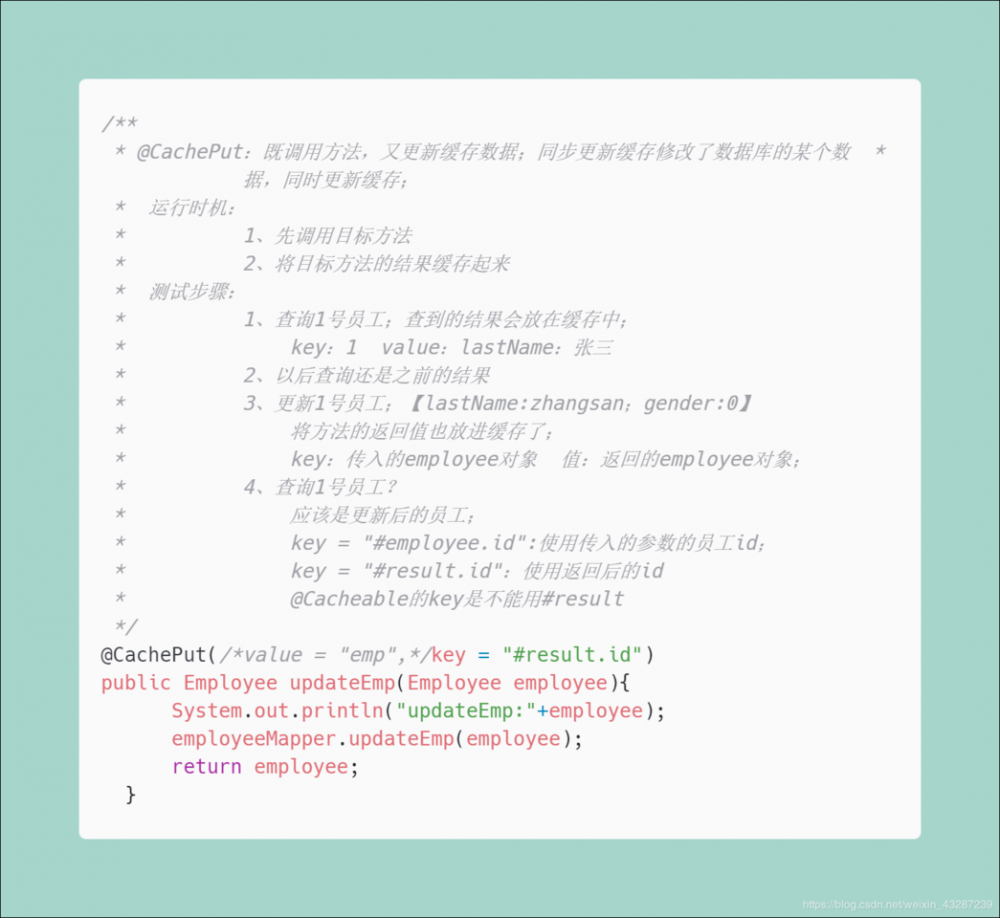
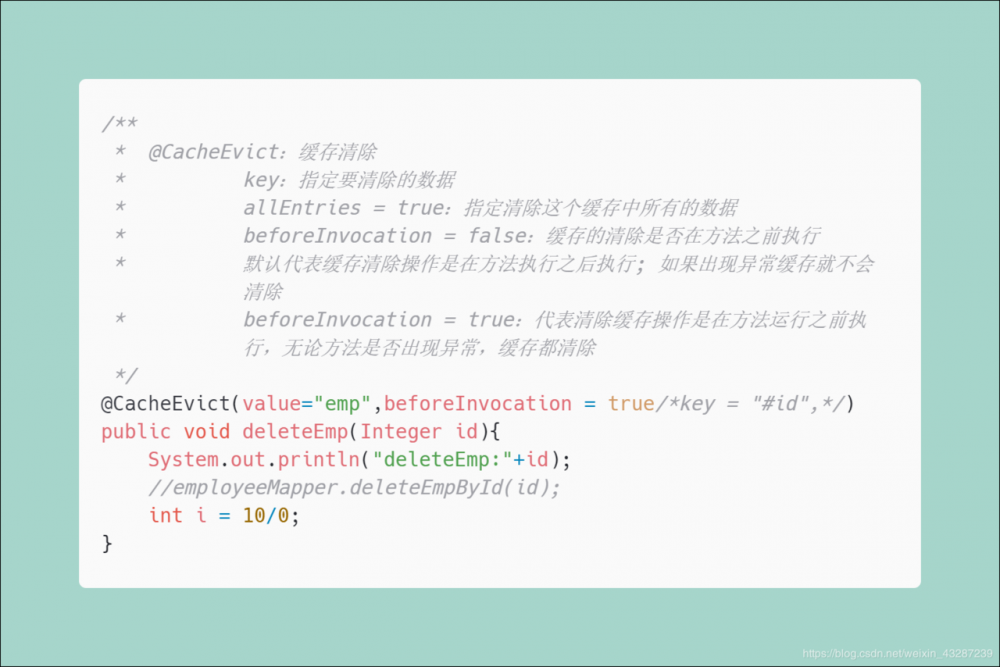
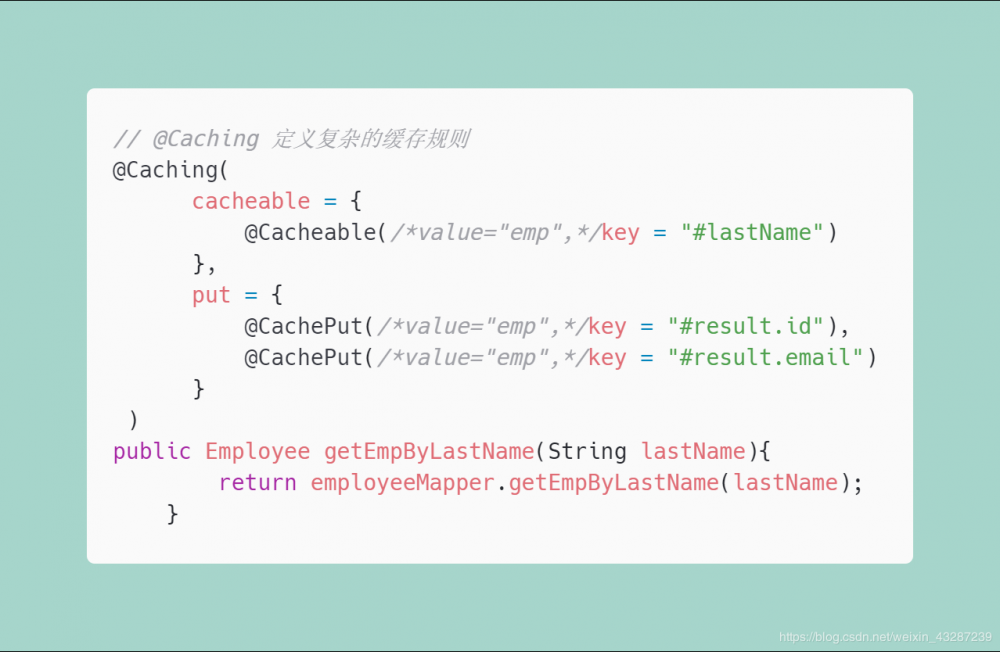
@Cacheable
@CacheEvict
@CachePut
将数据保存在 ConcurrentMap<Object, Object> 中
开发中使用缓存中间件: redis 、 memcached 、 ehcache
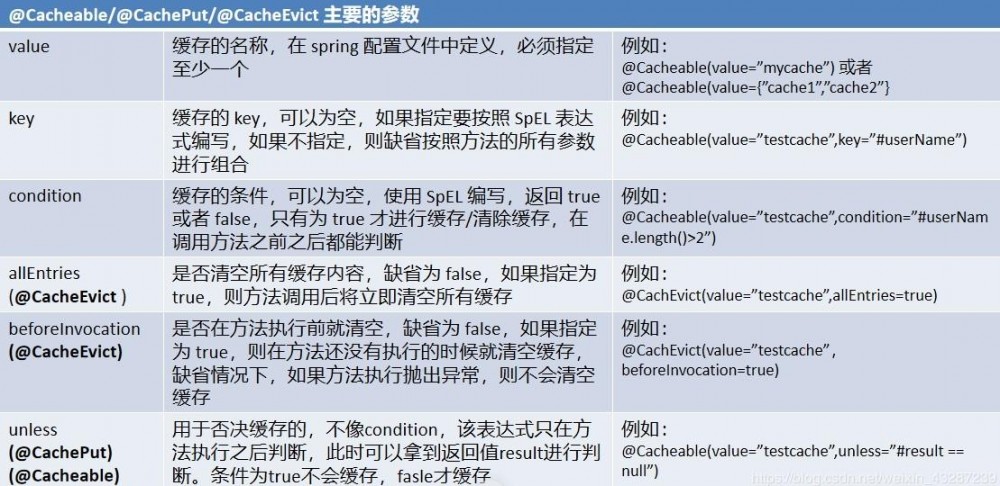
5)几大属性
cacheNames/value
key
keyGenerator
cacheManager
condition
unless
sync
-
示例1)
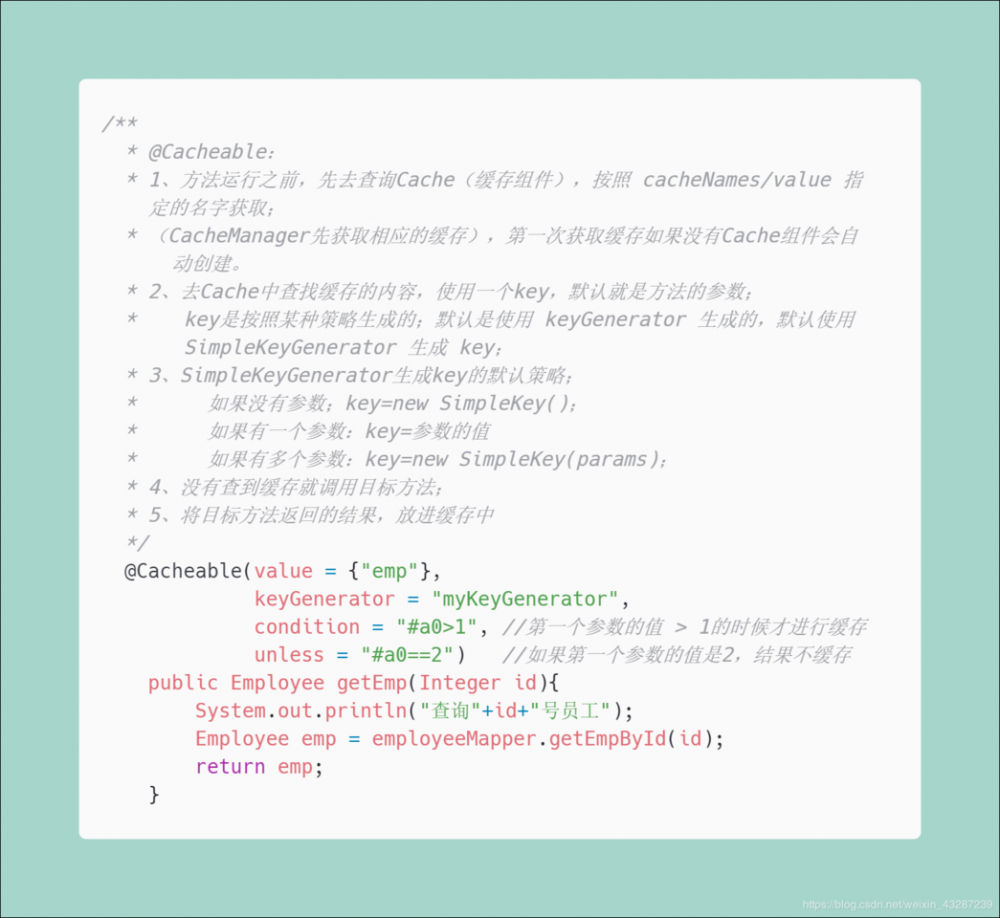
keyGenerator@Configuration public class MyCacheConfig { @Bean("myKeyGenerator") public KeyGenerator keyGenerator(){ return new KeyGenerator(){ @Override public Object generate(Object target, Method method, Object... params) { return method.getName()+"["+ Arrays.asList(params).toString()+"]"; } }; } } 复制代码
2)
3)
4)
6)整合redis
- 引入spring-boot-starter-data-redis
<dependency>
    <groupId>org.springframework.boot</groupId>
    <artifactId>spring-boot-starter-data-redis</artifactId>
</dependency>
复制代码
- application.yml配置 redis 连接地址
spring.redis.host=118.24.44.169
复制代码
-
使用ReditTemplate操作redis
常用方法 :
redisTemplate.opsForValue();    //操作字符串
redisTemplate.opsForHash();        //操作hash
redisTemplate.opsForList();        //操作list
redisTemplate.opsForSet();        //操作set
redisTemplate.opsForZSet();        //操作有序set
复制代码
-
配置缓存
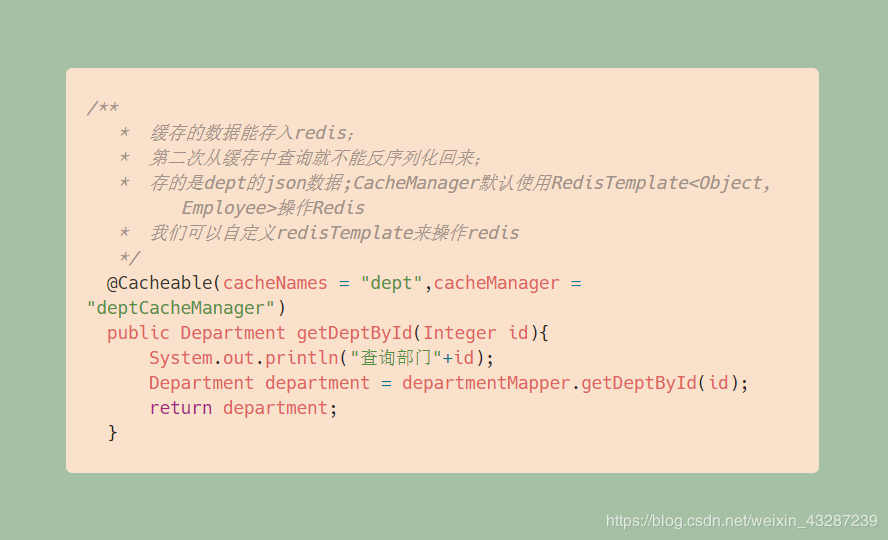
-
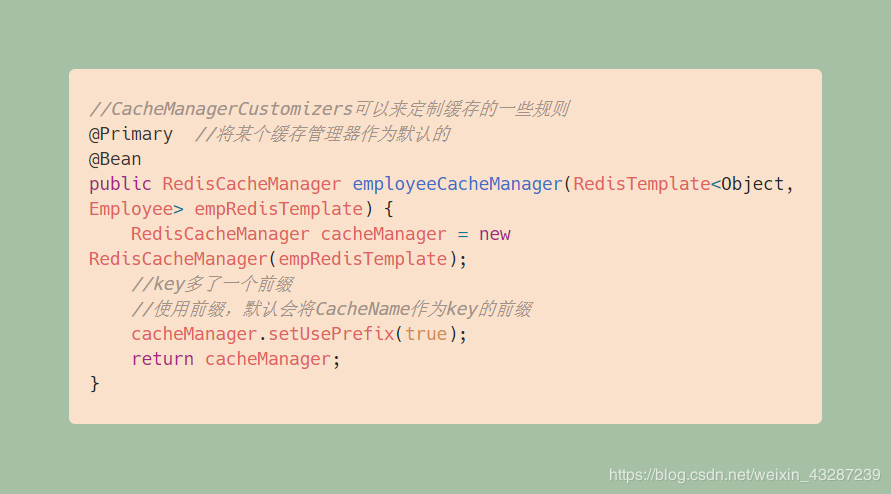
自定义redisTemplate

-
将自定义的redisTemplate注册进RedisCacheManager
二、消息
*大多应用中,可通过消息服务中间件来提升系统异步通信、扩展解耦能力 *
消息服务中两个重要概念:
- 消息代理(message broker)
- 目的地(destination)
当消息发送者发送消息以后,将由消息代理接管,消息代理保证消息传递到指定目的地。
消息队列主要有两种形式的目的地
- 队列(queue):点对点消息通信(point-to-point)
- 主题(topic):发布(publish)/订阅(subscribe)消息通信
点对点式
- 消息发送者发送消息,消息代理将其放入一个队列中,消息接收者从队列中获取消息内容,消息读取后被移出队列
- 消息只有唯一的发送者和接受者,但并不是说只能有一个接收者
发布订阅式
- 发送者(发布者)发送消息到主题,多个接收者(订阅者)监听(订阅)这个主题,那么就会在消息到达时同时收到消息
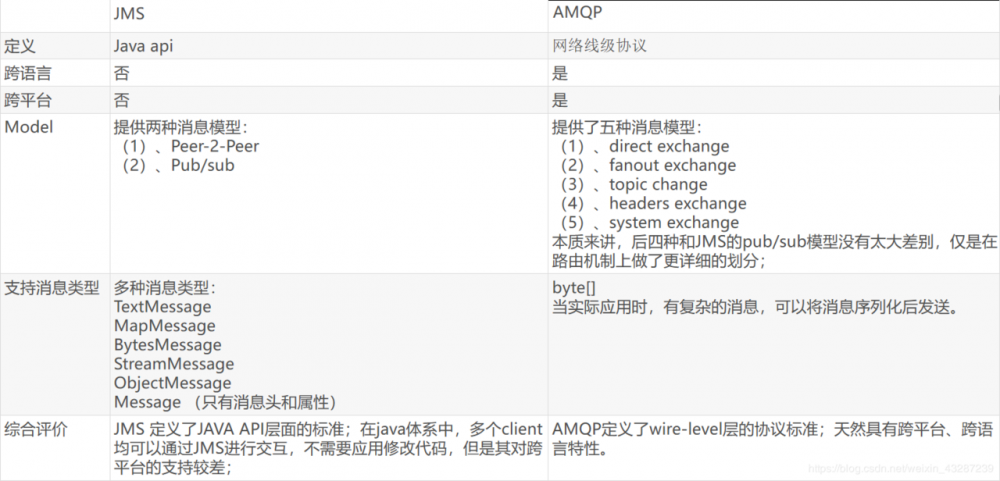
JMS(Java Message Service)JAVA消息服务
- 基于JVM消息代理的规范。ActiveMQ、HornetMQ是JMS实现
AMQP(Advanced Message Queuing Protocol)
- 高级消息队列协议,也是一个消息代理的规范,兼容JMS
- RabbitMQ是AMQP的实现
Spring支持
-
spring-jms提供了对JMS的支持 -
spring-rabbit提供了对AMQP的支持 - 需要
ConnectionFactory的实现来连接消息代理 - 提供
JmsTemplate、RabbitTemplate来发送消息 -
@JmsListener(JMS)、@RabbitListener(AMQP)注解在方法上监听消息代理发布的消息 -
@EnableJms、@EnableRabbit开启支持
Spring Boot自动配置
- JmsAutoConfiguration
- RabbitAutoConfiguration
RabbitMQ
简介 :
RabbitMQ是一个由erlang开发的AMQP(Advanved Message Queue Protocol)的开源实现。
核心概念 :
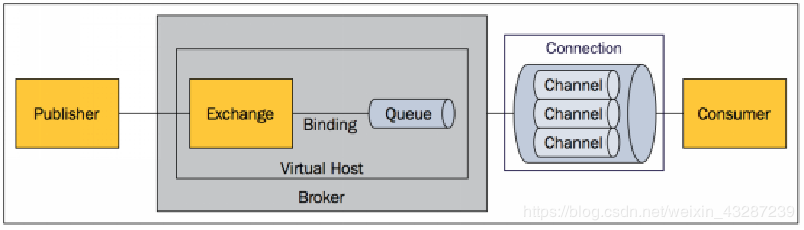
- Message:
消息,消息是不具名的,它由消息头和消息体组成。消息体是不透明的,而消息头则由一系列的可选属性组成,这些属性包括routing-key(路由键)、priority(相对于其他消息的优先权)、delivery-mode(指出该消息可能需要持久性存储)等。 - Publisher:
消息的生产者,也是一个向交换器发布消息的客户端应用程序。 - Consumer:
消息的消费者,表示一个从消息队列中取得消息的客户端应用程序。 - Exchange:
交换器,用来接收生产者发送的消息并将这些消息路由给服务器中的队列。
不同类型的Exchange转发消息的策略有所区别 -
direct(默认) -
fanout -
topic -
headers - Queue:
消息队列,用来保存消息直到发送给消费者。它是消息的容器,也是消息的终点。一个消息可投入一个或多个队列。消息一直在队列里面,等待消费者连接到这个队列将其取走。 - Binding:
绑定,用于消息队列和交换器之间的关联。一个绑定就是基于路由键将交换器和消息队列连接起来的路由规则,所以可以将交换器理解成一个由绑定构成的路由表。
Exchange 和Queue的绑定可以是多对多的关系。 - Connection:
网络连接,比如一个TCP连接。 - Channel:
信道,多路复用连接中的一条独立的双向数据流通道。信道是建立在真实的TCP连接内的虚拟连接,AMQP 命令都是通过信道发出去的,不管是发布消息、订阅队列还是接收消息,这些动作都是通过信道完成。因为对于操作系统来说建立和销毁 TCP 都是非常昂贵的开销,所以引入了信道的概念,以复用一条 TCP 连接。 - Virtual Host:
虚拟主机,表示一批交换器、消息队列和相关对象。虚拟主机是共享相同的身份认证和加密环境的独立服务器域。每个 vhost 本质上就是一个 mini 版的 RabbitMQ 服务器,拥有自己的队列、交换器、绑定和权限机制。vhost 是 AMQP 概念的基础,必须在连接时指定,RabbitMQ 默认的 vhost 是 / 。 - Broker:
表示消息队列服务器实体
运行机制 :
-
AMQP 中的消息路由
AMQP 中消息的路由过程和 Java 开发者熟悉的 JMS 存在一些差别,AMQP 中增加了
Exchange和Binding的角色。生产者把消息发布到Exchange上,消息最终到达队列并被消费者接收,而 Binding 决定交换器的消息应该发送到那个队列。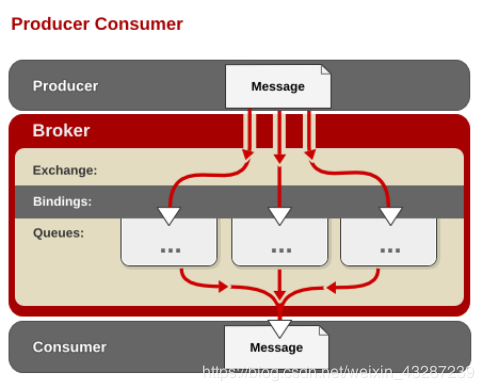
-
Exchange 类型
Exchange分发消息时根据类型的不同分发策略有区别,目前共四种类型: direct 、 fanout 、 topic 、 headers 。headers 匹配 AMQP 消息的* header 而不是路由键*, *headers 交换器和 direct 交换器完全一致*,但性能差很多,目前几乎用不到了,所以直接看另外三种类型:
-
direct

routing key)如果和Binding中的binding key一致, 交换器就将消息发到对应的队列中。路由键与队列名完全匹配,如果一个队列绑定到交换机要求路由键为“dog”,则只转发routing key标记为“dog”的消息,不会转发“dog.puppy”,也不会转发“dog.guard”等等。它是完全匹配、单播的模式。 -
fanout
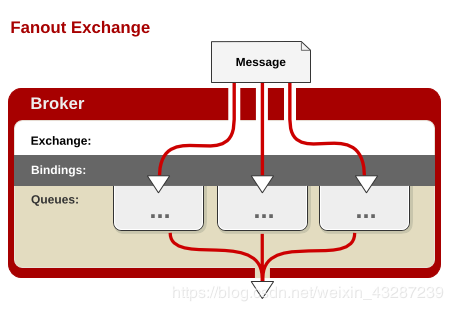
-
topic
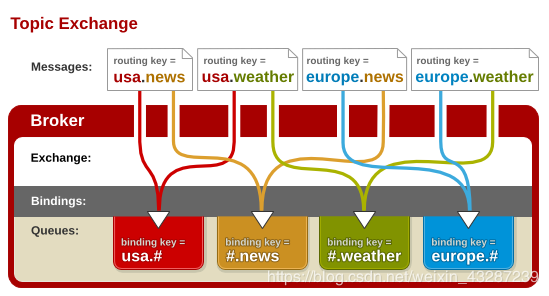
“#”和符号“*”。#匹配0个或多个单词,*匹配一个单词。
整合RabbitMQ
- 引入 spring-boot-starter-amqp
<dependency>
    <groupId>org.springframework.boot</groupId>
    <artifactId>spring-boot-starter-amqp</artifactId>
</dependency>
复制代码
- application.yml配置
spring.rabbitmq.host=118.24.44.169
spring.rabbitmq.username=guest
spring.rabbitmq.password=guest
复制代码
-
启动类
示例 :
- 自定义消息转换器,以Jackson的形式转换
@Configuration
public class MyAMQPConfig {
    @Bean
    public MessageConverter messageConverter(){
        return new Jackson2JsonMessageConverter();
    }
}
复制代码
- 注入Bean
/**
  * 注入我们需要的两个bean
  */
@Autowired
RabbitTemplate rabbitTemplate;
@Autowired
AmqpAdmin amqpAdmin;
复制代码
- 不同模式发送
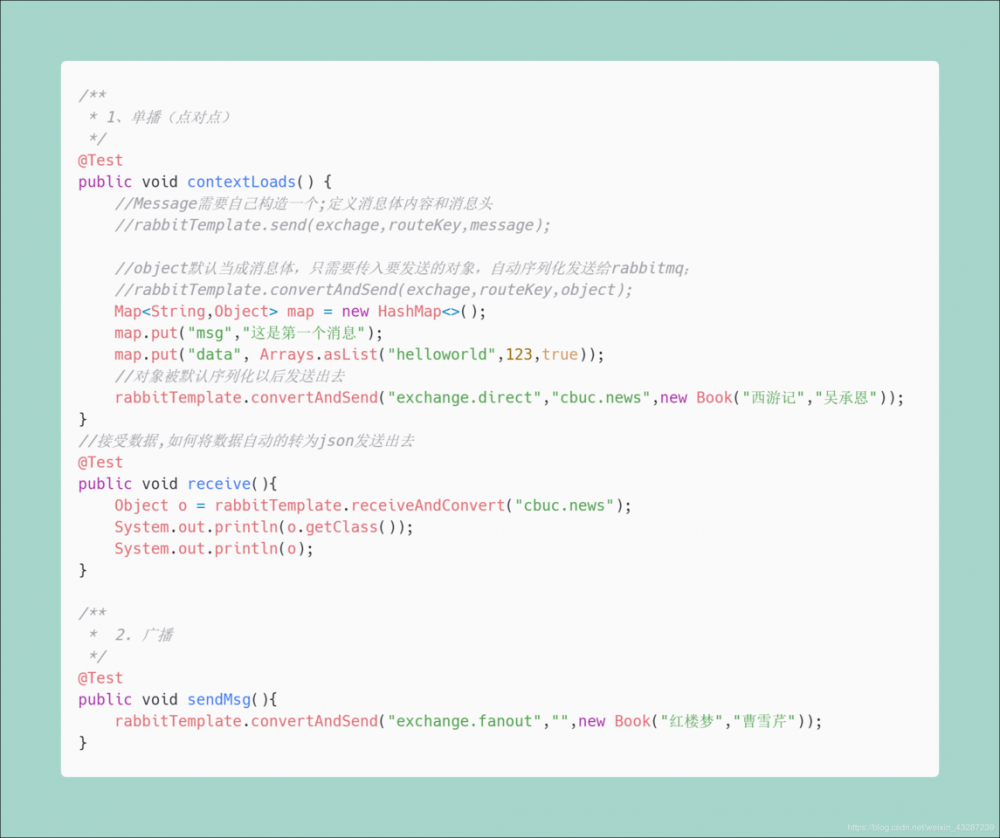
-
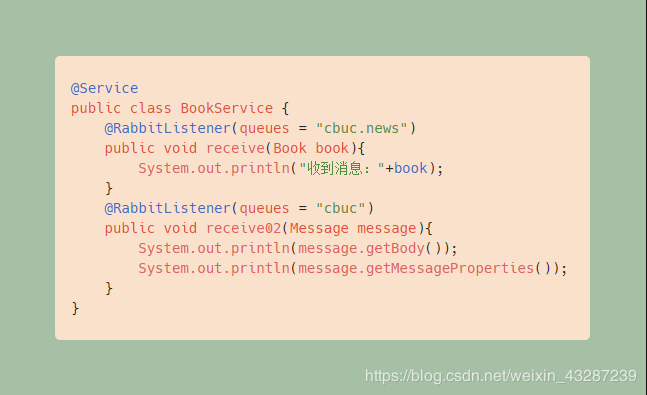
Service 中接收消息示例
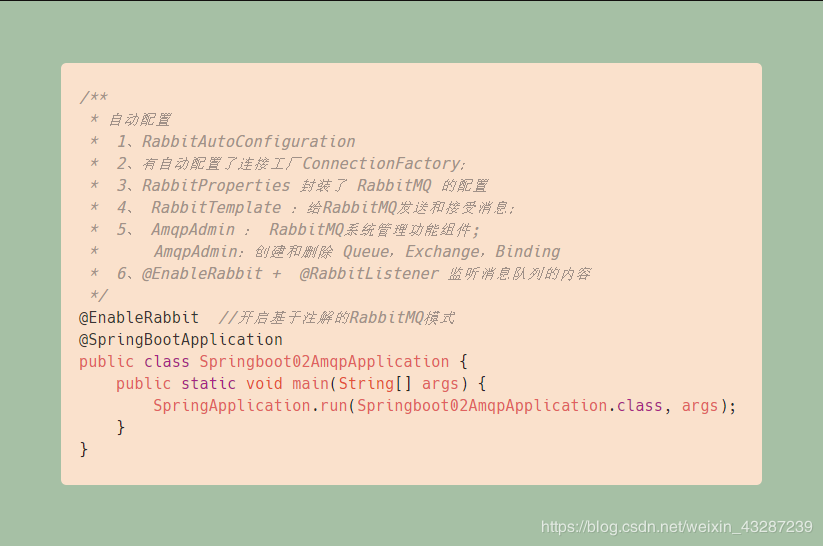
注意要在启动类中开启基于注解的RabbitMQ模式 :@EnableRabbit
三、检索
我们的应用经常需要添加检索功能,开源的 ElasticSearch 是目前全文搜索引擎的首选。他可以快速的存储、搜索和分析海量数据。Spring Boot通过整合 Spring Data ElasticSearch 为我们提供了非常便捷的检索功能支持;
Elasticsearch是一个分布式搜索服务,提供Restful API,底层基于Lucene,采用多shard(分片)的方式保证数据安全,并且提供自动resharding的功能,github等大型的站点也是采用了ElasticSearch作为其搜索服务
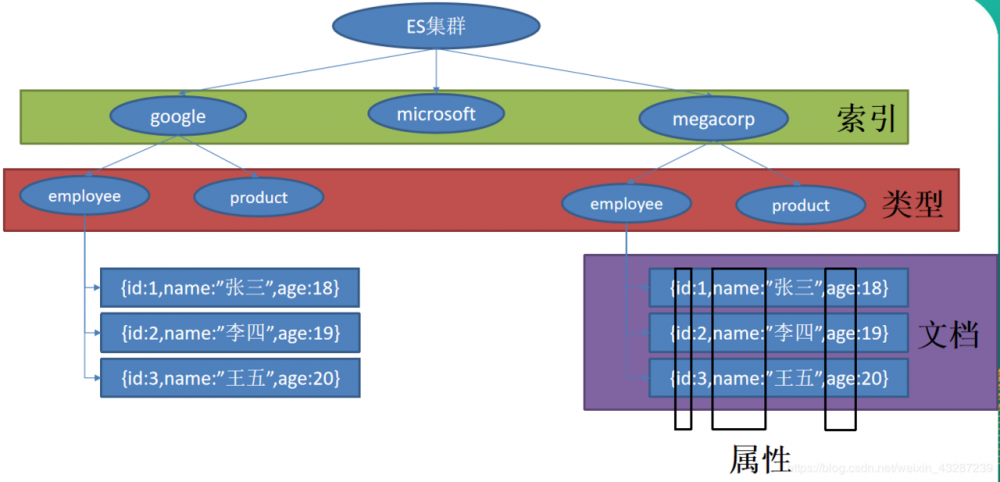
概念
以 员工文档 的形式存储为例:一个文档代表一个员工数据。存储数据到 ElasticSearch 的行为叫做索引,但在索引一个文档之前,需要确定将文档存储在哪里。
一个 ElasticSearch 集群可以 包含多个 索引,相应的每个索引可以包含多个 类型 。 这些不同的类型存储着多个 文档 ,每个文档又有 多个 属性 。
类似关系:
====
====
====
====
整合ElasticSearch
SpringBoot 默认支持两种技术来和 ES 交互
-
Jest(默认不生效)
导入jest的工具包
<dependency>
    <groupId>io.searchbox</groupId>
    <artifactId>jest</artifactId>
    <version>5.3.3</version>
</dependency>
复制代码
-
SpringData ElasticSearch
-
版本适配问题
- 升级SpringBoot版本
- 安装对应版本的ES
-
导入工具包
<!--SpringBoot默认使用SpringData ElasticSearch模块进行操作-->
<dependency>
    <groupId>org.springframework.boot</groupId>
    <artifactId>spring-boot-starter-data-elasticsearch</artifactId>
</dependency>
复制代码
- 安装Spring Data 对应版本的ElasticSearch
- application.properties配置
spring.data.elasticsearch.cluster-name=elasticsearch
spring.data.elasticsearch.cluster-nodes=118.24.44.169:9301
复制代码
- 测试
- 注入Bean:
@Document(indexName = "cbuc",type = "book")
public class Book {
    private Integer id;
    private String bookName;
    private String author;
    //省略 get/set方法
}

public class Article {
    @JestId
    private Integer id;
    private String author;
    private String title;
    private String content;
    //省略 get/set 方法
}
复制代码
- 编写 ElasticsearchRepository:
public interface BookRepository extends ElasticsearchRepository<Book,Integer> {
    //参照 https://docs.spring.io/spring-data/elasticsearch/docs/3.0.6.RELEASE/reference/html/
   public List<Book> findByBookNameLike(String bookName);
}
复制代码
- 引入所需要的Bean:
@Autowired
JestClient jestClient;
@Autowired
BookRepository bookRepository;
复制代码
法1:
存入index:
Book book = new Book();
book.setId(1);
book.setBookName("西游记");
book.setAuthor("吴承恩");
bookRepository.index(book);
复制代码
取:
for (Book book : bookRepository.findByBookNameLike("游")) {
    System.out.println(book);
}
复制代码
法2:
//给Es中索引(保存)一个文档:
Article article = new Article();
article.setId(1);
article.setTitle("测试");
article.setAuthor("cbuc");
article.setContent("测试检索");
//构建一个索引功能
Index index = new Index.Builder(article).index("cbuc").type("news").build();
//执行
jestClient.execute(index);
复制代码
测试搜索:
//查询表达式
@Test
public void search(){
    //查询表达式
    String json ="{/n" +
            "    /"query/" : {/n" +
            "        /"match/" : {/n" +
            "            /"content/" : /"hello/"/n" +
            "        }/n" +
            "    }/n" +
            "}";
    //更多操作: https://github.com/searchbox-io/Jest/tree/master/jest
    //构建搜索功能
    Search search = new Search.Builder(json).addIndex("cbuc").addType("news").build();
    //执行
    try {
        SearchResult result = jestClient.execute(search);
        System.out.println(result.getJsonString());
    } catch (IOException e) {
        e.printStackTrace();
    }
}
复制代码
四、任务
异步任务
在Java应用中,绝大多数情况下都是通过同步的方式来实现交互处理的。但是在处理与第三方系统交互的时候,容易造成响应迟缓的情况,之前大部分都是使用多线程来完成此类任务,其实,在Spring 3.x之后,就已经内置了@Async来完美解决这个问题。
两个注解:
@EnableAysnc
@Aysnc
使用:
- 启动类开启异步注解功能
@EnableAsync  //开启异步注解功能
@SpringBootApplication
public class Springboot04TaskApplication {
    public static void main(String[] args) {
        SpringApplication.run(Springboot04TaskApplication.class, args);
    }
}
复制代码
- Service:
@Service
public class AsyncService {
    //告诉Spring这是一个异步方法
    @Async
    public void test(){
        try {
            //当前线程睡眠 3 秒页面也能及时响应
            Thread.sleep(3000);
        } catch (InterruptedException e) {
            e.printStackTrace();
        }
        System.out.println("处理数据中...");
    }
}
复制代码
- Controller:
@RestController
public class AsyncController {
    @Autowired
    AsyncService asyncService;
    @GetMapping("/hello")
    public String hello(){
        asyncService.test();
        return "success";
    }
}
复制代码
定时任务
项目开发中经常需要执行一些定时任务,比如需要在每天凌晨时候,分析一次前一天的日志信息。Spring为我们提供了异步执行任务调度的方式,提供 TaskExecutor 、 TaskScheduler 接口。
两个注解:
@EnableScheduling
@Scheduled
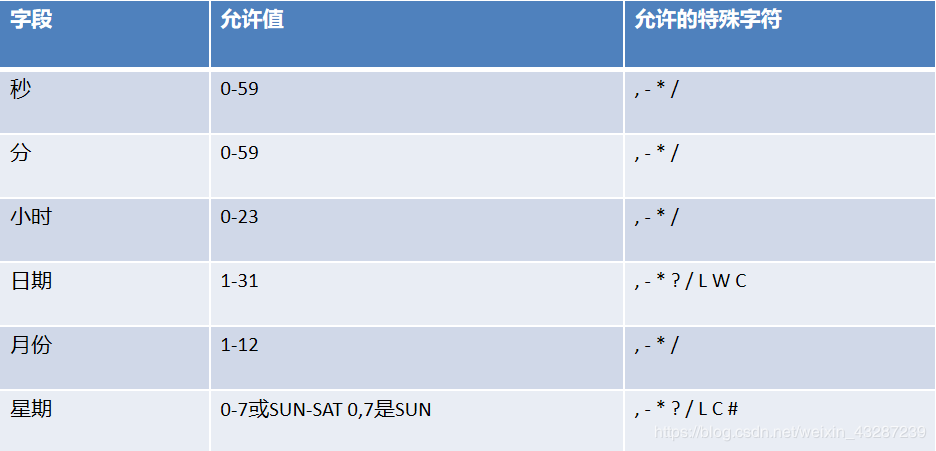
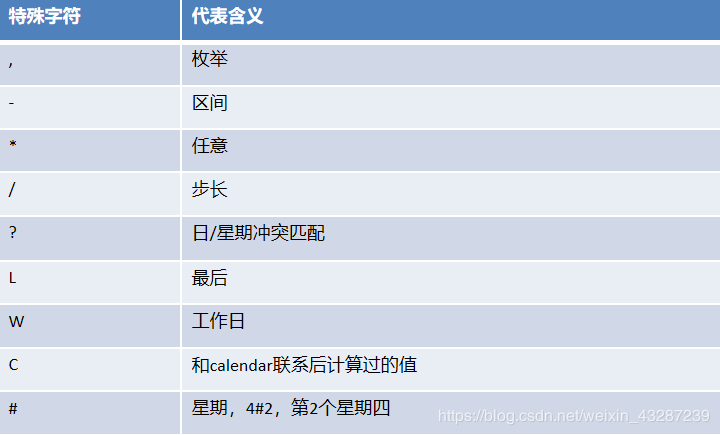
cron表达式:
使用:
- 启动类开启基于注解的定时任务:
@EnableScheduling //开启基于注解的定时任务
@SpringBootApplication
public class Springboot04TaskApplication {
    public static void main(String[] args) {
        SpringApplication.run(Springboot04TaskApplication.class, args);
    }
}
复制代码
-
Service:

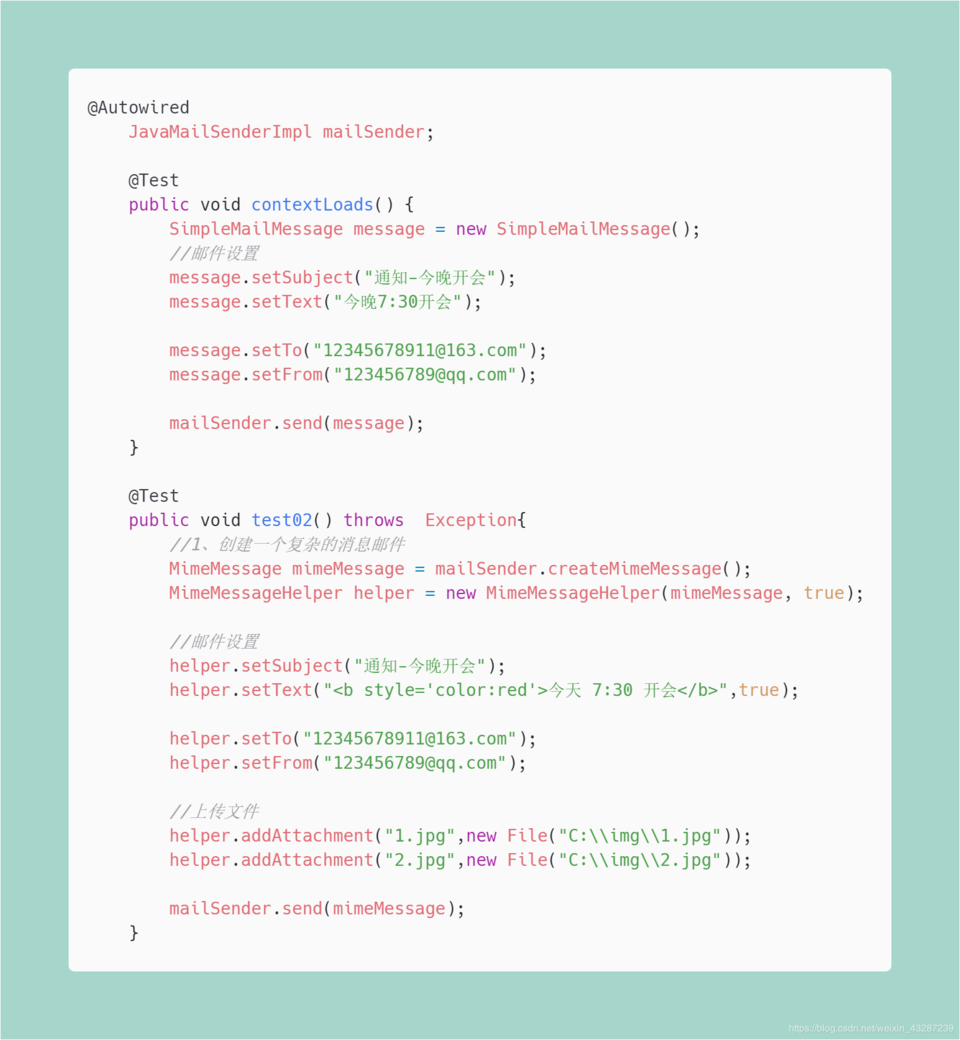
邮件任务
使用 :
- 邮件发送需要引入spring-boot-starter-mail
<dependency>
    <groupId>org.springframework.boot</groupId>
    <artifactId>spring-boot-starter-mail</artifactId>
</dependency>
复制代码
- 定义MailProperties内容,配置在application.properties中
spring.mail.username=(发送人qq账号)
spring.mail.password=(发送人qq密码)
spring.mail.host=smtp.qq.com
spring.mail.properties.mail.smtp.ssl.enable=true
复制代码
-
自动装配JavaMailSender
五、分布式系统
单一应用架构
当网站流量很小时,只需一个应用,将所有功能都部署在一起,以减少部署节点和成本。此时,用于简化增删改查工作量的数据访问框架(ORM)是关键。
垂直应用架构
当访问量逐渐增大,单一应用增加机器带来的加速度越来越小,将应用拆成互不相干的几个应用,以提升效率。此时,用于加速前端页面开发的Web框架(MVC)是关键。
流动计算架构
当服务越来越多,容量的评估,小服务资源的浪费等问题逐渐显现,此时需增加一个调度中心基于访问压力实时管理集群容量,提高集群利用率。此时,用于提高机器利用率的资源调度和治理中心(SOA)是关键
分布式服务架构
当垂直应用越来越多,应用之间交互不可避免,将核心业务抽取出来,作为独立的服务,逐渐形成稳定的服务中心,使前端应用能更快速的响应多变的市场需求。此时,用于提高业务复用及整合的分布式服务框架(RPC)是关键。
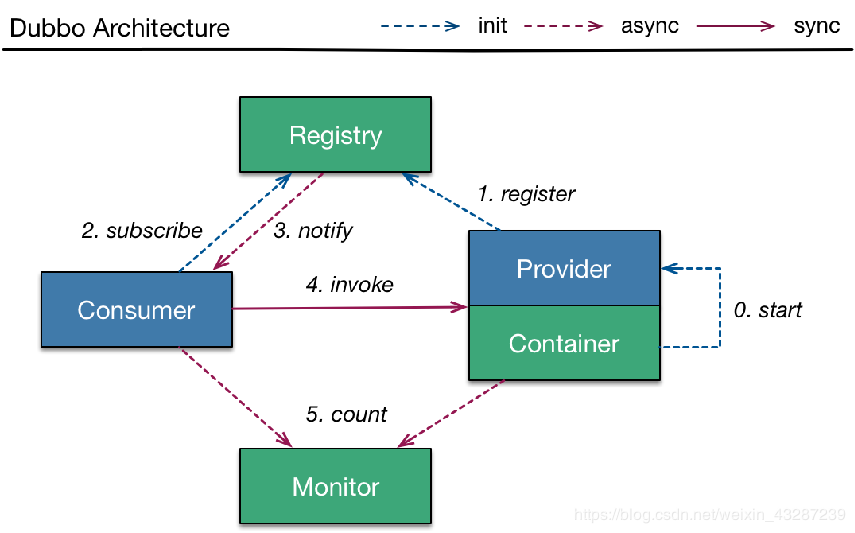
Zookeeper和Dubbo
ZooKeeper:
是一个分布式的,开放源码的分布式应用程序协调服务。它是一个为分布式应用提供一致性服务的软件,提供的功能包括:配置维护、域名服务、分布式同步、组服务等。
Dubbo:
是Alibaba开源的分布式服务框架,它最大的特点是按照分层的方式来架构,使用这种方式可以使各个层之间解耦合(或者最大限度地松耦合)。从服务模型的角度来看,Dubbo采用的是一种非常简单的模型,要么是提供方提供服务,要么是消费方消费服务,所以基于这一点可以抽象出服务提供方(Provider)和服务消费方(Consumer)两个角色。
使用:
- 安装zookeeper作为注册中心
- 编写服务提供者
引入dubbo和zkclient相关依赖
<dependency>
      <groupId>com.alibaba.boot</groupId>
      <artifactId>dubbo-spring-boot-starter</artifactId>
      <version>0.1.0</version>
</dependency>

<!--引入zookeeper的客户端工具-->
<!-- https://mvnrepository.com/artifact/com.github.sgroschupf/zkclient -->
<dependency>
      <groupId>com.github.sgroschupf</groupId>
      <artifactId>zkclient</artifactId>
      <version>0.1</version>
</dependency>
复制代码
配置dubbo的扫描包和注册中心地址
  dubbo.application.name=provider-ticket
  dubbo.registry.address=zookeeper://118.24.44.169:2181
  dubbo.scan.base-packages=cbuc.life.ticket.service
复制代码
使用@Service发布服务
  @Component
  @Service //将服务发布出去  注意注解 Service是dubbo包下的
  public class TicketServiceImpl implements TicketService {
      @Override
      public String getTicket() {
          return "《我和我的祖国》";
      }
  }
复制代码
- 编写服务消费者
引入dubbo和zkclient相关依赖
  <dependency>
      <groupId>com.alibaba.boot</groupId>
      <artifactId>dubbo-spring-boot-starter</artifactId>
      <version>0.1.0</version>
  </dependency>

  <!--引入zookeeper的客户端工具-->
  <!-- https://mvnrepository.com/artifact/com.github.sgroschupf/zkclient -->
  <dependency>
      <groupId>com.github.sgroschupf</groupId>
      <artifactId>zkclient</artifactId>
      <version>0.1</version>
  </dependency>
复制代码
引用服务
  @Service
  public class UserService{
      @Reference    // 使用 Reference 引入服务
      TicketService ticketService;
      public void hello(){
          String ticket = ticketService.getTicket();
          System.out.println("调用买票服务:"+ticket);
      }
  }
复制代码
Spring Boot和Spring Cloud
Spring Cloud是一个分布式的整体解决方案。Spring Cloud 为开发者提供了在分布式系统(配置管理,服务发现,熔断,路由,微代理,控制总线,一次性token,全局琐,leader选举,分布式session,集群状态)中快速构建的工具,使用Spring Cloud的开发者可以快速的启动服务或构建应用、同时能够快速和云平台资源进行对接。
SpringCloud分布式开发五大常用组件 :
-
服务发现 ——
Netflix Eureka -
客服端负载均衡 ——
Netflix Ribbon -
断路器 ——
Netflix Hystrix -
服务网关 ——
Netflix Zuul -
分布式配置 ——
Spring Cloud Config
使用 :
- 引入Eureka注册中心
<dependencyManagement>
    <dependencies>

        <dependency>
            <groupId>org.springframework.cloud</groupId>
            <artifactId>spring-cloud-starter-eureka-server</artifactId>
        </dependency>

        <dependency>
            <groupId>org.springframework.cloud</groupId>
            <artifactId>spring-cloud-dependencies</artifactId>
            <version>Edgware.SR3</version>
            <type>pom</type>
            <scope>import</scope>
        </dependency>

    </dependencies>
</dependencyManagement>
复制代码
- 配置application
server:
  port: 8761
eureka:
  instance:
    hostname: eureka-server  # eureka实例的主机名
  client:
    register-with-eureka: false #不把自己注册到eureka上
    fetch-registry: false #不从eureka上来获取服务的注册信息
    service-url:
      defaultZone: http://localhost:8761/eureka/
复制代码
- 启动类:
@EnableEurekaServer
@SpringBootApplication
public class EurekaServerApplication {
    public static void main(String[] args) {
        SpringApplication.run(EurekaServerApplication.class, args);
    }
}
复制代码
-
创建provider
引入依赖
<dependencyManagement>
  <dependencies>
  <dependency>
      <groupId>org.springframework.cloud</groupId>
      <artifactId>spring-cloud-starter-eureka-server</artifactId>
  </dependency>

  <dependency>
      <groupId>org.springframework.cloud</groupId>
      <artifactId>spring-cloud-dependencies</artifactId>
      <version>Edgware.SR3</version>
      <type>pom</type>
      <scope>import</scope>
  </dependency>
复制代码
</ dependencies >
</ dependencyManagement >
复制代码
配置application
server:
port: 8002
spring:
application:
  name: provider-ticket
eureka:
instance:
  prefer-ip-address: true # 注册服务的时候使用服务的ip地址
client:
  service-url:
    defaultZone: http://localhost:8761/eureka/
复制代码
启动类
@SpringBootApplication
public class ProviderTicketApplication {
  public static void main(String[] args) {
      SpringApplication.run(ProviderTicketApplication.class, args);
  }
}
复制代码
service
@Service
public class TicketService {

  public String getTicket(){
      return "《我和我的祖国》";
  }
}
复制代码
controller
@RestController public class TicketController { @Autowired TicketService ticketService; @GetMapping("/ticket") public String getTicket(){ return ticketService.getTicket(); } } 复制代码 -
创建consumer
引入依赖
<dependencyManagement>
  <dependencies>
  <dependency>
      <groupId>org.springframework.cloud</groupId>
      <artifactId>spring-cloud-dependencies</artifactId>
      <version>Edgware.SR3</version>
      <type>pom</type>
      <scope>import</scope>
  </dependency>

  <dependency>
      <groupId>org.springframework.cloud</groupId>
      <artifactId>spring-cloud-starter-eureka-server</artifactId>
  </dependency>
复制代码
</ dependencies >
</ dependencyManagement >
复制代码
配置application
spring:
application:
  name: consumer-user
server:
port: 8200
eureka:
instance:
  prefer-ip-address: true # 注册服务的时候使用服务的ip地址
client:
  service-url:
    defaultZone: http://localhost:8761/eureka/
复制代码
启动类
@EnableDiscoveryClient //开启发现服务功能
@SpringBootApplication
public class ConsumerUserApplication {

  public static void main(String[] args) {
      SpringApplication.run(ConsumerUserApplication.class, args);
  }

  @LoadBalanced //使用负载均衡机制
  @Bean
  public RestTemplate restTemplate(){
      return new RestTemplate();
  }
}
复制代码
controller (通过使用RestTemplate调用服务)
@RestController
public class UserController {

  @Autowired
  RestTemplate restTemplate;

  @GetMapping("/buy")
  public String buyTicket(String name){
      String s = restTemplate.getForObject("http://PROVIDER-TICKET/ticket", String.class);
      return name+"购买了"+s;
  }
}
复制代码

“
今天的你多努力一点,明天的你就能少说一句求人的话!
我是小菜,一个和你一起学习的男人。 :kiss:

正文到此结束
- 本文标签: ORM map 缓存 快的 云 Spring Boot RESTful 同步 源码 https Hystrix 域名 http message 网站 amqp value IO 开发者 开发 站点 Elasticsearch GitHub dist pom Word find Spring cloud Document bean zookeeper JVM REST id 管理 consumer 测试 git 本质 TCP 主机 ActiveMQ cat Spring Cloud Config key executor UI 操作系统 web rabbitmq 多线程 client db 凌晨 tar springcloud HTML Service 安全 索引 Eureka 应用架构 IDE provider 协议 ip 一致性 时间 ask JMS 互联网 zuul 消息队列 cache 配置 部署 dependencies java springboot API build node 网站流量 负载均衡 token App connectionFactory 集群 session 软件 Master redis dubbo ssl 模型 需求 src 任务调度 压力 Netflix json mapper 安装 加密 参数 spring 分布式 SOA Connection 认证 删除 js sharding CTO queue 搜索引擎 注册中心 list MQ 数据 开源 服务器 分布式系统 代码 lib mail ACE 线程 ribbon 实例
- 版权声明: 本文为互联网转载文章,出处已在文章中说明(部分除外)。如果侵权,请联系本站长删除,谢谢。
- 本文海报: 生成海报一 生成海报二
热门推荐


相关文章


Loading...
![[HBLOG]公众号](https://www.liuhaihua.cn/img/qrcode_gzh.jpg)

