根据plist文件来加载页面
以下给大家代码以及相应的plist文件的截图如下:
#import "SZMSettingsController.h" @interface SZMSettingsController () @property (nonatomic,strong)NSArray *groups; @end @implementation SZMSettingsController //确定用户创建tableview的时候为分组样式 - (instancetype)init { return [super initWithStyle:UITableViewStyleGrouped]; } - (instancetype)initWithStyle:(UITableViewStyle)style { return [super initWithStyle:UITableViewStyleGrouped]; } //懒加载plist文件到groups中 - (NSArray *)groups{ if (_groups == nil) { _groups = [NSArray arrayWithContentsOfFile:[[NSBundle mainBundle]pathForResource:@"SZMSettings.plist" ofType:nil]]; } return _groups; } - (void)viewDidLoad { [super viewDidLoad]; UIBarButtonItem *LenfBtn = [[UIBarButtonItem alloc]initWithImage:[UIImage imageNamed:@"NavBack"] style:UIBarButtonItemStylePlain target:self action:@selector(goToPre)]; self.navigationItem.leftBarButtonItem = LenfBtn; } - (void)goToPre{ [self.navigationController popViewControllerAnimated:YES]; } #pragma mark 数据源方法 //返回多少组 -(NSInteger)numberOfSectionsInTableView:(UITableView *)tableView{ return self.groups.count; } // 每组返回多少行 - (NSInteger)tableView:(UITableView *)tableView numberOfRowsInSection:(NSInteger)section { NSDictionary *groupDict = self.groups[section]; NSArray *items = groupDict[@"items"]; return items.count; } - (UITableViewCell *)tableView:(UITableView *)tableView cellForRowAtIndexPath:(NSIndexPath *)indexPath { //1.获取数据 NSDictionary *groupDict = self.groups[indexPath.section]; NSDictionary *item = groupDict[@"items"][indexPath.row]; //2.创建cell static NSString *ID = @"setCell"; UITableViewCell *cell = [tableView dequeueReusableCellWithIdentifier:ID]; if (cell == nil) { cell = [[UITableViewCell alloc]initWithStyle:UITableViewCellStyleDefault reuseIdentifier:ID]; } //3.把数据设置给cell cell.textLabel.text = item[@"title"]; cell.imageView.image = [UIImage imageNamed:item[@"icon"]]; //设置右侧的accessoryview if (item[@"accessory"]) { //根据配置文件中的字符串(item[@"accessory"]在plist文件中对应的字符串)来创建对应的类 Class accessoryCalss = NSClassFromString(item[@"accessory"]); //创建这个类型的对象 id obj = [[accessoryCalss alloc]init]; if ([obj isKindOfClass:[UIImageView class]]) { //表示是图片框 UIImageView *imgView = (UIImageView *)obj; imgView.image = [UIImage imageNamed:item[@"accessoryImage"]]; //调整图片框与图片大小相同 [imgView sizeToFit]; } //设置cell的accessoryView为动态的创建的这个类型 cell.accessoryView = obj; } //4.返回cell return cell; } @end 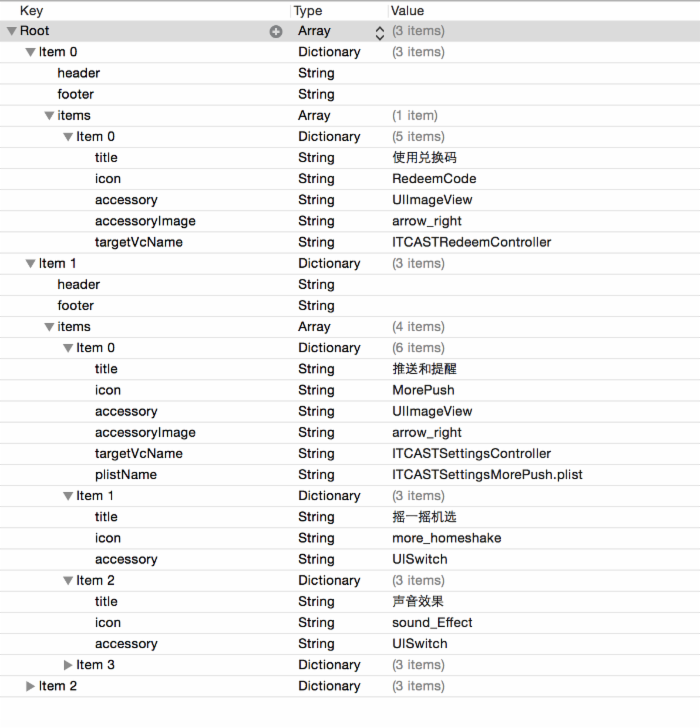
正文到此结束
热门推荐


相关文章


Loading...
![[HBLOG]公众号](http://www.liuhaihua.cn/img/qrcode_gzh.jpg)

