Android Handler消息机制
就应用程序而言,Android系统中Java的应用程序和其他系统上相同,都是靠消息驱动来工作的,它们大致的工作原理如下:
- 有一个消息队列,可以往这个消息队列中投递消息。
- 有一个消息循环,不断从消息队列中获取消息,然后处理。
示意图如下:
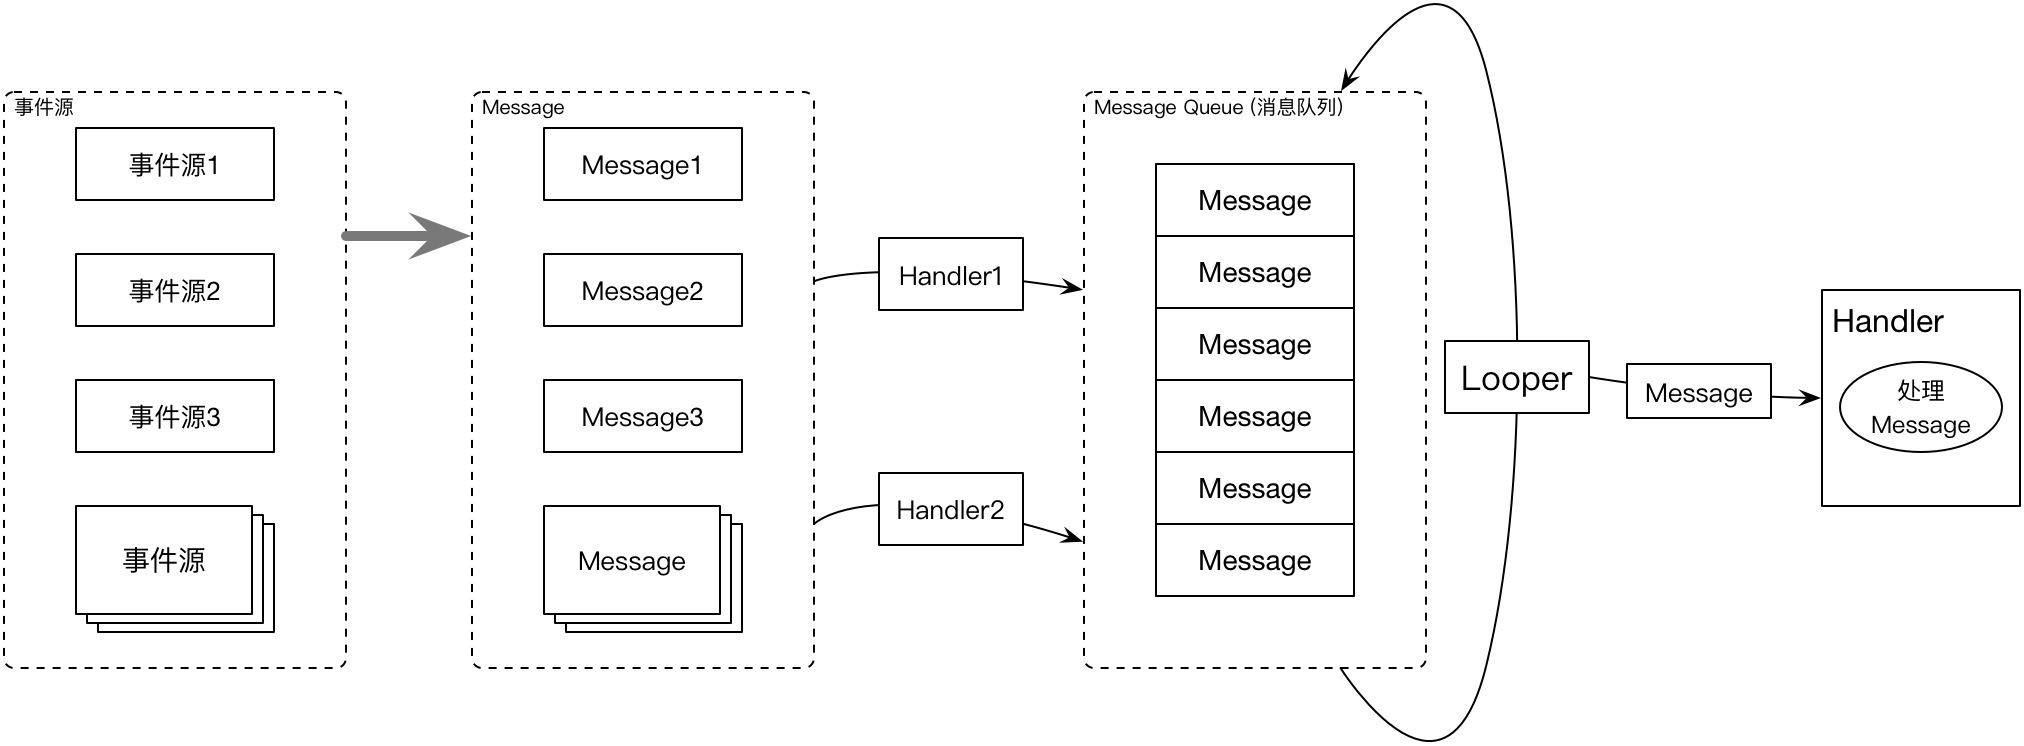
- 事件源把需要处理的消息加入到消息队列中,一般是放到队列的队尾,或者安装优先级来放置消息。
- 处理线程不断从消息队列中提取消息并处理。
在Android系统中,这个消息机制是有Looper(包含一个MessageQueue)和Handler来完成的。
- Looper类,用于封装消息循环,并且包含一个消息队列MessageQueue。
- Handler类,封装了消息的投递和消息的处理。
本文主要从Framework层展开的,对Native层的展开推荐 这篇文章 。
Message
消息机制,最基础的应该就是这个载体——消息了。Android上使用Message类表示一个消息,这个Message可以通过Handler传递,通过Looper进行分发,通过MessageQueue进行排列组队,最后通过Handler进行处理。
先看一下Message的基本成员,我们在使用中经常会用到:
// 用来保存消息标示,不同的Handler拥有不同的命名空间(name-space),不同担心what冲突
public int what;
// arg1和arg2是用来存放整型数据的
public int arg1;
public int arg2;
// Object类型的任意对象
public Object obj;

// replyTo和replyTo与Messenger通信相关
public Messenger replyTo;
public int replyTo = -1;
关于replyTo可以查看 这里 和 这里
还有消息机制中重要的成员:
// 标记消息,FLAG_IN_USE,FLAG_ASYNCHRONOUS等
int flags;
// 消息的投递时间,单位为毫秒
long when;
// 传递的数据
Bundle data;
// 消息最终执行的Handler
Handler target;
// 消息执行时的回调,Handler post的Runnable
Runnable callback;
// 下一个消息,通过next可以实现一个链表
Message next;
并且,Message内部保存了一个缓存的消息池,我们可以用obtain从缓存池获得一个消息,Message使用完后系统会调用recycle回收。
// Message缓存链表
private static Message sPool;
// 缓存最大值
private static final int MAX_POOL_SIZE = 50;
那么,缓存和回收是怎么实现的?
public static Message obtain() {
   synchronized (sPoolSync) {
       if (sPool != null) {
           Message m = sPool;
           sPool = m.next;
           m.next = null;
           m.flags = 0; // clear in-use flag
           sPoolSize--;
           return m;
       }
   }
   return new Message();
}
通过obtain获取缓存池链表的第一个Message返回,将第一个Message的next的Message作为第一个。其实就是查看缓存池是否有对象,有就返回缓存的对象,没有就创建新对象。
void recycleUnchecked() {
   flags = FLAG_IN_USE;
   what = 0;
   arg1 = 0;
   arg2 = 0;
   obj = null;
   replyTo = null;
   sendingUid = -1;
   when = 0;
   target = null;
   callback = null;
   data = null;

   synchronized (sPoolSync) {
       if (sPoolSize < MAX_POOL_SIZE) {
           next = sPool;
           sPool = this;
           sPoolSize++;
       }
   }
}
回收Message的时候,如果缓存池没满的话,将Message的成员清空之后放入缓存池。
由于Message具有缓存能力,所以我们在创建Message对象的时候最好使用obtain。
Looper
消息Message通过Handler传递给Looper,Looper通过封装一个消息队列MessageQueue来进行消息存放和分发。
Looper类主要是通过prepare方法进行准备和loop方法进行循环获取消息队列的消息进行分发处理。
1.prepare
private static void prepare(boolean quitAllowed) {
    if (sThreadLocal.get() != null) {
        throw new RuntimeException("Only one Looper may be created per thread");
    }
    sThreadLocal.set(new Looper(quitAllowed));
}
通过prepare方法,为当前调用线程生成一个Looper对象,这个对象保存在ThreadLocal( 关于ThreadLocal )中。通过这种方式使Looper和调用线程(最终的处理线程)进行关联,保证每个调用线程只会有一个Looper对象。
private Looper(boolean quitAllowed) {
   mQueue = new MessageQueue(quitAllowed);
   mThread = Thread.currentThread();
}
Looper在构成方法中,新建一个消息队列和获取当前线程。构成方法的参数quitAllowed,是给MessageQueue使用的,用来标记这个消息队列(同时也是这个Looper)能否终止运行。
2.loop
public static void loop() {
   final Looper me = myLooper();//获取ThreadLocal保存的Looper对象
   ...
   // 取出消息队列
   final MessageQueue queue = me.mQueue;
   ...
   // 循环获取消息队列的消息
   for (;;) {
      //获取队列的下一条消息,可能堵塞
       Message msg = queue.next(); // might block
       if (msg == null) { // 如果没有消息退出循环
           return;
       }
       ...
       // 调用消息的target(其实就是Handler)分发消息,让Handler处理这个消息
       msg.target.dispatchMessage(msg);
       ...
       // 回收消息对象
       msg.recycleUnchecked();
   }
}
loop将进行无限循环,更加消息队列MessageQueue的next进行退出,next方法可能堵塞(休眠),MessageQueue的休眠和唤醒机制是通过Native层完成,是一种epoll机制。
详细的native方面的讲解见 这里 和 这里
MessageQueue
MessageQueue类是Looper类分装消息列表的类,包含一个消息列表,这个列表通过Looper进行消息分发。
Messages are not added directly to a MessageQueue,but rather through {@link Handler} objects associated with the Looper.
Message不是直接添加到MessageQueue的,而是通过Handler将它与Looper关联的。
1)添加消息(enqueueMessage)
向队列中添加消息,是通过Handler的sendMessage等方法,然后执行Handler的enqueueMessage方法调用MessageQueue的enqueueMessage。enqueueMessage方法会更加Message的when添加到合适的队列的相应的位置。
2)获取消息(next)
loop每次从MessageQueue取出一个Message(通过next方法),分发,在Handler中处理消息,之后进行回收。
Handler
Handler类,封装了消息的投递和消息的处理。这个类是很多文章中都讲的很详细的一个类,这里就简单介绍了。
1 构造
public Handler(Looper looper, Callback callback, boolean async) {...}
通过构造方法设置Looper,Callback,async。其中async是设置Message的setAsynchronous。
1)Looper
Handler必须需要使用Looper,不过使用带有Looper的构成方法的时候,是使用当前线程的Looper。
mLooper = Looper.myLooper();
2) Callback
这里消息时候的回调,在处理消息的时候使用
public void dispatchMessage(Message msg) {
   if (msg.callback != null) {
       handleCallback(msg);
   } else {
       if (mCallback != null) {
           if (mCallback.handleMessage(msg)) {
               return;
           }
       }
       handleMessage(msg);
   }
}
所以,在创建Handler的时候,为了实现处理消息,除了可以使用自己实现Handler的handleMessage方法的形式,还可以使用一个Callback来完成。
2 消息投递
消息的投递有好几种方式,sendMessage、sendEmptyMessage、sendEmptyMessageDelayed…、post等,最终都是调用enqueueMessage。只是不同的方法,生成不同形式的Message。例如post方法,就是生成(obtain)一个Message,然后设置Message的callback。
private static Message getPostMessage(Runnable r) {
   Message m = Message.obtain();
   m.callback = r;
   return m;
}
3 消息处理
public void dispatchMessage(Message msg) {
   if (msg.callback != null) {
       handleCallback(msg);
   } else {
       if (mCallback != null) {
           if (mCallback.handleMessage(msg)) {
               return;
           }
       }
       handleMessage(msg);
   }
}
在Looper的loop调用Handler的dispatchMessage进行消息的处理。如果回调mCallback存在的话,使用会滴处理,如果不存在的话使用handleMessage处理。
Android主线程消息机制
Android在主线程已经为我们提供了一个Looper,所以我们在主线程任意创建Handler(不传入Looper,是当前前程的Looper),同Handler可以实现向主线程进行消息的投递,并且在主线程进行消息的处理,达到异步消息传递的效果。
主线程在启动的时候,调用Looper的prepareMainLooper,loop启动Looper。
public static void prepareMainLooper() {
   prepare(false);
   synchronized (Looper.class) {
       if (sMainLooper != null) {
           throw new IllegalStateException("The main Looper has already been prepared.");
       }
       sMainLooper = myLooper();
   }
}
prepare传入false,那么这个消息循环是不允许用户结束。
自定义消息线程
如果我们需要实现Handler传递的消息是传递到我们的自己的线程,要怎么实现呢?
我们知道只要将在线程中调用Looper的prepare方法为这个线程生成Looper对象,然后调用loop方法,使Looper启动循环。然后将Looper对象传递给Handler,Handler在其他线程投递消息,就实现了消息在其他线程传递到Looper的线程。
事实上,Android已经为我们提供了一个HandlerThread来实现这个功能。
public void run() {
   mTid = Process.myTid();
   Looper.prepare();
   synchronized (this) {
       mLooper = Looper.myLooper();
       notifyAll();
   }
   Process.setThreadPriority(mPriority);
   onLooperPrepared();
   Looper.loop();
   mTid = -1;
}
public Looper getLooper() {
   if (!isAlive()) {
       return null;
   }

   // If the thread has been started, wait until the looper has been created.
   synchronized (this) {
       while (isAlive() && mLooper == null) {
           try {
               wait();
           } catch (InterruptedException e) {
           }
       }
   }
   return mLooper;
}
通过wait和notifyAll保证getLooper获取的Looper对象一定是Looper.prepare之后的对象。
正文到此结束
热门推荐


相关文章


Loading...
![[HBLOG]公众号](http://www.liuhaihua.cn/img/qrcode_gzh.jpg)

