使用 Raspberry Pi 上的传感器在 Node.js 中创建一个 IoT Bluemix 应用程序
先决条件
- 一个IBM Bluemix 帐号,一个 Raspberry Pi 2 或 3,一个 PIR 运动传感器
适用于本文的 Github 存储库
如果您是一位精明的 Bluemix 开发人员,您可能只想看看如何在 node.js 中与 IoT 建立连接,或者只想了解如何从此 github 存储库中拉取我的代码。
git clone https://github.com/nicolefinnie/iot-nodejs-tutorial
以下是实现与 IBM IoT 平台连接在一起的 4 个 Raspberry Pi 上的多个传感器(加速计、运动传感器、湿度/温度传感器和雨滴传感器)的源代码。
git clone https://github.com/nicolefinnie/iot-disaster
否则,请继续阅读!
/************************************** WARNING ********************************************** * python scripts are every sensitive about indentation, the scripts below may not render * properly but the scripts in the git repository should be correct. ****************************************************************************************************/
让您的 Raspberry Pi 传感器正常工作!
物联网中最有趣的部分是连接您的 Raspberry Pi。运动传感器非常适合想要了解 Raspberry Pi 如何使用传感器的初学者。这也是我从一堆传感器中选择运动传感器的原因。我的 PIR 运动传感器的测试范围可达 7 米,由右至左的引脚分别代表 功耗、高低输出量、GND(地面) 。以下是我的 PIR 运动传感器的规格,您可能想验证您的传感器的规格是否与此类似:
https://www.mpja.com/download/31227sc.pdf
在本文中,我将蓝线连接到 5V 端口,将黄线连接到 GND,将绿线连接到 GPIO 端口 4。您可以参考下面的 GPIO 映射:
https://www.raspberrypi.org/documentation/usage/gpio/

安装一个辅助库 wiring Pi ,它会让控制 GPIO 端口变得非常容易。
sudo apt-get update sudo apt-get upgrade git clone git://git.drogon.net/wiringPi cd wiringPi ./build
在 Raspberry Pi 上安装 python 包管理器 和 IBM IoT 库 。
sudo apt-get install python-pip sudo pip install ibmiotf
在建立 Raspberry Pi 与 IoT 的连接之前,请确保硬件能够正常工作。可以运行以下脚本来测试您的运动传感器。
motionSensor.py
#!/usr/bin/python # Define setup() that initializes GPIO, and sample() that samples data import RPi.GPIO as GPIO gpioPort = 0 def setup(inputPort): global gpioPort gpioPort = inputPort GPIO.setmode(GPIO.BCM) GPIO.setup(gpioPort, GPIO.IN, GPIO.PUD_DOWN) def sample(): global gpioPort data = {} currentState = GPIO.input(gpioPort) data['motionDetected'] = currentState return data testMotionSensor.py
#!/usr/bin/python # It samples the data from the motion sensor every half second import motionSensor import json import time gpioPort = 4 motionSensor.setup(gpioPort) while True: time.sleep(0.5) try: motionData = motionSensor.sample() jsonData = json.dumps(motionData) print "Current motion sensor data:", jsonData except Exception as e: print "Uh oh, exception!", e
发出以下命令来运行测试脚本,不要忘记挥动您的运动传感器。该脚本每隔 0.5 秒就会打印通过运动传感器检测到的当前状态。
pi@hhbear:~/iot-tutorial $ sudo python testMotionSensor.py Current motion sensor data: {"motionDetected": 0} Current motion sensor data: {"motionDetected": 0} Current motion sensor data: {"motionDetected": 1} Current motion sensor data: {"motionDetected": 1} 在 IoT 平台上注册您的 Raspberry Pi ( Raspberry Pi <= IoT )
人们可能会问,IoT 平台如何才能与 Raspberry Pi 进行通话。由于 developerWorks 上提供了许多优秀文章,我将带您寻找下面的教程,该教程将引导您在 IoT 上注册您的 Raspberry Pi。
https://developer.ibm.com/recipes/tutorials/raspberry-pi-4/
之后,让我们看看您是否正确遵循该教程进行操作:
您应该已经下载并执行了 IoT 库 iot_1.0-1_armhf.deb。
curl -LO https://github.com/ibm-messaging/iot-raspberrypi/releases/download/1.0.2/iot_1.0-1_armhf.deb
您应该已经通过运行在 Raspberry Pi 上的 IoT 库,利用唯一 Mac 地址生成唯一 设备 ID 。
b827eb80403e (for example, this is my device ID)
应该在将设备添加到 IoT 平台时生成一个身份验证令牌。
auth-token= abcdefg_12345 (the auth-token for your device)
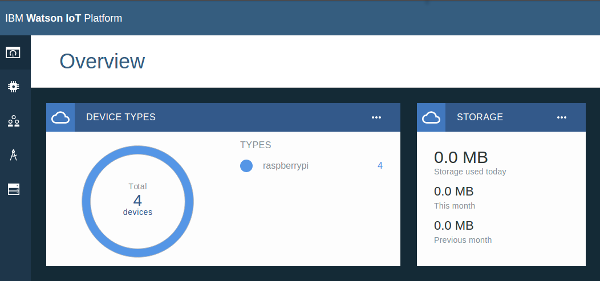
您创建了一个未绑定的 IoT 平台服务,以下是您的 IoT 平台仪表板看起来的样子。设备类型 raspberrypi 是我自己定义的。我在我的组织中注册了 4 个 Raspberry Pi。
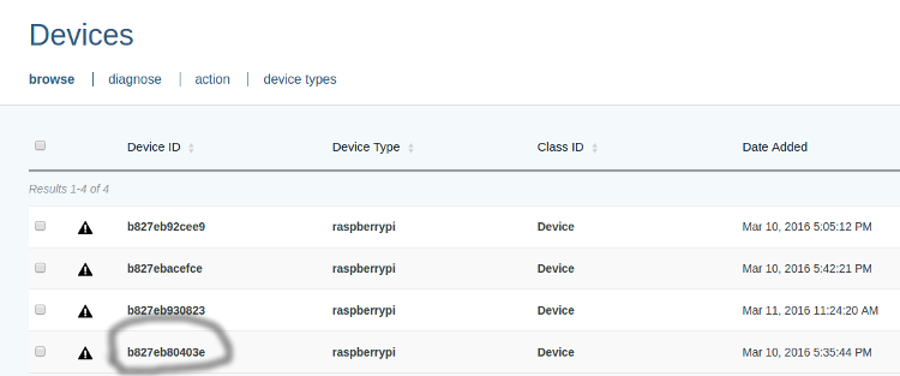
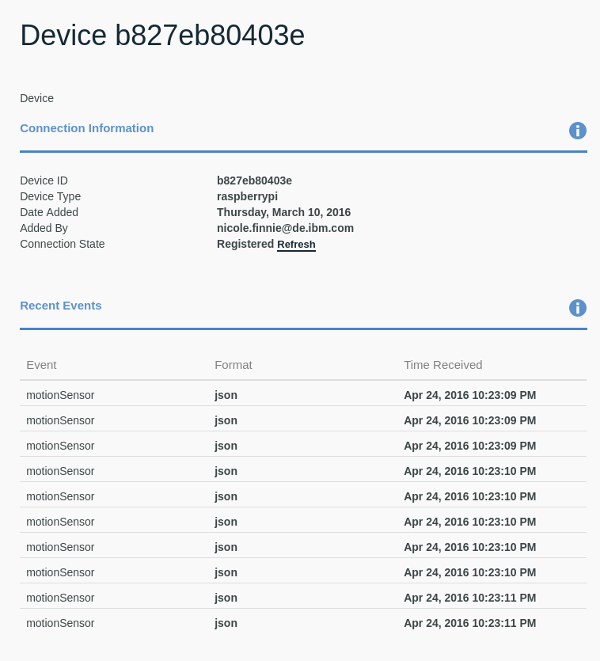
您已在 Bluemix 上注册了自己的设备。您可以在最底部查看我的设备 ID b827eb80403e 。
您在您的 Raspberry Pi 上创建了一个 device.cfg。
/etc/iotsample-raspberrypi/device.cfg
以下是我的 /etc/iotsample-raspberrypi/device.cfg 的一个示例,如果您按照建议的教程进行了正确操作,那么您现在应该使用自己的配置数据填充它。它允许通过交换身份验证令牌,将您的 IoT 平台连接到您的 Raspberry Pi。
org = 273pdc # The organization of your IoT platform service type = raspberrypi # Your Device Type defined when you add your device to IoT id = b827eb80403e # Your Device ID auth-method = token auth-token = abcdefg_12345 # generated by your IoT platform service when you add a device to it
在 IoT 平台上生成一个 API 密钥 ( Raspberry Pi => IoT )
在前面的步骤中,您已经了解了 IoT 如何从地球上所有设备中寻找到您的 Raspberry Pi。但是,您的 Raspberry Pi 必须采用某种方式与 IoT 平台进行交流。要对您的 Raspberry Pi 进行身份验证,需要在 IoT 平台上生成一个 API 密钥,它会向您提供一个身份验证密钥和一个身份验证令牌。当您读到这里时,您可能会问,为什么有这么多密钥和令牌 – 地球是一个危险的地方,您不能相信任何您知道的 Raspberry Pi。
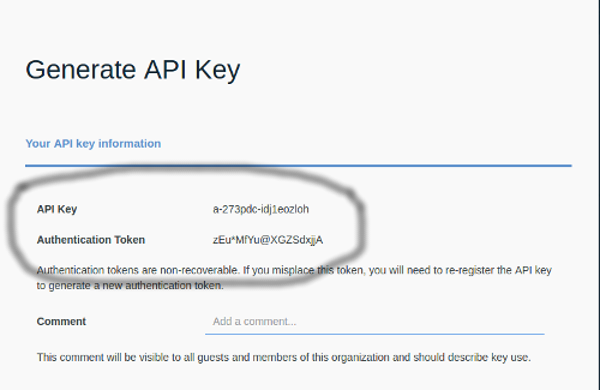
在您的 IoT 仪表板上,单击按钮 Generate API key 。

然后,生成了一个 API 密钥和身份验证令牌,您只需添加一条注释来命名该 API 密钥。请将这个窗口截图,因为您以后不会再有机会看到它。在下一个步骤中,您需要在您的 Raspberry Pi 上存储此 API 密钥和身份验证令牌。(当然,我已从我的 IoT 平台中删除此 API 密钥,否则您可能已将您的传感器数据发送到我的 IoT 平台。)
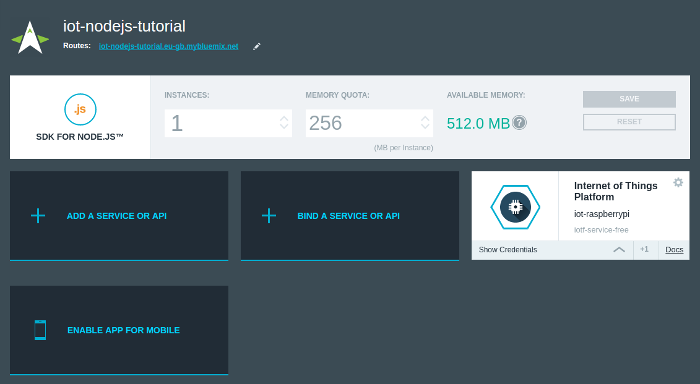
创建一个 Node.js Bluemix 应用程序并绑定 IoT 服务
在 Bluemix 上创建一个 node.js Web 应用程序,并将该应用程序绑定到您在第一步中创建的未绑定的 IOT 平台服务。好了!现在,您应该有一个启动并运行的 Node.js 应用程序。
我将跳过添加 git 仓库和编辑代码的步骤。如果您不知道如何解决所有问题,请单击此处: https://hub.jazz.net/tutorials/jazzeditor/ 。
建议您安装一个适用于 Bluemix 的 eclipse 插件,并将此应用程序作为一个 git 项目导入到 eclipse 工作区中。要获得有关如何使用此 git 存储库设置您的 eclipse 工作区的详细信息,请参阅此处: https://hub.jazz.net/docs/gitclient/#eclipse_using_egit 。
使用 ibmiotf 库创建一个 Node.js Web 应用程序
ibmiotf是由 IBM 实现的一个 node.js 库,它在幕后发送 MQTT 命令。它有助于订阅多个设备,并将事件发布到这些设备,所以此应用程序是使用 ibmiotf 实现的。要获得有关的更多细节,请参阅 http://iotf.readthedocs.io/en/latest/applications/libraries/nodejs.html 。
app.js是由 Bluemix 作为启动脚本而创建的。您可以在 package.json 中看到相关定义,还可以在 package.json 中导入 ibmiotf 库,因此 Bluemix 将在部署期间为我安装此库。
package.json
{ "name": "NodejsStarterApp", "version": "0.0.1", "private": true, "scripts": { "start": "node app.js" }, "dependencies": { "express": "4.13.x", "cfenv": "1.0.x", "ibmiotf":"~0.2.11" }, "repository": {}, "engines": { "node": "4.2.x" } } 连接到 IoT 非常简单。首先,您需要检索 IoT 服务的凭证,比如 iotCredentialsIdentifier、org、apiKey 和 apiToken。存储在 Bluemix 中的凭证非常类似于 Environment Variables VCAP_SERVICES 。
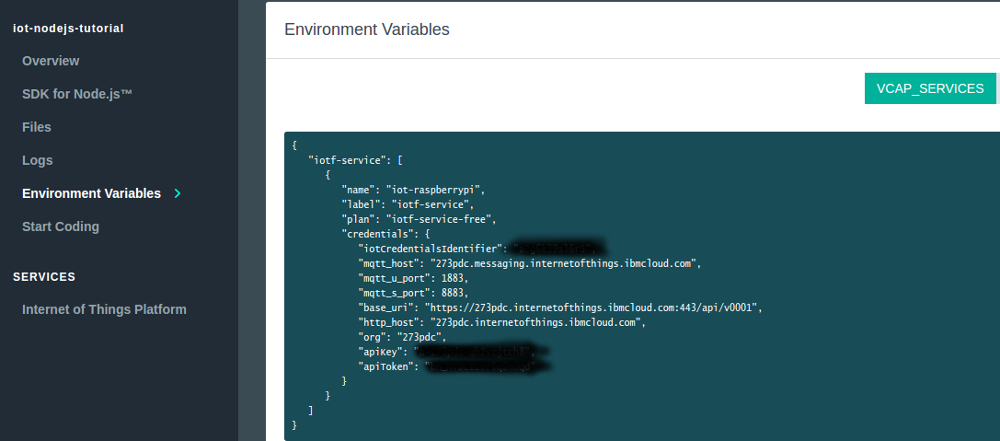
Bluemix 中的内部配置稍有不同(参见下文)。我添加了两种不同的方法来解析 app.js 中的凭证,这些凭证可以在前面提到的 github 库中找到。一种方法是解析 VCAP_SERVICES,以便在您的本地主机上测试您的 Node.js 应用程序和 IoT 服务。另一种方法是解析内部配置,以便在 Bluemix 上运行 Node.js 应用程序。不过,我只打算介绍在 Bluemix 中解析内部配置的方法。
Bluemix 中的内部配置(请注意,json 结构与上面截图中您的 VCAP_SERVICES 稍有不同)。
{ "iot-raspberrypi": { "name": "iot-raspberrypi", "label": "iotf-service", "plan": "iotf-service-free", "credentials": { "iotCredentialsIdentifier": "xxxxxxx", "mqtt_host": "273pdc.messaging.internetofthings.ibmcloud.com", "mqtt_u_port": 1883, "mqtt_s_port": 8883, "base_uri": "https://273pdc.internetofthings.ibmcloud.com:443/api/v0001", "http_host": "273pdc.internetofthings.ibmcloud.com", "org": "273pdc", "apiKey": "xxxxxxxxxxxxxxxxx", "apiToken": "xxxxxxxxxxxxxxxx" } } } app.js– 检索上面定义的 IoT 服务的凭证。
//@attention iot-raspberrypi is the IoT platform service name in this example, you should replace it with yours var iotPlatformServiceName = 'iot-raspberrypi'; // IBM IoT service var Client = require('ibmiotf').IotfApplication; // this iot service credentials var iotCredentials; //Loop through configuration internally defined in Bluemix and retrieve the credential from the IoT service var baseConfig = appEnv.getServices(iotPlatformServiceName); iotCredentials = baseConfig[iotPlatformServiceName]; var iotAppConfig = { "org" : iotCredentials.credentials.org, "id" : iotCredentials.credentials.iotCredentialsIdentifier, "auth-method" : "apikey", "auth-key" : iotCredentials.credentials.apiKey, "auth-token" : iotCredentials.credentials.apiToken } app.js– 连接到 IoT,并通过 Raspberry Pi 上的 client.py 订阅设备事件。
var appClient = new Client(iotAppConfig); appClient.connect(); console.log("Successfully connected to our IoT service!"); // subscribe to input events appClient.on("connect", function () { console.log("subscribe to input events"); appClient.subscribeToDeviceEvents("raspberrypi"); }); var motionSensorData = {"motionPayload":{}}; // deviceType "raspberrypi" and eventType "motionSensor" are published by client.py on RaspberryPi appClient.on("deviceEvent", function(deviceType, deviceId, eventType, format, payload){ if (eventType === 'motionSensor'){ motionSensorData.motionPayload = JSON.parse(payload); } } 将您的 Raspberry Pi 连接到 IoT 平台
现在,您拥有所需的全部身份验证密钥和令牌,让我们采用两种方法将您的 Raspberry Pi 连接到 IoT 平台。在 /home/pi/device.cfg 上(或其他地方)为您的 RaspberryPi 创建一个设备配置,以便连接到 IoT。此 device.cfg 用于 Raspberry Pi 与 IoT 平台之间的通话。
[application] org=273pdc # your org - same as /etc/iotsample-raspberrypi/device.cfg id=b827eb80403e # your device ID - same as /etc/iotsample-raspberrypi/device.cfg auth-method=apikey auth-key=a-273pdc-idj1eozloh # your API key generated in the step Generate API Key auth-token=zEu*MfYu@XGZSdxjjA # your Authentication token generated in the step Generate API Key type=raspberrypi # your device type - same as /etc/iotsample-raspberrypi/device.cfg
此时,您的 Raspberry Pi 已准备好与您的 IoT 服务进行交谈。这个 python 脚本通过调用 motionSensor.py 中定义的 sample() 对数据进行抽样。而且它会将您的 Raspberry Pi 连接到 IoT,并以 JSON 形式发布 motionSensor 事件。
client.py
#!/usr/bin/python # This is only executed on the device client e.g. Raspberry Pi import time import os, json import ibmiotf.application import uuid import motionSensor client = None motionSensorGPIOPort = 4 try: options = ibmiotf.application.ParseConfigFile("/home/pi/device.cfg") options["deviceId"] = options["id"] options["id"] = "aaa" + options["id"] client = ibmiotf.application.Client(options) print "try to connect to IoT" client.connect() print "connect to IoT successfully" motionStatus = False motionSensor.setup(motionSensorGPIOPort) while True: motionData = motionSensor.sample() jsonMotionData = json.dumps(motionData) client.publishEvent("raspberrypi", options["deviceId"], "motionSensor", "json", jsonMotionData) if motionData['motionDetected'] != motionStatus: motionStatus = motionData['motionDetected'] print "Change in motion detector status, motionDetected is now:", motionStatus time.sleep(0.2) except ibmiotf.ConnectionException as e: print e 查看 IoT 平台的仪表板,您会看到不断传入的大量 motionSensor 事件。
通过实现 RESTful API 将传感器数据返回给客户端(视图)
在订阅设备事件后,我们需要注册 RESTful API,以下是一个简单的 GET 示例,该示例允许我们的客户端(视图)向我们的应用程序发送一个 GET 请求。在此 GET API 中,我们返回了我们在前面步骤中订阅的运动传感器数据。
app.js
app.get('/sensordata', raspberryPiServer.returnCurrentSensorData(motionSensorData)); 而且这个 API 是在 express JS 中实现的,只用于返回运动传感器数据。
raspberryPiServer.js
/*eslint-env node */ /** * Server side - express JS - where you should define REST APIs of the server side. */ // client asks server for the sensor data, and server sends back the sensor data exports.returnCurrentSensorData = function(sensorData){ return function(req, res){ res.send(sensorData); }; }; 客户端(视图)请求获得传感器数据
客户端代码是用 angular.JS 编写的,angular.JS 在 Web 前端实现中很受欢迎。在这个代码段中,您可能已经猜到,它经常运行间隔性任务。在执行间隔性任务期间,客户端通过调用前面步骤中实现的 GET API 来请求获得传感器数据。检测到运动时,就会切换视图中的一个开关。
home.client.html
<section> <div ng-controller="HomeController" > <div class="switch"> <label> No Motion <input id="switch" type="checkbox"> <span class="lever"></span> Motion Detected </label> </div> </div> </section>
client.controller.js
/** Client side - angularJS - where controllers are defined. * HTML talks to these controllers. */ var homeControllers = angular.module('HomeControllers', []); homeControllers.controller('HomeController', ['$scope', '$rootScope', '$http', '$interval', function ($scope, $rootScope, $http, $interval) { // Set of all tasks that should be performed periodically var runIntervalTasks = function() { $http({ method: 'GET', url: '/sensordata' }).then(function successCallback(response) { if (response.data.motionPayload !== undefined) { // switch on when motion is detected if(Object.keys(response.data.motionPayload).length > 0){ var payload = JSON.parse(response.data.motionPayload); $('#switch').prop('checked', payload.motionDetected); } } }, function errorCallback(response) { console.log("failed to listen to sensor data"); }); }; } ]); 一个现实生活中的测试
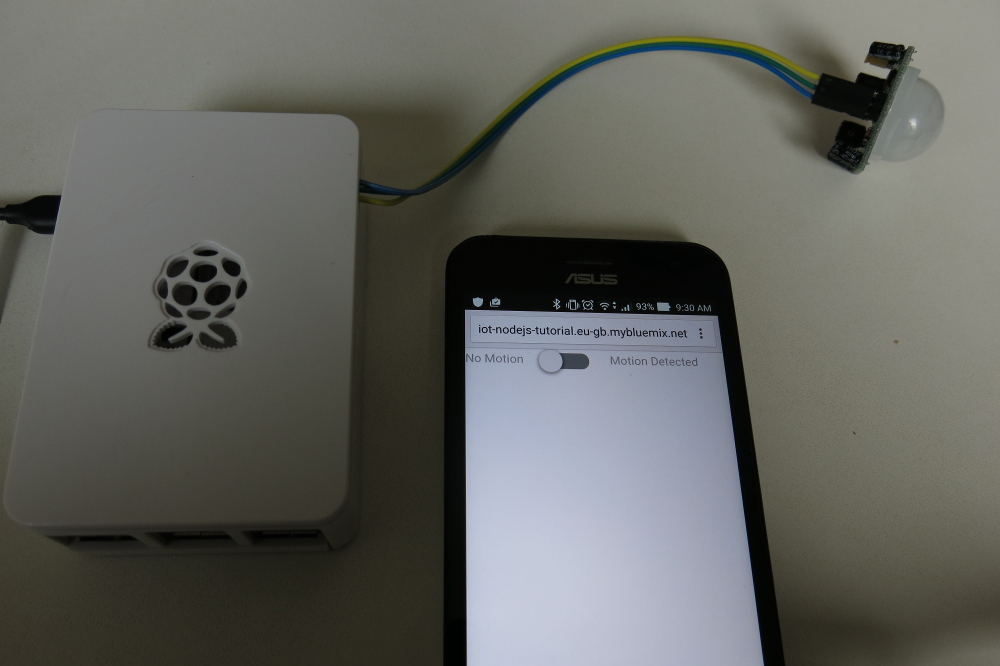
那么,让我们在实际生活中测试该应用程序。登录到您的 Raspberry Pi,并启动脚本 client.py 。
sudo python client.py
很好,现在未检测到任何运动。
突然,检测到一个入侵者!借助入侵检测程序,我敢肯定,您现在应该感觉安全多了。
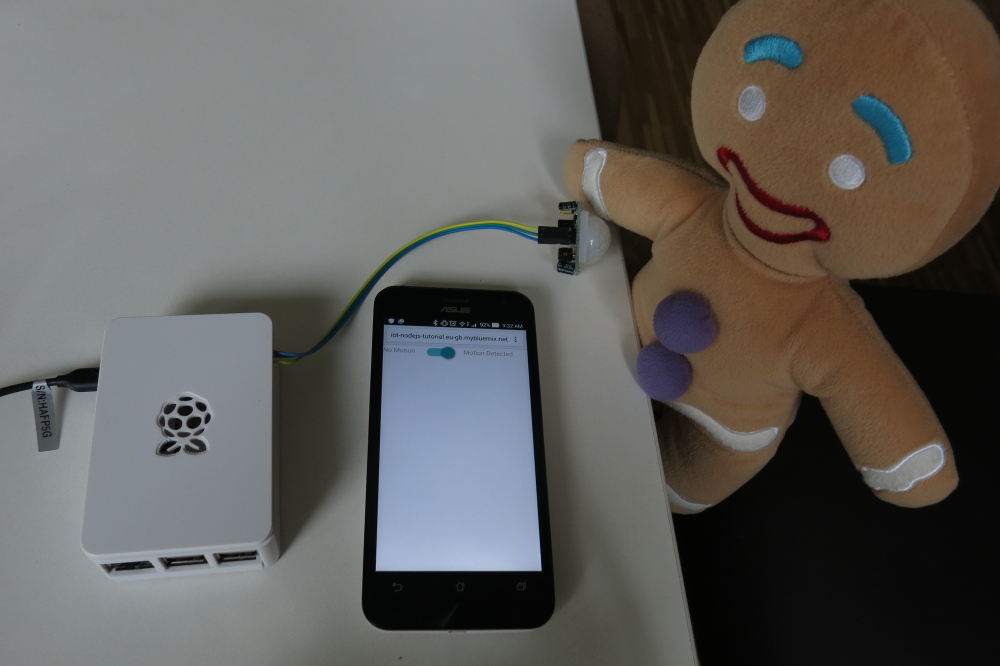
这只是一个基本的示例。您可以将此应用程序扩展到多个 Raspberry Pi 和不同的传感器,并建立更复杂的 GUI。
正文到此结束
- 本文标签: 开发 ask IDE Service CTO list eclipse example 安全 ACE Node.js 解析 root dependencies js src 数据 物联网 地球 key node Connection 密钥 删除 API HTML web REST https lib UI 下载 注释 json 端口 Developer cat http RESTful update 初学者 插件 git client 配置 文章 代码 Document IBM AngularJS tar 主机 管理 ORM App 组织 ip build 安装 python GitHub parse 测试
- 版权声明: 本文为互联网转载文章,出处已在文章中说明(部分除外)。如果侵权,请联系本站长删除,谢谢。
- 本文海报: 生成海报一 生成海报二
热门推荐


相关文章

近期评论
-
ws0132613@gmail.comhttps://getmacos.com/gopanel/william smith
-
谢谢
-
https://www.newcmy.com/register?aff=HBVX建议您试试草莓云机场,可以流畅观看youtube和tiktok,上reddit/x也没有问题,还有各种ai优化节点。
-
-
-
想购买您这个站,我的联系方式QQ741756694微信同步 能卖联系
-
-
-
-
Loading...
![[HBLOG]公众号](https://www.liuhaihua.cn/img/qrcode_gzh.jpg)

