Android自定义View系列(一)——打造一个爱心进度条
写作原因:Android进阶过程中有一个绕不开的话题——自定义View。这一块是安卓程序员更好地实现功能自主化必须迈出的一步。下面这个系列博主将通过实现几个例子来认识安卓自定义View的方法。从自定义View到自定义ViewGroup,View事件处理再到View深入分析(这一章如果水平未到位可能今后再补充),其中会涉及一些小的知识,包括Canvas的使用、动画等等。系列第一篇文章通过绘制一个心形进度条来学习自定义View的整体流程和简单地贝塞尔曲线的用法。下面开始折磨键盘吧。
最终效果
先看看今天我们要实现的效果:
具体功能就是一个心形的进度条,跟普通的进度条相似,但是显示进度的方式和整体的外观实现了自定义化。这个进度条会根据进度不断加深颜色,效果还不错。通过这个例子读者可以学会基本的自定义View的方法。
基本思路
我们需要新建一个attrs.xml来描述HeartProgressBar的属性,一个HeartProgressBar.java继承ProgressBar(直接继承View也行),然后通过取出属性,测量,绘制几步来实现自定义View全过程。
具体实现
一、定义XML属性文件
新建values/attrs.xml,在XML中声明好各个属性,注意一下format,详细的用法参考官方文档。然后在
标签下引入属性,具体见下面:
<?xml version="1.0" encoding="utf-8"?>
<resources>
    <attr name="UnReachedColor" format="color"/>
    <attr name="ReachedColor" format="color"/>
    <attr name="InnerTextColor" format="color"/>
    <attr name="InnerTextSize" format="dimension"/>
    <attr name="Progress" format="integer"/>
    <declare-styleable name="HeartProgressBar">
        <attr name="UnReachedColor"/>
        <attr name="ReachedColor" />
        <attr name="InnerTextColor" />
        <attr name="InnerTextSize" />
        <attr name="Progress"/>
    </declare-styleable>
</resources>
二、获取XML中的属性
这一步我们使用obtainAttributes()方法来获取开发者在布局中为我们的View设定的参数值。通过 TypedArray ta = getResources().obtainAttributes(attrs,R.styleable.HeartProgressBar); 获得TypedArray对象,使用该对象的get系列方法来获取参数值,如: unReachedColor = ta.getColor(R.styleable.HeartProgressBar_UnReachedColor,UNREACHEDCOLOR_DEFAULT); 。后面的UNREACHEDCOLOR_DEFAULT是默认参数值,是view创建者定义的,注意尺寸相关的需要进行单位转换。这样就取到了View的参数,这些参数是我们用来定义View的部分元素。
三、调用onMeasure()测量
这一步常常令许多人头大甚至望而却步,看了很多资料也理解不了。我在这里分享一下对于这一块的理解,希望能够帮助大家理解。首先得明白View的规格是受承载它的View或者ViewGroup影响的。这点很重要,因为这点才出现了三种测量模式:MeasureSpec.EXACTLY、MeasureSpec.UNSPECIFIED和MeasureSpec.AT_MOST。这三种测量模式分别对应三种情况:View有确定的宽高(包括match_parent和具体值两种情况),此时使用EXACTLY,直接把MeasureSpec.getSize()返回就行;View没有确定的宽高(即wrap_content),此时可能系统会使用MeasureSpec.UNSPECIFIED或者MeasureSpec.AT_MOST。在MeasureSpec.UNSPECIFIED中我们把尽量容纳View的尺寸返回给父View去处理,而在MeasureSpec.AT_MOST中则由于父View对子View的限制需要比对父View的限制的最大情况和子View尽可能容纳的尺寸,然后返回相对较小的值。看看本文的例子:
int usedHeight = getRealHeight(heightMeasureSpec);
int usedWidth = getRealWidth(widthMeasureSpec);
setMeasuredDimension(usedWidth,usedHeight);
这里将宽高测量后使用setMeasureDimension()返回给父View去处理。
以宽为例,代码如下:
public int getRealWidth(int widthMeasureSpec) {
        int widthMode = MeasureSpec.getMode(widthMeasureSpec);
        int widthVal = MeasureSpec.getSize(widthMeasureSpec);
        //取得父View或ViewGroup分配的默认为子View的大小和模式
        paddingLeft = getPaddingLeft();
        paddingRight = getPaddingRight();
        //注意处理一下Padding,把Padding值也赋给想要设置的子View的大小
        if(widthMode == MeasureSpec.EXACTLY){
            return paddingLeft+paddingRight+widthVal;
            //精确模式下返回具体值
        }else if(widthMode == MeasureSpec.UNSPECIFIED){
            return (int) (Math.abs(underPaint.ascent()-underPaint.descent()) + paddingLeft + paddingRight);
            //未确定模式下返回尽可能容纳View的尺寸
        }else{
            return (int) Math.min((Math.abs(underPaint.ascent()-underPaint.descent()) + paddingLeft + paddingRight),widthVal);
            //AT_MOST下返回父View限制值和View尽可能大尺寸之间的最小值
        }
    }
使用MeasureSpec.getMode()和getSize()分别取得测量模式和大小,然后处理三种测量模式下的大小值,最后再使用setMeasureDimension()将值返回。对于三种模式下的处理见上面的注释。自定义View中的测量是一块难点,应该详细阅读并实践。
四、重写onSizeChanged()获取最终View的宽高值
当父View真正为子View分配好空间后会回调这个方法,所以我们应该在里面取得最终的大小值。代码如下:
realWidth = w;
realHeight = h;
五、重写onDraw()方法绘制图像
这一步是整个流程中的重点步骤,所有的绘制工作都是在这里进行的。一般绘制的时候都要考虑尺寸问题,我们使用的宽高尺寸是onSizeChanged里面取出的,使用该尺寸来绘制,注意一定要对Padding进行处理(博主写完发现没处理,现在要修改发现很浪费时间就没做处理了。。。读者可以自行处理作为练习)这里有个难点,由于心形的特殊性,我们使用贝塞尔曲线来绘制。关于贝塞尔曲线,在这里就不班门弄斧了,只是说一下这种曲线可以将许多复杂的曲线转化成数学公式来描述,曲线由两种类型的点决定:起末点决定曲线的大概位置,其他点决定曲线的形状和弯曲程度。贝塞尔曲线有一阶二阶三阶高阶之分,具体见下面图片。
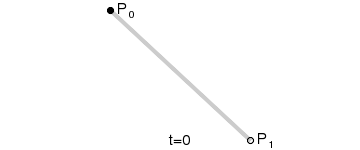
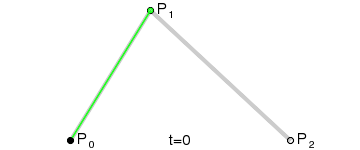
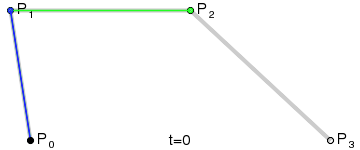
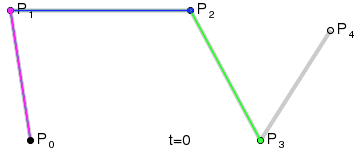
安卓中支持二阶和三阶贝塞尔曲线,方法分别为quadTo()和cubicTo()两个。本文使用cubicTo来实现。但是想想心形的形状,如果真的要自己用数学的方法去确定那几个点的位置,呵呵,我是办不到了。那怎么办?博主找到一个方法,在线生成贝塞尔曲线然后用ps标尺工具来确定点与宽高的比例关系……虽然还是很麻烦,但我还没想到别的方法或者工具。( Canvas二次贝塞尔曲线操作实例 ,这是一个为h5服务的贝塞尔曲线生成工具,将就用下……)如果读者有希望能分享一下,谢谢!
这是我得到的测量图(就是在这里忘了考虑padding,改起来又很麻烦):
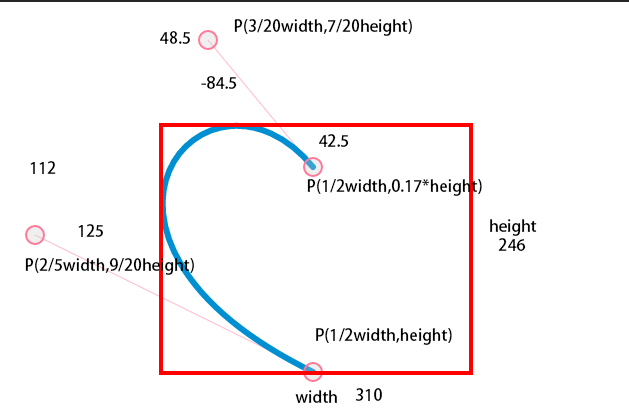
接下来就是利用这张图和Canvas来作图了,主要路径关注路径和颜色深浅表示进度的实现:
float pro = ((float)progress)/100.0f;
      int nowColor = (int) argbEvaluator.evaluate(pro,unReachedColor,reachedColor);
      underPaint.setColor(nowColor);
上面代码实现了View的颜色随着进度的变化而从某个颜色向另一个颜色变化的功能。ArgbEvaluator类挺实用的,可以实现微信底部滑动颜色变化的功能,这里也是利用它来实现的。
path.moveTo((float) (0.5*realWidth), (float) (0.17*realHeight));
path.cubicTo((float) (0.15*realWidth), (float) (-0.35*realHeight), (float) (-0.4*realWidth), (float) (0.45*realHeight), (float) (0.5*realWidth),realHeight);
path.moveTo((float) (0.5*realWidth),realHeight);
path.cubicTo((float) (realWidth+0.4*realWidth), (float) (0.45*realHeight),(float) (realWidth-0.15*realWidth), (float) (-0.35*realHeight),(float) (0.5*realWidth), (float) (0.17*realHeight));
path.close();
上述代码是path路径的绘制,绘制了一个心形的path,如果对于这两个方法有疑问的可以查看API文档。
由于我们的进度条跟随进度发生变化,所以我们要重写setProgress()方法,使用invalidate()来刷新onDraw()重绘实现变化。代码如下:
@Override
    public void setProgress(int progress) {
        this.progress = progress;
        invalidate();
    }
总结
Android自定义View除了上面的测量绘制之外还有对点击事件的处理一大块,这里每个地方都需要花时间去理解和实践才能搞懂,下篇博主会就事件处理和动画一块再次自定义一个View,如果觉得写得好的希望继续关注并喜欢我的简书,也可以关注我的博客。
附录:View具体代码
public class HeartProgressBar extends ProgressBar {

    private final static int UNREACHEDCOLOR_DEFAULT = 0xFF69B4;
    private final static int REACHEDCOLOR_DEFAULT = 0xFF1493;
    private final static int INNERTEXTCOLOR_DEFAULT = 0xDC143C;
    private final static int INNERTEXTSIZE_DEFAULT = 10;
    private static final int PROGRESS_DEFAULT = 0;
    private int unReachedColor;
    private int reachedColor;
    private int innerTextColor;
    private int innerTextSize;
    private int progress;
    private int realWidth;
    private int realHeight;
    private Paint underPaint;
    private Paint textPaint;
    private Path path;
    private int paddingTop;
    private int paddingBottom;
    private int paddingLeft;
    private int paddingRight;
    private ArgbEvaluator argbEvaluator;
    public HeartProgressBar(Context context) {
        this(context,null);
    }

    public HeartProgressBar(Context context, AttributeSet attrs) {
        super(context, attrs);
        argbEvaluator = new ArgbEvaluator();
        TypedArray ta = getResources().obtainAttributes(attrs,R.styleable.HeartProgressBar);
        unReachedColor = ta.getColor(R.styleable.HeartProgressBar_UnReachedColor,UNREACHEDCOLOR_DEFAULT);
        reachedColor = ta.getColor(R.styleable.HeartProgressBar_ReachedColor,REACHEDCOLOR_DEFAULT);
        innerTextColor = ta.getColor(R.styleable.HeartProgressBar_InnerTextColor,INNERTEXTCOLOR_DEFAULT);
        innerTextSize = (int) ta.getDimension(R.styleable.HeartProgressBar_InnerTextSize,INNERTEXTSIZE_DEFAULT);
        progress = ta.getInt(R.styleable.HeartProgressBar_Progress,PROGRESS_DEFAULT);
        ta.recycle();
        Log.i("nowColor",progress+"");
        //声明区
        underPaint = new Paint();
        textPaint = new Paint();
        path = new Path();
        //构造画笔区
        underPaint.setStyle(Paint.Style.FILL_AND_STROKE);
        underPaint.setStrokeWidth(5.0f);
        textPaint.setColor(innerTextColor);
        textPaint.setTextSize(innerTextSize);
        textPaint.setTextAlign(Paint.Align.CENTER);
    }

    @Override
    protected synchronized void onMeasure(int widthMeasureSpec, int heightMeasureSpec) {
        int usedHeight = getRealHeight(heightMeasureSpec);
        int usedWidth = getRealWidth(widthMeasureSpec);
        setMeasuredDimension(usedWidth,usedHeight);
    }

    @Override
    protected void onSizeChanged(int w, int h, int oldw, int oldh) {
        super.onSizeChanged(w, h, oldw, oldh);
        realWidth = w;
        realHeight = h;
    }

    @Override
    protected synchronized void onDraw(Canvas canvas) {
        super.onDraw(canvas);
        paddingBottom = getPaddingBottom();
        paddingTop = getPaddingTop();
        paddingLeft = getPaddingLeft();
        paddingRight = getPaddingRight();
        float pro = ((float)progress)/100.0f;
        Log.i("nowColor","pro"+pro+"");
        int nowColor = (int) argbEvaluator.evaluate(pro,unReachedColor,reachedColor);
        underPaint.setColor(nowColor);
        path.moveTo((float) (0.5*realWidth), (float) (0.17*realHeight));
        path.cubicTo((float) (0.15*realWidth), (float) (-0.35*realHeight), (float) (-0.4*realWidth), (float) (0.45*realHeight), (float) (0.5*realWidth),realHeight);
        path.moveTo((float) (0.5*realWidth),realHeight);
        path.cubicTo((float) (realWidth+0.4*realWidth), (float) (0.45*realHeight),(float) (realWidth-0.15*realWidth), (float) (-0.35*realHeight),(float) (0.5*realWidth), (float) (0.17*realHeight));
        path.close();
        canvas.drawPath(path,underPaint);
        canvas.drawText(String.valueOf(progress),realWidth/2,realHeight/2,textPaint);
    }


    public int getRealHeight(int heightMeasureSpec) {
        int heightMode = MeasureSpec.getMode(heightMeasureSpec);
        int heightVal = MeasureSpec.getSize(heightMeasureSpec);
        paddingTop = getPaddingTop();
        paddingBottom = getPaddingBottom();
        if(heightMode == MeasureSpec.EXACTLY){
            return paddingTop + paddingBottom + heightVal;
        }else if(heightMode == MeasureSpec.UNSPECIFIED){
            return (int) (Math.abs(underPaint.ascent()-underPaint.descent()) + paddingTop + paddingBottom);
        }else{
            return (int) Math.min((Math.abs(underPaint.ascent()-underPaint.descent()) + paddingTop + paddingBottom),heightVal);
        }
    }

    public int getRealWidth(int widthMeasureSpec) {
        int widthMode = MeasureSpec.getMode(widthMeasureSpec);
        int widthVal = MeasureSpec.getSize(widthMeasureSpec);
        paddingLeft = getPaddingLeft();
        paddingRight = getPaddingRight();
        if(widthMode == MeasureSpec.EXACTLY){
            return paddingLeft+paddingRight+widthVal;
        }else if(widthMode == MeasureSpec.UNSPECIFIED){
            return (int) (Math.abs(underPaint.ascent()-underPaint.descent()) + paddingLeft + paddingRight);
        }else{
            return (int) Math.min((Math.abs(underPaint.ascent()-underPaint.descent()) + paddingLeft + paddingRight),widthVal);
        }
    }

    @Override
    public void setProgress(int progress) {
        this.progress = progress;
        invalidate();
    }
}
正文到此结束
热门推荐


相关文章


Loading...
![[HBLOG]公众号](http://www.liuhaihua.cn/img/qrcode_gzh.jpg)

