
Haproxy安装及配置
1.安装
# wget http://haproxy.1wt.eu/download/1.3/src/haproxy-1.3.20.tar.gz
# tar zcvf haproxy-1.3.20.tar.gz
# cd haproxy-1.3.20
# make TARGET=linux26 PREFIX=/usr/local/haproxy #将haproxy安装到/usr/local/haproxy
# make install PREFIX=/usr/local/haproxy
2.配置
安装完毕后,进入安装目录配置文件,默认情况下目录里是没有.cfg配置文件的,可以回到安装文件目录下将examples下的haproxy.cfg拷贝到usr/local/haproxy下。
# cd /usr/local/haproxy
# vi haproxy.cfg
默认文件内容如下:
# this config needs haproxy-1.1.28 or haproxy-1.2.1
global
log 127.0.0.1 local0
log 127.0.0.1 local1 notice
#log loghost local0 info
maxconn 4096
chroot /usr/share/haproxy
uid 99
gid 99
daemon
#debug
#quiet
defaults
log global
mode http
option httplog
option dontlognull
retries 3
redispatch
maxconn 2000
contimeout 5000
clitimeout 50000
srvtimeout 50000
listen appli1-rewrite 0.0.0.0:10001
cookie SERVERID rewrite
balance roundrobin
server app1_1 192.168.34.23:8080 cookie app1inst1 check inter 2000 rise 2 fall 5
server app1_2 192.168.34.32:8080 cookie app1inst2 check inter 2000 rise 2 fall 5
server app1_3 192.168.34.27:8080 cookie app1inst3 check inter 2000 rise 2 fall 5
server app1_4 192.168.34.42:8080 cookie app1inst4 check inter 2000 rise 2 fall 5
listen appli2-insert 0.0.0.0:10002
option httpchk
balance roundrobin
cookie SERVERID insert indirect nocache
server inst1 192.168.114.56:80 cookie server01 check inter 2000 fall 3
server inst2 192.168.114.56:81 cookie server02 check inter 2000 fall 3
capture cookie vgnvisitor= len 32
option httpclose # disable keep-alive
rspidel ^Set-cookie:\ IP= # do not let this cookie tell our internal IP address
listen appli3-relais 0.0.0.0:10003
dispatch 192.168.135.17:80
listen appli4-backup 0.0.0.0:10004
option httpchk /index.html
option persist
balance roundrobin
server inst1 192.168.114.56:80 check inter 2000 fall 3
server inst2 192.168.114.56:81 check inter 2000 fall 3 backup
listen ssl-relay 0.0.0.0:8443
option ssl-hello-chk
balance source
server inst1 192.168.110.56:443 check inter 2000 fall 3
server inst2 192.168.110.57:443 check inter 2000 fall 3
server back1 192.168.120.58:443 backup
listen appli5-backup 0.0.0.0:10005
option httpchk *
balance roundrobin
cookie SERVERID insert indirect nocache
server inst1 192.168.114.56:80 cookie server01 check inter 2000 fall 3
server inst2 192.168.114.56:81 cookie server02 check inter 2000 fall 3
server inst3 192.168.114.57:80 backup check inter 2000 fall 3
capture cookie ASPSESSION len 32
srvtimeout 20000
option httpclose # disable keep-alive
option checkcache # block response if set-cookie & cacheable
rspidel ^Set-cookie:\ IP= # do not let this cookie tell our internal IP address
errorloc 502 http://192.168.114.58/error502.html
errorfile 503 /etc/haproxy/errors/503.http
根据实际需求,更改配置文件,我的配置如下
global #全局设置
log 127.0.0.1 local0 #日志输出配置,所有日志都记录在本机,通过local0输出
#log loghost local0 info
maxconn 4096 #最大连接数
chroot /usr/local/haproxy
uid 99 #所属运行的用户uid
gid 99 #所属运行的用户组
daemon #以后台形式运行haproxy
nbproc 2 #启动2个haproxy实例
pidfile /usr/local/haproxy/haproxy.pid #将所有进程写入pid文件
#debug
#quiet
defaults #默认设置
#log global
log 127.0.0.1 local3 #日志文件的输出定向
mode http #所处理的类别,默认采用http模式,可配置成tcp作4层消息转发
option httplog #日志类别,采用httplog
option dontlognull
option forwardfor #如果后端服务器需要获得客户端真实ip需要配置的参数,可以从Http Header中获得客户端ip
option httpclose #每次请求完毕后主动关闭http通道,haproxy不支持keep-alive,只能模拟这种模式的实现
retries 3 #3次连接失败就认为服务器不可用,主要通过后面的check检查
option redispatch #当serverid对应的服务器挂掉后,强制定向到其他健康服务器
maxconn 2000 #最大连接数
stats uri /haproxy-admin #haproxy 监控页面的访问地址
contimeout 5000 #连接超时时间
clitimeout 50000 #客户端连接超时时间
srvtimeout 50000 #服务器端连接超时时间
stats auth Frank:Frank #设置监控页面的用户和密码:Frank
stats hide-version #隐藏统计页面的HAproxy版本信息
frontend http-in #前台
bind *:80
mode http
option httplog
log global
default_backend htmpool #静态服务器池
backend htmpool #后台
balance leastconn#负载均衡算法
option httpchk HEAD /index.htm HTTP/1.0 #健康检查
server web1 10.16.0.9:8085 cookie 1 weight 5 check inter 2000 rise 2 fall 3
server web2 10.16.0.10:8085 cookie 2 weight 3 check inter 2000 rise 2 fall 3
#cookie 1表示serverid为1,check inter 1500 是检测心跳频率
#rise 2是2次正确认为服务器可用,fall 3是3次失败认为服务器不可用,weight代表权重
3.加上日志支持
# vim /etc/syslog.conf
在最下边增加
local3.* /var/log/haproxy.log
local0.* /var/log/haproxy.log
#vim /etc/sysconfig/syslog
修改: SYSLOGD_OPTIONS="-r -m 0"
重启日志服务service syslog restart
4.设置开机启动
为了方便系统在开机时加载,还可以创建启动脚本:
# vim /etc/rc.d/init.d/haproxy 内容如下:
#! /bin/sh
set -e
PATH=/sbin:/bin:/usr/sbin:/usr/bin:/usr/local/haproxy/sbin
PROGDIR=/usr/local/haproxy
PROGNAME=haproxy
DAEMON=$PROGDIR/sbin/$PROGNAME
CONFIG=$PROGDIR/$PROGNAME.conf
PIDFILE=$PROGDIR/$PROGNAME.pid
DESC="HAProxy daemon"
SCRIPTNAME=/etc/init.d/$PROGNAME
# Gracefully exit if the package has been removed.
test -x $DAEMON || exit 0
start()
{
echo -n "Starting $DESC: $PROGNAME"
$DAEMON -f $CONFIG
echo "."
}
stop()
{
echo -n "Stopping $DESC: $PROGNAME"
haproxy_pid=cat $PIDFILE
kill $haproxy_pid
echo "."
}
restart()
{
echo -n "Restarting $DESC: $PROGNAME"
$DAEMON -f $CONFIG -p $PIDFILE -sf $(cat $PIDFILE)
echo "."
}
case "$1" in
start)
start
;;
stop)
stop
;;
restart)
restart
;;
*)
echo "Usage: $SCRIPTNAME {start|stop|restart}" >&2
exit 1
;;
esac
exit 0
保存后赐予可执行权限
# chmod +x /etc/rc.d/init.d/haproxy
就可以使用 service haproxy start|stop|restart 来控***务的启动停止跟重启。
并通过以下命令加载到开机服务启动列表
# chkconfig --add haproxy
5.启动服务
启动服务:
# /usr/local/haproxy/sbin/haproxy -f /usr/local/haproxy/haproxy.cfg
重启服务:
# /usr/local/haproxy/sbin/haproxy -f /usr/local/haproxy/haproxy.cfg -st `cat /usr/local/haproxy/logs/haproxy.pid` (没有换行)
停止服务:
# killall haproxy
6.举例
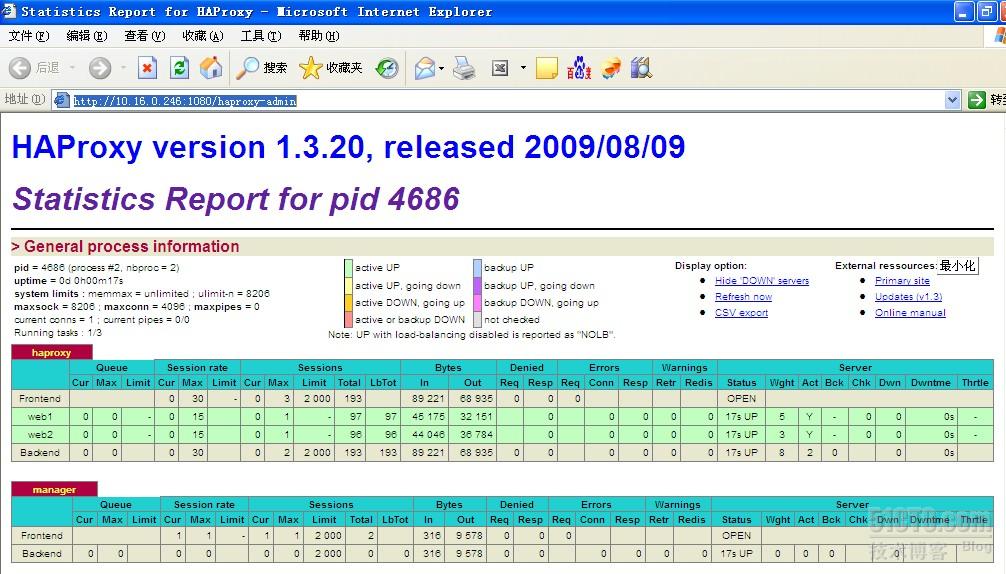
在浏览器中输入haproxy监控地址:http://10.16.0.246:1080/haproxy-admin,如图所示
650) this.width=650;" width="320" border="0" height="240" src="http://img1.51cto.com/attachment/201111/125114145.jpg" alt="125114145.jpg" onabort="" onblur="" onchange="" onclick="" ondblclick="" onerror="" onfocus="" onkeydown="" onkeypress="" onkeyup="" onmousedown="" onmousemove="" onmouseout="" onmouseover="" onmouseup="" onreset="" onresize="" onselect="" onsubmit="" onunload="" style="padding: 0px; margin: 0px; vertical-align: top; border: none;">
在浏览器输入haproxy设置的对外访问地址:http://10.16.0.244/,如图所示
650) this.width=650;" border="0" src="http://img1.51cto.com/attachment/201111/125415756.jpg" alt="125415756.jpg" onabort="" onblur="" onchange="" onclick="" ondblclick="" onerror="" onfocus="" onkeydown="" onkeypress="" onkeyup="" onmousedown="" onmousemove="" onmouseout="" onmouseover="" onmouseup="" onreset="" onresize="" onselect="" onsubmit="" onunload="" style="padding: 0px; margin: 0px; vertical-align: top; border: none;">650) this.width=650;" border="0" src="http://img1.51cto.com/attachment/201111/125453670.jpg" alt="125453670.jpg" onabort="" onblur="" onchange="" onclick="" ondblclick="" onerror="" onfocus="" onkeydown="" onkeypress="" onkeyup="" onmousedown="" onmousemove="" onmouseout="" onmouseover="" onmouseup="" onreset="" onresize="" onselect="" onsubmit="" onunload="" style="padding: 0px; margin: 0px; vertical-align: top; border: none;">
参考文献:
http://network.51cto.com/art/201110/295955_1.htm
http://blog.csdn.net/maijian/article/details/6082283
http://blog.sina.com.cn/s/blog_51d3553f0100u1bb.html
http://andrewyu.blog.51cto.com/1604432/647907
http://blog.chinaunix.net/space.php?uid=22600159&do=blog&id=2124188
http://sookk8.blog.51cto.com/455855/579719
http://freehat.blog.51cto.com/1239536/1347882
http://www.cnblogs.com/dkblog/archive/2012/03/13/2393321.html
http://jlsfwq.blog.51cto.com/818700/165617
正文到此结束
- 本文标签: Haproxy
- 版权声明: 本文由HARRIES原创发布,转载请遵循《署名-非商业性使用-相同方式共享 4.0 国际 (CC BY-NC-SA 4.0)》许可协议授权
- 本文海报: 生成海报一 生成海报二
热门推荐


相关文章


Loading...
![[HBLOG]公众号](http://www.liuhaihua.cn/img/qrcode_gzh.jpg)

