Spring Cloud Netflix微服务
在使用Spring Cloud Netflix构建微服务之前,我们先了解一下Spring Cloud集成的Netflix OSS的基础组件Eureka,对于Netflix的其他微服务组件,像Hystrix、Zuul、Ribbon等等本文暂不涉及,感兴趣可以参考官网文档。这里,我们用最基础的Eureka来构建一个最基础的微服务应用,来演示如何构建微服务,了解微服务的基本特点。
Eureka
Eureka是Netflix开源的一个微服务注册组件,提供服务发现特性,它是一个基于REST的服务,主要具有如下功能:
1.支持服务注册和发现
2.具有Load Balance和Failover的功能
3.在进行服务调用过程中,无需知道目标服务的主机(IP)和端口,只要知道服务名就可以实现调用
通过Netfix在Github上的文档,我们看一下Eureka的基本架构,如下图所示:
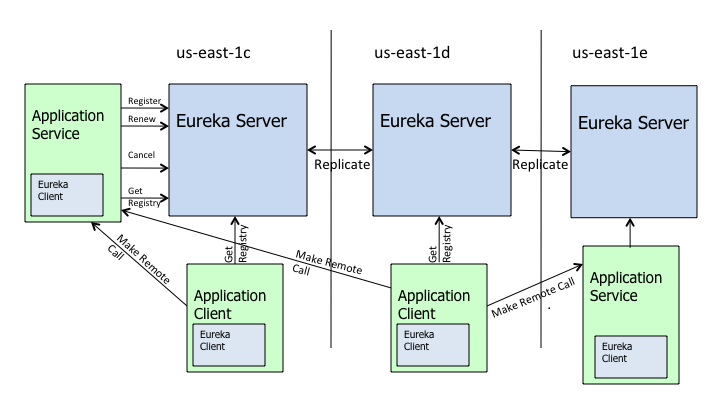
Eureka主要包含如下两个核心组件:
Eureka Server
Eureka Server是服务注册的服务端组件,负责管理Eureka Client注册的服务,提供服务发现的功能。它支持集群模式部署,集群部署模式中,多个Eureka Server之间会同步服务注册数据,能够保证某一个Eureka Server因为故障挂掉,仍能对外提供注册服务的能力。因为最初在Netflix,Eureka主要用在AWS Cloud上,用作定位服务、Load Balance和Failover,在AWS Cloud上,Eureka支持在多个Region中部署Eureka Server而构建一个注册中心集群,从而实现了服务注册中心的高可用性。
Eureka Client
Eureka Client是Eureka Server客户端组件库,可以基于它向Eureka Server注册服务,供服务调用方调用;也可以是一个服务调用方,通过检索服务并调用已经注册的服务。如上图所示,Application Service和Application Client都是基于Eureka Client开发的使用Eureka Server的服务。另外,Eureka Client提供了内置的Load Balancer,实现了基本的Round-robin模式的负载均衡。
Spring Cloud Netflix
Spring Cloud Netflix提供了对Netflix OSS的集成,同时还使用了Spring Boot,能够极大地简化微服务程序的开发。使用Spring Cloud提供的基本注解,就能非常方便的使用Netfix OSS基本组件。
要想使用Spring Cloud Eureka,只需要在Maven
<dependencyManagement>
<dependencies>
<dependency>
<groupId>org.springframework.cloud</groupId>
<artifactId>spring-cloud-netflix</artifactId>
<version>1.0.7.RELEASE</version>
<type>pom</type>
<scope>import</scope>
</dependency>
</dependencies>
</dependencyManagement>
POM文件中加入如下依赖管理配置即可:
关于如何使用注解,我们会在下面的实践中,详细说明。
构建微服务实践
我们构建一个简单的微服务应用,能够实现服务注册,服务调用的基本功能。计划实现的微服务应用,交互流程如下图所示:
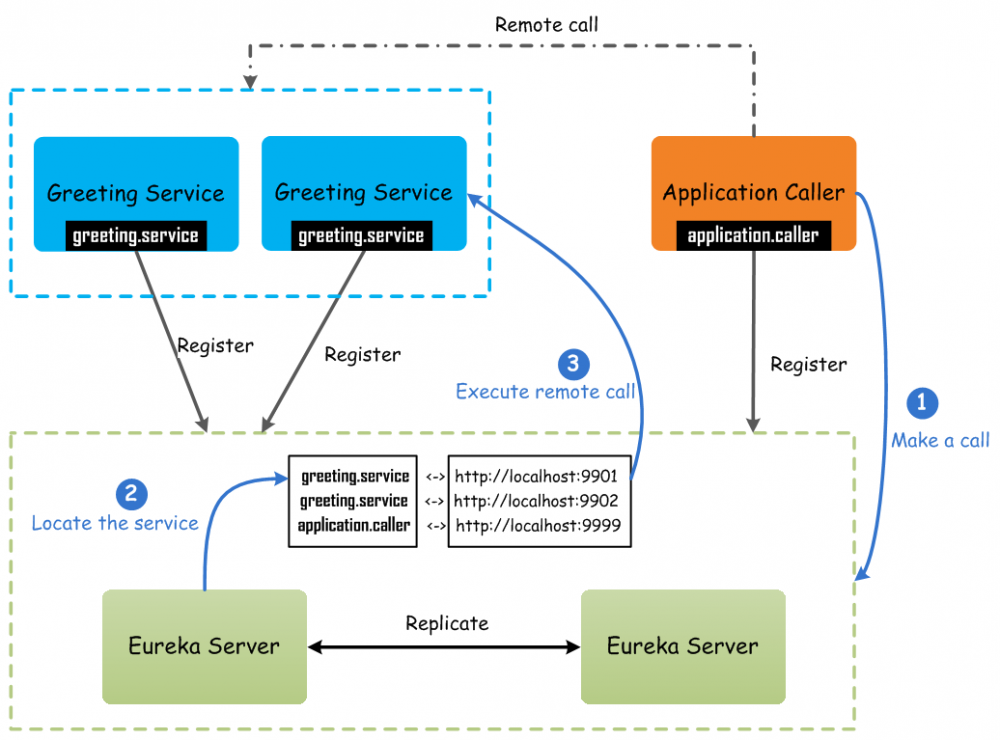
上图中,我们假设Eureka Client并没有缓存Eureka Server中注册的服务,而是每次都需要通过Eureka Server来查找并映射目标服务。上图所示的微服务应用,具有如下服务组件:
两个Eureka Server实例组成的服务发现集群
通过Spring Cloud实现,只需要使用注解配置即可,代码如下所示:
package org.shirdrn.springcloud.eureka.server;
import org.springframework.boot.autoconfigure
.SpringBootApplication;
import org.springframework.boot.builder.Spring
ApplicationBuilder;
import org.springframework.cloud.netflix.eureka.server
.EnableEurekaServer;
@EnableEurekaServer
@SpringBootApplication
public class MyEurekaServer {
public static void main(String[] args) {
new SpringApplicationBuilder(MyEurekaServer.class)
.web(true).run(args);
}
}
部署两个Eureka Server的代码是相同的,其中,对应的配置文件application.yml内容不同,示例如下所示:
server:
port: 3300
spring:
application:
name: my-eureka-server
eureka:
client:
serviceUrl:
defaultZone: http://localhost:3300/eureka/,http
//localhost:3301/eureka/
instance
metadataMap:
instanceId: ${spring.application.name}:${spring.
application
instance_id:${random.value}}
另一个只需要改一下server.port为3301即可。
具有两个实例的Greeting Service服务
该示例服务,只是提供一个接口,能够给调用方返回调用结果,实现代码,如下所示
package org.shirdrn.springcloud.eureka.applicati
onservice.greeting;
import org.springframework.boot.autoconfigure.EnableAut
oConfiguration;
import org.springframework.boot.autoconfigure.Spring
BootApplication;
import org.springframework.boot.builder.SpringAppli
cationBuilder;
import org.springframework.cloud.netflix.eureka.
EnableEurekaClient;
import org.springframework.web.bind.annotation
.PathVariable;
import org.springframework.web.bind.annotation.
RequestMapping;
import org.springframework.web.bind.annotation.
RequestMethod;
import org.springframework.web.bind.annotation
.RestController;
@SpringBootApplication
@EnableEurekaClient
@RestController
@EnableAutoConfiguration
public class GreeingService {
@RequestMapping(method = RequestMethod.GET,
value = "/greeting/{name}")
public String greet(@PathVariable("name")
String name) {
return "::01:: Hello, " + name + "!";
}
public static void main(String[] args) {
new SpringApplicationBuilder(GreeingService.class).
web(true).run(args);
}
}
为了能够观察,Greeting Service的两个实例,能够在调用的时候实现Round-robin风格的负载均衡,特别在返回的结果中增加了标识来区分。
对应的配置文件application.properties内容,除了对应的端口和服务实例名称不同,其它都相同,示例如下所示:
server.port=9901
spring.application.name = greeting.service
eureka.instance.metadataMap.instanceId = ${spring.application.name}:instance-9901
eureka.client.serviceUrl.defaultZone = http://localhost:3300/eureka/,http://localhost
:3301/eureka/
这样就可以在启动时注册到Eureka Server中。
一个名称为Application Caller的服务,需要调用Greeting Service服务
该服务和上面的服务类似,只是在其内部实现了对远程服务的调用,我们的实现代码如下所示:
package org.shirdrn.springcloud.eureka.applicati
onclient.caller;
import org.springframework.beans.factory.annotati
on.Autowired;
import org.springframework.boot.CommandLineRunner;
import org.springframework.boot.autoconfigure.
SpringBootApplication;
import org.springframework.boot.builder.
SpringApplicationBuilder;
import org.springframework.cloud.netflix.eureka.
EnableEurekaClient;
import org.springframework.cloud.netflix.feign
.EnableFeignClients;
import org.springframework.stereotype.Component;
import org.springframework.web.client.RestTemplate;
@SpringBootApplication
@EnableEurekaClient
@EnableFeignClients
public class Application {
public static void main(String[] args) {
new SpringApplicationBuilder(Application.class)
.web(false)
.run(args); }
}
@Component
class RestTemplateExample implements CommandLineRunner {
@Autowired
private RestTemplate restTemplate;
private static final String GREETING_SERVICE_URI = "http://greeting.service/greeting/{name}"; //
通过服务名称来调用,而不需要知道目标服务的IP和端口
@Override
public void run(String... strings) throws Exception {
while(true) {
String greetingSentence = this.restTemplate.
getForObject(
GREETING_SERVICE_URI,
String.class,
"Dean Shi"); // 透明调用远程服务
System.out.println("Response result: " +
greetingSentence);
Thread.sleep(5000);
}
}
启动并验证微服务应用
上面已经实现了该示例微服务应用的全部组件,先可以启动各个服务组件了。启动顺序如下所示:
1.启动两个Eureka Server
2.启动两个Greeting Service
3.启动服务消费应用Application Call
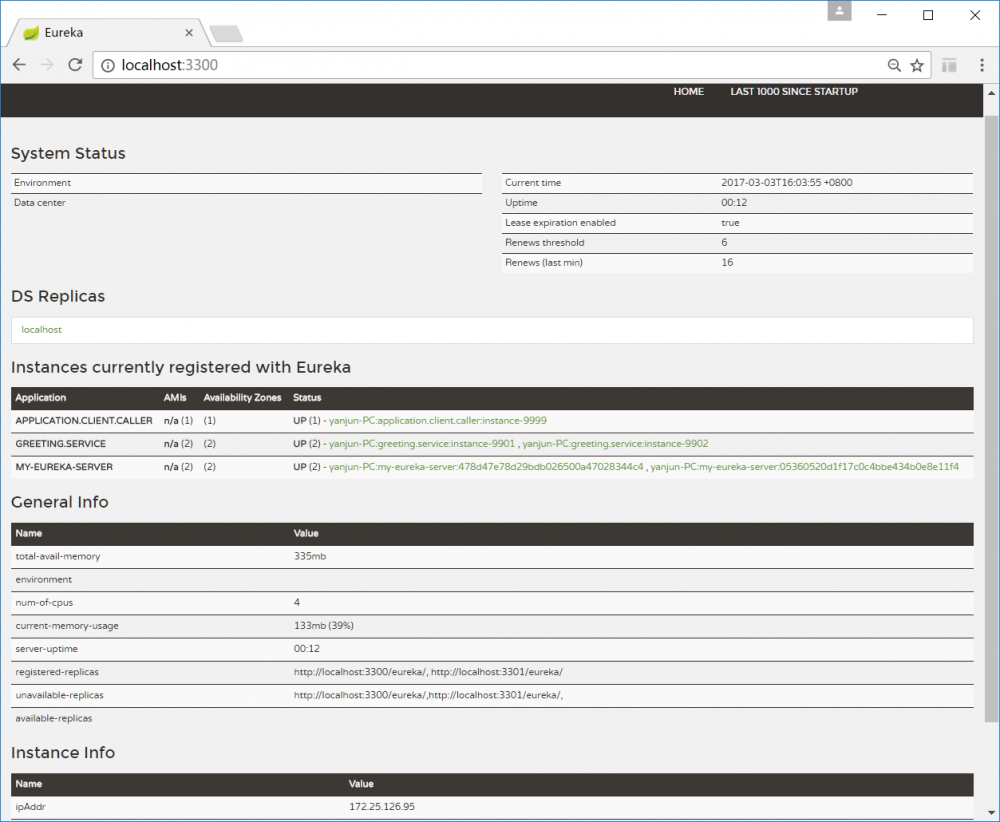
可以通过Web页面查看Eureka Server控制台,如下图所示:
多次启动Application Call应用,就可以通过查看Greeting Service服务的日志,可以看到服务被调用,而且实现了基础的Round-robin负载均衡,日志如下所示:
Response result: ::02:: Hello, Dean Shi!
Response result: ::01:: Hello, Dean Shi!
Response result: ::02:: Hello, Dean Shi!
Response result: ::01:: Hello, Dean Shi!
Response result: ::02:: Hello, Dean Shi!
Response result: ::01:: Hello, Dean Shi!
正文到此结束
热门推荐


相关文章


Loading...
![[HBLOG]公众号](http://www.liuhaihua.cn/img/qrcode_gzh.jpg)

