Spring Cloud(十一)高可用的分布式配置中心 Spring Cloud Bus 消息总线集成(RabbitMQ)
上一篇文章,留了一个悬念, Config Client 实现配置的实时更新,我们可以使用 /refresh 接口触发,如果所有客户端的配置的更改,都需要手动触发客户端 /refresh ,当服务越来越多的时候,那岂不是维护成本很高,显然不太合适,而使用 Spring Cloud Bus 消息总线实现方案,可以优雅的解决以上问题,那就是通过消息代理中间件 RabbitMQ 加 Git 的 Webhooks 來触发配置的更新,那具体是怎么实现的,我会通过图文形式介绍。
Spring Cloud Bus
Spring Cloud Bus将分布式系统的节点通过轻量级消息代理连接起来。用于在集群中传播状态更改(例如配置更改事件)或其他管理指令。Spring Cloud Bus 的一个核心思想是通过分布式的启动器对 Spring Boot 应用进行扩展,也可以用来建立一个或多个应用之间的通信频道。目前唯一实现的方式是用 AMQP 消息代理作为通道,但是相同的基本功能集(还有一些取决于传输)在其他传输的路线图上
消息总线
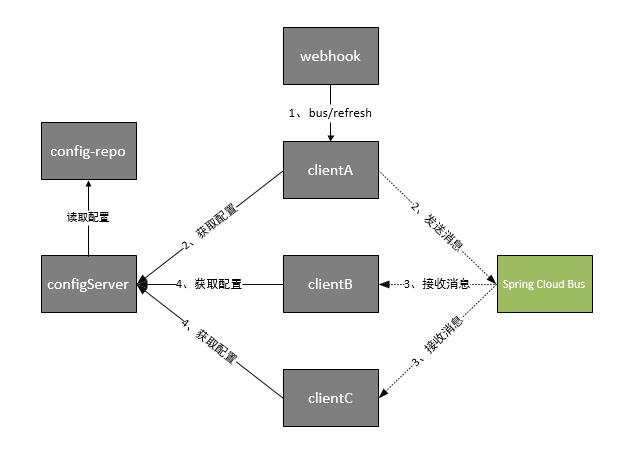
消息总线是一种通信工具,可以在机器之间互相传输消息、文件等。消息总线扮演着一种消息路由的角色,拥有一套完备的路由机制来决定消息传输方向。发送段只需要向消息总线发出消息而不用管消息被如何转发。 Spring cloud bus 通过轻量消息代理连接各个分布的节点。管理和传播所有分布式项目中的消息,本质是利用了MQ的广播机制在分布式的系统中传播消息,目前常用的有Kafka和RabbitMQ。 下面是一个配置中心刷新配置的例子
[图片来源于网络如有侵权请私信删除]
- 1、提交代码触发post请求给bus/refresh
- 2、server端接收到请求并发送给Spring Cloud Bus
- 3、Spring Cloud bus接到消息并通知给其它客户端
- 4、其它客户端接收到通知,请求Server端获取最新配置
- 5、全部客户端均获取到最新的配置
消息代理
消息代理(Message Broker)是一种消息验证、传输、路由的架构模式。消息代理是一个中间件产品,它的核心是一个消息的路由程序,用来实现接收和分发消息,并根据设定好的消息处理流来转发给正确的应用。它包括独立的通信和消息传递协议,能够实现组织内部和组织间的网络通信。设计代理的目的就是为了能够从应用程序中传入消息,并执行一些特别的操作。
和组织间的网络通信。设计代理的目的就是为了能够从应用程序中传入消息,并执行一些特别的操作。 现有的消息代理开源产品:
- ActiveMQ
- Kafka
- RabbitMQ
- RocketMQ
目前 Spring Cloud Bus 支持 RabbitMQ 和 Kafka,spring-cloud-starter-bus-amqp 、 spring-cloud-starter-bus-kafka
RabbitMQ简介
RabbitMQ是一个开源的AMQP实现,服务器端用Erlang语言编写,支持多种客户端,如:Python、Ruby、.NET、Java、JMS、C、PHP、ActionScript、XMPP、STOMP等,支持AJAX。用于在分布式系统中存储转发消息,在易用性、扩展性、高可用性等方面表现不俗。
AMQP,即Advanced message Queuing Protocol,高级消息队列协议,是应用层协议的一个开放标准,为面向消息的中间件设计。消息中间件主要用于组件之间的解耦,消息的发送者无需知道消息使用者的存在,反之亦然。
AMQP的主要特征是面向消息、队列、路由(包括点对点和发布/订阅)、可靠性、安全。
Github: https://github.com/rabbitmq
官网地址: http://www.rabbitmq.com
安装RabbitMQ
安装RabbitMQ 可以参考之前的文章
CentOs7.3 搭建 RabbitMQ 3.6 单机服务:
https://segmentfault.com/a/1190000010693696CentOs7.3 搭建 RabbitMQ 3.6 Cluster 集群服务:
https://segmentfault.com/a/1190000010702020Spring Boot 中使用 RabbitMQ: https://segmentfault.com/a/1190000011577243
准备工作
以下项目修改不做过多解释,部分代码不再展示,请阅读上篇文章,Spring Cloud(十)高可用的分布式配置中心 Spring Cloud Config 中使用 Refresh: https://segmentfault.com/a/1190000012553128
Config Server
在项目 spring-cloud-config-server-provider 进行以下操作
添加依赖
<dependency>
	<groupId>org.springframework.cloud</groupId>
	<artifactId>spring-cloud-starter-bus-amqp</artifactId>
</dependency>
添加配置
在 application.properties 添加以下配置.关闭安全认证
RabbitMQ的 admin 用户是手动创建的,具体阅读上面 安装 RabbitMQ 部分
#关闭安全验证
management.security.enabled=false

spring.rabbitmq.host=192.168.252.128
spring.rabbitmq.port=5672
spring.rabbitmq.username=admin
spring.rabbitmq.password=123456
Config Client
把上一篇,示例代码 spring-cloud-config-client-consumer 复制三份进行修改,依次类推修改项目名称 spring-cloud-config-client-consumer-1 [1-3] 进行以下操作
添加依赖
<dependency>
	<groupId>org.springframework.cloud</groupId>
	<artifactId>spring-cloud-starter-bus-amqp</artifactId>
</dependency>
添加配置
在 application.properties 添加以下配置.关闭安全认证
server.port=8081

#关闭安全验证
management.security.enabled=false

spring.rabbitmq.host=192.168.252.128
spring.rabbitmq.port=5672
spring.rabbitmq.username=admin
spring.rabbitmq.password=123456
值是 false 的话,除开 health 接口还依赖 endpoints.health.sensitive 的配置外,其他接口都不需要输入用户名和密码了
RabbitMQ的 admin 用户是手动创建的,具体阅读上面 安装 RabbitMQ 部分
server.port= Config Client 客户端口依次类推 8081 , 8082 , 8083
测试服务
启动RabbitMQ
启动MQ服务
$ service rabbitmq-server start
Redirecting to /bin/systemctl start  rabbitmq-server.service
查看MQ状态
$ service rabbitmq-server status
[root@node8 opt]#
Redirecting to /bin/systemctl status  rabbitmq-server.service
● rabbitmq-server.service - RabbitMQ broker
   Loaded: loaded (/usr/lib/systemd/system/rabbitmq-server.service; disabled; vendor preset: disabled)
   Active: active (running) since Sun 2017-12-24 18:57:24 CST; 3h 24min ago
  Process: 4456 ExecStop=/usr/sbin/rabbitmqctl stop (code=exited, status=0/SUCCESS)
 Main PID: 4589 (beam)
   Status: "Initialized"
   CGroup: /system.slice/rabbitmq-server.service
           ├─4589 /usr/lib64/erlang/erts-8.0.3/bin/beam -W w -A 64 -P 1048576 -t 5000000 -stbt db -zdbbl 32000 -K true -- -root /usr/li...
           ├─4773 /usr/lib64/erlang/erts-8.0.3/bin/epmd -daemon
           ├─4875 erl_child_setup 1024
           ├─4882 inet_gethost 4
           └─4883 inet_gethost 4

Dec 24 18:57:23 node8 rabbitmq-server[4589]: RabbitMQ 3.6.10. Copyright (C) 2007-2017 Pivotal Software, Inc.
Dec 24 18:57:23 node8 rabbitmq-server[4589]: ##  ##      Licensed under the MPL.  See http://www.rabbitmq.com/
Dec 24 18:57:23 node8 rabbitmq-server[4589]: ##  ##
Dec 24 18:57:23 node8 rabbitmq-server[4589]: ##########  Logs: /var/log/rabbitmq/rabbit@node8.log
Dec 24 18:57:23 node8 rabbitmq-server[4589]: ######  ##        /var/log/rabbitmq/rabbit@node8-sasl.log
Dec 24 18:57:23 node8 rabbitmq-server[4589]: ##########
Dec 24 18:57:23 node8 rabbitmq-server[4589]: Starting broker...
Dec 24 18:57:24 node8 rabbitmq-server[4589]: systemd unit for activation check: "rabbitmq-server.service"
Dec 24 18:57:24 node8 systemd[1]: Started RabbitMQ broker.
Dec 24 18:57:24 node8 rabbitmq-server[4589]: completed with 6 plugins.
[root@node8 opt]#
启动项目
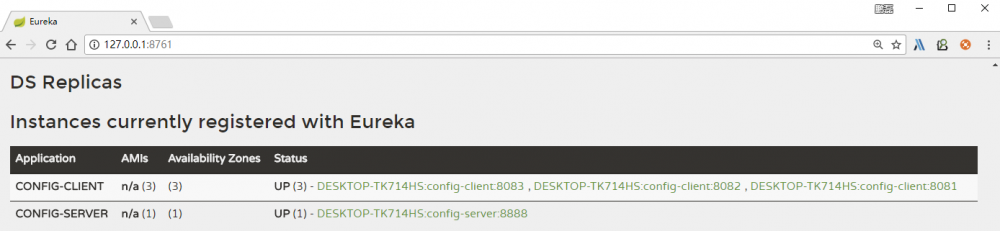
按照顺序启动五个项目
spring-cloud-eureka-service spring-cloud-config-server-provider
spring-cloud-config-client-consumer-1
spring-cloud-config-client-consumer-2
spring-cloud-config-client-consumer-3
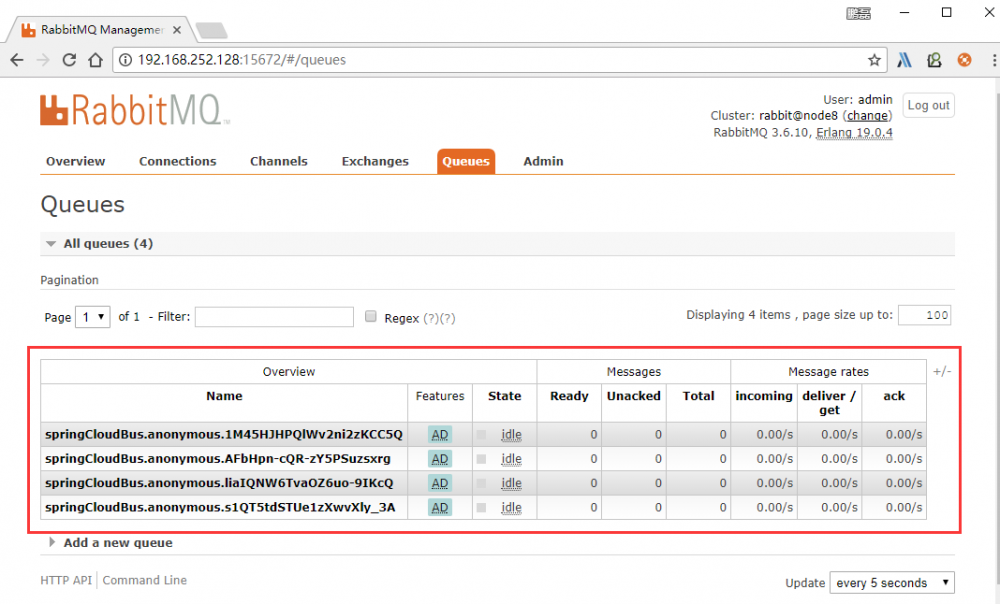
检查Queues
浏览器打开 : http://192.168.252.128:15672/
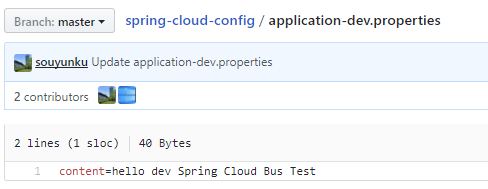
修改配置
修改 Git 仓库配置,在 content=hello dev 后面加上 Spring Cloud Bus Test
查看 Config Server
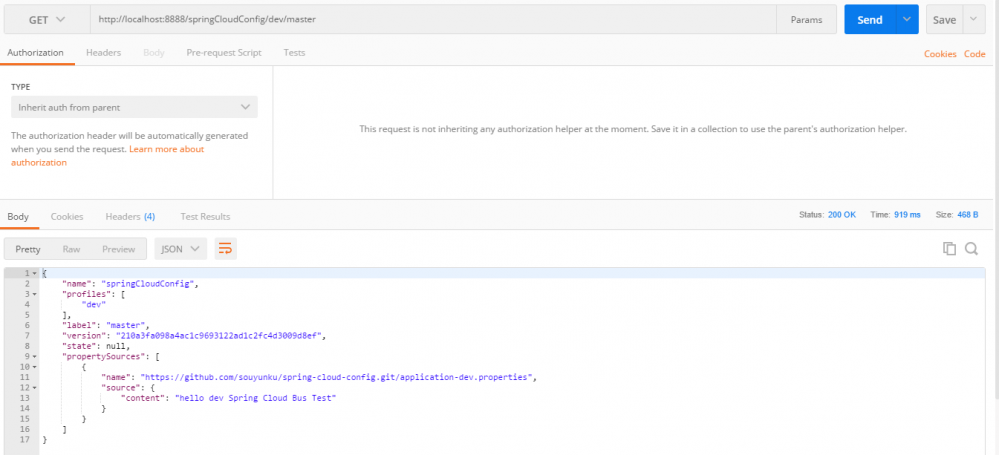
通过 Postman 发送 GET 请求到: http://localhost:8888/springCloudConfig/dev/master 查看 Config Server 是否是最新的值
查看 Config Client
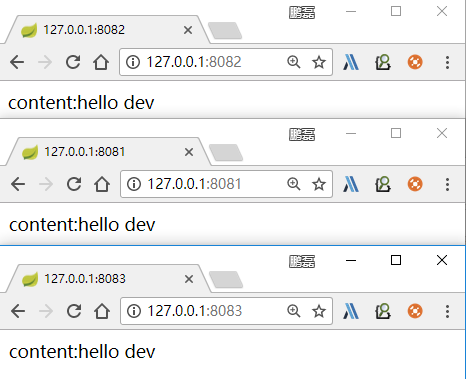
访问: http://localhost:8081/ , http://localhost:8082/ , http://localhost:8083/ ,发现没有任何改变,为什么呢,因为我们没有主动触发 Config Server bus/refresh 接口
刷新配置
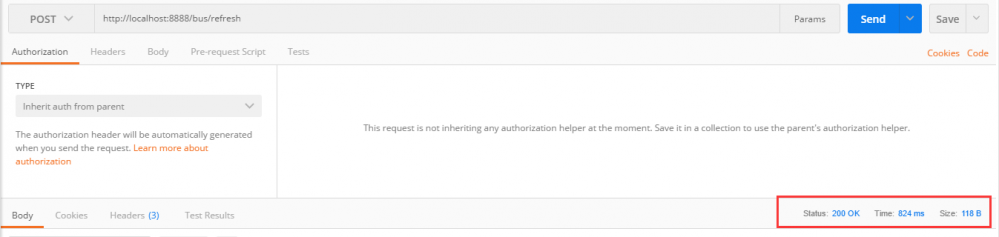
通过 Postman 发送 POST 请求到: http://localhost:8888/bus/refresh ,我们可以看到以下内容:
注意是 PSOT 请求
三个Config Client 客户端控制台,分别会打印以下内容意思就是,收到远程更新请求,config.client,KEYY 刷新, key 是 content
2017-12-24 22:47:48.860  INFO 14760 --- [Ue1zXwvXly_3A-1] o.s.cloud.bus.event.RefreshListener      : Received remote refresh request. Keys refreshed [config.client.version, content]
2017-12-24 22:47:48.861  INFO 14760 --- [nfoReplicator-0] com.netflix.discovery.DiscoveryClient    : DiscoveryClient_CONFIG-CLIENT/DESKTOP-TK714HS:config-client:8081: registering service...
2017-12-24 22:47:48.866  INFO 14760 --- [nfoReplicator-0] com.netflix.discovery.DiscoveryClient    : DiscoveryClient_CONFIG-CLIENT/DESKTOP-TK714HS:config-client:8081 - registration status: 204
2017-12-24 22:52:48.858  INFO 14760 --- [trap-executor-0] c.n.d.s.r.aws.ConfigClusterResolver      : Resolving eureka endpoints via configuration
2017-12-24 22:57:48.859  INFO 14760 --- [trap-executor-0] c.n.d.s.r.aws.ConfigClusterResolver      : Resolving eureka endpoints via configuration
再次查看 Config Client
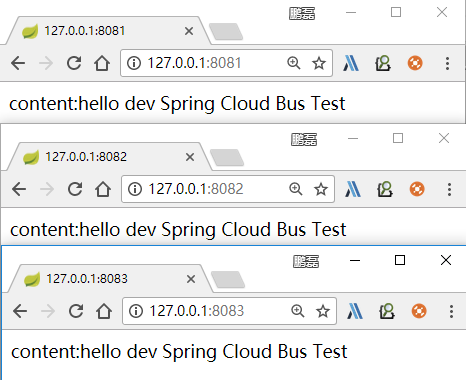
访问: http://localhost:8081/ , http://localhost:8082/ , http://localhost:8083/ 已经刷新了配置
扩展阅读
Git webhooks
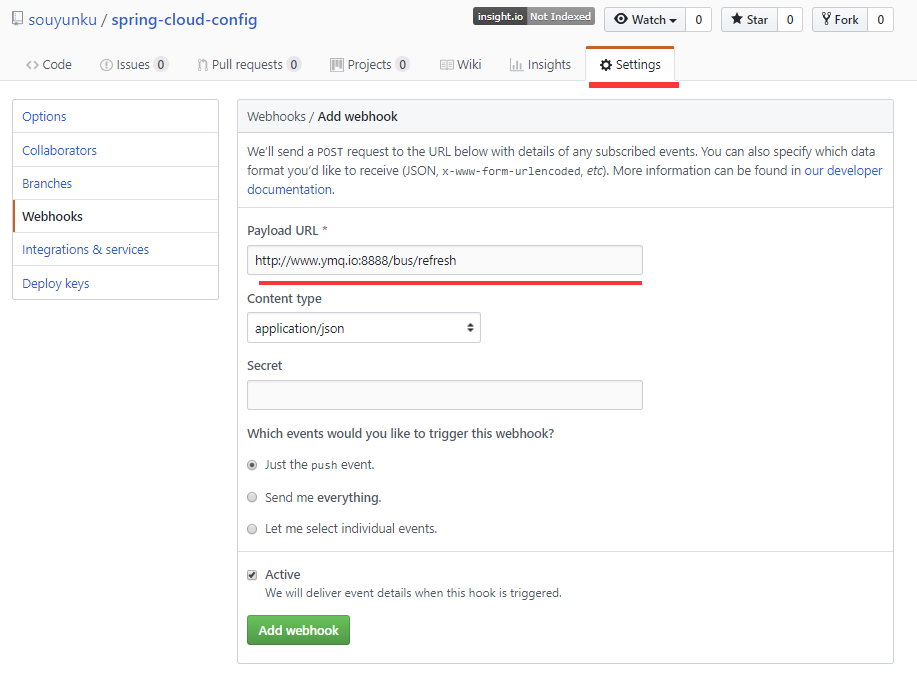
现在虽然可以不用重启服务就更新配置了,但还是需要我们手动操作,这样还是不可取的。所以,这里就要用到Git的webhooks来达到自动更新配置。
打开git上配置仓库的地址,添加 webhooks ,上面 Payload URL 我写的域名,当然我没有部署,上面的 Payload URL 就填写我们的配置中心触发刷新的地址,当然这里不能写 localhost 啦,要外网访问地址才行。
还有这里面有个Secret的秘钥验证,如果这里填写的话,在配置文件上要写上 encrypt.key 与之对应。
局部刷新
某些场景下(例如灰度发布),我们可能只想刷新部分微服务的配置,此时可通过 /bus/refresh 端点的 destination 参数来定位要刷新的应用程序。
例如: /bus/refresh?destination=customers:8000 ,这样消息总线上的微服务实例就会根据 destination 参数的值来判断是否需要要刷新。其中, customers:8000 指的是各个微服务的 ApplicationContext ID 。
destination 参数也可以用来定位特定的微服务。例如: /bus/refresh?destination=customers:** ,这样就可以触发 customers 微服务所有实例的配置刷新。
跟踪总线事件
一些场景下,我们可能希望知道 Spring Cloud Bus 事件传播的细节。此时,我们可以跟踪总线事件( RemoteApplicationEvent 的子类都是总线事件)。
跟踪总线事件非常简单,只需设置 spring.cloud.bus.trace.enabled=true ,这样在 /bus/refresh 端点被请求后,访问 /trace 端点就可获得类似如下的结果:
发送 GET 请求到: http://localhost:8888/trace
    {
        "timestamp": 1514128639236,
        "info": {
            "signal": "spring.cloud.bus.ack",
            "event": "RefreshRemoteApplicationEvent",
            "id": "51d73ce8-5cd2-4d7a-9a40-ae3ab0dabc57",
            "origin": "config-client:8081",
            "destination": "**"
        }
    },
    {
        "timestamp": 1514128638763,
        "info": {
            "method": "GET",
            "path": "/config-client/dev/master",
            "headers": {
                "request": {
                    "accept": "application/json, application/*+json",
                    "user-agent": "Java/1.8.0_112",
                    "host": "localhost:8888",
                    "connection": "keep-alive"
                },
                "response": {
                    "X-Application-Context": "config-server:8888",
                    "Content-Type": "application/json;charset=UTF-8",
                    "Transfer-Encoding": "chunked",
                    "Date": "Sun, 24 Dec 2017 15:17:18 GMT",
                    "status": "200"
                }
            },
            "timeTaken": "3364"
        }
    },
    {
        "timestamp": 1514128638393,
        "info": {
            "signal": "spring.cloud.bus.ack",
            "event": "RefreshRemoteApplicationEvent",
            "id": "51d73ce8-5cd2-4d7a-9a40-ae3ab0dabc57",
            "origin": "config-client:8082",
            "destination": "**"
        }
    },
    {
        "timestamp": 1514128637908,
        "info": {
            "method": "GET",
            "path": "/config-client/dev/master",
            "headers": {
                "request": {
                    "accept": "application/json, application/*+json",
                    "user-agent": "Java/1.8.0_112",
                    "host": "localhost:8888",
                    "connection": "keep-alive"
                },
                "response": {
                    "X-Application-Context": "config-server:8888",
                    "Content-Type": "application/json;charset=UTF-8",
                    "Transfer-Encoding": "chunked",
                    "Date": "Sun, 24 Dec 2017 15:17:17 GMT",
                    "status": "200"
                }
            },
            "timeTaken": "2444"
        }
    },
    {
        "timestamp": 1514128637621,
        "info": {
            "signal": "spring.cloud.bus.ack",
            "event": "RefreshRemoteApplicationEvent",
            "id": "51d73ce8-5cd2-4d7a-9a40-ae3ab0dabc57",
            "origin": "config-client:8083",
            "destination": "**"
        }
    },
    {
        "timestamp": 1514128637076,
        "info": {
            "method": "GET",
            "path": "/config-client/dev/master",
            "headers": {
                "request": {
                    "accept": "application/json, application/*+json",
                    "user-agent": "Java/1.8.0_112",
                    "host": "localhost:8888",
                    "connection": "keep-alive"
                },
                "response": {
                    "X-Application-Context": "config-server:8888",
                    "Content-Type": "application/json;charset=UTF-8",
                    "Transfer-Encoding": "chunked",
                    "Date": "Sun, 24 Dec 2017 15:17:17 GMT",
                    "status": "200"
                }
            },
            "timeTaken": "1716"
        }
    }
源码下载
- https://github.com/souyunku/spring-cloud-examples/tree/master/spring-cloud-config-bus
正文到此结束
- 本文标签: java 源码 git centos 代码 组织 example ACE Security 希望 分布式系统 spring xmpp ip 集群 GitHub list Connection Word queue MQ rabbitmq 测试 cat 管理 key Ajax 删除 message IO 高可用 协议 db 产品 IDE 消息队列 consumer http ActiveMQ 图片 RocketMQ 服务器 node tar UI json provider ECS JMS executor 分布式 灰度发布 root remote 配置 实例 开源 src 下载 plugin Spring Boot PHP 端口 js 安装 App 参数 lib 文章 Service id Keep-Alive web 认证 https 安全 域名 Eureka client python Action Master 本质
- 版权声明: 本文为互联网转载文章,出处已在文章中说明(部分除外)。如果侵权,请联系本站长删除,谢谢。
- 本文海报: 生成海报一 生成海报二
热门推荐


相关文章


Loading...
![[HBLOG]公众号](http://www.liuhaihua.cn/img/qrcode_gzh.jpg)

