基于SpringBoot的后台管理系统(Apache Shiro,Spring Session(重点))(五)
如果您有幸能看到,请认阅读以下内容;
-
1、本项目临摹自 abel533 的Guns,他的项目 fork 自stylefeng 的Guns!开源的世界真好,可以学到很多知识。
-
2、版权归原作者所有,自己只是学习使用。跟着大佬的思路,希望自己也能变成大佬。gogogo》。。
-
3、目前只是一个后台模块,希望自己技能增强到一定时,可以把stylefeng 的 [Guns]融合进来。
-
4、note里面是自己的学习过程,菜鸟写的,不是大佬写的。内容都是大佬的。
-
5、如有拼写错误,还请见谅。目前的桌子不适合打字,本文只为自己记录.
问大家一个问题,你们在看本文的时候,觉得哪里有需要修改的地方?内容和格式方面,欢迎大家提出来。
目录
- 1、SpringBoot第一站:分析了启动类。还有各种自动配置的源码 点这里
- 2、SpringBoot第二站:定义了异常、注解、Node节点、Page 点这里
- 3、SpringBoot第三站:SpringBoot数据源配置、Mybatis配置、日志记录 点这里
- 4、SpringBoot第四站:SpringBoot缓存配置、全局异常处理 点这里
说明
如果您有幸能看到,请认阅读以下内容;
-
1、本项目临摹自 abel533 的Guns,他的项目 fork 自stylefeng 的Guns!开源的世界真好,可以学到很多知识。
-
2、版权归原作者所有,自己只是学习使用。跟着大佬的思路,希望自己也能变成大佬。gogogo》。。
-
3、目前只是一个后台模块,希望自己技能增强到一定时,可以把stylefeng 的 [Guns]融合进来。
-
4、note里面是自己的学习过程,菜鸟写的,不是大佬写的。内容都是大佬的。
Apache Shiro
在本项目中使用了Apache 的Shiro为安全护航,其实Spring也提供了声明式安全保护的框架,那就是Spring Securitu。有兴趣的可以看下我之前的笔记 Srping-Secutiry实战笔记 。
(1)、Spring Security 是基于Spring 应用程序提供的声明式安全保护的安全框架。Spring Sercurity 提供了完整的安全性解决方案,它能够在Web请求级别和方法调用级别处理身份认证和授权,因为是基于Spring,所以Spring Security充分利用了依赖注入(Dependency injection DI) 和面向切面的技术。
Spring Security从两个角度来解决安全性,他使用Servlet规范中的Filter保护Web请求并限制URL级别的访问。Spring Security还能够使用AOP保护方法调用——借助于对象代理和使用通知,能够取保只有具备适当权限的用户才能访问安全保护的方法。
(2)、Apache Shiro是一个功能强大且灵活的开源安全框架,主要功能包括用户认证、授权、会话管理以及加密。
Apache Shiro的首要目标是易于使用和理解。系统安全是非常复杂甚至痛苦的,但Shiro并不是。一个框架应该尽可能的隐藏那些复杂的细节,并且公开一组简洁直观的API以简化开发人员在系统安全上所付出的努力。
个人倾向于前者,毕竟是Spring生态系统上的一员。
Apache Shiro功能:
- 验证用户身份
- 控制用户访问
- 及时响应在认证、访问控制或会话声明周期内的所有事件。
- 实现单点登录功能
Apache Shiro的特点:参考这里
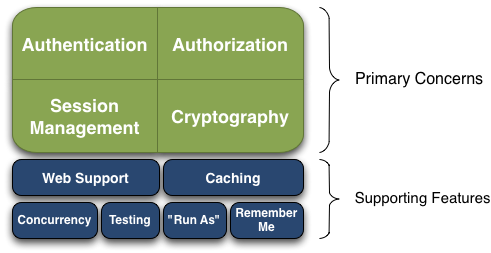
这些特点被Shiro开发团队称之为“应用安全的四大基石”——认证、授权、会话管理和加密:
- 认证:有时候被称作“登录”,也就是验证一个用户是谁。
- 授权:处理访问控制,例如决定“谁”可以访问“什么”资源。
- 会话管理:管理特定用户的会话,甚至在非web环境或非EJB应用环境下。
- 加密:在保持易用性的同时使用加密算法保持数据的安全。
- Web支持:Shiro的web api可以帮组web应用非常方便的提高安全性。
- 缓存:缓存可以让Apache Shiro的api在安全操作上的保持快速和高效。
看完这些基础的概念,我们直接看接口的定义吧。
/**
 * 定义shirorealm所需数据的接口
 */
public interface IShiro {

    /**
     * 根据账号获取登录用户
     */
    User user(String account);

    /**
     * 根据系统用户获取Shiro的用户
     */
    ShiroUser shiroUser(User user);

    //省略部分
    /**
     * 获取shiro的认证信息
     */
    SimpleAuthenticationInfo info(ShiroUser shiroUser, User user, String realmName);
}

--------------------------------------------------------------------------------
/**
 * 自定义Authentication对象,使得Subject除了携带用户的登录名外还可以携带更多信息
 */
public class ShiroUser implements Serializable {

    private static final long serialVersionUID = 1L;

    public Integer id;          // 主键ID
    public String account;      // 账号
    public String name;         // 姓名
    public Integer deptId;      // 部门id
    public List<Integer> roleList; // 角色集
    public String deptName;        // 部门名称
    public List<String> roleNames; // 角色名称集
    //Setter、Getter略
ShiroFactroy工厂, SpringContextHolder 是Spring的ApplicationContext的持有者,可以用静态方法的方式获取spring容器中的bean
@Service
@DependsOn("springContextHolder")
@Transactional(readOnly = true)
public class ShiroFactroy implements IShiro {

    @Autowired
    private UserMapper userMapper;

    @Autowired
    private MenuMapper menuMapper;

    public static IShiro me() {
        return SpringContextHolder.getBean(IShiro.class);
    }

    @Override
    public User user(String account) {

        User user = userMapper.getByAccount(account);

        // 账号不存在
        if (null == user) {
            throw new CredentialsException();
        }
        // 账号被冻结
        if (user.getStatus() != ManagerStatus.OK.getCode()) {
            throw new LockedAccountException();
        }
        return user;
    }

    @Override
    public ShiroUser shiroUser(User user) {
        ShiroUser shiroUser = new ShiroUser();

        shiroUser.setId(user.getId());            // 账号id
        shiroUser.setAccount(user.getAccount());// 账号
        shiroUser.setDeptId(user.getDeptid());    // 部门id
        shiroUser.setDeptName(ConstantFactory.me().getDeptName(user.getDeptid()));// 部门名称
        shiroUser.setName(user.getName());        // 用户名称

        Integer[] roleArray = Convert.toIntArray(user.getRoleid());// 角色集合
        List<Integer> roleList = new ArrayList<Integer>();
        List<String> roleNameList = new ArrayList<String>();
        for (int roleId : roleArray) {
            roleList.add(roleId);
            roleNameList.add(ConstantFactory.me().getSingleRoleName(roleId));
        }
        shiroUser.setRoleList(roleList);
        shiroUser.setRoleNames(roleNameList);

        return shiroUser;
    }

  //省略部分

    @Override
    public SimpleAuthenticationInfo info(ShiroUser shiroUser, User user, String realmName) {
        String credentials = user.getPassword();
        // 密码加盐处理
        String source = user.getSalt();
        ByteSource credentialsSalt = new Md5Hash(source);
        return new SimpleAuthenticationInfo(shiroUser, credentials, credentialsSalt, realmName);
    }

}
这个类是重点
public class ShiroDbRealm extends AuthorizingRealm {

    /**
     * 登录认证
     */
    @Override
    protected AuthenticationInfo doGetAuthenticationInfo(AuthenticationToken authcToken)
            throws AuthenticationException {
        IShiro shiroFactory = ShiroFactroy.me();
        UsernamePasswordToken token = (UsernamePasswordToken) authcToken;
        User user = shiroFactory.user(token.getUsername());
        ShiroUser shiroUser = shiroFactory.shiroUser(user);
        SimpleAuthenticationInfo info = shiroFactory.info(shiroUser, user, super.getName());
        return info;
    }
-------------------------------------------------------------------------------------------------
    /**
     * 权限认证
     */
    @Override
    protected AuthorizationInfo doGetAuthorizationInfo(PrincipalCollection principals) {
        IShiro shiroFactory = ShiroFactroy.me();
        ShiroUser shiroUser = (ShiroUser) principals.getPrimaryPrincipal();
        List<Integer> roleList = shiroUser.getRoleList();

        Set<String> permissionSet = new HashSet<>();
        Set<String> roleNameSet = new HashSet<>();

        for (Integer roleId : roleList) {
            List<String> permissions = shiroFactory.findPermissionsByRoleId(roleId);
            if (permissions != null) {
                for (String permission : permissions) {
                    if (ToolUtil.isNotEmpty(permission)) {
                        permissionSet.add(permission);
                    }
                }
            }
            String roleName = shiroFactory.findRoleNameByRoleId(roleId);
            roleNameSet.add(roleName);
        }

        SimpleAuthorizationInfo info = new SimpleAuthorizationInfo();
        info.addStringPermissions(permissionSet);
        info.addRoles(roleNameSet);
        return info;
    }
-------------------------------------------------------------------------------------
    /**
     * 设置认证加密方式
     */
    @Override
    public void setCredentialsMatcher(CredentialsMatcher credentialsMatcher) {
        HashedCredentialsMatcher md5CredentialsMatcher = new HashedCredentialsMatcher();
        md5CredentialsMatcher.setHashAlgorithmName(ShiroKit.hashAlgorithmName);
        md5CredentialsMatcher.setHashIterations(ShiroKit.hashIterations);
        super.setCredentialsMatcher(md5CredentialsMatcher);
    }
}
让我们来具体看看怎么用?权限是设置好了,但是每次用的时候需要检查是否拥有权限
/**
 *  检查用接口
 */
public interface ICheck {

    /**
     * 检查指定角色
     */
    boolean check(Object[] permissions);

    /**
     * 检查全体角色
     */
    boolean checkAll();
}
--------------------------------------------------------------------------------
/**
 * 权限自定义检查
 */
@Service
@DependsOn("springContextHolder")
@Transactional(readOnly = true)
public class PermissionCheckFactory implements ICheck {

    public static ICheck me() {
        return SpringContextHolder.getBean(ICheck.class);
    }

    @Override
    public boolean check(Object[] permissions) {
        ShiroUser user = ShiroKit.getUser();
        if (null == user) {
            return false;
        }
        String join = CollectionKit.join(permissions, ",");
        if (ShiroKit.hasAnyRoles(join)) {
            return true;
        }
        return false;
    }
    public boolean checkAll() {...}
}
/**
 * 权限检查工厂
 */
public class PermissionCheckManager {
    private final static PermissionCheckManager me = new PermissionCheckManager();

    private ICheck defaultCheckFactory = SpringContextHolder.getBean(ICheck.class);

    public static PermissionCheckManager me() {
        return me;
    }
    //....
    public static boolean check(Object[] permissions) {
        return me.defaultCheckFactory.check(permissions);
    }

    public static boolean checkAll() {
        return me.defaultCheckFactory.checkAll();
    }
}
这时候就需要把权限设置为一个切面,在需要的时候直接织入。
/**
 * 权限注解,用于检查权限 规定访问权限
 */
@Inherited
@Retention(RetentionPolicy.RUNTIME)
@Target({ElementType.METHOD})
public @interface Permission {
    String[] value() default {};
}
-------------------------------------------------------------------------------
/**
 * AOP 权限自定义检查
 */
@Aspect
@Component
public class PermissionAop {

    @Pointcut(value = "@annotation(com.guo.guns.common.annotion.Permission)")
    private void cutPermission() {

    }

    @Around("cutPermission()")
    public Object doPermission(ProceedingJoinPoint point) throws Throwable {
        MethodSignature ms = (MethodSignature) point.getSignature();
        Method method = ms.getMethod();
        Permission permission = method.getAnnotation(Permission.class);
        Object[] permissions = permission.value();
        if (permissions == null || permissions.length == 0) {
            //检查全体角色
            boolean result = PermissionCheckManager.checkAll();
            if (result) {
                return point.proceed();
            } else {
                throw new NoPermissionException();
            }
        } else {
            //检查指定角色
            boolean result = PermissionCheckManager.check(permissions);
            if (result) {
                return point.proceed();
            } else {
                throw new NoPermissionException();
            }
        }
    }
}
让我们看一下在代码中具体是如何使用的,只有具有管理员才具备修改的权限。
/**
 * 管理员角色的名字
 */
String ADMIN_NAME = "administrator";
--------------------------------------------------------------------------------
/**
 * 角色修改
 */
@RequestMapping(value = "/edit")
@BussinessLog(value = "修改角色", key = "name", dict = Dict.RoleDict)
@Permission(Const.ADMIN_NAME)
@ResponseBody
public Tip edit(@Valid Role role, BindingResult result) {
    if (result.hasErrors()) {
        throw new BussinessException(BizExceptionEnum.REQUEST_NULL);
    }
    roleMapper.updateByPrimaryKeySelective(role);

    //删除缓存
    CacheKit.removeAll(Cache.CONSTANT);
    return SUCCESS_TIP;
}
Spring Session
之前处理Session的办法是将HTTP session状态保存在独立的数据存储中,这个存储位于运行应用程序代码的JVM之外。使用 tomcat-redis-session-manager 开源项目解决分布式session跨域的问题,他的主要思想是利用Servlet容器提供的插件功能,自定义HttpSession的创建和管理策略,并通过配置的方式替换掉默认的策略。使用过tomcat-redis-session-manager 的都应该知道,配置相对还是有一点繁琐的,需要人为的去修改Tomcat的配置,需要耦合Tomcat等Servlet容器的代码,并且对于分布式Redis集群的管理并不是很好,与之相对的个人认为比较好的一个框架Spring Session可以真正对用户透明的去管理分布式Session。参考
Spring Session提供了一套创建和管理Servlet HttpSession的方案。Spring Session提供了集群Session(Clustered Sessions)功能,默认采用外置的Redis来存储Session数据,以此来解决Session共享的问题。
Spring Session不依赖于Servlet容器,而是Web应用代码层面的实现,直接在已有项目基础上加入spring Session框架来实现Session统一存储在Redis中。如果你的Web应用是基于Spring框架开发的,只需要对现有项目进行少量配置,即可将一个单机版的Web应用改为一个分布式应用,由于不基于Servlet容器,所以可以随意将项目移植到其他容器。
/**
 * spring session配置
 */
//@EnableRedisHttpSession(maxInactiveIntervalInSeconds = 1800)  //session过期时间  如果部署多机环境,需要打开注释
@ConditionalOnProperty(prefix = "guns", name = "spring-session-open", havingValue = "true")
public class SpringSessionConfig {


}
因为是声明式的,所以用起来很简单
/**
 * 静态调用session的拦截器
 */
@Aspect
@Component
public class SessionInterceptor extends BaseController {

    @Pointcut("execution(* com.guo.guns.*..controller.*.*(..))")
    public void cutService() {
    }

    @Around("cutService()")
    public Object sessionKit(ProceedingJoinPoint point) throws Throwable {

        HttpSessionHolder.put(super.getHttpServletRequest().getSession());
        try {
            return point.proceed();
        } finally {
            HttpSessionHolder.remove();
        }
    }
}
--------------------------------------------------------------------------------
/**
 * 验证session超时的拦截器
 *
 * @author fengshuonan
 * @date 2017年6月7日21:08:48
 */
@Aspect
@Component
@ConditionalOnProperty(prefix = "guns", name = "session-open", havingValue = "true")
public class SessionTimeoutInterceptor extends BaseController {

    @Pointcut("execution(* com.guo.guns.*..controller.*.*(..))")
    public void cutService() {
    }

    @Around("cutService()")
    public Object sessionTimeoutValidate(ProceedingJoinPoint point) throws Throwable {

        String servletPath = HttpKit.getRequest().getServletPath();

        if (servletPath.equals("/kaptcha") || servletPath.equals("/login") || servletPath.equals("/global/sessionError")) {
            return point.proceed();
        }else{
            if(ShiroKit.getSession().getAttribute("sessionFlag") == null){
                ShiroKit.getSubject().logout();
                throw new InvalidSessionException();
            }else{
                return point.proceed();
            }
        }
    }
}
让我们看下具体是如何使用的》
/**
 * 获取shiro指定的sessionKey
 *
 */
@SuppressWarnings("unchecked")
public static <T> T getSessionAttr(String key) {
    Session session = getSession();
    return session != null ? (T) session.getAttribute(key) : null;
}

/**
 * 设置shiro指定的sessionKey
 *
 */
public static void setSessionAttr(String key, Object value) {
    Session session = getSession();
    session.setAttribute(key, value);
}

/**
 * 移除shiro指定的sessionKey
 */
public static void removeSessionAttr(String key) {
    Session session = getSession();
    if (session != null)
        session.removeAttribute(key);
}
-------------------登录执行中的步骤-----------------------------------------
ShiroUser shiroUser = ShiroKit.getUser();
super.getSession().setAttribute("shiroUser", shiroUser);
super.getSession().setAttribute("username", shiroUser.getAccount());

LogManager.me().executeLog(LogTaskFactory.loginLog(shiroUser.getId(), getIp()));

ShiroKit.getSession().setAttribute("sessionFlag",true);

return REDIRECT + "/";
super.getSession()调用的是BaseController中的方法。
防止XSS攻击
防止XSS攻击,通过XssFilter类对所有的输入的非法字符串进行过滤以及替换。
public class XssFilter implements Filter {

    FilterConfig filterConfig = null;

    public void init(FilterConfig filterConfig) throws ServletException {
        this.filterConfig = filterConfig;
    }

    public void destroy() {
        this.filterConfig = null;
    }

    public void doFilter(ServletRequest request, ServletResponse response, FilterChain chain) throws IOException, ServletException {
        chain.doFilter(new XssHttpServletRequestWrapper(
                (HttpServletRequest) request), response);
    }

}
---------------------------------------------------------------------------------
public class XssHttpServletRequestWrapper extends HttpServletRequestWrapper {

    public XssHttpServletRequestWrapper(HttpServletRequest servletRequest) {

        super(servletRequest);

    }

    public String[] getParameterValues(String parameter) {

        String[] values = super.getParameterValues(parameter);

        if (values == null) {

            return null;

        }

        int count = values.length;

        String[] encodedValues = new String[count];

        for (int i = 0; i < count; i++) {

            encodedValues[i] = cleanXSS(values[i]);

        }

        return encodedValues;

    }
    //省略部分

    private String cleanXSS(String value) {

        //You'll need to remove the spaces from the html entities below

        value = value.replaceAll("<", "& lt;").replaceAll(">", "& gt;");

        value = value.replaceAll("//(", "& #40;").replaceAll("//)", "& #41;");

        value = value.replaceAll("'", "& #39;");

        value = value.replaceAll("eval//((.*)//)", "");

        value = value.replaceAll("[///"///'][//s]*javascript:(.*)[///"///']", "/"/"");

        value = value.replaceAll("script", "");

        return value;

    }
}
自己只是过了一遍,要想更深入的了解,还需好好努力啊,只是自己的笔记。
正文到此结束
- 本文标签: Authorization 配置 API cache spring key token node ask find Action IDE CTO 希望 apache mybatis tomcat ACE map 管理 mapper rmi XSS攻击 springboot 认证 src tar Property redis 注释 AOP update 插件 servlet Word 安全 开源项目 bean 目录 Select 分布式 源码 开源 JavaScript 数据 时间 Collection ssh list 删除 集群 constant logo NSA HTML Spring Security ssl final https Security UI 代码 IO java value db http cat Service Menu App id web 开发 ip
- 版权声明: 本文为互联网转载文章,出处已在文章中说明(部分除外)。如果侵权,请联系本站长删除,谢谢。
- 本文海报: 生成海报一 生成海报二
热门推荐


相关文章

近期评论
-
谢谢
-
https://www.newcmy.com/register?aff=HBVX建议您试试草莓云机场,可以流畅观看youtube和tiktok,上reddit/x也没有问题,还有各种ai优化节点。
-
-
-
想购买您这个站,我的联系方式QQ741756694微信同步 能卖联系
-
-
-
-
-
https://www.liuhaihua.cn/archives/40657.html 这篇博客中的图片打不开了
Loading...
![[HBLOG]公众号](https://www.liuhaihua.cn/img/qrcode_gzh.jpg)

