Springmvc入门
-
解决
V(View)和C(Controller)的交互问题,即解决了Controller如果接收了用户的请求,并将结果响应给用户的问题 -
springmvc约定了一套处理用户请求的流程
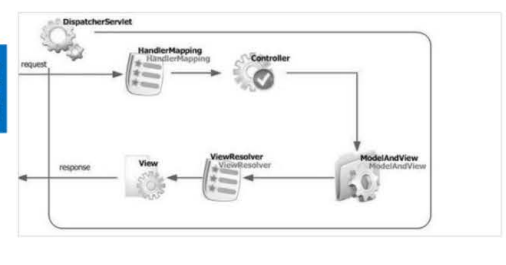
Springmvc的核心组件
-
DispatcherServlet:前端控制器,请求入口 -
HandlerMapping: 控制器,其中存放着处理请求的组件,请求派发 -
Controller:控制器,处理请求 -
ModelAndView:模型,封装业务处理结果和视图 -
ViewResolver: 视图解析器,显示视图
springmvc处理流程
- 用户发出请求,请求交给前端控制器(
DispatcherServlet)处理 - DispatcherServlet通过
HandlerMapping找到Controller中相对应的组件处理请求 - 执行
Controller组件约定方法处理请求,在约定方法调用模型组件(Service,Dao)完成业务逻辑,约定方法返回一个ModelAndView对象,封装了处理结果和视图名称信息 - 控制器接收了
ModelAndView之后,调用视图解析器(ViewResolver)组件,定位到指定的View(JSP)并且传递处理结果,生成响应界面结果
创建一个Springmvc项目
- 创建
maven项目 - 导入
web.xml - 配置
tomact项目运行环境(项目右击 --> properties - > Target Runtimes) - 配置
pom.xml依赖
<dependencies>
		<dependency>
			<groupId>org.springframework</groupId>
			<artifactId>spring-webmvc</artifactId>
			<version>4.3.12.RELEASE</version>
		</dependency>
		<dependency>
			<groupId>junit</groupId>
			<artifactId>junit</artifactId>
			<version>4.12</version>
		</dependency>
</dependencies>
- 添加springmvc的配置文件在resource目录下(
applicationContext.xml)- 开启组件扫描
- 配置视图解析器,用来定义跳转的视图,在视图解析中,最后的jsp文件在
perfix + controller中返回的字符串 + suffix
<?xml version="1.0" encoding="UTF-8"?>
<beansxmlns="http://www.springframework.org/schema/beans"
	xmlns:xsi="http://www.w3.org/2001/XMLSchema-instance" xmlns:context="http://www.springframework.org/schema/context"
	xmlns:jdbc="http://www.springframework.org/schema/jdbc" xmlns:jee="http://www.springframework.org/schema/jee"
	xmlns:tx="http://www.springframework.org/schema/tx" xmlns:aop="http://www.springframework.org/schema/aop"
	xmlns:mvc="http://www.springframework.org/schema/mvc" xmlns:util="http://www.springframework.org/schema/util"
	xmlns:jpa="http://www.springframework.org/schema/data/jpa"
	xsi:schemaLocation="
		http://www.springframework.org/schema/beans http://www.springframework.org/schema/beans/spring-beans-3.2.xsd
		http://www.springframework.org/schema/context http://www.springframework.org/schema/context/spring-context-3.2.xsd
		http://www.springframework.org/schema/jdbc http://www.springframework.org/schema/jdbc/spring-jdbc-3.2.xsd
		http://www.springframework.org/schema/jee http://www.springframework.org/schema/jee/spring-jee-3.2.xsd
		http://www.springframework.org/schema/tx http://www.springframework.org/schema/tx/spring-tx-3.2.xsd
		http://www.springframework.org/schema/data/jpa http://www.springframework.org/schema/data/jpa/spring-jpa-1.3.xsd
		http://www.springframework.org/schema/aop http://www.springframework.org/schema/aop/spring-aop-3.2.xsd
		http://www.springframework.org/schema/mvc http://www.springframework.org/schema/mvc/spring-mvc-3.2.xsd
		http://www.springframework.org/schema/util http://www.springframework.org/schema/util/spring-util-3.2.xsd">

	<!-- 开启组件扫描 -->
	<context:component-scanbase-package="cn.tedu.springmvc"></context:component-scan>

	<!-- 配置视图解析器:
		prefix:表示前缀
		suffix:表示后缀
		如果controller中返回的是success这个字符串,那么对应的视图是/WEB-INF/JSP/success.jsp这个视图
	-->

	<bean
	class="org.springframework.web.servlet.view.InternalResourceViewResolver">
		<propertyname="prefix"value="/WEB-INF/JSP/"/>
		<propertyname="suffix"value=".jsp"/>
	</bean>
</beans>
- 配置前端控制器(DispatcherServlet),在
web.xml中配置
<!-- 配置前端控制器DispatcherServlet -->
<servlet>
	<servlet-name>DispatcherServlet</servlet-name>
	<servlet-class>org.springframework.web.servlet.DispatcherServlet</servlet-class>

	<!-- 配置springMVC配置文件的路径,这里如果想要使用默认的可以不用配置 -->
	<init-param>
		<param-name>contextConfigLocation</param-name>
		<!-- classpath表示根路径,这里找的项目根路径下的applicationContext.xml -->
		<param-value>classpath:applicationContext.xml</param-value>
	</init-param>

	<!-- 当tomcat启动的时候就加载,设置启动的优先级 -->
	<load-on-startup>1</load-on-startup>

</servlet>

<servlet-mapping>
	<servlet-name>DispatcherServlet</servlet-name>
	<!-- 配置分发规则,这个是用来控制所有的请求,只要是请求后缀为.do的都会拦截分发-->
	<url-pattern>*.do</url-pattern>
</servlet-mapping>
- 在
cn.tedu.springmvc.controller包中创建一个UserController类
@Controller
@RequestMapping("/user")
public class UserController{

	@RequestMapping("/hello.do")
	public String testHello(){
		System.out.println("Hello World");
		return "success";  //返回视图,这里通过视图解析器之后对应的是 /WEB-INF/JSP/success.jsp
	}
}
- 在
WEB-INF/JSP/中创建一个success.jsp页面,添加一个<h1>Hello World</h1>
- 此时启动项目,打开浏览器输入
http://localhost:8080/Springmvc_01/user/hello.do,那么就会看见成功跳转到success.jsp页面,显示文字
正文到此结束
热门推荐


相关文章


Loading...
![[HBLOG]公众号](http://www.liuhaihua.cn/img/qrcode_gzh.jpg)

