netty 之 telnet HelloWorld 详解

前言
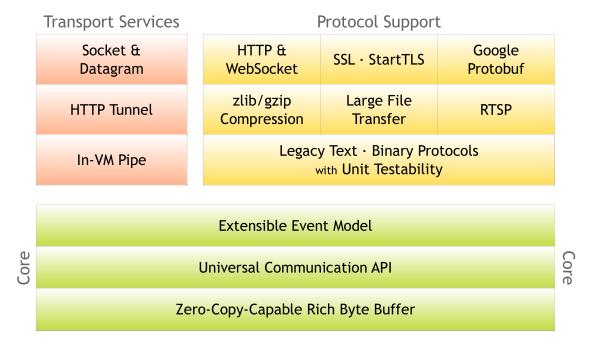
Netty是 一个异步事件驱动的网络应用程序框架, 用于快速开发可维护的高性能协议服务器和客户端。
Netty是一个NIO客户端服务器框架,可以快速轻松地开发协议服务器和客户端等网络应用程序。它极大地简化并简化了TCP和UDP套接字服务器等网络编程。
“快速简便”并不意味着最终的应用程序会受到可维护性或性能问题的影响。Netty经过精心设计,具有丰富的协议,如FTP,SMTP,HTTP以及各种二进制和基于文本的传统协议。因此,Netty成功地找到了一种在不妥协的情况下实现易于开发,性能,稳定性和灵活性的方法。
特征
设计
适用于各种传输类型的统一API - 阻塞和非阻塞套接字
基于灵活且可扩展的事件模型,可以清晰地分离关注点
高度可定制的线程模型 - 单线程,一个或多个线程池,如SEDA
真正的无连接数据报套接字支持(自3.1起)
使用方便
详细记录的Javadoc,用户指南和示例
没有其他依赖项,JDK 5(Netty 3.x)或6(Netty 4.x)就足够了
注意:某些组件(如HTTP / 2)可能有更多要求。 有关更多信息,请参阅 “要求”页面。
性能
吞吐量更高,延迟更低
减少资源消耗
最小化不必要的内存复制
安全
完整的SSL / TLS和StartTLS支持
社区
早发布,经常发布
自2003年以来,作者一直在编写类似的框架,他仍然觉得你的反馈很珍贵!
依赖工具
- Maven
- Git
- JDK
- IntelliJ IDEA
源码拉取
从官方仓库 github.com/netty/netty Fork 出属于自己的仓库。为什么要 Fork ?既然开始阅读、调试源码,我们可能会写一些注释,有了自己的仓库,可以进行自由的提交。:smiling_imp:
使用 IntelliJ IDEA 从 Fork 出来的仓库拉取代码。
本文使用的 Netty 版本为 4.1.26.Final-SNAPSHOT 。
Maven Profile
打开 IDEA 的 Maven Projects ,选择对应的 Profiles 。如下图所示:

-
jdk8:笔者使用的 JDK 版本是 8 ,所以勾选了jdk8。如果错误的选择,可能会报如下错误:java.lang.NoSuchMethodError: java.nio.ByteBuffer.clear()Ljava/nio/ByteBuffer 复制代码
-
linux: 选择对应的系统版本。:smiling_imp: 笔者手头没有 windows 的电脑,所以不知道该怎么选。
修改完成后,点击左上角的【刷新】按钮,进行依赖下载,耐心等待...
解决依赖报错
在 codec-redis 模块中,类 FixedRedisMessagePool 会报如下类不存在的问题:
import io.netty.util.collection.LongObjectHashMap;
import io.netty.util.collection.LongObjectMap;
复制代码
- 具体如下图所示:
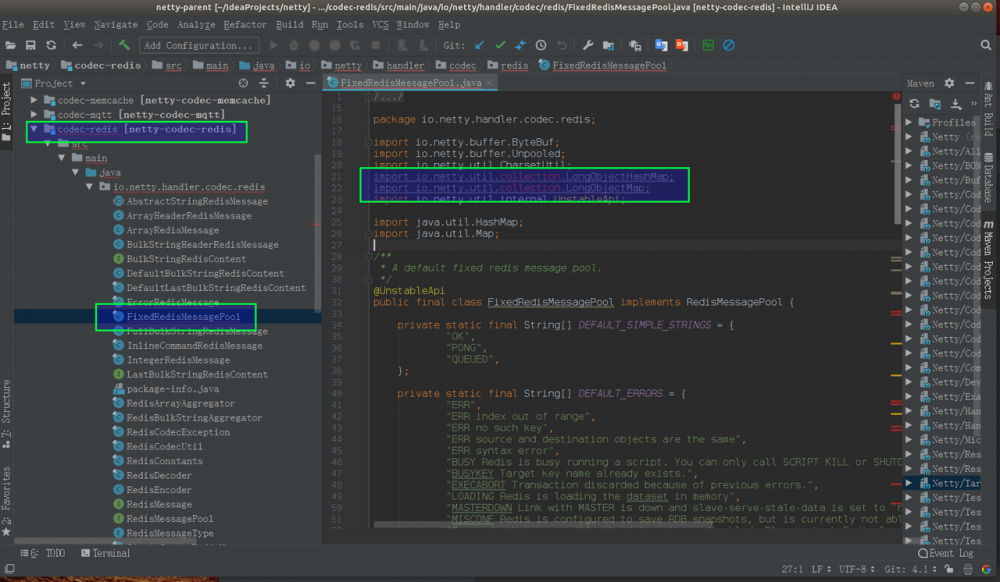
解决方式如下:
cd common;
mvn clean compile;
复制代码
- 跳转到
common模块中,编译生成对应的类。为什么可以通过编译生成对应的类呢,原因参见common模块的src/java/templates/io/netty/util/collection目录下的.template文件。
在 Github 上,也有多个针对这个情况讨论的 issue :
- 《Can not find class io.netty.util.collection.LongObjectHashMap in 4.1.8.final》
- 《io.netty.util.collection.LongObjectHashMap not found at branch 4.1》
example 模块
在 example 模块里,官网提供了多个 Netty 的使用示例。 本文以 telnet 包下来作为示例。哈哈哈,因为最简单且完整。
netty-helloworld
说明: 如果想直接获取工程那么可以直接跳到底部,通过 链接 下载工程代码。
开发准备
环境要求
- JDK: 1.8
- Netty: 4.0或以上
如果对Netty不熟的话,可以看看之前写的一些文章。大神请无视☺。
首先还是Maven的相关依赖:
<properties>
        <project.build.sourceEncoding>UTF-8</project.build.sourceEncoding>
        <project.reporting.outputEncoding>UTF-8</project.reporting.outputEncoding>
        <java.version>1.8</java.version>
        <netty-all.version>4.1.6.Final</netty-all.version>
    </properties>

    <dependencies>
        <dependency>
            <groupId>io.netty</groupId>
            <artifactId>netty-all</artifactId>
            <version>${netty-all.version}</version>
        </dependency>
    </dependencies>
复制代码
添加了相应的maven依赖之后,配置文件这块暂时没有什么可以添加的,因为暂时就一个监听的端口而已。
代码编写
代码模块主要分为服务端和客户端。 主要实现的业务逻辑: 服务端启动成功之后,客户端也启动成功,这时服务端会发送一条信息给客户端。客户端或者 telnet 发送一条信息到服务端,服务端会根据逻辑回复客户端一条客户端,当客户端或者 telent 发送 bye 给服务端,服务端和客户端断开链接。
项目结构
netty-helloworld
  ├── client
    ├── Client.class -- 客户端启动类
    ├── ClientHandler.class -- 客户端逻辑处理类
    ├── ClientHandler.class -- 客户端初始化类
  ├── server
    ├── Server.class -- 服务端启动类
    ├── ServerHandler -- 服务端逻辑处理类
    ├── ServerInitializer -- 服务端初始化类
复制代码
服务端
首先是编写服务端的启动类。
代码如下:
public final class Server {
    public  static void main(String[] args) throws Exception {
        //Configure the server
        //创建两个EventLoopGroup对象
        //创建boss线程组 用于服务端接受客户端的连接
        EventLoopGroup bossGroup = new NioEventLoopGroup(1);
        // 创建 worker 线程组 用于进行 SocketChannel 的数据读写
        EventLoopGroup workerGroup = new NioEventLoopGroup();
        try {
            // 创建 ServerBootstrap 对象
            ServerBootstrap b = new ServerBootstrap();
            //设置使用的EventLoopGroup
            b.group(bossGroup,workerGroup)
                //设置要被实例化的为 NioServerSocketChannel 类
                    .channel(NioServerSocketChannel.class)
                // 设置 NioServerSocketChannel 的处理器
                    .handler(new LoggingHandler(LogLevel.INFO))
                 // 设置连入服务端的 Client 的 SocketChannel 的处理器
                    .childHandler(new ServerInitializer());
            // 绑定端口,并同步等待成功,即启动服务端
            ChannelFuture f = b.bind(8888);
            // 监听服务端关闭,并阻塞等待
            f.channel().closeFuture().sync();
        } finally {
            // 优雅关闭两个 EventLoopGroup 对象
            bossGroup.shutdownGracefully();
            workerGroup.shutdownGracefully();
        }
    }
}
复制代码
-
第6到8行: 创建两个EventLoopGroup对象。
- boss 线程组: 用于服务端接受客户端的 连接 。
- worker 线程组: 用于进行客户端的SocketChannel的 数据读写 。
- 关于为什么是 两 个EventLoopGroup对象,请了解文章NIO系列之Reactro模型。
-
第11行: 创建 ServerBootstrap 对象,用于设置服务端的启动配置。
- 第13行: 调用
#group(EventLoopGroup parentGroup, EventLoopGroup childGroup)方法,设置使用的 EventLoopGroup 。 - 第15行: 调用
#channel(Class<? extends C> channelClass)方法,设置要被实例化的 Channel 为 NioServerSocketChannel 类。在下文中,我们会看到该 Channel 内嵌了java.nio.channels.ServerSocketChannel对象。是不是很熟悉 :smiling_imp: ? - 第17行: 调用
#handler(ChannelHandler handler)方法,设置 NioServerSocketChannel 的处理器。在本示例中,使用了io.netty.handler.logging.LoggingHandler类,用于打印服务端的每个事件。 - 第19行: 调用
#childHandler(ChannelHandler handler)方法,设置连入服务端的 Client 的 SocketChannel 的处理器。在本实例中,使用 ServerInitializer() 来初始化连入服务端的 Client 的 SocketChannel 的处理器。
- 第13行: 调用
-
第21行: 先 调用
#bind(int port)方法,绑定端口, 后 调用ChannelFuture#sync()方法,阻塞等待成功。这个过程,就是“ 启动服务端 ”。 -
第23行: 先 调用
#closeFuture()方法, 监听 服务器关闭, 后 调用ChannelFuture#sync()方法,阻塞等待成功。:smiling_imp: 注意,此处不是关闭服务器,而是“ 监听 ”关闭。 -
第26到27行: 执行到此处,说明服务端已经关闭,所以调用
EventLoopGroup#shutdownGracefully()方法,分别关闭两个 EventLoopGroup 对象。
服务端主类编写完毕之后,我们再来设置下相应的过滤条件。 这里需要继承Netty中 ChannelInitializer 类,然后重写 initChannel 该方法,进行添加相应的设置,传输协议设置,以及相应的业务实现类。 代码如下:
public class ServerInitializer extends ChannelInitializer<SocketChannel> {
    private static final StringDecoder DECODER = new StringDecoder();
    private static final StringEncoder ENCODER = new StringEncoder();

    private static final ServerHandler SERVER_HANDLER = new ServerHandler();


    @Override
    public void initChannel(SocketChannel ch) throws Exception {
        ChannelPipeline pipeline = ch.pipeline();

        // 添加帧限定符来防止粘包现象
        pipeline.addLast(new DelimiterBasedFrameDecoder(8192, Delimiters.lineDelimiter()));
        // 解码和编码,应和客户端一致
        pipeline.addLast(DECODER);
        pipeline.addLast(ENCODER);

        // 业务逻辑实现类
        pipeline.addLast(SERVER_HANDLER);
    }
}
复制代码
服务相关的设置的代码写完之后,我们再来编写主要的业务代码。 使用Netty编写业务层的代码,我们需要继承 ChannelInboundHandlerAdapter 或 SimpleChannelInboundHandler 类,在这里顺便说下它们两的区别吧。 继承 SimpleChannelInboundHandler 类之后,会在接收到数据后会自动 release 掉数据占用的 Bytebuffer 资源。并且继承该类需要指定数据格式。 而继承 ChannelInboundHandlerAdapter 则不会自动释放,需要手动调用 ReferenceCountUtil.release() 等方法进行释放。继承该类不需要指定数据格式。 所以在这里,个人推荐服务端继承 ChannelInboundHandlerAdapter ,手动进行释放,防止数据未处理完就自动释放了。而且服务端可能有多个客户端进行连接,并且每一个客户端请求的数据格式都不一致,这时便可以进行相应的处理。 客户端根据情况可以继承 SimpleChannelInboundHandler 类。好处是直接指定好传输的数据格式,就不需要再进行格式的转换了。
代码如下:
@Sharable
public class ServerHandler extends SimpleChannelInboundHandler<String> {
    /**
     * 建立连接时,发送一条庆祝消息
     */
    @Override
    public void channelActive(ChannelHandlerContext ctx) throws Exception {
        // 为新连接发送庆祝
        ctx.write("Welcome to " + InetAddress.getLocalHost().getHostName() + "!/r/n");
        ctx.write("It is " + new Date() + " now./r/n");
        ctx.flush();
    }

    //业务逻辑处理
    @Override
    public void channelRead0(ChannelHandlerContext ctx, String request) throws Exception {
        // Generate and write a response.
        String response;
        boolean close = false;
        if (request.isEmpty()) {
            response = "Please type something./r/n";
        } else if ("bye".equals(request.toLowerCase())) {
            response = "Have a good day!/r/n";
            close = true;
        } else {
            response = "Did you say '" + request + "'?/r/n";
        }

        ChannelFuture future = ctx.write(response);

        if (close) {
            future.addListener(ChannelFutureListener.CLOSE);
        }
    }

    @Override
    public void channelReadComplete(ChannelHandlerContext ctx) {
        ctx.flush();
    }

    //异常处理
    @Override
    public void exceptionCaught(ChannelHandlerContext ctx, Throwable cause) {
        cause.printStackTrace();
        ctx.close();
    }
}
复制代码
到这里服务端相应的代码就编写完毕了:rocket: 。
客户端
客户端这边的代码和服务端的很多地方都类似,我就不再过多细说了,主要将一些不同的代码拿出来简单的讲述下。 首先是客户端的主类,基本和服务端的差不多。 主要实现的代码逻辑如下:
public static void main(String[] args) throws Exception {
        EventLoopGroup group = new NioEventLoopGroup();
        try {
            Bootstrap b = new Bootstrap();
            b.group(group)
                    .channel(NioSocketChannel.class)
                    .handler(new ClientInitializer());
            Channel ch = b.connect("127.0.0.1",8888).sync().channel();


            ChannelFuture lastWriteFuture = null;
            BufferedReader in = new BufferedReader(new InputStreamReader(System.in));
            for (;;) {
                String line = in.readLine();
                if (line == null) {
                    break;
                }

                // Sends the received line to the server.
                lastWriteFuture = ch.writeAndFlush(line + "/r/n");

                // If user typed the 'bye' command, wait until the server closes
                // the connection.
                if ("bye".equals(line.toLowerCase())) {
                    ch.closeFuture().sync();
                    break;
                }
            }

            // Wait until all messages are flushed before closing the channel.
            if (lastWriteFuture != null) {
                lastWriteFuture.sync();
            }
        } finally {
            group.shutdownGracefully();
        }
    }
复制代码
客户端过滤其这块基本和服务端一致。不过需要注意的是,传输协议、编码和解码应该一致。
代码如下:
public class ClientInitializer extends ChannelInitializer<SocketChannel> {
    private static final StringDecoder DECODER = new StringDecoder();
    private static final StringEncoder ENCODER = new StringEncoder();

    private static final ClientHandler CLIENT_HANDLER = new ClientHandler();


    @Override
    public void initChannel(SocketChannel ch) {
        ChannelPipeline pipeline = ch.pipeline();
        pipeline.addLast(new DelimiterBasedFrameDecoder(8192, Delimiters.lineDelimiter()));
        pipeline.addLast(DECODER);
        pipeline.addLast(ENCODER);

        pipeline.addLast(CLIENT_HANDLER);
    }
}
复制代码
客户端的业务代码逻辑。
主要时打印读取到的信息。
这里有个注解, 该注解 Sharable 主要是为了多个handler可以被多个channel安全地共享,也就是保证线程安全。 废话就不多说了,代码如下:
@Sharable
public class ClientHandler extends SimpleChannelInboundHandler<String> {
	//打印读取到的数据
    @Override
    protected void channelRead0(ChannelHandlerContext ctx, String msg) throws Exception {
        System.err.println(msg);
    }
	//异常数据捕获
    @Override
    public void exceptionCaught(ChannelHandlerContext ctx, Throwable cause) {
        cause.printStackTrace();
        ctx.close();
    }
}

复制代码
那么到这里客户端的代码也编写完毕了:rocket: 。
功能测试
首先启动服务端,然后再启动客户端。
我们来看看结果是否如上述所说。
服务端输出结果:
十月 02, 2018 10:03:00 上午 io.netty.handler.logging.LoggingHandler channelRegistered
信息: [id: 0x1c7da838] REGISTERED
十月 02, 2018 10:03:00 上午 io.netty.handler.logging.LoggingHandler bind
信息: [id: 0x1c7da838] BIND: 0.0.0.0/0.0.0.0:8888
十月 02, 2018 10:03:00 上午 io.netty.handler.logging.LoggingHandler channelActive
信息: [id: 0x1c7da838, L:/0:0:0:0:0:0:0:0:8888] ACTIVE
十月 02, 2018 10:03:51 上午 io.netty.handler.logging.LoggingHandler channelRead
信息: [id: 0x1c7da838, L:/0:0:0:0:0:0:0:0:8888] RECEIVED: [id: 0xc033aea8, L:/127.0.0.1:8888 - R:/127.0.0.1:58178]
复制代码
客户端输入结果:
Connected to the target VM, address: '127.0.0.1:37175', transport: 'socket'
Welcome to james!
It is Tue Oct 02 10:03:51 CST 2018 now.
yes
Did you say 'yes'?
hello world
Did you say 'hello world'?
bye
Have a good day!
Disconnected from the target VM, address: '127.0.0.1:37175', transport: 'socket'

Process finished with exit code 0
复制代码
telnet客户端 和服务端交互结果如下:
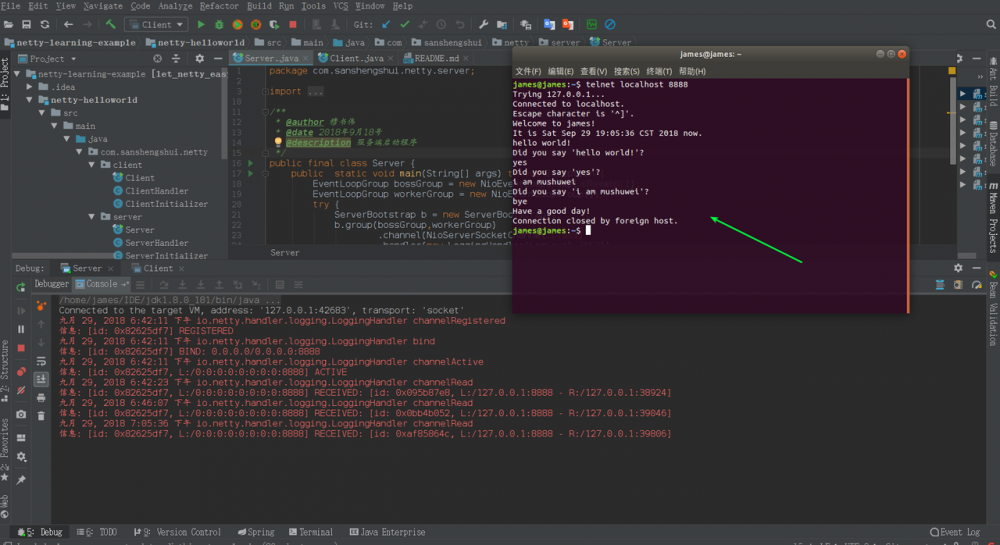
通过打印信息可以看出如上述所说。
正文到此结束
- 本文标签: 处理器 HashMap ssl maven 安全 Bootstrap 实例 ftp 文章 用户指南 模型 服务器 端口 线程 IDE UDP Connection ACE Transport id java windows find redis TCP 同步 http message 服务端 目录 源码 tar 数据 注释 性能问题 DDL 线程池 Collection linux 测试 调试 代码 final src Logging IO CST 定制 https UI GitHub 开发 client IOS NIO stream 协议 git 配置 Netty dependencies build 业务层 equals 编译 ip map API list example 下载
- 版权声明: 本文为互联网转载文章,出处已在文章中说明(部分除外)。如果侵权,请联系本站长删除,谢谢。
- 本文海报: 生成海报一 生成海报二
热门推荐


相关文章


Loading...
![[HBLOG]公众号](http://www.liuhaihua.cn/img/qrcode_gzh.jpg)

