springboot整合各种消息队列(一):redis消息队列
 本篇博客将介绍使用redis作为消息中间件和springboot的整合使用;
安装配置redis
请参考笔者另一篇博客,有详细介绍: https://jsbintask.cn/2019/01/24/middleware/redis-install/#more
整合springboot
新建项目
新建一个springboot项目,并且修改application.yml文件,pom如下:
spring:
  redis:
    host: youripaddress
    password: jsbintask
host和password修改成自己的服务器用户名密码。pom:
<?xml version="1.0" encoding="UTF-8"?>
<project xmlns="http://maven.apache.org/POM/4.0.0" xmlns:xsi="http://www.w3.org/2001/XMLSchema-instance"
         xsi:schemaLocation="http://maven.apache.org/POM/4.0.0 http://maven.apache.org/xsd/maven-4.0.0.xsd">
    <modelVersion>4.0.0</modelVersion>
    <parent>
        <groupId>org.springframework.boot</groupId>
        <artifactId>spring-boot-starter-parent</artifactId>
        <version>2.1.2.RELEASE</version>
        <relativePath/> <!-- lookup parent from repository -->
    </parent>
    <groupId>cn.jsbintask</groupId>
    <artifactId>springboot-redis-learning</artifactId>
    <version>0.0.1-SNAPSHOT</version>
    <name>springboot-redis-learning</name>
    <description>Demo project for Spring Boot redis</description>

    <properties>
        <java.version>1.8</java.version>
    </properties>

    <dependencies>
        <dependency>
            <groupId>org.springframework.boot</groupId>
            <artifactId>spring-boot-starter-data-redis</artifactId>
        </dependency>

        <dependency>
            <groupId>org.projectlombok</groupId>
            <artifactId>lombok</artifactId>
            <optional>true</optional>
        </dependency>
        <dependency>
            <groupId>org.springframework.boot</groupId>
            <artifactId>spring-boot-starter-test</artifactId>
            <scope>test</scope>
        </dependency>
    </dependencies>

    <build>
        <plugins>
            <plugin>
                <groupId>org.springframework.boot</groupId>
                <artifactId>spring-boot-maven-plugin</artifactId>
            </plugin>
        </plugins>
    </build>

</project>
消息消费者(接收者)
编写一个消息消费者类:
@Log
@Component
public class RedisMessageReceiver {
    @Autowired
    private CountDownLatch countDownLatch;

    public void receivedMsg(String msg) {
        log.info("received msg: " + msg);
        // 计数,减一
        countDownLatch.countDown();
    }
}
并且加入@Component注解,将其作为bean归spring管理,并且通过@Autowried注入了一个CountdownLatch类。
将消息消费者作为监听器监听 redis的消息:
@Configuration
public class RedisConfig {
    public static final String MSG_TOPIC = "chat";

    @Bean
    public CountDownLatch countDownLatch() {
        return new CountDownLatch(1);
    }

    /**
     * 消息消费者 适配器,其中 receivedMsg为定义的消费者的消费方法,必须保持一致
     */
    @Bean
    MessageListenerAdapter listenerAdapter(RedisMessageReceiver receiver) {
        return new MessageListenerAdapter(receiver, "receivedMsg");
    }

    @Bean
    StringRedisTemplate template(RedisConnectionFactory connectionFactory) {
        return new StringRedisTemplate(connectionFactory);
    }

    /**
     * 消息监听容器,将适配器加入, 注意此处的 topic
     */
    @Bean
    RedisMessageListenerContainer container(RedisConnectionFactory connectionFactory,
                                            MessageListenerAdapter listenerAdapter) {

        RedisMessageListenerContainer container = new RedisMessageListenerContainer();
        container.setConnectionFactory(connectionFactory);
        container.addMessageListener(listenerAdapter, new PatternTopic(MSG_TOPIC));

        return container;
    }
}
启动测试类,发送消息
@SpringBootApplication
public class SpringbootRedisLearningApplication {

    public static void main(String[] args) throws Exception {
        ConfigurableApplicationContext applicationContext = SpringApplication.run(SpringbootRedisLearningApplication.class, args);

        //从 spring中取出已经有的bean
        CountDownLatch countDownLatch = applicationContext.getBean(CountDownLatch.class);
        StringRedisTemplate stringRedisTemplate = applicationContext.getBean(StringRedisTemplate.class);

        stringRedisTemplate.convertAndSend(RedisConfig.MSG_TOPIC, "hello from jsbintask.");

        // 一直等待消息被接收,没接收不退出
        countDownLatch.await();
    }
}
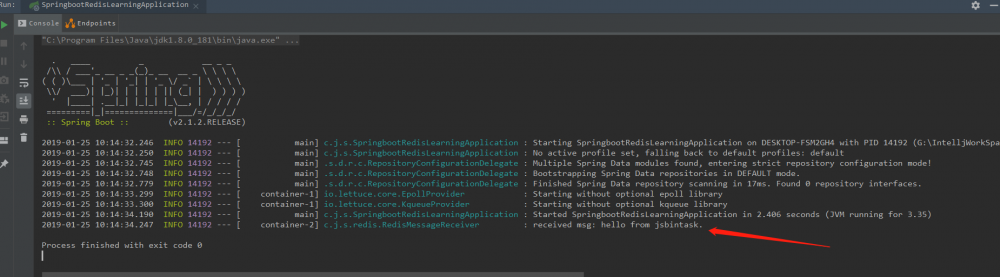
启动,查看控制台:收到消息并且打印:
这样redis作为消息队列就成功了。 源码地址: https://github.com/jsbintask22/springboot-redis-learning
本文原创地址: https://jsbintask.cn/2019/01/25/springboot/springboot-redis-jms/ ,未经允许,禁止转载。
谢谢你支持我分享知识

扫码打赏,心意已收

打开 微信 扫一扫,即可进行扫码打赏哦
正文到此结束
- 本文标签: 适配器 UI dependencies http 测试 IO tar CTO spring build JMS ip CountDownLatch 配置 list ask 服务器 plugin GitHub schema 监听器 pom springboot 安装 XML DDL 安装配置 bean js 管理 Connection Word maven Spring Boot cat 消息队列 src apache connectionFactory https 2019 redis final 博客 源码 id description App dist java message git
- 版权声明: 本文为互联网转载文章,出处已在文章中说明(部分除外)。如果侵权,请联系本站长删除,谢谢。
- 本文海报: 生成海报一 生成海报二
热门推荐


相关文章

近期评论
-
收到
-
https://www.liuhaihua.cn/archives/40657.html 这篇博客中的图片打不开了
-
不会英语啊。
-
-
-
https://pplx.ai/floraliu4199466 这个链接打不开是什么原因?
-
-
-
-
来看看,最近更新了一波,顺着友联过来的,几年过去了,网站越搞越好,厉害
Loading...
![[HBLOG]公众号](https://www.liuhaihua.cn/img/qrcode_gzh.jpg)

