Spring Boot 学习 (1): 初始化工程
spring boot 项目初始化,介绍三种方式: IntelliJ 创建、 Spring CLI 创建以及手动创建,工程使用 gradle 构建工具。
IntelliJ创建
- 选择 spring initializr

- 填写自己想要的配置信息

- 选择依赖包:
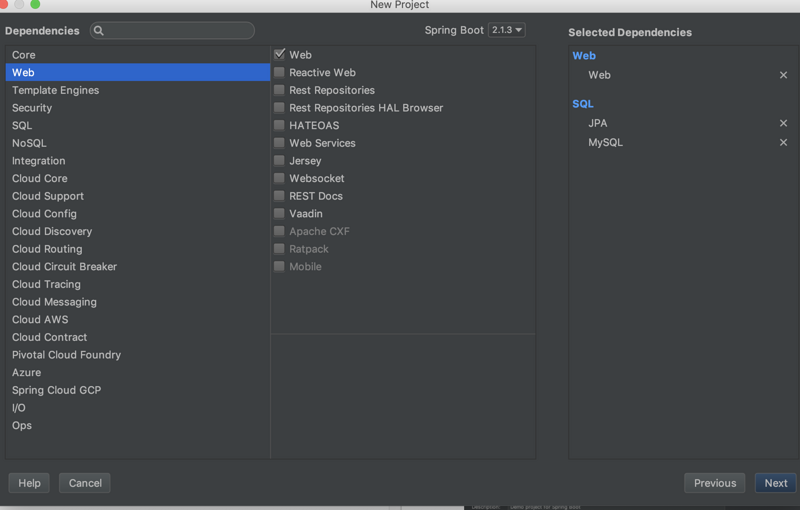
- 配置工程名和工程所在目录:

进入到工程,如下图所示:
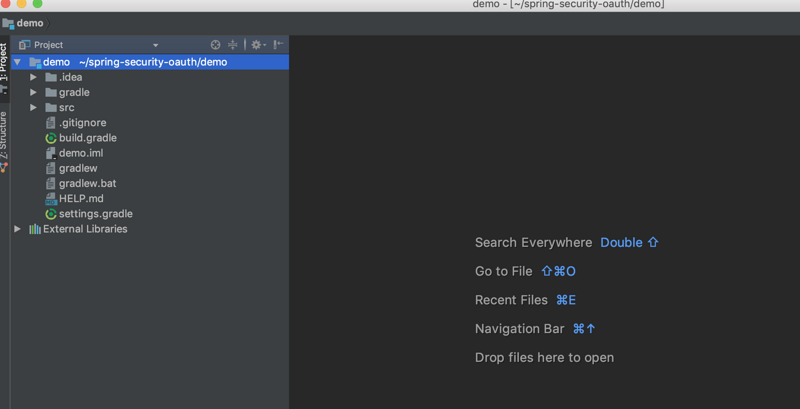
创建完成。
2. Spring CLI创建
示例:
spring init -dweb,data-jpa,h2,thymeleaf --build gradle initbycli
运行命令后会显示:
Using service at https://start.spring.io
Project extracted to '<current_path>/initbycli'
执行完成会看到当前目录下会多出 initbycli 目录.
.
└── initbycli
    ├── HELP.md
    ├── build.gradle
    ├── gradle
    │   └── wrapper
    │       ├── gradle-wrapper.jar
    │       └── gradle-wrapper.properties
    ├── gradlew
    ├── gradlew.bat
    ├── settings.gradle
    └── src
        ├── main
        │   ├── java
        │   │   └── com
        │   │       └── example
        │   │           └── initbycli
        │   │               └── DemoApplication.java
        │   └── resources
        │       ├── application.properties
        │       ├── static
        │       └── templates
        └── test
            └── java
                └── com
                    └── example
                        └── initbycli
                            └── DemoApplicationTests.java
可以看到基本工程目录文件已经创建好了。
再看一下 Spring CLI 的说明:
$ spring help init
spring init - Initialize a new project using Spring Initializr (start.spring.io)

usage: spring init [options] [location]

Option                       Description
------                       -----------
-a, --artifactId <String>    Project coordinates; infer archive name (for
                               example 'test')
-b, --boot-version <String>  Spring Boot version (for example '1.2.0.RELEASE')
--build <String>             Build system to use (for example 'maven' or
                               'gradle') (default: maven)
-d, --dependencies <String>  Comma-separated list of dependency identifiers to
                               include in the generated project
--description <String>       Project description
-f, --force                  Force overwrite of existing files
--format <String>            Format of the generated content (for example
                               'build' for a build file, 'project' for a
                               project archive) (default: project)
-g, --groupId <String>       Project coordinates (for example 'org.test')
-j, --java-version <String>  Language level (for example '1.8')
-l, --language <String>      Programming language  (for example 'java')
--list                       List the capabilities of the service. Use it to
                               discover the dependencies and the types that are
                               available
-n, --name <String>          Project name; infer application name
-p, --packaging <String>     Project packaging (for example 'jar')
--package-name <String>      Package name
-t, --type <String>          Project type. Not normally needed if you use --
                               build and/or --format. Check the capabilities of
                               the service (--list) for more details
--target <String>            URL of the service to use (default: https://start.
                               spring.io)
-v, --version <String>       Project version (for example '0.0.1-SNAPSHOT')
-x, --extract                Extract the project archive. Inferred if a
                               location is specified without an extension
说明:
- 依赖: 使用
-d, --dependencies <String>,,号分割. - 项目构建类型:
--build <String>, 默认为maven, 另一选项是gradle. - 初始化类型:
--format <String>, 默认为project, 会初始化整个工程的目录结构。可选项是build, 只会生成工程所需要的build.gradle文件. - 查看有哪些可以配置的:
--list, 命令输出以后,内容包括可选的依赖包,工程类型和构建属性( java 版本等).
3. 手动创建
- 建立工程目录:
mkdir initbyself -
在工程目录下建立
build.gradle文件,cd initbyself vim build.gradle
build.gradle内容为:plugins { id 'org.springframework.boot' version '2.1.3.RELEASE' id 'java' } apply plugin: 'io.spring.dependency-management' group = 'com.example' version = '0.0.1-SNAPSHOT' sourceCompatibility = '1.8' repositories { mavenCentral() } dependencies { implementation 'org.springframework.boot:spring-boot-starter-data-jpa' implementation 'org.springframework.boot:spring-boot-starter-thymeleaf' implementation 'org.springframework.boot:spring-boot-starter-web' runtimeOnly 'com.h2database:h2' testImplementation 'org.springframework.boot:spring-boot-starter-test' } - 创建
setting.gradle文件
pluginManagement {
        repositories {
            gradlePluginPortal()
        }
    }
    rootProject.name = 'initbyself'
-
创建java代码目录
mkdir -p src/main/java/com/example/initbyself
mkdir -p src/main/java/resources
-
创建
application- 切换到代码目录
cd src/main/java/com/example/initbyself -
编写源码文件
DemoApplication.javapackage com.example.initbyself; import org.springframework.boot.SpringApplication; import org.springframework.boot.autoconfigure.SpringBootApplication; @SpringBootApplication public class DemoApplication { public static void main(String[] args) { SpringApplication.run(DemoApplication.class, args); } }
- 切换到代码目录
-
运行
gradle build, 结果为:> Task :build Skipping task ':build' as it has no actions. :build (Thread[Daemon worker Thread 2,5,main]) completed. Took 0.0 secs. BUILD SUCCESSFUL in 3s 2 actionable tasks: 2 executed
- 运行项目:
java -jar build/libs/initbyself-0.0.1-SNAPSHOT.jar

 .   ____          _            __ _ _
 /// / ___'_ __ _ _(_)_ __  __ _ / / / /
( ( )/___ | '_ | '_| | '_ // _` | / / / /
 ///  ___)| |_)| | | | | || (_| |  ) ) ) )
  '  |____| .__|_| |_|_| |_/__, | / / / /
 =========|_|==============|___/=/_/_/_/
 :: Spring Boot ::        (v2.1.3.RELEASE)
.
.
.
.
.
2019-03-07 00:17:36.996  INFO 11848 --- [           main] o.s.b.w.embedded.tomcat.TomcatWebServer  : Tomcat started on port(s): 8080 (http) with context path ''
2019-03-07 00:17:36.999  INFO 11848 --- [           main] com.example.initbyself.DemoApplication   : Started DemoApplication in 19.497 seconds (JVM running for 19.992)
此时,已说明工程初始化成功了。
小结
以上是 Spring Boot 项目的初始化的三种方式,不一定全。第一种和第二种都依赖 https://start.spring.io 这个地址,这是官方提供的快速初始化方式,第三种是我们全手动一步一步初始化,需要对构建工具十分熟悉。
正文到此结束
热门推荐


相关文章

近期评论
-
主要用的是AI
-
博主的博客用的什么技术栈,内容都是干货,赞
-
-
https://www.liuhaihua.cn/archives/40657.html 这篇博客中的图片打不开了
-
不会英语啊。
-
-
-
-
-
Loading...
![[HBLOG]公众号](https://www.liuhaihua.cn/img/qrcode_gzh.jpg)

