Swagger使用指南
| 编辑推荐: |
| 本文来自于csdn,本文主要介绍了swagger配置类里面,要配置自己的controller包路径以及如何使用swagger,希望对您的学习有所帮助。 |
1:认识Swagger
Swagger 是一个规范和完整的框架,用于生成、描述、调用和可视化 RESTful 风格的 Web 服务。总体目标是使客户端和文件系统作为服务器以同样的速度来更新。文件的方法,参数和模型紧密集成到服务器端的代码,允许API来始终保持同步。
作用:
1. 接口的文档在线自动生成。
2. 功能测试。
Swagger是一组开源项目,其中主要要项目如下:
1. Swagger-tools:提供各种与Swagger进行集成和交互的工具。例如模式检验、Swagger 1.2文档转换成Swagger 2.0文档等功能。
2. Swagger-core: 用于Java/Scala的的Swagger实现。与JAX-RS(Jersey、Resteasy、CXF...)、Servlets和Play框架进行集成。
3. Swagger-js: 用于JavaScript的Swagger实现。
4. Swagger-node-express: Swagger模块,用于node.js的Express web应用框架。
5. Swagger-ui:一个无依赖的HTML、JS和CSS集合,可以为Swagger兼容API动态生成优雅文档。
6. Swagger-codegen:一个模板驱动引擎,通过分析用户Swagger资源声明以各种语言生成客户端代码。
2:Maven
版本号请根据实际情况自行更改。
<dependency>
<groupId>io.springfox</groupId>
<artifactId>springfox-swagger2</artifactId>
<version>2.2.2</version>
</dependency>
<dependency>
<groupId>io.springfox</groupId>
<artifactId>springfox-swagger-ui</artifactId>
<version>2.2.2</version>
</dependency>
3:创建Swagger2配置类
在Application.java同级创建Swagger2的配置类Swagger2
 package com.swaggerTest;

 import org.springframework.context.annotation.Bean;
 import org.springframework.context.annotation.Configuration;

 import springfox.documentation.builders.ApiInfoBuilder;
 import springfox.documentation.builders.PathSelectors;
 import springfox.documentation.builders.RequestHandlerSelectors;
 import springfox.documentation.service.ApiInfo;
 import springfox.documentation.spi.DocumentationType;
 import springfox.documentation.spring.web.plugins.Docket;
 import springfox.documentation.swagger2.annotations.EnableSwagger2;

 /**
 * Swagger2配置类
 * 在与spring boot集成时,放在与Application.java同级的目录下。
 * 通过@Configuration注解,让Spring来加载该类配置。
 * 再通过@EnableSwagger2注解来启用Swagger2。
 */
 @Configuration
 @EnableSwagger2
 public class Swagger2 {

 /**
 * 创建API应用
 * apiInfo() 增加API相关信息
 * 通过select()函数返回一个ApiSelectorBuilder实例,用来控制哪些接口暴露给Swagger来展现,
 * 本例采用指定扫描的包路径来定义指定要建立API的目录。
 *
 * @return
 */
 @Bean
 public Docket createRestApi() {
 return new Docket(DocumentationType.SWAGGER_2)
 .apiInfo(apiInfo())
 .select()
 .apis(RequestHandlerSelectors.basePackage("com.swaggerTest.controller"))
 .paths(PathSelectors.any())
 .build();
 }

 /**
 * 创建该API的基本信息(这些基本信息会展现在文档页面中)
 * 访问地址:http://项目实际地址/swagger-ui.html
 * @return
 */
 private ApiInfo apiInfo() {
 return new ApiInfoBuilder()
 .title("Spring Boot中使用Swagger2构建RESTful APIs")
 .description("更多请关注http://www.baidu.com")
 .termsOfServiceUrl("http://www.baidu.com")
 .contact("sunf")
 .version("1.0")
 .build();
 }
 }
如上代码所示,通过createRestApi函数创建Docket的Bean之后,apiInfo()用来创建该Api的基本信息(这些基本信息会展现在文档页面中)。
4:添加文档内容
在完成了上述配置后,其实已经可以生产文档内容,但是这样的文档主要针对请求本身,描述的主要来源是函数的命名,对用户并不友好,我们通常需要自己增加一些说明来丰富文档内容。
Swagger使用的注解及其说明:
@Api:用在类上,说明该类的作用。
@ApiOperation:注解来给API增加方法说明。
@ApiImplicitParams : 用在方法上包含一组参数说明。
@ApiImplicitParam:用来注解来给方法入参增加说明。
@ApiResponses:用于表示一组响应
@ApiResponse:用在@ApiResponses中,一般用于表达一个错误的响应信息
l code:数字,例如400
l message:信息,例如"请求参数没填好"
l response:抛出异常的类
@ApiModel:描述一个Model的信息(一般用在请求参数无法使用@ApiImplicitParam注解进行描述的时候)
l @ApiModelProperty:描述一个model的属性
注意:@ApiImplicitParam的参数说明:
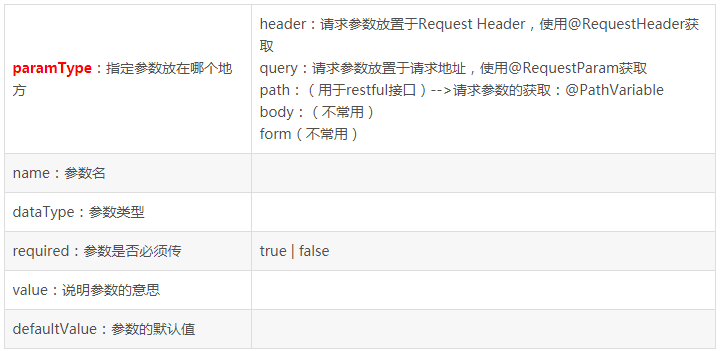
例子:
package com.swaggerTest.controller;
import org.springframework.stereotype.Controller;
import org.springframework.util.StringUtils;
import org.springframework.web.bind.annotation.RequestMapping;
import org.springframework.web.bind.annotation.RequestMethod;
import org.springframework.web.bind.annotation.RequestParam;
import org.springframework.web.bind.annotation.ResponseBody;
import io.swagger.annotations.Api;
import io.swagger.annotations.ApiImplicitParam;
import io.swagger.annotations.ApiImplicitParams;
import io.swagger.annotations.ApiOperation;
/**
* 一个用来测试swagger注解的控制器
* 注意@ApiImplicitParam的使用会影响程序运行,如果使用不当可能造成控制器收不到消息
*
* @author SUNF
*/
@Controller
@RequestMapping("/say")
@Api(value = "SayController|一个用来测试swagger注解的控制器")
public class SayController {
@ResponseBody
@RequestMapping(value ="/getUserName", method= RequestMethod.GET)
@ApiOperation(value="根据用户编号获取用户姓名", notes="test: 仅1和2有正确返回")
@ApiImplicitParam(paramType="query", name = "userNumber", value = "用户编号", required = true, dataType = "Integer")
public String getUserName(@RequestParam Integer userNumber){
if(userNumber == 1){
return "张三丰";
}
else if(userNumber == 2){
return "慕容复";
}
else{
return "未知";
}
}
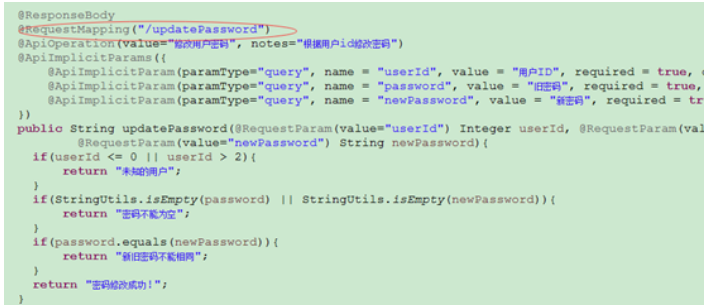
@ResponseBody
@RequestMapping("/updatePassword")
@ApiOperation(value="修改用户密码", notes="根据用户id修改密码")
@ApiImplicitParams({
@ApiImplicitParam(paramType="query", name = "userId", value = "用户ID", required = true, dataType = "Integer"),
@ApiImplicitParam(paramType="query", name = "password", value = "旧密码", required = true, dataType = "String"),
@ApiImplicitParam(paramType="query", name = "newPassword", value = "新密码", required = true, dataType = "String")
})
public String updatePassword(@RequestParam(value="userId") Integer userId, @RequestParam(value="password") String password,
@RequestParam(value="newPassword") String newPassword){
if(userId <= 0 || userId > 2){
return "未知的用户";
}
if(StringUtils.isEmpty(password) || StringUtils.isEmpty(newPassword)){
return "密码不能为空";
}
if(password.equals(newPassword)){
return "新旧密码不能相同";
}
return "密码修改成功!";
}
}
完成上述代码添加上,启动Spring Boot程序,访问: http://localhost:8080/swagger-ui.html
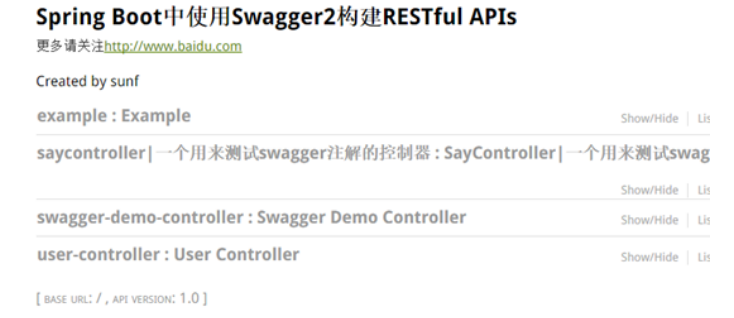
如上图,可以看到暴漏出来的控制器信息,点击进入可以看到详细信息。
两个注意点:
1. paramType会直接影响程序的运行期,如果paramType与方法参数获取使用的注解不一致,会直接影响到参数的接收。
例如:
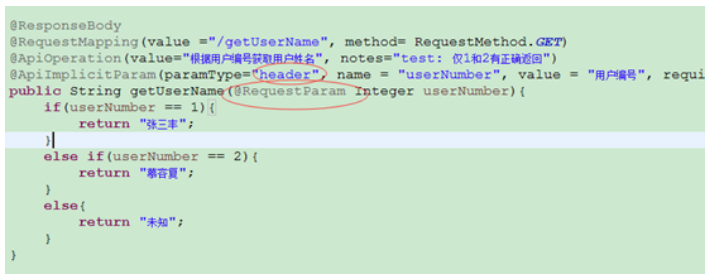
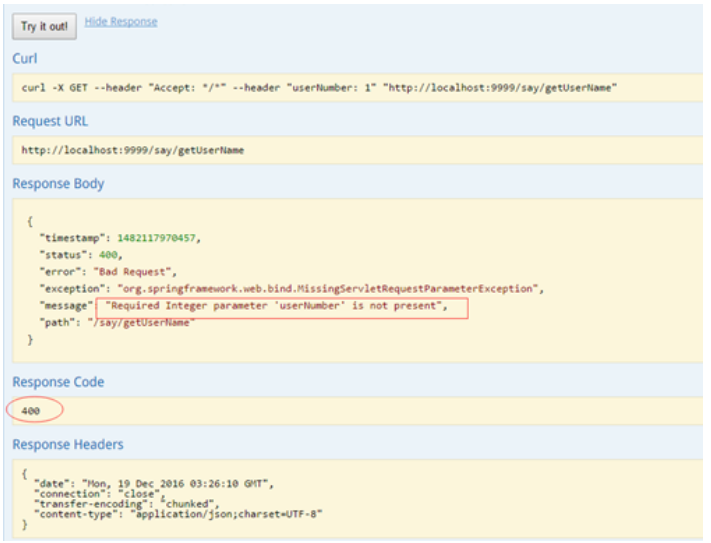
使用Sawgger UI进行测试,接收不到!
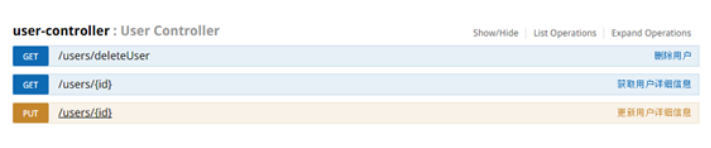
2. 还有一个需要注意的地方:
Conntroller中定义的方法必须在@RequestMapper中显示的指定RequestMethod类型,否则SawggerUi会默认为全类型皆可访问, API列表中会生成多条项目。
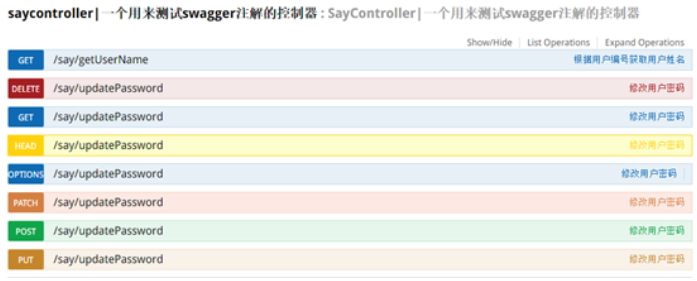
如上图:updatePassword()未指定requestMethod,结果生成了7条API信息。所以如果没有特殊需求,建议根据实际情况加上requestMethod。
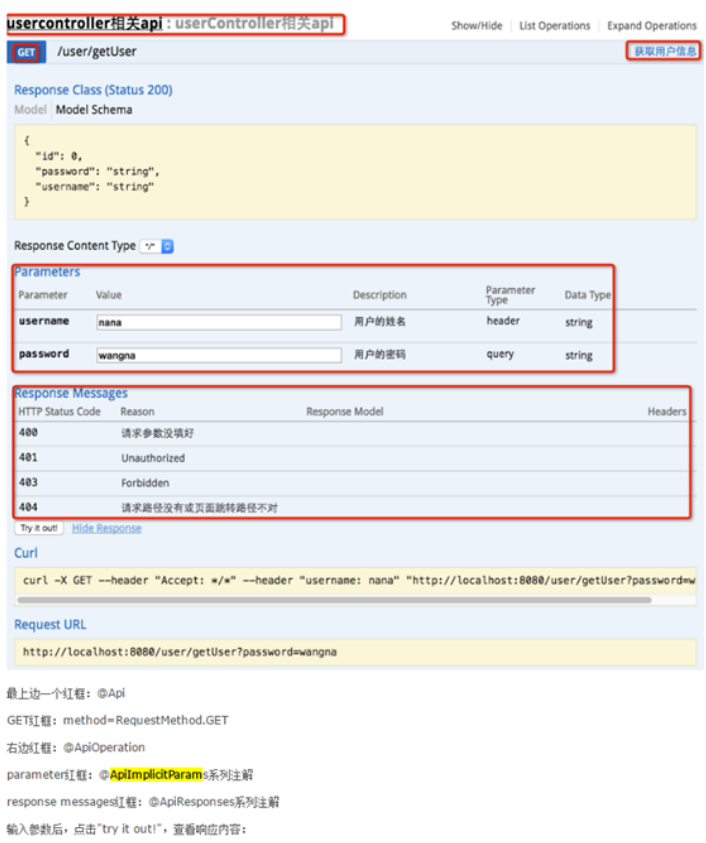
5:Swagger UI面板说明
正文到此结束
- 本文标签: 开源项目 App 参数 Word plugin 模型 服务器 js CSS CTO 修改密码 http mapper Spring Boot web https UI 需求 REST core bean id update ip 代码 value src Service CXF java servlet 配置 Node.js 实例 build Property 希望 spring maven map SDN Select 同步 JavaScript 文件系统 目录 node cat API Document scala IO 2019 tab description RESTful HTML 开源 message 自动生成 equals 测试
- 版权声明: 本文为互联网转载文章,出处已在文章中说明(部分除外)。如果侵权,请联系本站长删除,谢谢。
- 本文海报: 生成海报一 生成海报二
热门推荐


相关文章


Loading...
![[HBLOG]公众号](http://www.liuhaihua.cn/img/qrcode_gzh.jpg)

