带你探索JUnit 5.4
Java最受欢迎的测试库JUnit发布了一个新版本5.4。自上一次5.3.2发布以来,这个版本带来了一些值得我们去尝试的地方,本文中,我将介绍最重要的内容,并在适用的地方提供代码示例。
你可能知道,JUnit 5.x(Jupiter)是对JUnit 4.x(Vintage)的巨大改进。JUnit 5是一个更优秀的版本,包括Lambda支持, JUnit 5扩展 ,测试方法参数注入以及许多其他功能。JUnit 5.4是JUnit 5的演变,进一步改善了测试体验。
什么是Junit 5?
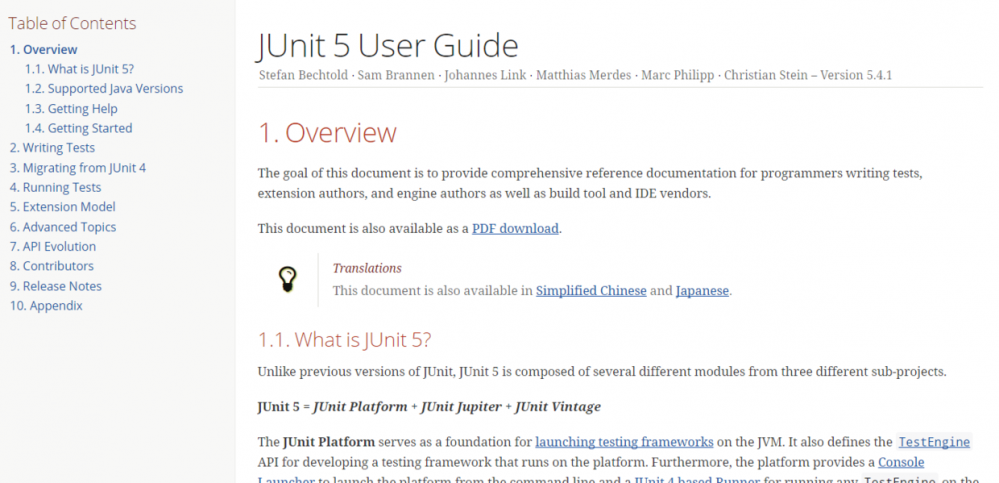
官方使用说明
JUnit 5 = JUnit平台 + JUnit Jupiter + JUnit Vintage
以下是原文就不翻译了。
The JUnit Platform serves as a foundation for launching testing frameworks on the JVM. It also defines the [TestEngine](https://junit.org/junit5/docs/current/api/org/junit/platform/engine/TestEngine.html) API for developing a testing framework that runs on the platform. Furthermore, the platform provides a Console Launcher to launch the platform from the command line and a JUnit 4 based Runner for running any TestEngine on the platform in a JUnit 4 based environment. First-class support for the JUnit Platform also exists in popular IDEs (see IntelliJ IDEA , Eclipse , NetBeans , and Visual Studio Code ) and build tools (see Gradle , Maven , and Ant ).
JUnit Jupiteris the combination of the new programming model and extension model for writing tests and extensions in JUnit 5. The Jupiter sub-project provides a TestEngine for running Jupiter based tests on the platform.
JUnit Vintageprovides a TestEngine for running JUnit 3 and JUnit 4 based tests on the platform.
Junit 5 对应的JDK版本一定要是1.8以上
JUnit 5.4入门
要开始使用JUnit 5.4,通过Maven引入。使用JUnit 5.4已经简化了。而在先前版本的JUnit 5中,需要分别导入几个Jar包(例如,jupiter-api,jupiter-params,jupiter-engine),新版本允许你通过包括仅仅单一的使用JUnit 5.4 junit-jupiter依赖性聚集工件。
<!-- https://mvnrepository.com/artifact/org.junit.jupiter/junit-jupiter -->
<dependency>
    <groupId>org.junit.jupiter</groupId>
    <artifactId>junit-jupiter</artifactId>
    <version>5.4.1</version>
    <scope>test</scope>
</dependency>
项目代码结构
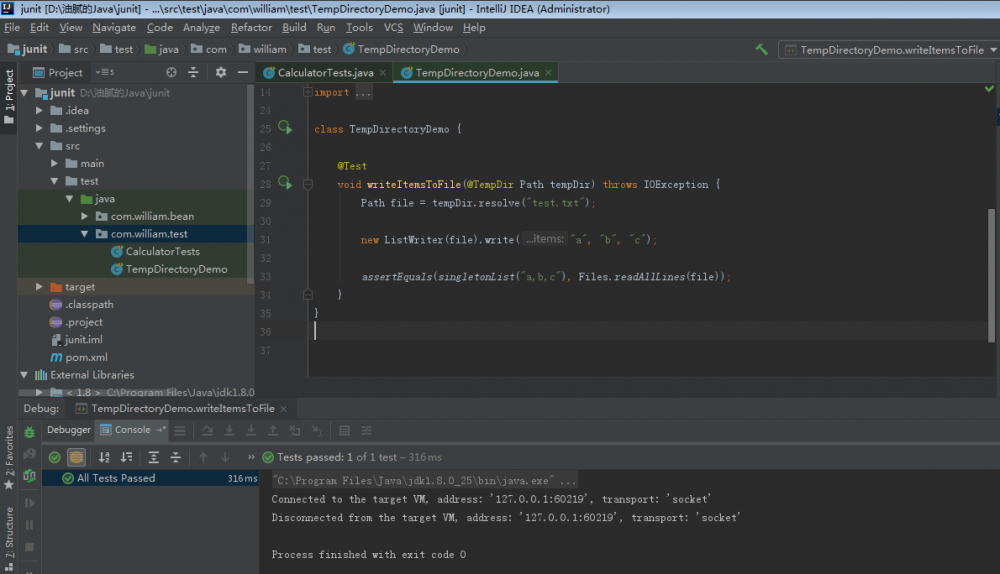
@TempDir支持临时目录
在测试时,有时你需要访问临时文件。JUnit 5现在提供了一个创建和清理临时文件的扩展,而不是自己处理这样一个文件的创建。您可以使用它来放置@TempDirectory注释Path或File测试输入参数或字段。一个例子:
@Test
void writeItemsToFile(@TempDir Path tempDir) throws IOException {
        Path file = tempDir.resolve("test.txt");
        new ListWriter(file).write("a", "b", "c");
        assertEquals(singletonList("a,b,c"), Files.readAllLines(file));
    }
参数化测试null和空支持
参数化测试是为了测试的时候提供好的入参,比如下面的的Limit就会直接打印Limit的所有枚举列表
public enum Limit {
    IN(1,"包含"),
    NOT_IN(0,"不包含");
    public final int value;
    public final String alias;
    Limit(int value, String k) {
        this.value = value;
        this.alias = k;
    }
}
@ParameterizedTest
@EnumSource(Limit.class)
void checkLimit(Limit limit) {
   assertTrue(limitCheck.isValid(limit));
}
但是,在这样的设置中,假如我们需要去测试极端场景下,代码的健壮性,模拟提供null元素有点困难,或者在其他情况下,提供空元素。@NullSource(并@EmptySource加@NullAndEmptySource)就可以帮助到我们。
@NullSource相当于Mock了一个Null值做为入参,以此我们可以去测试代码
@ParameterizedTest
@NullSource // now also null is tested
@EnumSource(Limit.class)
void checkLimit(Limit limit) {
   assertTrue(limitCheck.isValid(limit));
}
设置单元测试名称
通常,在使用测试类时,可以使用@DisplayName注释覆盖测试方法名称或类。例如,见下文
@Test
@DisplayName("计算加法的一个单元测试")
public void add() { }
虽然上面提供了更易读的格式,但它非常静态。您现在可以做的是根据例如嵌套类或方法名称生成显示名称。可以在文档中找到一个好的 DisplayNameGeneration示例 。
如何排序JUnit 5测试方法?
虽然通常将测试方法相互依赖并不是一个好主意,但对于某些情况,在测试执行中有一定的顺序是很方便的。例如,一个测试可能在REST端点中创建资源,而其他测试则验证此资源的某些属性。
在以前版本的JUnit中,这很难做到,但是从5.4开始,你可以使用一个新TestMethodOrder命名的OrderAnnotation。你可以以此来结合使用,Order以强制按特定顺序执行测试方法。
@TestMethodOrder(OrderAnnotation.class)
class SequenceTest {

    @Test
    @Order(1)
    void createResource() {
        // Create a resource first...
    }

    @Test
    @Order(2)
    void verify() {
        // ...then verify some attributes.
    }
}
下一步?
新的JUnit 5版本中还有许多其他功能,可以在 官网 找到。除了框架之外,JUnit 5的一大优点是文档很好。有很多可用的文档,其中的概念用非常简单的代码示例进行了解释,这一点我觉得和Spring的官网说明一样具有高质量,简单清晰。
如果您尚未升级到 JUnit 5 ,那么最新版本提供了许多强大的功能,这些功能将使迁移变得有价值。
正文到此结束
热门推荐


相关文章


Loading...
![[HBLOG]公众号](http://www.liuhaihua.cn/img/qrcode_gzh.jpg)

