SpringBoot+Redis作为二级缓存整合的基本Demo
Redis 是一个高性能的key-value数据库。 redis的出现,很大程度补偿了memcached这类key/value存储的不足,在部 分场合可以对关系数据库起到很好的补充作用。它提供了Java,C/C++,C#,PHP,JavaScript,Perl,Object-C,Python,Ruby,Erlang等客户端,使用很方便。
2、优点
(1)数据操作全在内存,读写性能强。
(2)数据结构丰富,支持string,hash,list,set及zset(sorted set)。
(3)支持主从复制,以及数据持久化等
二、Redis的搭建
1、安装
按顺序执行如下命令:
$ wget http://download.redis.io/releases/redis-5.0.4.tar.gz
$ tar xzf redis-5.0.4.tar.gz
$ cd redis-5.0.4
$ make
$ make install
复制代码
2、测试
开启服务
$ redis-server
复制代码
启动客户机交互测试
$ redis-cli -p 6379
127.0.0.1:6379> set k1 k2
OK
127.0.0.1:6379> get k1
"k2"
127.0.0.1:6379>

复制代码
三、基本环境配置
这里使用MyBatis作为持久层框架,使用Druid作为连接池,使用MySql数据库。
1、POM依赖
<dependencies>
        <dependency>
            <groupId>org.springframework.boot</groupId>
            <artifactId>spring-boot-starter-cache</artifactId>
        </dependency>
        <dependency>
            <groupId>org.springframework.boot</groupId>
            <artifactId>spring-boot-starter-data-redis</artifactId>
        </dependency>
        <dependency>
            <groupId>org.springframework.boot</groupId>
            <artifactId>spring-boot-starter-thymeleaf</artifactId>
        </dependency>
        <dependency>
            <groupId>org.springframework.boot</groupId>
            <artifactId>spring-boot-starter-web</artifactId>
        </dependency>
        <dependency>
            <groupId>org.mybatis.spring.boot</groupId>
            <artifactId>mybatis-spring-boot-starter</artifactId>
            <version>2.0.1</version>
        </dependency>

        <dependency>
            <groupId>mysql</groupId>
            <artifactId>mysql-connector-java</artifactId>
            <scope>runtime</scope>
        </dependency>
        <dependency>
            <groupId>org.springframework.boot</groupId>
            <artifactId>spring-boot-starter-test</artifactId>
            <scope>test</scope>
        </dependency>

        <!-- https://mvnrepository.com/artifact/com.alibaba/druid-spring-boot-starter -->
        <dependency>
            <groupId>com.alibaba</groupId>
            <artifactId>druid-spring-boot-starter</artifactId>
            <version>1.1.16</version>
        </dependency>
        <!-- https://mvnrepository.com/artifact/log4j/log4j -->
        <!-- Druid开启SQL监控所需要的依赖-->
        <dependency>
            <groupId>log4j</groupId>
            <artifactId>log4j</artifactId>
            <version>1.2.17</version>
        </dependency>
    </dependencies>
复制代码
2、YML配置文件
server:
  port: 80
spring:
  http:
    encoding:
      charset: UTF-8
  cache:
    type: redis
  redis:
    #redis服务器地址
    host: 192.168.78.128
    #设置端口号,默认6379
    port: 6379
  datasource:
    driver-class-name: com.mysql.jdbc.Driver
    username: root
    password: 123456
    url: jdbc:mysql://localhost:3306/test
#控制台查看SQL执行状况
logging:
  level:
   com.yurui.rediscache: debug
复制代码
3、测试连接
package com.yurui.rediscache;

import org.junit.Test;
import org.junit.runner.RunWith;
import org.springframework.beans.factory.annotation.Autowired;
import org.springframework.boot.test.context.SpringBootTest;
import org.springframework.data.redis.core.StringRedisTemplate;
import org.springframework.test.context.junit4.SpringRunner;

@RunWith(SpringRunner.class)
@SpringBootTest
public class RediscacheApplicationTests {
    @Autowired
    private StringRedisTemplate stringRedisTemplate;

    @Test
    public void contextLoads() {
        stringRedisTemplate.opsForValue().set("k1","v1");
        System.out.println(stringRedisTemplate.opsForValue().get("k1"));
    }
}
复制代码
测试成功效果:

测试失败的可能原因:
1、Linux防火墙没设置好
2、启动服务器前配置文件内没有注释bind 127.0.0.1
3、配置文件中没把protected-mode yes改为no
四、三个基本的缓存标签
1、@Cacheable
@Cacheable可以标记在一个方法上,也可以标记在一个类上。当标记在一个方法上时表示该方法是支持缓存的,当标记在一个类上时则表示该类所有的方法都是支持缓存的。对于一个支持缓存的方法,Spring会在其被调用后将其返回值缓存起来,以保证下次利用同样的参数来执行该方法时可以直接从缓存中获取结果,而不需要再次执行该方法。
2、@CachePut
@CachePut可以声明一个方法支持缓存功能。与@Cacheable不同的是使用@CachePut标注的方法在执行前不会去检查缓存中是否存在之前执行过的结果,而是每次都会执行该方法,并将执行结果以键值对的形式存入指定的缓存中。
3、@CacheEvict
@CacheEvict是用来标注在需要清除缓存元素的方法或类上的。当标记在一个类上时表示其中所有的方法的执行都会触发缓存的清除操作。@CacheEvict可以指定的属性有value、key、condition、allEntries和beforeInvocation。
三者共有属性:
-
value
表示对应生成缓存的名称,以及所操作的缓存的名称
-
key
表示需要三种操作所操作的key值,如未指定则会使用默认策略生成的key;
-
condition
表示操作发生的条件
@CacheEvict的allEntries和beforeInvocation属性
- allEntries
allEntries是boolean类型,表示是否需要清除缓存中的所有元素。默认为false,表示不需要。当指定了allEntries为true时,Spring Cache将忽略指定的key。可一下清除所有名称相同的缓存。 - beforeInvocation
清除操作默认是在对应方法成功执行之后触发的,即方法如果因为抛出异常而未能成功返回时也不会触发清除操作。使用beforeInvocation可以改变触发清除操作的时间,当我们指定该属性值为true时,Spring会在调用该方法之前清除缓存中的指定元素。
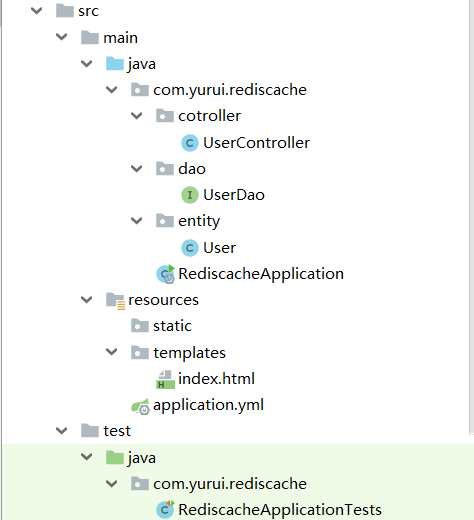
五、基本的Demo
项目结构
Entity类:
package com.yurui.rediscache.entity;

import org.springframework.stereotype.Component;
import java.io.Serializable;      //    返回实体缓存需要实现可序列化

@Component
public class User implements Serializable {
    private int userId;
    private String username;
    //  setters,getters,toString()方法已被省略
}
复制代码
由于业务逻辑简单,取消了Service层
Dao层:
package com.yurui.rediscache.dao;

import com.yurui.rediscache.entity.User;
import org.apache.ibatis.annotations.Insert;
import org.apache.ibatis.annotations.Mapper;
import org.apache.ibatis.annotations.Select;

@Mapper
public interface UserDao {
    @Insert("insert into user(userId,username) values(#{userId},#{username})")
    int userInsert(User user);

    @Select("select * from user where userId=#{userId}")
    User userQuery(int userId);
}
复制代码
Controller:
package com.yurui.rediscache.cotroller;

import com.yurui.rediscache.dao.UserDao;
import com.yurui.rediscache.entity.User;
import org.springframework.beans.factory.annotation.Autowired;
import org.springframework.cache.annotation.CacheEvict;
import org.springframework.cache.annotation.CachePut;
import org.springframework.cache.annotation.Cacheable;
import org.springframework.web.bind.annotation.*;

@RestController
public class UserController {

    @Autowired
    private UserDao userDao;

    @PostMapping("user")
    public String userAdd(User user) {
        return userDao.userInsert(user) != 0 ? "success" : "fail";
    }

    //  测试Cacheable注解
    @Cacheable(cacheNames = "User", key = "#userId")
    @GetMapping("/testCacheable/{userId}")
    public User testCacheable(@PathVariable("userId") Integer userId) {
        return userDao.userQuery(userId);
    }

    //  测试CachePut注解
    @CachePut(cacheNames = "User", key = "#userId") //缓存名字为"User","userId"作为key
    @GetMapping("/testCachePut/{userId}")
    public User testCachePut(@PathVariable("userId") Integer userId) {
        return userDao.userQuery(userId);
    }

    //  测试CacheEvict注解清空指定用户缓存
    @CacheEvict(cacheNames = "User", key = "#userId")
    @GetMapping("/testCacheEvict/{userId}")
    public String testCacheEvict(@PathVariable("userId") Integer userId) {
        return "cache for " + userId + " has been flushed";
    }

    //  测试CacheEvict注解的allEntries属性清空所有用户缓存
    @CacheEvict(cacheNames = "User", allEntries = true)
    @GetMapping("/testAllEntries")
    public String testAllEntries() {
        return "All cache has been flushed";
    }
}
复制代码
主类
package com.yurui.rediscache;

import org.springframework.boot.SpringApplication;
import org.springframework.boot.autoconfigure.SpringBootApplication;
import org.springframework.cache.annotation.EnableCaching;

@SpringBootApplication
@EnableCaching                          //    开启缓存注解
public class RediscacheApplication {

    public static void main(String[] args) {
        SpringApplication.run(RediscacheApplication.class, args);
    }

}
复制代码
主页(index.html)
<!DOCTYPE html>
<html lang="en">
<head>
    <meta charset="UTF-8">
    <title>主页</title>
</head>
<body>
<h1>添加员工</h1>
<form method="post" action="/user">
    <table>
        <tr>
            <td>userId:</td>
            <td><input type="text" name="userId"></td>
        </tr>
        <tr>
            <td>username:</td>
            <td><input type="text" name="username"></td>
        </tr>
        <tr>
            <td></td>
            <td><input type="submit"></td>
        </tr>
    </table>
</form>
</body>
</html>
复制代码
六、Demo效果测试
测试之前,先向数据库插入两条记录:1、张三,2、李四,并清空redis的缓存
127.0.0.1:6379> flushall
OK
复制代码
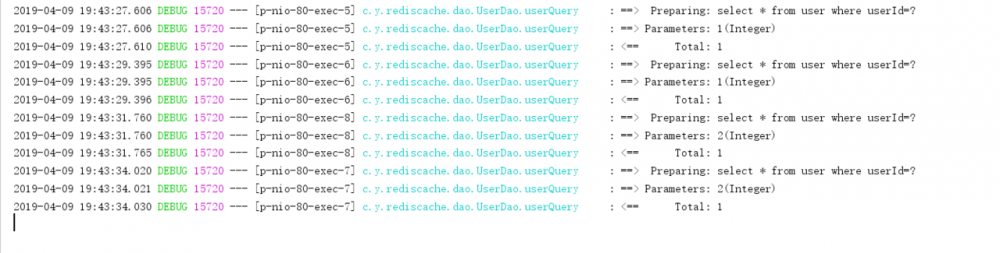
1、Cacheable
分别访问两次
localhost/testCacheable/1
localhost/testCacheable/2
复制代码
控制台打印情况:

由上图可得,两条语句均只打印一次,再查询redis:
127.0.0.1:6379> keys *
1) "User::2"
2) "User::1"
127.0.0.1:6379>
复制代码
综上,完成了使用@Cacheable注解实现redis作为二级缓存的测试。
2、CachePut
清空缓存后分别访问两次
localhost/testCachePut/1
localhost/testCachePut/2
复制代码
再访问
localhost/testCacheable/1
复制代码
控制台打印:
上图共有四条SQL语句执行,可发现每次访问@CachePut注解标注的方法时都会直接从数据库查询,并且查询结果已经存入缓存。
3、CacheEvict
1、不开启allEntries
测试前先访问两次@Cacheable标注的路径完成缓存,然后分别访问
http://localhost/testCacheEvict/1
http://localhost/testCacheable/1
http://localhost/testCacheable/2
复制代码
控制台打印:

可发现,用户张三的缓存已被清除,李四不受影响,再次访问testCacheable/1会从数据库查询并重新缓存张三。
2、开启allEntries
测试前先访问两边@Cacheable标注的路径完成缓存,然后分别访问
http://localhost/testAllEntries
http://localhost/testCacheable/1
http://localhost/testCacheable/2
复制代码
控制台打印:

可发现,用户张三、李四的缓存均被清空,再次查询会调用数据库重新缓存。
六、CacheManager的定制
1、未定制前
当我们使用引入redis的starter时,容器中默认使用的是RedisCacheManager。它在操作redis时使用的是RedisTemplate<Object, Object>,默认采用JDK的序列化机制,例如redis中查看张三的缓存:
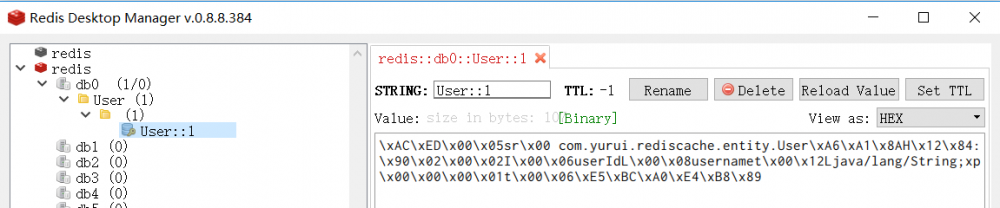
我们可以通过定制CacheManager改变采取序列化机制。
2、进行定制
配置类
package com.yurui.rediscache.config;

import org.springframework.context.annotation.Bean;
import org.springframework.context.annotation.Configuration;
import org.springframework.data.redis.cache.RedisCacheConfiguration;
import org.springframework.data.redis.cache.RedisCacheManager;
import org.springframework.data.redis.connection.RedisConnectionFactory;
import org.springframework.data.redis.serializer.Jackson2JsonRedisSerializer;
import org.springframework.data.redis.serializer.RedisSerializationContext;

@Configuration
public class Config {

    @Bean
    public RedisCacheManager JsonCacheManager(RedisConnectionFactory factory) {
        RedisCacheConfiguration config = RedisCacheConfiguration.defaultCacheConfig()
                //     使用Jackson2JsonRedisSerializer序列化得到Value
                .serializeValuesWith(RedisSerializationContext.SerializationPair.
                        fromSerializer(new Jackson2JsonRedisSerializer<Object>(Object.class)));
        return RedisCacheManager.builder(factory)
                .cacheDefaults(config)
                .build();
    }
}

复制代码
缓存之后查看:
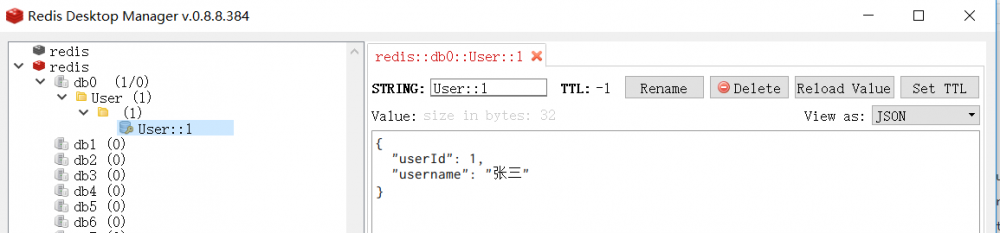
其他配置可根据RedisCacheConfiguration中的方法配置。
正文到此结束
- 本文标签: PHP pom sql 时间 value build ACE ORM springboot druid web db cat 代码 key Connection Word bean id junit apache 端口 数据库 redis json dataSource http Service iBATIS zab wget tab tar 数据 Select dependencies core Action IO 缓存 java 测试 js UI HTML 参数 entity JavaScript 二级缓存 JDBC spring 定制 https 配置 App mybatis src connectionFactory cache 连接池 mysql 服务器 ip 安装 CTO REST lib Logging SQL执行 Mysql数据库 linux root map 注释 list dist python mapper bug
- 版权声明: 本文为互联网转载文章,出处已在文章中说明(部分除外)。如果侵权,请联系本站长删除,谢谢。
- 本文海报: 生成海报一 生成海报二
热门推荐


相关文章


Loading...
![[HBLOG]公众号](http://www.liuhaihua.cn/img/qrcode_gzh.jpg)

