GraphQL(三):GraphQL集成SpringBoot原理
在 GraphQL(二):GraphQL服务搭建 中我们在pom文件中增加了如下依赖:
<dependency>
    <groupId>com.graphql-java</groupId>
    <artifactId>graphql-java-tools</artifactId>
    <version>4.0.0</version>
</dependency>
<dependency>
    <groupId>com.graphql-java</groupId>
    <artifactId>graphiql-spring-boot-starter</artifactId>
    <version>3.6.0</version>
</dependency>
<dependency>
    <groupId>com.graphql-java</groupId>
    <artifactId>graphql-spring-boot-starter</artifactId>
    <version>3.6.0</version>
</dependency>
复制代码
接下来我们来分析其中的部分原理。
包
添加了上述依赖后,会引入这么几个jar包:
- graphiql-spring-boot-autoconfigure: 开发者工具graphiql的自动配置jar包
- graphiql-spring-boot-starter: 开发者工具graphiql的实现
- graphql-java: graphql的java实现
- graphql-java-servlet: 封装graphql服务为servlet,处理graphql的request和response
- graphql-java-tools: 自动加载*.graphqls文件,并屏蔽graphql-java的底层实现细节
- graphql-spring-boot-autoconfigure: graphql-spring-boot的自动配置jar包
- graphql-spring-boot-starter: starter
开发者工具的两个包暂不讨论。一切都是从graphql-spring-boot-autoconfigure开始的,通过graphql-spring-boot-autoconfigure完成了GraphQLServlet的自动配置。
@Configuration
@ConfigurationProperties(prefix = "graphql.servlet")
public class GraphQLServletProperties {

    private String mapping;

    public String getMapping() {
        return mapping != null ? mapping : "/graphql";
    }

    //省略
}

复制代码
在GraphQLServletProperties配置类上启动了ConfigurationProperties,前缀是"graphql.servlet",因此我们可以在application.properties中以"graphql.servlet"开头进行配置,比如将endpoint从默认的“/graphql”改为“/school”:
graphql.servlet.mapping=/school
复制代码
同样的,在GraphQLWebAutoConfiguration配置类中可以找到关于是否启用GraphQLServlet和跨域访问的配置。
GraphQLServlet
通过graphql-spring-boot-autoconfigure,SpringBoot会自动扫描到GraphQLServlet的相关配置信息,在GraphQLServlet的构造函数中初始化了getHandler和postHandler分别用于处理get和post请求

和Spring的DispatcherServlet不一样,GraphQLServlet重写了doGet和doPost方法,同时GraphQLServlet并不包含拦截器( DispatcherServlet请求执行过程 ),GraphQL提供了一个GraphQLServletListener接口,允许我们针对请求执行结果做处理:
private void doRequest(HttpServletRequest request, HttpServletResponse response, RequestHandler handler) {

    List<GraphQLServletListener.RequestCallback> requestCallbacks = runListeners(l -> l.onRequest(request, response));

    try {
        handler.handle(request, response);
        runCallbacks(requestCallbacks, c -> c.onSuccess(request, response));
    } catch (Throwable t) {
        response.setStatus(500);
        log.error("Error executing GraphQL request!", t);
        runCallbacks(requestCallbacks, c -> c.onError(request, response, t));
    } finally {
        runCallbacks(requestCallbacks, c -> c.onFinally(request, response));
    }
}
复制代码
那么,如果要在GraphQL中实现拦截器的功能要怎么做呢?
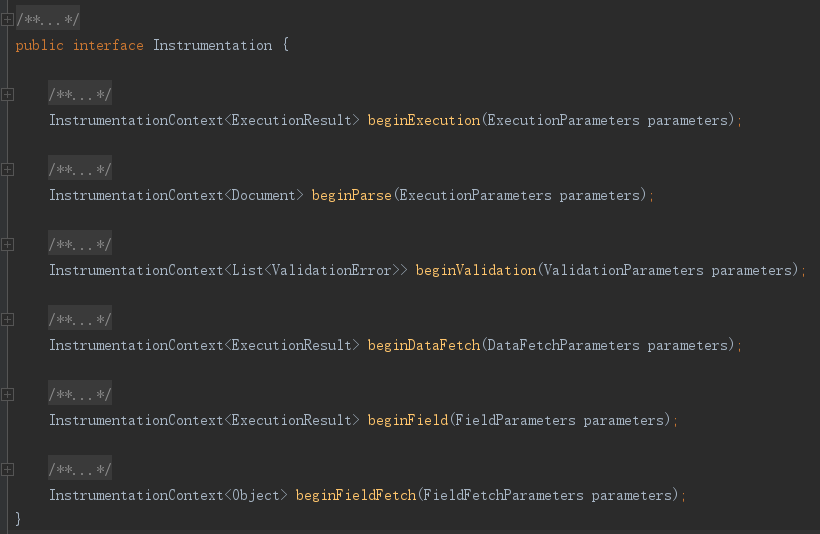
GraphQL提供了一个Instrumentation接口:

允许我们在执行前、解析前、验证前、数据获取前、字段数据获取前(最后两个是一样的作用)插入自己的逻辑,但是它跟Spring的拦截器不一样,它没有提供跳过执行的功能,要拦截掉执行只能抛出异常。
FiledResolverScanner
在 GraphQL(二):GraphQL服务搭建 中我们提到,实现Resolver需要满足如下约定:
1. <field>
2. is<field> – only if the field is of type Boolean
3. get<field>
4. getField<field>(最新版增加的契约)
复制代码
关于这部分契约的定义在官方文档中并没有找到,那就从源代码去找是如何定义契约。
在graphql-java-tools(4.0.0版本)中,可以找到一个FieldResolverScanner类,负责了FieldResolver的扫描,找到方法findResolverMethod:
private fun findResolverMethod(field: FieldDefinition, search: Search): java.lang.reflect.Method? {

    val methods = getAllMethods(search.type)
    val argumentCount = field.inputValueDefinitions.size + if(search.requiredFirstParameterType != null) 1 else 0
    val name = field.name

    val isBoolean = isBoolean(field.type)

    // Check for the following one by one:
    //   1. Method with exact field name
    //   2. Method that returns a boolean with "is" style getter
    //   3. Method with "get" style getter
    return methods.find {
        it.name == name && verifyMethodArguments(it, argumentCount, search)
    } ?: methods.find {
        (isBoolean && it.name == "is${name.capitalize()}") && verifyMethodArguments(it, argumentCount, search)
    } ?: methods.find {
        it.name == "get${name.capitalize()}" && verifyMethodArguments(it, argumentCount, search)
    }
}
复制代码
这就是定义以上契约的地方。


![[HBLOG]公众号](http://www.liuhaihua.cn/img/qrcode_gzh.jpg)

