LinkedHashMap源码解析
LinkedHashMap类是构建在HashMap的基础上的。HashMap是数组+链表+红黑树的复合数据结构。LinkedHashMap在HashMap的基础上添加了head和tail指针。这两个指针会将HashMap中的元素链接起来,组成一个链表。下面我们通过图片来看下LinkedHashMap的结构。
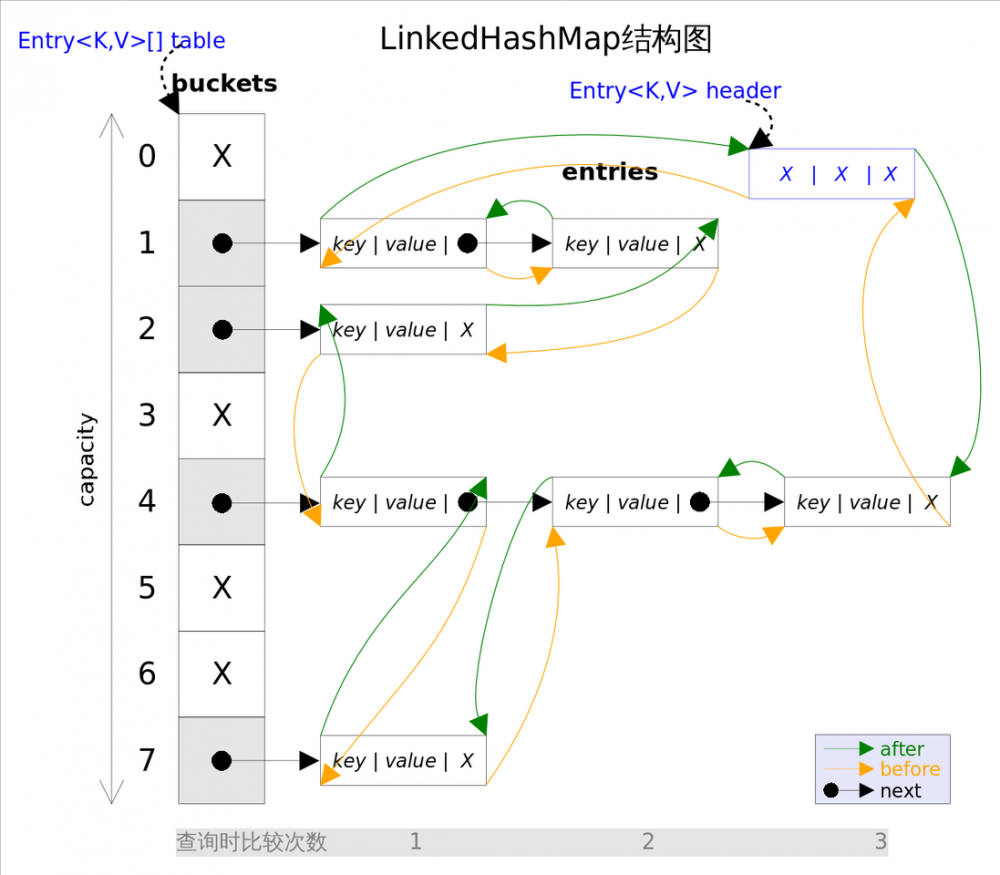
上面的图片我们看到了LinkedHashMap的结构。下面我们将链表单独拎出来,其结构如下:

LinkedHashMap类字段
/**
 * The head (eldest) of the doubly linked list.
 */
transient LinkedHashMapEntry<K,V> head;

/**
 * The tail (youngest) of the doubly linked list.
 */
transient LinkedHashMapEntry<K,V> tail;

/**
 * The iteration ordering method for this linked hash map: <tt>true</tt>
 * for access-order, <tt>false</tt> for insertion-order.
 *
 * @serial
 */
final boolean accessOrder;
复制代码
上面的head和tail字段是表示链表的头结点和尾节点的。accessOrder字段可以定制LinkedHashMap的插入顺序。这个后面我们分析源码的时候详细介绍。
LinkedHashMap的链表节点结构
上面介绍了LinkedHashMap很多特性,主要都是其链表的相关特性(其大部分特性还是继承HashMap的)。我们来看下LinkedHashMap的节点结构:
/**
 * HashMap.Node subclass for normal LinkedHashMap entries.
 */
static class LinkedHashMapEntry<K,V> extends HashMap.Node<K,V> {
    LinkedHashMapEntry<K,V> before, after;
    LinkedHashMapEntry(int hash, K key, V value, Node<K,V> next) {
        super(hash, key, value, next);
    }
}
复制代码
节点结构很清晰,只是添加了before和after节点,分别指向前后的两个节点。
LinkedHashMap构造器
/**
 * Constructs an empty insertion-ordered <tt>LinkedHashMap</tt> instance
 * with the specified initial capacity and load factor.
 *
 * @param  initialCapacity the initial capacity
 * @param  loadFactor      the load factor
 * @throws IllegalArgumentException if the initial capacity is negative
 *         or the load factor is nonpositive
 */
public LinkedHashMap(int initialCapacity, float loadFactor) {
    super(initialCapacity, loadFactor);
    accessOrder = false;
}

/**
 * Constructs an empty insertion-ordered <tt>LinkedHashMap</tt> instance
 * with the specified initial capacity and a default load factor (0.75).
 *
 * @param  initialCapacity the initial capacity
 * @throws IllegalArgumentException if the initial capacity is negative
 */
public LinkedHashMap(int initialCapacity) {
    super(initialCapacity);
    accessOrder = false;
}

/**
 * Constructs an empty insertion-ordered <tt>LinkedHashMap</tt> instance
 * with the default initial capacity (16) and load factor (0.75).
 */
public LinkedHashMap() {
    super();
    accessOrder = false;
}

/**
 * Constructs an insertion-ordered <tt>LinkedHashMap</tt> instance with
 * the same mappings as the specified map.  The <tt>LinkedHashMap</tt>
 * instance is created with a default load factor (0.75) and an initial
 * capacity sufficient to hold the mappings in the specified map.
 *
 * @param  m the map whose mappings are to be placed in this map
 * @throws NullPointerException if the specified map is null
 */
public LinkedHashMap(Map<? extends K, ? extends V> m) {
    super();
    accessOrder = false;
    putMapEntries(m, false);
}

/**
 * Constructs an empty <tt>LinkedHashMap</tt> instance with the
 * specified initial capacity, load factor and ordering mode.
 *
 * @param  initialCapacity the initial capacity
 * @param  loadFactor      the load factor
 * @param  accessOrder     the ordering mode - <tt>true</tt> for
 *         access-order, <tt>false</tt> for insertion-order
 * @throws IllegalArgumentException if the initial capacity is negative
 *         or the load factor is nonpositive
 */
public LinkedHashMap(int initialCapacity,
                     float loadFactor,
                     boolean accessOrder) {
    super(initialCapacity, loadFactor);
    this.accessOrder = accessOrder;
}
复制代码
- 绝大多数的构造函数都会先调用HashMap的构造函数,然后将accessOrder设置为false。LinkedHashMap默认的链表结构是插入顺序的。
- 我们当然可以设置accessOrder来修改LinkedHashMap的中链表的顺序。
LinkedHashMap相关操作方法
绝大多数方法都是使用的HashMap的,有些方法是经过LinkedHashMap复写的。下面我们来一一介绍这些方法。
LinkedHashMap的插入方法
我们介绍HashMap中的putVal的时候肯定看到如下代码:
afterNodeInsertion(evict);
复制代码
这个方法在HashMap中的实现是空的,LinkedHashMap复写了这个方法,我们来看源码:
void afterNodeInsertion(boolean evict) {
    // possibly remove eldest
    LinkedHashMapEntry<K,V> first;
    if (evict && (first = head) != null && removeEldestEntry(first)) {
        K key = first.key;
        removeNode(hash(key), key, null, false, true);
    }
}
复制代码
我们看到如果evict参数是true并且有头结点并且removeEldestEntry函数返回true的话就会删除头结点(这其实是LRU算法)。 细心的同学可能会问,上面不是说LinkedHashMap默认是实现是添加Node节点到链表尾部吗?没看见相关代码啊,只是看到了afterNodeInsertion方法。我们仔细的看源码会发现,如果需要插入节点的话肯定会调用newNode方法。我们来看HashMap中和LinkedHashMap中newNode的实现:
// Create a regular (non-tree) node
Node<K,V> newNode(int hash, K key, V value, Node<K,V> next) {
    return new Node<>(hash, key, value, next);
}

Node<K,V> newNode(int hash, K key, V value, Node<K,V> e) {
    LinkedHashMapEntry<K,V> p =
        new LinkedHashMapEntry<K,V>(hash, key, value, e);
    linkNodeLast(p);
    return p;
}
复制代码
我们看到在HashMap中newNode只是返回一个Node节点对象。在LinkedHashMap中会先构造一个LinkedHashMapEntry对象,然后调用linkNodeLast将其链接到链表的尾部。源码如下:
// link at the end of list
private void linkNodeLast(LinkedHashMapEntry<K,V> p) {
    LinkedHashMapEntry<K,V> last = tail;
    tail = p;
    if (last == null)
        head = p;
    else {
        p.before = last;
        last.after = p;
    }
}
复制代码
get方法
/**
 * Returns the value to which the specified key is mapped,
 * or {@code null} if this map contains no mapping for the key.
 *
 * <p>More formally, if this map contains a mapping from a key
 * {@code k} to a value {@code v} such that {@code (key==null ? k==null :
 * key.equals(k))}, then this method returns {@code v}; otherwise
 * it returns {@code null}.  (There can be at most one such mapping.)
 *
 * <p>A return value of {@code null} does not <i>necessarily</i>
 * indicate that the map contains no mapping for the key; it's also
 * possible that the map explicitly maps the key to {@code null}.
 * The {@link #containsKey containsKey} operation may be used to
 * distinguish these two cases.'
 */
public V get(Object key) {
    Node<K,V> e;
    if ((e = getNode(hash(key), key)) == null)
        return null;
    if (accessOrder)
        afterNodeAccess(e);
    return e.value;
}
复制代码
主要还是会调用getNode方法,其次会根据accessOrder参数决定是否调用afterNodeAccess方法。我们来看下其相关逻辑:
void afterNodeAccess(Node<K,V> e) { // move node to last
    LinkedHashMapEntry<K,V> last;
    if (accessOrder && (last = tail) != e) {
        LinkedHashMapEntry<K,V> p =
            (LinkedHashMapEntry<K,V>)e, b = p.before, a = p.after;
        p.after = null;
        if (b == null)
            head = a;
        else
            b.after = a;
        if (a != null)
            a.before = b;
        else
            last = b;
        if (last == null)
            head = p;
        else {
            p.before = last;
            last.after = p;
        }
        tail = p;
        ++modCount;
    }
}
复制代码
从源码中我们看到,如果accessOrder为true就会将原来位置的节点e删除,然后将其链接到链表的尾部。accessOrder参数设置为true,LinkedHashMap就会使用符合LRU的特性,将最新访问的节点移动到链表的尾部(注意:这个移动只是在链表中,元素实际的在HashMap的存储还是不变的)。
LinkedHashMap与LRU缓存
上面我们或多或少已经介绍了使用LinkedHashMap来实现LRU的相关内容。这一节我们详细介绍下如何使用LInkedHashMap来定制自己的LRU算法。
- 第一步就是将accessOrder设置为true。accessOrder设置为true,LinkedHashMap会将访问操作都是LRU的方式来进行。
- 需要覆盖removeEldestEntry方法。LinkedHashMap默认实现如下:
protected boolean removeEldestEntry(Map.Entry<K,V> eldest) {
    return false;
}
复制代码
我们可以根据需要定制相关逻辑。下面我们来看下一个简单的例子
class LRUCache<T> extends LinkedHashMap {

    public LRUCache() {
    	super(16, 0.75f, true);
    }

    @Override
    protected boolean removeEldestEntry(java.util.Map.Entry eldest) {
    	return size()>3;
    }
}
复制代码
在构造函数中我们设置accessOrder为true,让LinkedHashMap符合LRU的相关特性。同时我们复写removeEldestEntry方法。当Map中的元素超过3个时候将最早添加的元素移除。我们来些例子验证下:
LRUCache<String> lruCache=new LRUCache<>();

lruCache.put("1","A");
lruCache.put("2","B");
lruCache.put("3","C");

System.out.println(lruCache);

//插入第4个元素(默认会移除第一个元素A)
lruCache.put("4","D");

System.out.println(lruCache);

//访问元素,会将C移动到链表的尾部
lruCache.get("3");

System.out.println(lruCache);

//输出如下:
{1=A, 2=B, 3=C}
{2=B, 3=C, 4=D}
{2=B, 4=D, 3=C}
复制代码
总结
- LinkedHashMap与HashMap相比,额外添加了一条链表将所有节点连接起来。这个链表是双向的循环链表。
- accessOrder参数默认是false。LinkedHashMap使用插入排序机制。保持默认的插入顺序。如果将accessOrder设置为true。那么访问LinkedHashMap中的元素将导致最新访问的元素往链表尾部移动,符合LRU的访问特性。
- removeEldestEntry方法是删除最老的元素,通过复写该方法我们可以实现一个简单的支持LRU的类。
- LinkedHashMap的遍历性能要更加好些,因为其可以通过LinkedHashMap维护的链表进行遍历。
正文到此结束
热门推荐


相关文章


Loading...
![[HBLOG]公众号](http://www.liuhaihua.cn/img/qrcode_gzh.jpg)

