okhttp源码浅析
Android网络平台的三板斧基本被square公司承包了,Okhttp,Retrofit,Okio真可是三巨头。平时用的okhttp比较多,所以我们很有必要来看看它的实现原理。
2.使用
相信大家对okhttp的使用一点都不陌生了,我这里不会详细讲解它的使用,仅仅把官网上的搬下来看看,作为研究的入口:
OkHttpClient client = new OkHttpClient();

String run(String url) throws IOException {
  Request request = new Request.Builder()
      .url(url)
      .build();

  try (Response response = client.newCall(request).execute()) {
    return response.body().string();
  }
}

复制代码
这个是比较简单的Get请求
public static final MediaType JSON
    = MediaType.get("application/json; charset=utf-8");

OkHttpClient client = new OkHttpClient();

String post(String url, String json) throws IOException {
  RequestBody body = RequestBody.create(JSON, json);
  Request request = new Request.Builder()
      .url(url)
      .post(body)
      .build();
  try (Response response = client.newCall(request).execute()) {
    return response.body().string();
  }
}
复制代码
这个是Post请求
3.详细分析
3.1 OkHttpClient实例化
从上面的使用来看,不管是get还是post请求,都会先创建OkHttpClient实例,这个很容易理解,没有实例哪来的入口呢,观摩一下:
OkHttpClient client = new OkHttpClient();
复制代码
接着看看实例化了哪些东西
public OkHttpClient() {
    this(new Builder());
  }
复制代码
OkHttpClient(Builder builder) {
    this.dispatcher = builder.dispatcher;
    this.proxy = builder.proxy;
    this.protocols = builder.protocols;
    this.connectionSpecs = builder.connectionSpecs;
    this.interceptors = Util.immutableList(builder.interceptors);
    this.networkInterceptors = Util.immutableList(builder.networkInterceptors);
    this.eventListenerFactory = builder.eventListenerFactory;
    this.proxySelector = builder.proxySelector;
    this.cookieJar = builder.cookieJar;
    this.cache = builder.cache;
    this.internalCache = builder.internalCache;
    this.socketFactory = builder.socketFactory;
    ...
  }
复制代码
这是默认的实例化方式,builder里面也都是默认值,主要实例了代理,缓存,超时等等一些参数,这些系统都给我们设置了一些默认的值,比如超时是10s,读写也是10s等等。但是在实际情况中,我们往往去要自定义一些方式,比如,读写时间设置30s,增加一些拦截器等,这就需要另外一种实例化的方式了。
OkHttpClient okHttpClient = new OkHttpClient.Builder()
                    .addInterceptor(loggingInterceptor)
                    .connectTimeout(20 * 1000, TimeUnit.MILLISECONDS)
                    .readTimeout(30 * 1000, TimeUnit.MILLISECONDS)
                    /* 关闭OkHttp失败重试连接的机制,该问题导致发帖重复的问题 */
                    .retryOnConnectionFailure(false)
                    .addInterceptor(new EnhancedCacheInterceptor())
                    .addInterceptor(new SecurityInterceptor(mApplicationContext)) // 加密解密
                    .addNetworkInterceptor(new StethoInterceptor())
                    .dns(new dsn().build();
复制代码
看上去很清晰,采用的是建造者模式,我们设置自定义参数,然后通过build去实例化。这两种方式具体怎么用,选择哪一种那就看我们具体业务了。
3.2构建Request
接下来看看Request的封装
Request request = new Request.Builder()
      .url(url)
      .post(body)
      .build();
复制代码
同样的,不管什么请求方式,都要构建Request
final HttpUrl url;
  final String method;
  final Headers headers;
  final @Nullable RequestBody body;
  final Object tag;

  private volatile CacheControl cacheControl; // Lazily initialized.

  Request(Builder builder) {
    this.url = builder.url;
    this.method = builder.method;
    this.headers = builder.headers.build();
    this.body = builder.body;
    this.tag = builder.tag != null ? builder.tag : this;
  }
复制代码
可以看到request包含url,请求方法,header,以及body。这也就对应了http里面的请求头部,包含一些具体信息。它也是采用的建造者模式去构造的。平时我们用得比较多的是post请求,这里我们做个简要的分析:
RequestBody body = RequestBody.create(JSON, json);
...

  public Builder post(RequestBody body) {
      return method("POST", body);
    }
复制代码
首先我们构造RequestBody,body里面封装表单或者json,然后调用post方法:
if (method == null) throw new NullPointerException("method == null");
      if (method.length() == 0) throw new IllegalArgumentException("method.length() == 0");
      if (body != null && !HttpMethod.permitsRequestBody(method)) {
        throw new IllegalArgumentException("method " + method + " must not have a request body.");
      }
      if (body == null && HttpMethod.requiresRequestBody(method)) {
        throw new IllegalArgumentException("method " + method + " must have a request body.");
      }
      this.method = method;
      this.body = body;
      return this;
    }
复制代码
这里面很简单,分别对method,body做个校验,这两者都不能为空,也就是说,当采用post去发请求的时候body是不能为空的,这个错误有时候我们经常会遇到。然后赋值给request的变量存着备用。
3.3请求发送
ok,如果上面的都是准备工作,那么接下来就是正式发送请求了。还是直接看代码:
Response response = client.newCall(request).execute()
复制代码
这个是发送同步请求的,哇塞,一句话?是的,就是一句话解决了,看上去简直不可思议,我们看看源码newCall方法,很显然call是发送请求的核心:
@Override public Call newCall(Request request) {
    return RealCall.newRealCall(this, request, false /* for web socket */);
  }
复制代码
接着去RealCall类中去调用newRealCall方法:
private RealCall(OkHttpClient client, Request originalRequest, boolean forWebSocket) {
    this.client = client;
    this.originalRequest = originalRequest;
    this.forWebSocket = forWebSocket;
    this.retryAndFollowUpInterceptor = new RetryAndFollowUpInterceptor(client, forWebSocket);
  }
复制代码
构造函数把参数赋值,然后new了一个实例RetryAndFollowUpInterceptor,这个我们后面再来看。接着就是调用execut函数了:
@Override public Response execute() throws IOException {
    synchronized (this) {
      if (executed) throw new IllegalStateException("Already Executed");
      executed = true;
    }
    captureCallStackTrace();
    eventListener.callStart(this);
    try {
      client.dispatcher().executed(this);
      Response result = getResponseWithInterceptorChain();
      if (result == null) throw new IOException("Canceled");
      return result;
    } catch (IOException e) {
      eventListener.callFailed(this, e);
      throw e;
    } finally {
      client.dispatcher().finished(this);
    }
  }
复制代码
这里做了几件事:
- 1.检查当前call是否已经执行,如果已经执行过了就抛异常,每个call只执行一次。
- 2.调用dispatcher执行executed执行请求,dispatcher是异步请求的概念,同步也有涉及,这是做得事很少。
- 3.getResponseWithInterceptorChain获取请求,拦截器去拦截请求,做对应的处理之后返回结果。
- 4.关闭请求。 有些细节我们不必过多的在乎,真正发请求后回去结果的是getResponseWithInterceptorChain
Response getResponseWithInterceptorChain() throws IOException {
    // Build a full stack of interceptors.
    List<Interceptor> interceptors = new ArrayList<>();
    interceptors.addAll(client.interceptors());
    interceptors.add(retryAndFollowUpInterceptor);
    interceptors.add(new BridgeInterceptor(client.cookieJar()));
    interceptors.add(new CacheInterceptor(client.internalCache()));
    interceptors.add(new ConnectInterceptor(client));
    if (!forWebSocket) {
      interceptors.addAll(client.networkInterceptors());
    }
    interceptors.add(new CallServerInterceptor(forWebSocket));

    Interceptor.Chain chain = new RealInterceptorChain(interceptors, null, null, null, 0,
        originalRequest, this, eventListener, client.connectTimeoutMillis(),
        client.readTimeoutMillis(), client.writeTimeoutMillis());

    return chain.proceed(originalRequest);
  }
复制代码
这看上去有点儿陌生,里面增加了各种拦截器,然后调用了chain.proceed(originalRequest),感觉这才是大boss啊,官网里面有句话
the whole thing is just a stack of built-in interceptors.
复制代码
这句话很有含金量,也就是说okhttp所做的是就是拦截各种请求去解析,对拦截器一一做处理,纳闷了,为啥要拦截这么多?因为一个请求的发送到接收到返回数据,中间要做很多是事,比如失败重传,缓存,还有自定义的拦截器,比如对数据加密等等。
3.4分析拦截器
首先给出一张整体图:
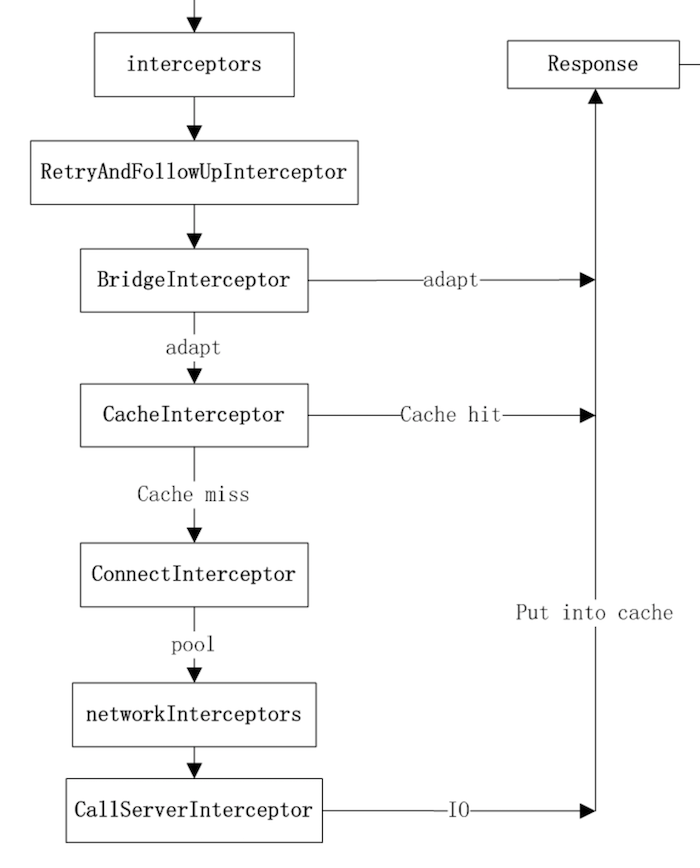
上一节中,实例化RealInterceptorChain 后调用了chain.proceed();最终会执行下面的代码
public Response proceed(Request request, StreamAllocation streamAllocation, HttpCodec httpCodec,
      RealConnection connection) throws IOException {
    if (index >= interceptors.size()) throw new AssertionError();

    calls++;

    // If we already have a stream, confirm that the incoming request will use it.
    if (this.httpCodec != null && !this.connection.supportsUrl(request.url())) {
      throw new IllegalStateException("network interceptor " + interceptors.get(index - 1)
          + " must retain the same host and port");
    }

    // If we already have a stream, confirm that this is the only call to chain.proceed().
    if (this.httpCodec != null && calls > 1) {
      throw new IllegalStateException("network interceptor " + interceptors.get(index - 1)
          + " must call proceed() exactly once");
    }

    // Call the next interceptor in the chain.
    RealInterceptorChain next = new RealInterceptorChain(interceptors, streamAllocation, httpCodec,
        connection, index + 1, request, call, eventListener, connectTimeout, readTimeout,
        writeTimeout);
    Interceptor interceptor = interceptors.get(index);
    Response response = interceptor.intercept(next);

    // Confirm that the next interceptor made its required call to chain.proceed().
    if (httpCodec != null && index + 1 < interceptors.size() && next.calls != 1) {
      throw new IllegalStateException("network interceptor " + interceptor
          + " must call proceed() exactly once");
    }

    // Confirm that the intercepted response isn't null.
    if (response == null) {
      throw new NullPointerException("interceptor " + interceptor + " returned null");
    }

    if (response.body() == null) {
      throw new IllegalStateException(
          "interceptor " + interceptor + " returned a response with no body");
    }

    return response;
  }
复制代码
这是核心中的核心,它采用了责任链模式,这种模式,是java设计模式中比较重要的一种,大家不懂的可以单独去查查,它的总体思想就是如果自己可以消费事件就消费,不消费就传递给下一个拦截器。
RealInterceptorChain next = new RealInterceptorChain(interceptors, streamAllocation, httpCodec,
        connection, index + 1, request, call, eventListener, connectTimeout, readTimeout,
        writeTimeout);
    Interceptor interceptor = interceptors.get(index);
    Response response = interceptor.intercept(next);
复制代码
可以看到这里的index进行了+1处理,然后开始启动下一个拦截器。很显然,这这些拦截器的执行是有顺序的。我们先看看这种拦截器的左右:
- RetryAndFollowUpInterceptor:负责失败重传和重定向。
- BridgeInterceptor
/**
 * Bridges from application code to network code. First it builds a network request from a user
 * request. Then it proceeds to call the network. Finally it builds a user response from the network
 * response.
 */
复制代码
它的意思是把用户的代码,也就是我们写的代码,转换为服务器标准的代码。解释:它会提取http请求所需要的一些参数,比如agent,heades,contenttype等,然后发送出去。响应的过程也是一样,把服务器的响应结果转换为我们需要的,比如把respones转换为我们需要的对象。实质就是按照http协议标准化格式。
- CacheInterceptor
/** Serves requests from the cache and writes responses to the cache. */
复制代码
这个主要是处理缓存的,我们发送请求和获取响应结果的时候,不能每次都去重新创建吧,那样效率太低,首先去从缓存中去取没,如果缓存中有现有的连接,我们直接发请求,不用重复创建。响应结果也是一样的。
- ConnectInterceptor
/** Opens a connection to the target server and proceeds to the next interceptor. */
复制代码
如果缓存没有命中,那么就去新建连接啦,这个用来新建连接的。
- CallServerInterceptor
/** This is the last interceptor in the chain. It makes a network call to the server. */
复制代码
这个是责任链模式的尾端,它最终会去通过网络请求服务器资源。
这里我来着重分析一下ConnectInterceptor,CallServerInterceptor这两种,因为这是最终建议连接和发送请求的过程,可以说是最重要的。
3.4.1 ConnectInterceptor
@Override public Response intercept(Chain chain) throws IOException {
    RealInterceptorChain realChain = (RealInterceptorChain) chain;
    Request request = realChain.request();
    StreamAllocation streamAllocation = realChain.streamAllocation();

    // We need the network to satisfy this request. Possibly for validating a conditional GET.
    boolean doExtensiveHealthChecks = !request.method().equals("GET");
    HttpCodec httpCodec = streamAllocation.newStream(client, chain, doExtensiveHealthChecks);
    RealConnection connection = streamAllocation.connection();

    return realChain.proceed(request, streamAllocation, httpCodec, connection);
  }
复制代码
这个过程创建了HttpCodec,但是它并没有在这个拦截器中去使用,而是传递到后面发动请求的拦截器中去了也即是CallServerInterceptor。HttpCodec到底是什么,它是对HTTP协议做了抽象处理,在 Http1Codec 中,它利用 Okio 对 Socket 的读写操作进行封装,Okio 以后有机会再进行分析,现在让我们对它们保持一个简单地认识:它对 java.io 和 java.nio 进行了封装,让我们更便捷高效的进行 IO 操作。
3.4.2 CallServerInterceptor
@Override public Response intercept(Chain chain) throws IOException {
  HttpCodec httpCodec = ((RealInterceptorChain) chain).httpStream();
  StreamAllocation streamAllocation = ((RealInterceptorChain) chain).streamAllocation();
  Request request = chain.request();

  long sentRequestMillis = System.currentTimeMillis();
  httpCodec.writeRequestHeaders(request);

  if (HttpMethod.permitsRequestBody(request.method()) && request.body() != null) {
    Sink requestBodyOut = httpCodec.createRequestBody(request, request.body().contentLength());
    BufferedSink bufferedRequestBody = Okio.buffer(requestBodyOut);
    request.body().writeTo(bufferedRequestBody);
    bufferedRequestBody.close();
  }

  httpCodec.finishRequest();

  Response response = httpCodec.readResponseHeaders()
      .request(request)
      .handshake(streamAllocation.connection().handshake())
      .sentRequestAtMillis(sentRequestMillis)
      .receivedResponseAtMillis(System.currentTimeMillis())
      .build();

  if (!forWebSocket || response.code() != 101) {
    response = response.newBuilder()
        .body(httpCodec.openResponseBody(response))
        .build();
  }

  if ("close".equalsIgnoreCase(response.request().header("Connection"))
      || "close".equalsIgnoreCase(response.header("Connection"))) {
    streamAllocation.noNewStreams();
  }

  // 省略部分检查代码

  return response;
}
复制代码
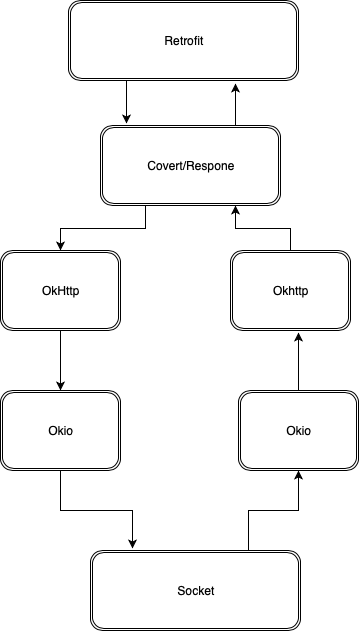
这个里面代码比较长,我们只保留核心分心,上面不是传递了HttpCodec了嘛,这里就利用起来了,它是利用okio进行发送请求,这里okio不是我们分析的重点,读者可以单独找文章去看看。 总之:Okhttp发送请求是通过okio去做的,okio实质上就是对socket进行了封装,一层套一层而已,这就是神秘的面纱后面的简单。 这里做了几件事:
- 1.发送header
- 2.发送body,如果有
- 3.获取响应数据
- 4.close连接 这里给出一张整体总结图:
4.总结
我们对okhttp做了个整体介绍,当然里面有很多细节没有解释,也不想去解释,读者有需要自己去研究。这里我总结一下:
4.1 设计模式
OKhttp中使用的设计模式:建造者模式和责任链模式;
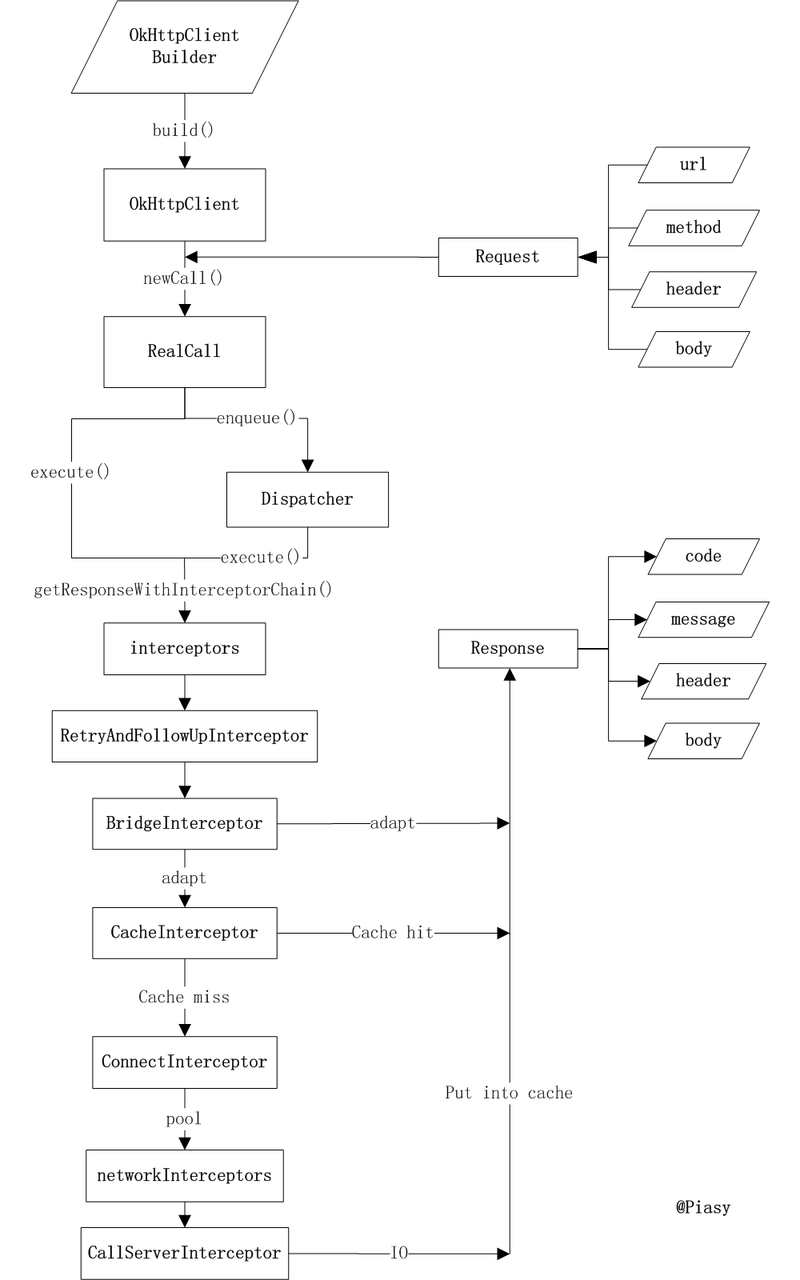
4.2 总体执行流程
- OkHttpClient 实现 Call.Factory,负责为 Request 创建 Call;
- RealCall 为具体的 Call 实现,其 enqueue() 异步接口通过 Dispatcher 利用 ExecutorService 实现,而最终进行网络请求时和同步 execute() 接口一致,都是通过 getResponseWithInterceptorChain() 函数实现;
- getResponseWithInterceptorChain() 中利用 Interceptor 链条,分层实现缓存、透明压缩、网络 IO 等功能;
最后上一张图片,这个是从其他读者文章弄过来的,很用心,我就直接使用了;
正文到此结束
- 本文标签: Full Stack json 详细分析 Logging IO Agent 协议 cat 时间 实例 Connection 文章 NIO 缓存 服务器 tar 代码 Select 同步 ACE 图片 Proxy web FIT 解析 总结 http executor synchronized java DNS IDE Android final ECS cache equals tag rmi js 数据 App volatile src Service ArrayList 加密 https UI CTO 参数 client Security id stream tab 设计模式 list build queue HTTP协议 retry 源码 map
- 版权声明: 本文为互联网转载文章,出处已在文章中说明(部分除外)。如果侵权,请联系本站长删除,谢谢。
- 本文海报: 生成海报一 生成海报二
热门推荐


相关文章


Loading...
![[HBLOG]公众号](http://www.liuhaihua.cn/img/qrcode_gzh.jpg)

