Spring IOC 源码解析
注意,看完这篇文章需要很长很长很长时间。。。
准备工作
本文会分析Spring的IOC模块的整体流程,分析过程需要使用一个简单的demo工程来启动Spring,demo工程我以备好,需要的童鞋自行在下方链接下载:
https://github.com/shiyujun/spring-framework
Demo工程示例代码
本文源码分析基于Spring5.0.0,所以pom文件中引入5.0的依赖
<dependencies>
<dependency>
<groupId>org.springframework</groupId>
<artifactId>spring-context</artifactId>
<version>5.0.0.RELEASE</version>
</dependency>
</dependencies>
然后写一个简单的接口和实现类
public interface IOCService {
public String hollo();
}
public class IOCServiceImpl implements IOCService {
public String hollo() {
return "Hello,IOC";
}
}
新建一个application-ioc.xml
<?xml version="1.0" encoding="UTF-8" ?>
<beans xmlns:xsi="http://www.w3.org/2001/XMLSchema-instance"
xmlns="http://www.springframework.org/schema/beans"
xsi:schemaLocation="http://www.springframework.org/schema/beans http://www.springframework.org/schema/beans/spring-beans.xsd" default-autowire="byName">
<bean id="iocservice" class="cn.shiyujun.service.impl.IOCServiceImpl"/>
</beans>
启动Spring
public class IOCDemo {
public static void main (String args[]){
ApplicationContext context = new ClassPathXmlApplicationContext("classpath:application-ioc.xml");
IOCService iocService=context.getBean(IOCService.class);
System.out.println(iocService.hollo());
}
}
上方一个简单的demo工程相信各位童鞋在刚刚学习Spring的时候就已经的特别6了。我就不详细的说明了,直接开始看源码吧
ClassPathXmlApplicationContext
背景调查
在文章开始的demo工程中,我选择使用了一个xml文件来配置了接口和实现类之间的关系,然后使用了ClassPathXmlApplicationContext这个类来加载这个配置文件。现在我们就先来看一下这个类到底是个什么东东
首先看一下继承关系图(只保留了跟本文相关的,省略了很多其他的继承关系)
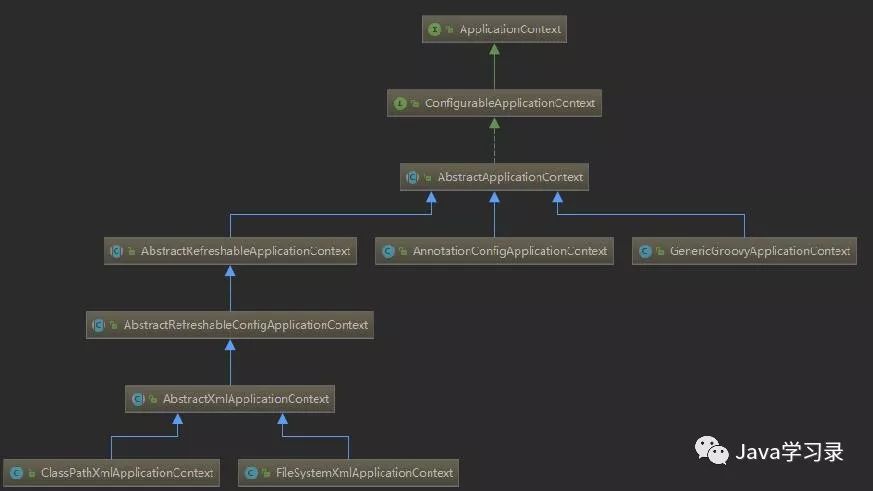
可以看到左下角的就是我们今天的主角ClassPathXmlApplicationContext、然后它的旁边是一个同门师兄弟FileSystemXmlApplicationContext。看名字就可以知道它们哥俩都是通过加载配置文件来启动Spring的,只不过一个是从程序内加载一个是从系统内加载。
除了这两个还有一个类AnnotationConfigApplicationContext比较值得
我们关注,这个类是用来处理注解式编程的。
而最上边的ApplicationContext则是大名鼎鼎的Spring核心上下文了
源码分析

看一下这个类的源代码
public class ClassPathXmlApplicationContext extends AbstractXmlApplicationContext {
//配置文件数组
private Resource[] configResources;
// 指定ApplicationContext的父容器
public ClassPathXmlApplicationContext(ApplicationContext parent) {
super(parent);
}
public ClassPathXmlApplicationContext(String[] configLocations, boolean refresh, ApplicationContext parent)
throws BeansException {
super(parent);
// 根据提供的路径,处理成配置文件数组(以分号、逗号、空格、tab、换行符分割)
setConfigLocations(configLocations);
if (refresh) {
refresh();
}
}
}
可以看到整体来看源码比较简单,只有setConfigLocations和refresh两个方法没有看到具体的实现。但是如果你因为这个而小巧了Spring那可就大错特错了,setConfigLocations只是一个开胃小菜,refresh才是我们本文的重点
setConfigLocations
setConfigLocations方法的主要工作有两个:创建环境对象ConfigurableEnvironment和处理ClassPathXmlApplicationContext传入的字符串中的占位符
跟着setConfigLocations方法一直往下走
public void setConfigLocations(String... locations) {
if (locations != null) {
Assert.noNullElements(locations, "Config locations must not be null");
this.configLocations = new String[locations.length];
for (int i = 0; i < locations.length; i++) {
//往下看
this.configLocations[i] = resolvePath(locations[i]).trim();
}
}
else {
this.configLocations = null;
}
}
protected String resolvePath(String path) {
return getEnironment().resolveRequiredPlaceholders(path);
}
这里getEnironment()就涉及到了创建环境变量相关的操作了
获取环境变量
public ConfigurableEnvironment getEnvironment() {
if (this.environment == null) {
this.environment = createEnvironment();
}
return this.environment;
}
看一下ConfigurableEnvironment这个接口的继承图(1张没能截全,两张一块看)
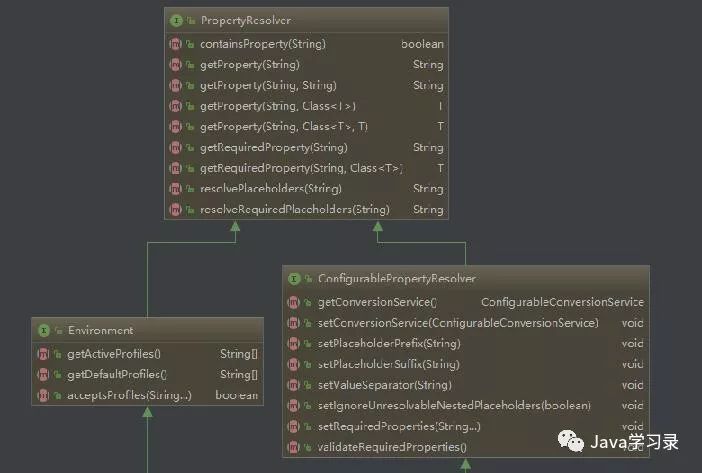
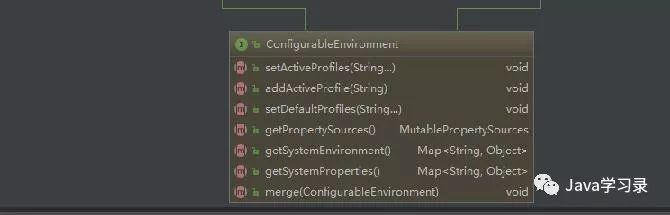
这个接口比较重要的就是两部分内容了,一个是设置Spring的环境就是我们经常用的spring.profile配置。另外就是系统资源Property
接着看`createEnvironment()`方法,发现它返回了一个`StandardEnvironment`类,而这个类中的`customizePropertySources`方法就会往资源列表中添加Java进程中的变量和系统的环境变量
protected void customizePropertySources(MutablePropertySources propertySources) {
propertySources.addLast(new MapPropertySource(SYSTEM_PROPERTIES_PROPERTY_SOURCE_NAME, getSystemProperties()));
propertySources.addLast(new SystemEnvironmentPropertySource(SYSTEM_ENVIRONMENT_PROPERTY_SOURCE_NAME, getSystemEnvironment()));
}
处理占位符
再次回到 `resolvePath`方法后跟进通过上方获取的`ConfigurableEnvironment`接口的`resolveRequiredPlaceholders`方法,终点就是下方的这个方法。这个方法主要就是处理所有使用${}方式的占位符
protected String parseStringValue(
String value, PlaceholderResolver placeholderResolver, Set<String> visitedPlaceholders) {
StringBuilder result = new StringBuilder(value);
int startIndex = value.indexOf(this.placeholderPrefix);
while (startIndex != -1) {
int endIndex = findPlaceholderEndIndex(result, startIndex);
if (endIndex != -1) {
String placeholder = result.substring(startIndex + this.placeholderPrefix.length(), endIndex);
String originalPlaceholder = placeholder;
if (!visitedPlaceholders.add(originalPlaceholder)) {
throw new IllegalArgumentException(
"Circular placeholder reference '" + originalPlaceholder + "' in property definitions");
}
placeholder = parseStringValue(placeholder, placeholderResolver, visitedPlaceholders);
// Now obtain the value for the fully resolved key...
String propVal = placeholderResolver.resolvePlaceholder(placeholder);
if (propVal == null && this.valueSeparator != null) {
int separatorIndex = placeholder.indexOf(this.valueSeparator);
if (separatorIndex != -1) {
String actualPlaceholder = placeholder.substring(0, separatorIndex);
String defaultValue = placeholder.substring(separatorIndex + this.valueSeparator.length());
propVal = placeholderResolver.resolvePlaceholder(actualPlaceholder);
if (propVal == null) {
propVal = defaultValue;
}
}
}
if (propVal != null) {
// Recursive invocation, parsing placeholders contained in the
// previously resolved placeholder value.
propVal = parseStringValue(propVal, placeholderResolver, visitedPlaceholders);
result.replace(startIndex, endIndex + this.placeholderSuffix.length(), propVal);
if (logger.isTraceEnabled()) {
logger.trace("Resolved placeholder '" + placeholder + "'");
}
startIndex = result.indexOf(this.placeholderPrefix, startIndex + propVal.length());
}
else if (this.ignoreUnresolvablePlaceholders) {
// Proceed with unprocessed value.
startIndex = result.indexOf(this.placeholderPrefix, endIndex + this.placeholderSuffix.length());
}
else {
throw new IllegalArgumentException("Could not resolve placeholder '" +
placeholder + "'" + " in value /"" + value + "/"");
}
visitedPlaceholders.remove(originalPlaceholder);
}
else {
startIndex = -1;
}
}
return result.toString();
}
refresh
配置文件名称解析完毕后,就到了最关键的一步refresh方法。这个方法,
接下来会用超级长的篇幅来解析这个方法
先看一下这个方法里大致内容
public void refresh() throws BeansException, IllegalStateException {
synchronized (this.startupShutdownMonitor) {
// Prepare this context for refreshing.
prepareRefresh();
// Tell the subclass to refresh the internal bean factory.
ConfigurableListableBeanFactory beanFactory = obtainFreshBeanFactory();
// Prepare the bean factory for use in this context.
prepareBeanFactory(beanFactory);
try {
// Allows post-processing of the bean factory in context subclasses.
postProcessBeanFactory(beanFactory);
// Invoke factory processors registered as beans in the context.
invokeBeanFactoryPostProcessors(beanFactory);
// Register bean processors that intercept bean creation.
registerBeanPostProcessors(beanFactory);
// Initialize message source for this context.
initMessageSource();
// Initialize event multicaster for this context.
initApplicationEventMulticaster();
// Initialize other special beans in specific context subclasses.
onRefresh();
// Check for listener beans and register them.
registerListeners();
// Instantiate all remaining (non-lazy-init) singletons.
finishBeanFactoryInitialization(beanFactory);
// Last step: publish corresponding event.
finishRefresh();
}
catch (BeansException ex) {
if (logger.isWarnEnabled()) {
logger.warn("Exception encountered during context initialization - " +
"cancelling refresh attempt: " + ex);
}
// Destroy already created singletons to avoid dangling resources.
destroyBeans();
// Reset 'active' flag.
cancelRefresh(ex);
// Propagate exception to caller.
throw ex;
}
finally {
// Reset common introspection caches in Spring's core, since we
// might not ever need metadata for singleton beans anymore...
resetCommonCaches();
}
}
}
是不是看着有点懵,不要着急,一行一行往下看,不研究明白誓不罢休

1. `synchronized`
为了避免`refresh()` 还没结束,再次发起启动或者销毁容器引起的冲突
2. `prepareRefresh()`
做一些准备工作,记录容器的启动时间、标记“已启动”状态、检查环境变量等
protected void prepareRefresh() {
this.startupDate = System.currentTimeMillis();
this.closed.set(false);
this.active.set(true);
if (logger.isInfoEnabled()) {
logger.info("Refreshing " + this);
}
// 初始化加载配置文件方法,并没有具体实现,一个留给用户的扩展点
initPropertySources();
// 检查环境变量
getEnvironment().validateRequiredProperties();
this.earlyApplicationEvents = new LinkedHashSet<>();
}
其中检查环境变量的核心方法为,简单来说就是如果存在环境变量的value
为空的时候就抛异常,然后停止启动Spring
public void validateRequiredProperties() {
MissingRequiredPropertiesException ex = new MissingRequiredPropertiesException();
for (String key : this.requiredProperties) {
if (this.getProperty(key) == null) {
ex.addMissingRequiredProperty(key);
}
}
if (!ex.getMissingRequiredProperties().isEmpty()) {
throw ex;
}
}
基于这个特性我们可以做一些扩展,提前在集合`requiredProperties`中
放入我们这个项目必须存在的一些环境变量。假说我们的生产环境数据库地址、用户名和密码都是使用环境变量的方式注入进去来代替测试环境的配置,那么就可以在这里添加这个校验,在程序刚启动的时候就能发现问题
3. `obtainFreshBeanFactory()`
乍一看这个方法也没几行代码,但是这个方法负责了BeanFactory的初始化、Bean的加载和注册等事件
protected ConfigurableListableBeanFactory obtainFreshBeanFactory() {
// 核心
refreshBeanFactory();
// 返回刚刚创建的 BeanFactory
ConfigurableListableBeanFactory beanFactory = getBeanFactory();
if (logger.isDebugEnabled()) {
logger.debug("Bean factory for " + getDisplayName() + ": " + beanFactory);
}
return beanFactory;
}
BeanFactory

先看`refreshBeanFactory()`
protected final void refreshBeanFactory() throws BeansException {
// 判断当前ApplicationContext是否存在BeanFactory,如果存在的话就销毁所有 Bean,关闭 BeanFactory
// 注意,一个应用可以存在多个BeanFactory,这里判断的是当前ApplicationContext是否存在BeanFactory
if (hasBeanFactory()) {
destroyBeans();
closeBeanFactory();
}
try {
// 初始化DefaultListableBeanFactory
DefaultListableBeanFactory beanFactory = createBeanFactory();
beanFactory.setSerializationId(getId());
// 设置 BeanFactory 的两个配置属性:是否允许 Bean 覆盖、是否允许循环引用
customizeBeanFactory(beanFactory);
// 加载 Bean 到 BeanFactory 中
loadBeanDefinitions(beanFactory);
synchronized (this.beanFactoryMonitor) {
this.beanFactory = beanFactory;
}
}
catch (IOException ex) {
throw new ApplicationContextException("I/O error parsing bean definition source for " + getDisplayName(), ex);
}
}
这里一开始就实例化了一个DefaultListableBeanFactory,先看一下这个类的继承关系
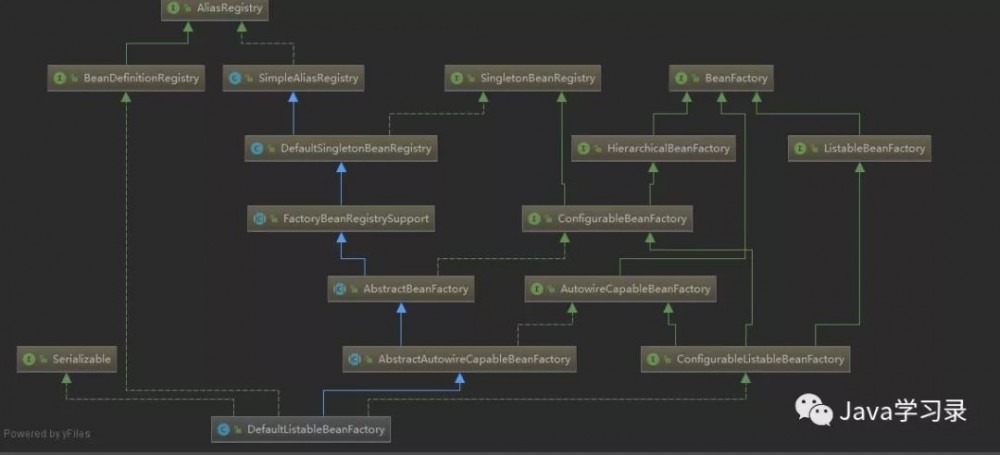
可以看到这个哥们的背景相当大,所有关于容器的接口、抽象类他都继承了
。再看他的方法


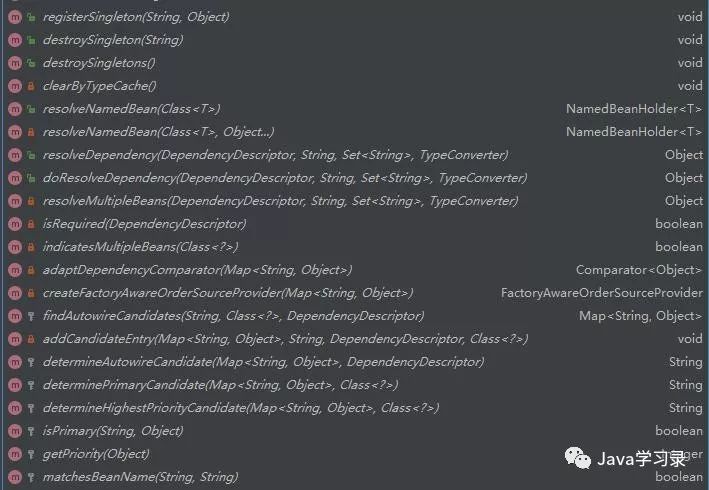

这方法简直多的吓人,妥妥的Spring家族超级富二代。看他的方法名称相信就可以猜出他大部分的功能了
BeanDefinition
在看`loadBeanDefinitions()`这个方法之前,就必须了解一个东西了。那就是:BeanDefinition
我们知道BeanFactory是一个Bean容器,而BeanDefinition就是Bean的一
种形式(它里面包含了Bean指向的类、是否单例、是否懒加载、Bean的依赖关系等相关的属性)。BeanFactory中就是保存的BeanDefinition。
看BeanDefinition的接口定义
public interface BeanDefinition extends AttributeAccessor, BeanMetadataElement {
// Bean的生命周期,默认只提供sington和prototype两种,在WebApplicationContext中还会有request, session, globalSession, application, websocket 等
String SCOPE_SINGLETON = ConfigurableBeanFactory.SCOPE_SINGLETON;
String SCOPE_PROTOTYPE = ConfigurableBeanFactory.SCOPE_PROTOTYPE;
// 设置父Bean
void setParentName(String parentName);
// 获取父Bean
String getParentName();
// 设置Bean的类名称
void setBeanClassName(String beanClassName);
// 获取Bean的类名称
String getBeanClassName();
// 设置bean的scope
void setScope(String scope);
String getScope();
// 设置是否懒加载
void setLazyInit(boolean lazyInit);
boolean isLazyInit();
// 设置该Bean依赖的所有Bean
void setDependsOn(String... dependsOn);
// 返回该Bean的所有依赖
String[] getDependsOn();
// 设置该Bean是否可以注入到其他Bean中
void setAutowireCandidate(boolean autowireCandidate);
// 该Bean是否可以注入到其他Bean中
boolean isAutowireCandidate();
// 同一接口的多个实现,如果不指定名字的话,Spring会优先选择设置primary为true的bean
void setPrimary(boolean primary);
// 是否是primary的
boolean isPrimary();
// 指定工厂名称
void setFactoryBeanName(String factoryBeanName);
// 获取工厂名称
String getFactoryBeanName();
// 指定工厂类中的工厂方法名称
void setFactoryMethodName(String factoryMethodName);
// 获取工厂类中的工厂方法名称
String getFactoryMethodName();
// 构造器参数
ConstructorArgumentValues getConstructorArgumentValues();
// Bean 中的属性值,后面给 bean 注入属性值的时候会说到
MutablePropertyValues getPropertyValues();
// 是否 singleton
boolean isSingleton();
// 是否 prototype
boolean isPrototype();
// 如果这个 Bean 是被设置为 abstract,那么不能实例化,常用于作为 父bean 用于继承
boolean isAbstract();
int getRole();
String getDescription();
String getResourceDescription();
BeanDefinition getOriginatingBeanDefinition();
}
读取配置文件
现在可以看`loadBeanDefinitions()`方法了,这个方法会根据配置,加载各个 Bean,然后放到 BeanFactory 中
@Override
protected void loadBeanDefinitions(DefaultListableBeanFactory beanFactory) throws BeansException, IOException {
// 实例化XmlBeanDefinitionReader
XmlBeanDefinitionReader beanDefinitionReader = new XmlBeanDefinitionReader(beanFactory);
beanDefinitionReader.setEnvironment(this.getEnvironment());
beanDefinitionReader.setResourceLoader(this);
beanDefinitionReader.setEntityResolver(new ResourceEntityResolver(this));
// 初始化 BeanDefinitionReader
initBeanDefinitionReader(beanDefinitionReader);
// 接着往下看
loadBeanDefinitions(beanDefinitionReader);
}
protected void loadBeanDefinitions(XmlBeanDefinitionReader reader) throws BeansException, IOException {
Resource[] configResources = getConfigResources();
if (configResources != null) {
reader.loadBeanDefinitions(configResources);
}
String[] configLocations = getConfigLocations();
if (configLocations != null) {
reader.loadBeanDefinitions(configLocations);
}
}
第一个if是看有没有系统指定的配置文件,如果没有的话就走第二个if加载我们最开始传入的`classpath:application-ioc.xml`
public int loadBeanDefinitions(Resource... resources) throws BeanDefinitionStoreException {
Assert.notNull(resources, "Resource array must not be null");
int counter = 0;
// 循环,处理所有配置文件,咱们这里就传了一个
for (Resource resource : resources) {
// 继续往下看
counter += loadBeanDefinitions(resource);
}
// 最后返回加载的所有BeanDefinition的数量
return counter;
}
@Override
public int loadBeanDefinitions(String location) throws BeanDefinitionStoreException {
return loadBeanDefinitions(location, null);
}
public int loadBeanDefinitions(String location, @Nullable Set<Resource> actualResources) throws BeanDefinitionStoreException {
ResourceLoader resourceLoader = getResourceLoader();
if (resourceLoader == null) {
throw new BeanDefinitionStoreException(
"Cannot import bean definitions from location [" + location + "]: no ResourceLoader available");
}
if (resourceLoader instanceof ResourcePatternResolver) {
try {
//将配置文件转换为Resource对象
Resource[] resources = ((ResourcePatternResolver) resourceLoader).getResources(location);
//接着往下看
int loadCount = loadBeanDefinitions(resources);
if (actualResources != null) {
for (Resource resource : resources) {
actualResources.add(resource);
}
}
if (logger.isDebugEnabled()) {
logger.debug("Loaded " + loadCount + " bean definitions from location pattern [" + location + "]");
}
return loadCount;
}
catch (IOException ex) {
throw new BeanDefinitionStoreException(
"Could not resolve bean definition resource pattern [" + location + "]", ex);
}
}
else {
// Can only load single resources by absolute URL.
Resource resource = resourceLoader.getResource(location);
int loadCount = loadBeanDefinitions(resource);
if (actualResources != null) {
actualResources.add(resource);
}
if (logger.isDebugEnabled()) {
logger.debug("Loaded " + loadCount + " bean definitions from location [" + location + "]");
}
return loadCount;
}
}
离解析越来越近了
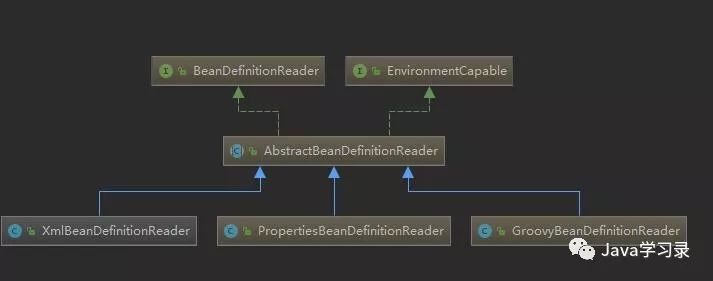
这里先小小的看一下Spring中的设计模式,我们跟着`loadBeanDefinitions()`方法往下走,最终会进入类XmlBeanDefinitionReader,这是因为我们这里要解析的配置文件是XML。如果我们使用Java类配置或者是Groovy的话就是另外的类了。看一下这个类继承图:
接着看
public int loadBeanDefinitions(EncodedResource encodedResource) throws BeanDefinitionStoreException {
Assert.notNull(encodedResource, "EncodedResource must not be null");
if (logger.isInfoEnabled()) {
logger.info("Loading XML bean definitions from " + encodedResource.getResource());
}
Set<EncodedResource> currentResources = this.resourcesCurrentlyBeingLoaded.get();
if (currentResources == null) {
currentResources = new HashSet<>(4);
this.resourcesCurrentlyBeingLoaded.set(currentResources);
}
if (!currentResources.add(encodedResource)) {
throw new BeanDefinitionStoreException(
"Detected cyclic loading of " + encodedResource + " - check your import definitions!");
}
try {
//获取文件流
InputStream inputStream = encodedResource.getResource().getInputStream();
try {
InputSource inputSource = new InputSource(inputStream);
if (encodedResource.getEncoding() != null) {
inputSource.setEncoding(encodedResource.getEncoding());
}
//加载
return doLoadBeanDefinitions(inputSource, encodedResource.getResource());
}
finally {
inputStream.close();
}
}
catch (IOException ex) {
throw new BeanDefinitionStoreException(
"IOException parsing XML document from " + encodedResource.getResource(), ex);
}
finally {
currentResources.remove(encodedResource);
if (currentResources.isEmpty()) {
this.resourcesCurrentlyBeingLoaded.remove();
}
}
}
下面是分为两步
protected int doLoadBeanDefinitions(InputSource inputSource, Resource resource)
throws BeanDefinitionStoreException {
try {
//将 xml 文件转换为 Document 对象
Document doc = doLoadDocument(inputSource, resource);
//根据Document对象注册Bean
return registerBeanDefinitions(doc, resource);
}
catch (BeanDefinitionStoreException ex) {
throw ex;
}
catch (SAXParseException ex) {
throw new XmlBeanDefinitionStoreException(resource.getDescription(),
"Line " + ex.getLineNumber() + " in XML document from " + resource + " is invalid", ex);
}
catch (SAXException ex) {
throw new XmlBeanDefinitionStoreException(resource.getDescription(),
"XML document from " + resource + " is invalid", ex);
}
catch (ParserConfigurationException ex) {
throw new BeanDefinitionStoreException(resource.getDescription(),
"Parser configuration exception parsing XML from " + resource, ex);
}
catch (IOException ex) {
throw new BeanDefinitionStoreException(resource.getDescription(),
"IOException parsing XML document from " + resource, ex);
}
catch (Throwable ex) {
throw new BeanDefinitionStoreException(resource.getDescription(),
"Unexpected exception parsing XML document from " + resource, ex);
}
}
文件转换就不详细展开了,接着往下看
注册Bean
public int registerBeanDefinitions(Document doc, Resource resource) throws BeanDefinitionStoreException {
//构建读取Document的工具类
BeanDefinitionDocumentReader documentReader = createBeanDefinitionDocumentReader();
//获取已注册的bean数量
int countBefore = getRegistry().getBeanDefinitionCount();
// 在这接着往下看
documentReader.registerBeanDefinitions(doc, createReaderContext(resource));
//总注册的bean减去之前注册的bean就是本次注册的bean
return getRegistry().getBeanDefinitionCount() - countBefore;
}
@Override
public void registerBeanDefinitions(Document doc, XmlReaderContext readerContext) {
this.readerContext = readerContext;
logger.debug("Loading bean definitions");
//获取Document的根节点
Element root = doc.getDocumentElement();
//继续往下
doRegisterBeanDefinitions(root);
}
protected void doRegisterBeanDefinitions(Element root) {
// 当前根节点
BeanDefinitionParserDelegate parent = this.delegate;
this.delegate = createDelegate(getReaderContext(), root, parent);
if (this.delegate.isDefaultNamespace(root)) {
// 获取 <beans ... profile="***" /> 中的 profile参数与当前环境是否匹配,如果不匹配则不再进行解析
String profileSpec = root.getAttribute(PROFILE_ATTRIBUTE);
if (StringUtils.hasText(profileSpec)) {
String[] specifiedProfiles = StringUtils.tokenizeToStringArray(
profileSpec, BeanDefinitionParserDelegate.MULTI_VALUE_ATTRIBUTE_DELIMITERS);
if (!getReaderContext().getEnvironment().acceptsProfiles(specifiedProfiles)) {
if (logger.isInfoEnabled()) {
logger.info("Skipped XML bean definition file due to specified profiles [" + profileSpec +
"] not matching: " + getReaderContext().getResource());
}
return;
}
}
}
// 前置扩展点
preProcessXml(root);
// 往下看
parseBeanDefinitions(root, this.delegate);
// 后置扩展点
postProcessXml(root);
this.delegate = parent;
}
改变bean定义的扩展点
preProcessXml和postProcessXml着两个办法是留给我们实现DefaultBeanDefinitionDocumentReader方法后自定义实现的
解析XML

接下来,看核心解析方法 `parseBeanDefinitions()`
protected void parseBeanDefinitions(Element root, BeanDefinitionParserDelegate delegate) {
// default namespace 涉及到的就四个标签 <import />、<alias />、<bean /> 和 <beans />
if (delegate.isDefaultNamespace(root)) {
NodeList nl = root.getChildNodes();
for (int i = 0; i < nl.getLength(); i++) {
Node node = nl.item(i);
if (node instanceof Element) {
Element ele = (Element) node;
if (delegate.isDefaultNamespace(ele)) {
// 解析 default namespace 下面的几个元素
parseDefaultElement(ele, delegate);
}
else {
// 解析其他 namespace 的元素
delegate.parseCustomElement(ele);
}
}
}
}
else {
// 解析其他 namespace 的元素
delegate.parseCustomElement(root);
}
}
接着往下看这些标签的处理方式
default标签处理
private void parseDefaultElement(Element ele, BeanDefinitionParserDelegate delegate) {
if (delegate.nodeNameEquals(ele, IMPORT_ELEMENT)) {
// 处理 <import /> 标签
importBeanDefinitionResource(ele);
}
else if (delegate.nodeNameEquals(ele, ALIAS_ELEMENT)) {
// 处理 <alias /> 标签
// <alias name="fromName" alias="toName"/>
processAliasRegistration(ele);
}
else if (delegate.nodeNameEquals(ele, BEAN_ELEMENT)) {
// 处理 <bean /> 标签定义
processBeanDefinition(ele, delegate);
}
else if (delegate.nodeNameEquals(ele, NESTED_BEANS_ELEMENT)) {
// 处理 <beans /> 标签
doRegisterBeanDefinitions(ele);
}
}
简单看一下<bean /> 标签的处理方式
protected void processBeanDefinition(Element ele, BeanDefinitionParserDelegate delegate) {
//创建BeanDefinition
BeanDefinitionHolder bdHolder = delegate.parseBeanDefinitionElement(ele);
if (bdHolder != null) {
bdHolder = delegate.decorateBeanDefinitionIfRequired(ele, bdHolder);
try {
// Register the final decorated instance.
BeanDefinitionReaderUtils.registerBeanDefinition(bdHolder, getReaderContext().getRegistry());
}
catch (BeanDefinitionStoreException ex) {
getReaderContext().error("Failed to register bean definition with name '" +
bdHolder.getBeanName() + "'", ele, ex);
}
// Send registration event.
getReaderContext().fireComponentRegistered(new BeanComponentDefinition(bdHolder));
}
}
先从第一行往下看
public BeanDefinitionHolder parseBeanDefinitionElement(Element ele) {
return parseBeanDefinitionElement(ele, null);
}
public BeanDefinitionHolder parseBeanDefinitionElement(Element ele, BeanDefinition containingBean) {
String id = ele.getAttribute(ID_ATTRIBUTE);
String nameAttr = ele.getAttribute(NAME_ATTRIBUTE);
List<String> aliases = new ArrayList<String>();
// 将 name 属性的定义按照 “逗号、分号、空格” 切分,形成一个 别名列表数组,
if (StringUtils.hasLength(nameAttr)) {
String[] nameArr = StringUtils.tokenizeToStringArray(nameAttr, MULTI_VALUE_ATTRIBUTE_DELIMITERS);
aliases.addAll(Arrays.asList(nameArr));
}
String beanName = id;
// 如果没有指定id, 那么用别名列表的第一个名字作为beanName
if (!StringUtils.hasText(beanName) && !aliases.isEmpty()) {
beanName = aliases.remove(0);
if (logger.isDebugEnabled()) {
logger.debug("No XML 'id' specified - using '" + beanName +
"' as bean name and " + aliases + " as aliases");
}
}
if (containingBean == null) {
checkNameUniqueness(beanName, aliases, ele);
}
// 根据 <bean ...>...</bean> 中的配置创建 BeanDefinition,然后把配置中的信息都设置到实例中,
// 这行执行完毕,一个 BeanDefinition 实例就出来了。等下接着往下看
AbstractBeanDefinition beanDefinition = parseBeanDefinitionElement(ele, beanName, containingBean);
// <bean /> 标签完成
if (beanDefinition != null) {
// 如果没有设置 id 和 name,那么此时的 beanName 就会为 null
if (!StringUtils.hasText(beanName)) {
try {
if (containingBean != null) {
beanName = BeanDefinitionReaderUtils.generateBeanName(
beanDefinition, this.readerContext.getRegistry(), true);
}
else {
beanName = this.readerContext.generateBeanName(beanDefinition);
String beanClassName = beanDefinition.getBeanClassName();
if (beanClassName != null &&
beanName.startsWith(beanClassName) && beanName.length() > beanClassName.length() &&
!this.readerContext.getRegistry().isBeanNameInUse(beanClassName)) {
// 把 beanClassName 设置为 Bean 的别名
aliases.add(beanClassName);
}
}
if (logger.isDebugEnabled()) {
logger.debug("Neither XML 'id' nor 'name' specified - " +
"using generated bean name [" + beanName + "]");
}
}
catch (Exception ex) {
error(ex.getMessage(), ele);
return null;
}
}
String[] aliasesArray = StringUtils.toStringArray(aliases);
// 返回 BeanDefinitionHolder
return new BeanDefinitionHolder(beanDefinition, beanName, aliasesArray);
}
return null;
}
创建BeanDefinition
接着是最重要的地方,如何根据配置创建 BeanDefinition 实例
public AbstractBeanDefinition parseBeanDefinitionElement(
Element ele, String beanName, BeanDefinition containingBean) {
this.parseState.push(new BeanEntry(beanName));
String className = null;
if (ele.hasAttribute(CLASS_ATTRIBUTE)) {
className = ele.getAttribute(CLASS_ATTRIBUTE).trim();
}
try {
String parent = null;
if (ele.hasAttribute(PARENT_ATTRIBUTE)) {
parent = ele.getAttribute(PARENT_ATTRIBUTE);
}
// 创建 BeanDefinition,然后设置类信息
AbstractBeanDefinition bd = createBeanDefinition(className, parent);
// 设置 BeanDefinition 的一堆属性,这些属性定义在 AbstractBeanDefinition 中
parseBeanDefinitionAttributes(ele, beanName, containingBean, bd);
bd.setDescription(DomUtils.getChildElementValueByTagName(ele, DESCRIPTION_ELEMENT));
/**
* 下面的一堆是解析 <bean>......</bean> 内部的子元素,
* 解析出来以后的信息都放到 bd 的属性中
*/
// 解析 <meta />
parseMetaElements(ele, bd);
// 解析 <lookup-method />
parseLookupOverrideSubElements(ele, bd.getMethodOverrides());
// 解析 <replaced-method />
parseReplacedMethodSubElements(ele, bd.getMethodOverrides());
// 解析 <constructor-arg />
parseConstructorArgElements(ele, bd);
// 解析 <property />
parsePropertyElements(ele, bd);
// 解析 <qualifier />
parseQualifierElements(ele, bd);
bd.setResource(this.readerContext.getResource());
bd.setSource(extractSource(ele));
return bd;
}
catch (ClassNotFoundException ex) {
error("Bean class [" + className + "] not found", ele, ex);
}
catch (NoClassDefFoundError err) {
error("Class that bean class [" + className + "] depends on not found", ele, err);
}
catch (Throwable ex) {
error("Unexpected failure during bean definition parsing", ele, ex);
}
finally {
this.parseState.pop();
}
return null;
}
终于终于这么长时间把这个BeanDefinition搞出来了,太不容易了!!!

接着回到刚才的代码
protected void processBeanDefinition(Element ele, BeanDefinitionParserDelegate delegate) {
// 上面说的一堆
BeanDefinitionHolder bdHolder = delegate.parseBeanDefinitionElement(ele);
if (bdHolder != null) {
// 如果有自定义属性的话,进行相应的解析
bdHolder = delegate.decorateBeanDefinitionIfRequired(ele, bdHolder);
try {
// 注册Bean
BeanDefinitionReaderUtils.registerBeanDefinition(bdHolder, getReaderContext().getRegistry());
}
catch (BeanDefinitionStoreException ex) {
getReaderContext().error("Failed to register bean definition with name '" +
bdHolder.getBeanName() + "'", ele, ex);
}
// 注册完成后,发送事件
getReaderContext().fireComponentRegistered(new BeanComponentDefinition(bdHolder));
}
}
Bean的注册
这次看注册bean的实现
public static void registerBeanDefinition(
BeanDefinitionHolder definitionHolder, BeanDefinitionRegistry registry)
throws BeanDefinitionStoreException {
String beanName = definitionHolder.getBeanName();
// 注册这个 Bean
registry.registerBeanDefinition(beanName, definitionHolder.getBeanDefinition());
// 如果配置有别名的话,也要根据别名全部注册一遍
String[] aliases = definitionHolder.getAliases();
if (aliases != null) {
for (String alias : aliases) {
registry.registerAlias(beanName, alias);
}
}
}
又是一个长方法。。。
@Override
public void registerBeanDefinition(String beanName, BeanDefinition beanDefinition)
throws BeanDefinitionStoreException {
Assert.hasText(beanName, "Bean name must not be empty");
Assert.notNull(beanDefinition, "BeanDefinition must not be null");
if (beanDefinition instanceof AbstractBeanDefinition) {
try {
((AbstractBeanDefinition) beanDefinition).validate();
}
catch (BeanDefinitionValidationException ex) {
throw new BeanDefinitionStoreException(...);
}
}
BeanDefinition oldBeanDefinition;
// 所有的 Bean 注册后都会被放入到这个beanDefinitionMap 中,查看是否已存在这个bean
oldBeanDefinition = this.beanDefinitionMap.get(beanName);
// 处理重复名称的 Bean 定义的情况
if (oldBeanDefinition != null) {
if (!isAllowBeanDefinitionOverriding()) {
// 如果不允许覆盖的话,抛异常
throw new BeanDefinitionStoreException(beanDefinition.getResourceDescription(), beanName,
"Cannot register bean definition [" + beanDefinition + "] for bean '" + beanName +
"': There is already [" + oldBeanDefinition + "] bound.");
}
else if (oldBeanDefinition.getRole() < beanDefinition.getRole()) {
// 用框架定义的 Bean 覆盖用户自定义的 Bean
if (this.logger.isWarnEnabled()) {
this.logger.warn("Overriding user-defined bean definition for bean '" + beanName +
"' with a framework-generated bean definition: replacing [" +
oldBeanDefinition + "] with [" + beanDefinition + "]");
}
}
else if (!beanDefinition.equals(oldBeanDefinition)) {
// 用新的 Bean 覆盖旧的 Bean
if (this.logger.isWarnEnabled()) {
this.logger.warn("Overriding user-defined bean definition for bean '" + beanName +
"' with a framework-generated bean definition: replacing [" +
oldBeanDefinition + "] with [" + beanDefinition + "]");
}
}
else {
// log...用同等的 Bean 覆盖旧的 Bean
if (this.logger.isInfoEnabled()) {
this.logger.info("Overriding bean definition for bean '" + beanName +
"' with a different definition: replacing [" + oldBeanDefinition +
"] with [" + beanDefinition + "]");
}
}
// 覆盖
this.beanDefinitionMap.put(beanName, beanDefinition);
}
else {
// 判断是否已经有其他的 Bean 开始初始化了.注意,"注册Bean" 这个动作结束,Bean 依然还没有初始化 在 Spring 容器启动的最后,会 预初始化 所有的 singleton beans
if (hasBeanCreationStarted()) {
// Cannot modify startup-time collection elements anymore (for stable iteration)
synchronized (this.beanDefinitionMap) {
this.beanDefinitionMap.put(beanName, beanDefinition);
List<String> updatedDefinitions = new ArrayList<String>(this.beanDefinitionNames.size() + 1);
updatedDefinitions.addAll(this.beanDefinitionNames);
updatedDefinitions.add(beanName);
this.beanDefinitionNames = updatedDefinitions;
if (this.manualSingletonNames.contains(beanName)) {
Set<String> updatedSingletons = new LinkedHashSet<String>(this.manualSingletonNames);
updatedSingletons.remove(beanName);
this.manualSingletonNames = updatedSingletons;
}
}
}
else {
// 将 BeanDefinition 放到这个 map 中,这个 map 保存了所有的 BeanDefinition
this.beanDefinitionMap.put(beanName, beanDefinition);
// 这是个 ArrayList,所以会按照 bean 配置的顺序保存每一个注册的 Bean 的名字
this.beanDefinitionNames.add(beanName);
// 这是个 LinkedHashSet,代表的是手动注册的 singleton bean,
this.manualSingletonNames.remove(beanName);
}
this.frozenBeanDefinitionNames = null;
}
if (oldBeanDefinition != null || containsSingleton(beanName)) {
resetBeanDefinition(beanName);
}
}
到这里已经初始化了 Bean 容器,<bean/>的配置也相应的转换为了一个个BeanDefinition,然后注册了所有的BeanDefinition到beanDefinitionMap
4. `prepareBeanFactory()`
现在回到最开始的`refresh()`方法
`prepareBeanFactory()`这个方法主要会设置BeanFactory的类加载器、添加几个 BeanPostProcessor、手动注册几个特殊的bean
继续撸代码
protected void prepareBeanFactory(ConfigurableListableBeanFactory beanFactory) {
// 设置为加载当前ApplicationContext类的类加载器
beanFactory.setBeanClassLoader(getClassLoader());
// 设置 BeanExpressionResolver
beanFactory.setBeanExpressionResolver(new StandardBeanExpressionResolver(beanFactory.getBeanClassLoader()));
beanFactory.addPropertyEditorRegistrar(new ResourceEditorRegistrar(this, getEnvironment()));
// 这里是Spring的又一个扩展点
//在所有实现了Aware接口的bean在初始化的时候,这个 processor负责回调,
// 这个我们很常用,如我们会为了获取 ApplicationContext 而 implement ApplicationContextAware
// 注意:它不仅仅回调 ApplicationContextAware,还会负责回调 EnvironmentAware、ResourceLoaderAware 等
beanFactory.addBeanPostProcessor(new ApplicationContextAwareProcessor(this));
// 下面几行的意思就是,如果某个 bean 依赖于以下几个接口的实现类,在自动装配的时候忽略它们,Spring 会通过其他方式来处理这些依赖。
beanFactory.ignoreDependencyInterface(EnvironmentAware.class);
beanFactory.ignoreDependencyInterface(EmbeddedValueResolverAware.class);
beanFactory.ignoreDependencyInterface(ResourceLoaderAware.class);
beanFactory.ignoreDependencyInterface(ApplicationEventPublisherAware.class);
beanFactory.ignoreDependencyInterface(MessageSourceAware.class);
beanFactory.ignoreDependencyInterface(ApplicationContextAware.class);
//下面几行就是为特殊的几个 bean 赋值,如果有 bean 依赖了以下几个,会注入这边相应的值
beanFactory.registerResolvableDependency(BeanFactory.class, beanFactory);
beanFactory.registerResolvableDependency(ResourceLoader.class, this);
beanFactory.registerResolvableDependency(ApplicationEventPublisher.class, this);
beanFactory.registerResolvableDependency(ApplicationContext.class, this);
// 注册 事件监听器
beanFactory.addBeanPostProcessor(new ApplicationListenerDetector(this));
// 如果存在bean名称为loadTimeWeaver的bean则注册一个BeanPostProcessor
if (beanFactory.containsBean(LOAD_TIME_WEAVER_BEAN_NAME)) {
beanFactory.addBeanPostProcessor(new LoadTimeWeaverAwareProcessor(beanFactory));
// Set a temporary ClassLoader for type matching.
beanFactory.setTempClassLoader(new ContextTypeMatchClassLoader(beanFactory.getBeanClassLoader()));
}
// 如果没有定义 "environment" 这个 bean,那么 Spring 会 "手动" 注册一个
if (!beanFactory.containsLocalBean(ENVIRONMENT_BEAN_NAME)) {
beanFactory.registerSingleton(ENVIRONMENT_BEAN_NAME, getEnvironment());
}
// 如果没有定义 "systemProperties" 这个 bean,那么 Spring 会 "手动" 注册一个
if (!beanFactory.containsLocalBean(SYSTEM_PROPERTIES_BEAN_NAME)) {
beanFactory.registerSingleton(SYSTEM_PROPERTIES_BEAN_NAME, getEnvironment().getSystemProperties());
}
// 如果没有定义 "systemEnvironment" 这个 bean,那么 Spring 会 "手动" 注册一个
if (!beanFactory.containsLocalBean(SYSTEM_ENVIRONMENT_BEAN_NAME)) {
beanFactory.registerSingleton(SYSTEM_ENVIRONMENT_BEAN_NAME, getEnvironment().getSystemEnvironment());
}
}
5. postProcessBeanFactory()
这个比较简单,又是Spring的一个扩展点

如果有Bean实现了BeanFactoryPostProcessor接口,
那么在容器初始化以后,Spring 会负责调用里面的 postProcessBeanFactory 方法。具体的子类可以在这步的时候添加一些特殊的 BeanFactoryPostProcessor 的实现类或做点什么事
6. invokeBeanFactoryPostProcessors()
调用BeanFactoryPostProcessor各个实现类的postProcessBeanFactory(factory) 方法
7. `registerBeanPostProcessors()`
又是一个扩展点
注册 BeanPostProcessor 的实现类,注意不是BeanFactoryPostProcessor
此接口有两个方法: postProcessBeforeInitialization 和 postProcessAfterInitialization分别会在Bean初始化之前和初始化之后得到执行
8. `initMessageSource()`
初始化当前 ApplicationContext 的 MessageSource,有想了解国际化的相关知识可以深入研究一下
##### 9. `initApplicationEventMulticaster()`
这个方法主要为初始化当前 ApplicationContext 的事件广播器

撸代码:
private void initApplicationEventMulticaster() throws BeansException {
//如果用户配置了自定义事件广播器,就使用用户的
if (containsLocalBean(APPLICATION_EVENT_MULTICASTER_BEAN_NAME )) {
this.applicationEventMulticaster = (ApplicationEventMulticaster)
getBean( APPLICATION_EVENT_MULTICASTER_BEAN_NAME ,
ApplicationEventMulticaster.class );
if (logger.isInfoEnabled()) {
logger.info("Using ApplicationEventMulticaster ["
+ this. applicationEventMulticaster + "]" );
}
}else {
//使用默认的时间广播器
this.applicationEventMulticaster = new SimpleApplicationEventMulticaster();
if (logger.isInfoEnabled()) {
logger.info("Unable to locate ApplicationEventMulticaster with name '"+
APPLICATION_EVENT_MULTICASTER_BEAN_NAME +
"': using default [" + this .applicationEventMulticaster + "]");
}
}
}
10. `onRefresh()`
又是一个扩展点,子类可以在这里来搞事情
11. `registerListeners()`
注册事件监听器
protected void registerListeners() {
//先添加手动set的一些监听器
for (ApplicationListener<?> listener : getApplicationListeners()) {
getApplicationEventMulticaster().addApplicationListener(listener);
}
//取到监听器的名称,设置到广播器
String[] listenerBeanNames = getBeanNamesForType(ApplicationListener.class, true, false);
for (String listenerBeanName : listenerBeanNames) {
getApplicationEventMulticaster().addApplicationListenerBean(listenerBeanName);
}
// 如果存在早期应用事件,发布
Set<ApplicationEvent> earlyEventsToProcess = this.earlyApplicationEvents;
this.earlyApplicationEvents = null;
if (earlyEventsToProcess != null) {
for (ApplicationEvent earlyEvent : earlyEventsToProcess) {
getApplicationEventMulticaster().multicastEvent(earlyEvent);
}
}
}
看到这里不要以为文章结束了,上方那么大的篇幅其实总结起来仅仅只介绍了Bean容器的创建过程,由于微信的字数限制所以本篇文章只能写到这里了。
< END >

正文到此结束
- 本文标签: stream root pom description IDE 解析 list build ACE Service token 测试环境 web db find 数据 App value schema strace Property bug Qualifier update node tar UI CTO key spring ioc 生命 BeanDefinition id 类加载器 java tab 配置 CEO XML Java类 http message Collection synchronized spring 源码 https map 设计模式 实例 总结 DDL 监听器 IO equals classpath git cat 时间 DOM final core Listeners cache ArrayList tag 测试 struct 进程 代码 Document dependencies entity 下载 ioc session HashSet ssl ip 数据库 GitHub parse 参数 src 文章 bean
- 版权声明: 本文为互联网转载文章,出处已在文章中说明(部分除外)。如果侵权,请联系本站长删除,谢谢。
- 本文海报: 生成海报一 生成海报二
热门推荐


相关文章


Loading...
![[HBLOG]公众号](http://www.liuhaihua.cn/img/qrcode_gzh.jpg)

