springSecurity02(mybatis+springmvc+spring) 01
1.建立一个模块继承上一个模块然后添加依赖
<dependencies>

        <dependency>
            <groupId>junit</groupId>
            <artifactId>junit</artifactId>
            <version>4.11</version>
            <scope>test</scope>
        </dependency>
        <dependency>
            <groupId>org.springframework</groupId>
            <artifactId>spring-test</artifactId>
            <version>4.2.8.RELEASE</version>
        </dependency>
        <dependency>
            <groupId>org.mybatis</groupId>
            <artifactId>mybatis</artifactId>
            <version>3.4.4</version>
        </dependency>
        <dependency>
            <groupId>org.mybatis</groupId>
            <artifactId>mybatis-spring</artifactId>
            <version>1.3.0</version>
        </dependency>
        <dependency>
            <groupId>com.alibaba</groupId>
            <artifactId>druid</artifactId>
            <version>1.1.8</version>
        </dependency>
        <dependency>
            <groupId>mysql</groupId>
            <artifactId>mysql-connector-java</artifactId>
            <version>5.1.41</version>
        </dependency>
    </dependencies>

    <!--解决打包时找不到xml文件-->
    <build>
        <resources>
            <resource>
                <directory>src/main/java</directory>
                <includes>
                    <include>**/*.xml</include>
                </includes>
            </resource>
        </resources>
        <plugins>
            <plugin>
                <groupId>org.apache.maven.plugins</groupId>
                <artifactId>maven-compiler-plugin</artifactId>
                <configuration>
                    <source>1.8</source>
                    <target>1.8</target>
                </configuration>
            </plugin>
        </plugins>
    </build>
2.建立数据源文件application.properties
#数据库连接相关
jdbc.driver = com.mysql.jdbc.Driver
jdbc.url = jdbc:mysql://localhost:3306/security-demo?useUnicode=true&characterEncoding=utf-8&useSSL=false
jdbc.username = root
jdbc.password = 123456
3.修改applicationContext.xml,配置数据源,和mybatis整合,以及事务管理
<?xml version="1.0" encoding="UTF-8"?>
<beans xmlns="http://www.springframework.org/schema/beans"
       xmlns:xsi="http://www.w3.org/2001/XMLSchema-instance"
       xmlns:context="http://www.springframework.org/schema/context"
       xmlns:mvc="http://www.springframework.org/schema/mvc" xmlns:tx="http://www.alibaba.com/schema/stat"
       xsi:schemaLocation="http://www.springframework.org/schema/beans
        http://www.springframework.org/schema/beans/spring-beans.xsd
        http://www.springframework.org/schema/context
        http://www.springframework.org/schema/context/spring-context.xsd
        http://www.springframework.org/schema/mvc
        http://www.springframework.org/schema/mvc/spring-mvc.xsd http://www.alibaba.com/schema/stat http://www.alibaba.com/schema/stat.xsd">

    <!-- 自动扫描 -->
    <context:component-scan base-package="com.ty">
        <!-- 扫描时跳过 @TestController 注解的JAVA类(控制器) -->
        <context:exclude-filter type="annotation"
                                expression="org.springframework.stereotype.Controller" />
        <context:exclude-filter type="annotation"
                                expression="org.springframework.web.bind.annotation.ControllerAdvice" />
    </context:component-scan>

    <!--扫描配置文件(这里指向的是之前配置的那个config.properties) -->
    <context:property-placeholder location="classpath:application.properties" />

    <!--配置数据源 -->
    <bean id="dataSource" class="com.alibaba.druid.pool.DruidDataSource"
          destroy-method="close">
        <property name="driverClassName" value="${jdbc.driver}" />  <!--数据库连接驱动 -->
        <property name="url" value="${jdbc.url}" />     <!--数据库地址 -->
        <property name="username" value="${jdbc.username}" />   <!--用户名 -->
        <property name="password" value="${jdbc.password}" />   <!--密码 -->
        <property name="maxActive" value="40" />      <!--最大连接数 -->
        <property name="minIdle" value="1" />       <!--最小连接数 -->
        <property name="initialSize" value="10" />      <!--初始化连接池内的数据库连接 -->
        <property name="maxWait" value="20" />  <!--最大空闲时间 -->
    </bean>

    <!--mybatis与spring整合 -->
    <bean id="sessionFactory" class="org.mybatis.spring.SqlSessionFactoryBean">
        <property name="dataSource" ref="dataSource" />
        <!--配置别名扫描包-->
        <property name="typeAliasesPackage" value="com.ty.pojo"></property>
        <property name="mapperLocations" value="classpath:com.ty.mapper/*.xml"></property>
    </bean>

    <!--扫描接口-->
    <bean class="org.mybatis.spring.mapper.MapperScannerConfigurer">
        <property name="basePackage" value="com.ty.mapper"></property>
    </bean>

   <!--事务配置-->
    <bean id="transactionManager" class="org.springframework.jdbc.datasource.DataSourceTransactionManager">
        <property name="dataSource" ref="dataSource"></property>
    </bean>
    <!--开启事务-->
    <tx:annotation-drive
![图片上传中...]
n/>

</beans>
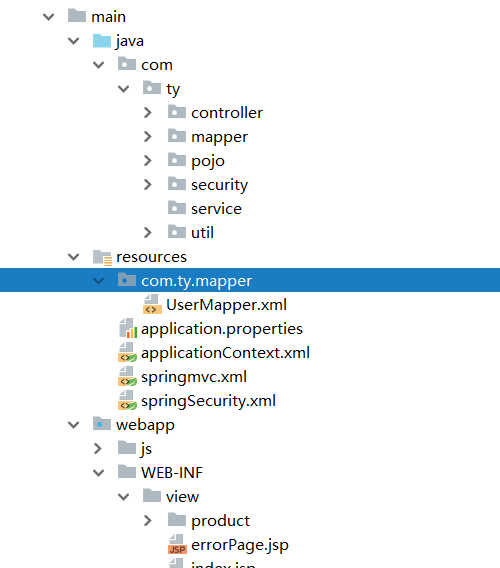
目录结构,我这里测试mybatis时放在同一包出问题,所以选择了分别扫描xml和mapper接口
数据库,总共建立了5张表,用户表,角色表,用户角色对应表,权限表,权限角色对应表,关系也很简单,一个用户有多个角色,一个角色也可以有多个用户拥有,一个角色有多种权限,一个权限也可以由多个角色掌握,这个看自己怎么设计,其中用户表最重要,这里面包含了用户的基本信息
/*
Navicat MySQL Data Transfer

Source Server         : security
Source Server Version : 50719
Source Host           : localhost:3306
Source Database       : security-demo

Target Server Type    : MYSQL
Target Server Version : 50719
File Encoding         : 65001

Date: 2019-08-02 10:25:48
*/

SET FOREIGN_KEY_CHECKS=0;

-- ----------------------------
-- Table structure for sys_authorization
-- ----------------------------
DROP TABLE IF EXISTS `sys_authorization`;
CREATE TABLE `sys_authorization` (
  `id` int(11) NOT NULL,
  `authorizationName` varchar(50) DEFAULT NULL,
  `authorizationMark` varchar(50) DEFAULT NULL,
  PRIMARY KEY (`id`)
) ENGINE=InnoDB DEFAULT CHARSET=utf8;

-- ----------------------------
-- Records of sys_authorization
-- ----------------------------
INSERT INTO `sys_authorization` VALUES ('1', '产品查询', 'ROLE_LIST_PRODUCT');
INSERT INTO `sys_authorization` VALUES ('2', '产品添加', 'ROLE_ADD_PRODUCT');
INSERT INTO `sys_authorization` VALUES ('3', '产品修改', 'ROLE_UPDATE_PRODUCT');
INSERT INTO `sys_authorization` VALUES ('4', '产品删除', 'ROLE_DELETE_PRODUCT');

-- ----------------------------
-- Table structure for sys_role
-- ----------------------------
DROP TABLE IF EXISTS `sys_role`;
CREATE TABLE `sys_role` (
  `id` int(11) NOT NULL,
  `roleName` varchar(50) DEFAULT NULL,
  `roleDescription` varchar(50) DEFAULT NULL,
  PRIMARY KEY (`id`)
) ENGINE=InnoDB DEFAULT CHARSET=utf8;

-- ----------------------------
-- Records of sys_role
-- ----------------------------
INSERT INTO `sys_role` VALUES ('1', '普通用户', '普通用户');
INSERT INTO `sys_role` VALUES ('2', '管理员', '管理员');

-- ----------------------------
-- Table structure for sys_role_authorization
-- ----------------------------
DROP TABLE IF EXISTS `sys_role_authorization`;
CREATE TABLE `sys_role_authorization` (
  `roleId` int(11) NOT NULL,
  `authorizationId` int(11) NOT NULL
) ENGINE=InnoDB DEFAULT CHARSET=utf8;

-- ----------------------------
-- Records of sys_role_authorization
-- ----------------------------
INSERT INTO `sys_role_authorization` VALUES ('1', '1');
INSERT INTO `sys_role_authorization` VALUES ('1', '2');
INSERT INTO `sys_role_authorization` VALUES ('2', '1');
INSERT INTO `sys_role_authorization` VALUES ('2', '2');
INSERT INTO `sys_role_authorization` VALUES ('2', '3');
INSERT INTO `sys_role_authorization` VALUES ('2', '4');

-- ----------------------------
-- Table structure for sys_user
-- ----------------------------
DROP TABLE IF EXISTS `sys_user`;
CREATE TABLE `sys_user` (
  `id` int(11) NOT NULL AUTO_INCREMENT,
  `username` varchar(50) DEFAULT NULL,
  `password` varchar(100) DEFAULT NULL,
  `realname` varchar(50) DEFAULT NULL,
  `createDate` date DEFAULT NULL,
  `lastLoginTime` date DEFAULT NULL,
  `enabled` int(11) DEFAULT NULL,
  `accountNonExpired` int(11) DEFAULT NULL,
  `accountNonLocked` int(11) DEFAULT NULL,
  `credentialsNonExpired` int(11) DEFAULT NULL,
  PRIMARY KEY (`id`)
) ENGINE=InnoDB AUTO_INCREMENT=3 DEFAULT CHARSET=utf8;

-- ----------------------------
-- Records of sys_user
-- ----------------------------
INSERT INTO `sys_user` VALUES ('1', 'jojo', '$2a$10$VCvgzml/DNzBTkjsPlImDuZp38sNZB7cEmsNgFIWBm/Vtpn0Q3Bj.', '张三', '2019-06-26', '2019-08-01', '1', '1', '1', '1');
INSERT INTO `sys_user` VALUES ('2', 'jack', '$2a$10$W1T2Z5dUMIgBfxvFdBOWuusq8Nwke/cQydxDFemsbTh0PjGeZCiMC', '李四', '2019-07-30', '2019-08-01', '1', '1', '1', '1');

-- ----------------------------
-- Table structure for sys_user_role
-- ----------------------------
DROP TABLE IF EXISTS `sys_user_role`;
CREATE TABLE `sys_user_role` (
  `userId` int(11) NOT NULL,
  `roleId` int(11) NOT NULL
) ENGINE=InnoDB DEFAULT CHARSET=utf8;

-- ----------------------------
-- Records of sys_user_role
-- ----------------------------
INSERT INTO `sys_user_role` VALUES ('1', '1');
INSERT INTO `sys_user_role` VALUES ('2', '2');
基本配置完成
在mapper文件夹下建立UserMapper接口
package com.ty.mapper;

import com.ty.pojo.Authorization;
import com.ty.pojo.User;
import org.apache.ibatis.annotations.Select;
import org.apache.ibatis.annotations.Update;

import java.util.List;

/**
 * @Author:TY
 * @Descroption:
 * @Date: Created in 11:34 2019/8/1
 * @Modificd By:
 */
public interface UserMapper {

    @Select("select * from sys_user")
    List<User> findAll();
    /**
     * 查询当前用户对象
     */

    public User findByUserName(String username);


    /**
     * 查询当前用户的权限
     */
    List<Authorization> findAuthorizationByUserName(String username);

    /**
     * 修改密码
     */

    @Update("update sys_user set password=#{password} where username=#{username}")
    public void updatePassword(User user);


}
UserMapper.xml:
<?xml version="1.0" encoding="UTF-8" ?>
<!DOCTYPE mapper PUBLIC "-//mybatis.org//DTD Mapper 3.0//EN"
        "http://mybatis.org/dtd/mybatis-3-mapper.dtd">

<mapper namespace="com.ty.mapper.UserMapper">


    <select id="findByUserName" resultType="User" parameterType="String">
         SELECT * FROM sys_user where username = #{username}
    </select>


    <select id="findAuthorizationByUserName" parameterType="String" resultType="Authorization">
          SELECT a.* from sys_user u ,sys_user_role ur,sys_role_authorization ra,sys_authorization a
          WHERE u.id=ur.userId  and ur.roleId= ra.roleId and ra.authorizationId=a.id
          AND u.username=#{username}
    </select>
</mapper>
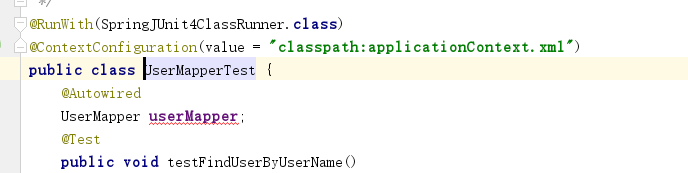
想要测试就这样
在MainController里面添加一个验证码接口(生成验证码网上都有,这里就不列出了)
@RequestMapping("/imageCode")
    public void imageCode(HttpServletRequest request, HttpServletResponse response) throws Exception {

//        ImageCodeProcessor.send(new ServletWebRequest(request,response),new ImageCodeGenerator().generate(new ServletWebRequest(request)));
        ImageCode generate = new ImageCodeGenerator().generate(new ServletWebRequest(request));
        HttpSession session = request.getSession();
        System.out.println("生成的验证码为:"+generate.getCode());
        session.setAttribute("key",generate.getCode());
        response.setContentType("image/jpeg");
        // 将图像输出到Servlet输出流中。
        ServletOutputStream sos = response.getOutputStream();
        ImageIO.write(generate.getImage(), "jpeg", sos);
        sos.close();
    }
pojo包中的User对象,里面添加了一个权限的字段,是user表中没有的,并且User对象实现了UserDetails接口,实现了其中的方法,方便后面security使用
package com.ty.pojo;


import org.springframework.beans.factory.annotation.Autowired;
import org.springframework.security.core.GrantedAuthority;
import org.springframework.security.core.userdetails.UserDetails;
import org.springframework.security.core.userdetails.UserDetailsService;
import org.springframework.security.core.userdetails.UsernameNotFoundException;

import java.util.ArrayList;
import java.util.Date;
import java.util.List;

public class User implements UserDetails{

  private Integer id;
  private String username;
  private String password;
  private String realname;
  private java.util.Date createDate;
  private java.util.Date lastLoginTime;
  private boolean enabled;
  private boolean accountNonExpired;
  private boolean accountNonLocked;
  private boolean credentialsNonExpired;

  //用户拥有的所有权限
  List<GrantedAuthority>  authorities=new ArrayList<>();

  @Override
  public String toString() {
    return "User{" +
            "username='" + username + '/'' +
            ", realname='" + realname + '/'' +
            ", authorities=" + authorities +
            '}';
  }

  @Override
  public String getPassword() {
    return password;
  }

  public void setPassword(String password) {
    this.password = password;
  }

  public List<GrantedAuthority> getAuthorities() {
    return authorities;
  }


  public void setAuthorities(List<GrantedAuthority> authorities) {
    this.authorities = authorities;
  }

  public Integer getId() {
    return id;
  }

  public void setId(Integer id) {
    this.id = id;
  }

  public String getUsername() {
    return username;
  }

  public void setUsername(String username) {
    this.username = username;
  }

  public String getRealname() {
    return realname;
  }

  public void setRealname(String realname) {
    this.realname = realname;
  }

  public Date getCreateDate() {
    return createDate;
  }

  public void setCreateDate(Date createDate) {
    this.createDate = createDate;
  }

  public Date getLastLoginTime() {
    return lastLoginTime;
  }

  public void setLastLoginTime(Date lastLoginTime) {
    this.lastLoginTime = lastLoginTime;
  }

  public boolean isEnabled() {
    return enabled;
  }

  public void setEnabled(boolean enabled) {
    this.enabled = enabled;
  }

  public boolean isAccountNonExpired() {
    return accountNonExpired;
  }

  public void setAccountNonExpired(boolean accountNonExpired) {
    this.accountNonExpired = accountNonExpired;
  }

  public boolean isAccountNonLocked() {
    return accountNonLocked;
  }

  public void setAccountNonLocked(boolean accountNonLocked) {
    this.accountNonLocked = accountNonLocked;
  }

  public boolean isCredentialsNonExpired() {
    return credentialsNonExpired;
  }

  public void setCredentialsNonExpired(boolean credentialsNonExpired) {
    this.credentialsNonExpired = credentialsNonExpired;
  }
}
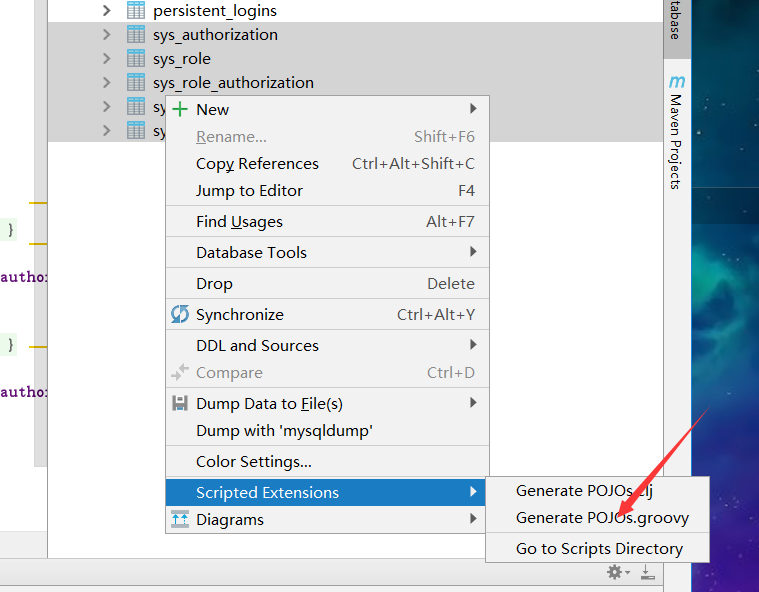
其它表就直接用idea自带的工具:数据库生成pojo类执行就行了
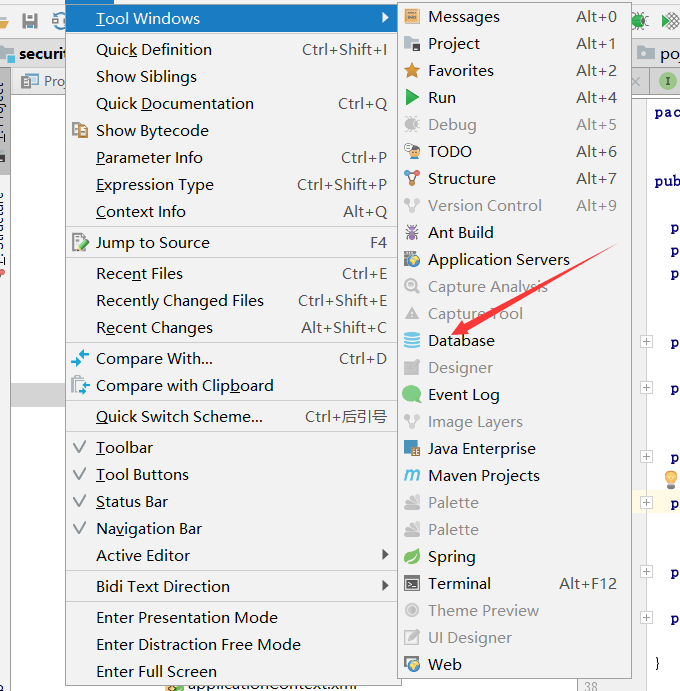
连接数据库点击
springSecurity.xml:里面都有注释,而且也不难,一看就会系列
<?xml version="1.0" encoding="UTF-8"?>
<beans xmlns="http://www.springframework.org/schema/beans"
       xmlns:xsi="http://www.w3.org/2001/XMLSchema-instance"
       xmlns:security="http://www.springframework.org/schema/security"
       xsi:schemaLocation="
        http://www.springframework.org/schema/beans
        http://www.springframework.org/schema/beans/spring-beans.xsd
        http://www.springframework.org/schema/security
        http://www.springframework.org/schema/security/spring-security-4.2.xsd">
    <!--  <security:http>:对web.xml中spring过滤器链的配置:web.xml里面的过滤器接受到请求,就会根据这个配置去过滤
    1)需要拦截什么资源
    2)什么资源什么角色权限
    3)定义认证方式:HttpBasic,FormLogin
    4)定义登陆页面,定义登陆请求地址,定义错误处理方式
    用于授权
    -->
    <security:http>
        <security:intercept-url pattern="/product/index" access="permitAll()"></security:intercept-url>
        <security:intercept-url pattern="/product/list" access="hasAuthority('ROLE_LIST_PRODUCT')"></security:intercept-url>
        <security:intercept-url pattern="/product/add" access="hasAuthority('ROLE_ADD_PRODUCT')"></security:intercept-url>
        <security:intercept-url pattern="/product/update" access="hasAuthority('ROLE_UPDATE_PRODUCT')"></security:intercept-url>
        <security:intercept-url pattern="/product/delete" access="hasAuthority('ROLE_DELETE_PRODUCT')"></security:intercept-url>
        <security:intercept-url pattern="/js/**" access="permitAll()"></security:intercept-url>

        <security:intercept-url pattern="/imageCode" access="permitAll()"></security:intercept-url>

        <security:intercept-url pattern="/userLogin" access="permitAll()"></security:intercept-url>
        <security:intercept-url pattern="/**" access="isFullyAuthenticated()"></security:intercept-url>


        <!--自定义SpringSecurity过滤器-->
        <security:custom-filter ref="imageCodeAuthenticationFilter" before="FORM_LOGIN_FILTER"/>

        <security:form-login login-page="/userLogin" login-processing-url="/login"
                             authentication-success-handler-ref="mySuccessAthenticationHandler"
                            authentication-failure-handler-ref="myAuthenticationFailureHandler"/>


        <!--权限不足做处理-->
        <security:access-denied-handler error-page="/error"></security:access-denied-handler>
        <security:csrf disabled="true"></security:csrf>

        <!--加上rememberme的功能-->
        <!--token-validity-seconds:cookie过期时间-->
        <security:remember-me token-repository-ref="jdbcTokenRepository" token-validity-seconds="3600"></security:remember-me>
    </security:http>

    <security:authentication-manager>
        <security:authentication-provider user-service-ref="myUserDetailService">
            <!--使用加密的算法,然后再和数据库密码配对-->
            <security:password-encoder ref="passwordEncoder"></security:password-encoder>
        </security:authentication-provider>
    </security:authentication-manager>


    <bean id="imageCodeAuthenticationFilter" class="com.ty.security.ImageCodeAuthenticationFilter">
        <property name="authenticationFailureHandler" ref="myAuthenticationFailureHandler"></property>
    </bean>

    <bean id="myUserDetailService" class="com.ty.security.MyUserDetailService"></bean>
    <bean id="mySuccessAthenticationHandler" class="com.ty.security.MySuccessAthenticationHandler"></bean>

    <!--失败处理器-->
    <bean id="myAuthenticationFailureHandler" class="com.ty.security.MyAuthenticationFailureHandler"></bean>

    <bean id="passwordEncoder" class="org.springframework.security.crypto.bcrypt.BCryptPasswordEncoder"></bean>


    <!--rememberme功能的bean-->
    <bean id="jdbcTokenRepository" class="org.springframework.security.web.authentication.rememberme.JdbcTokenRepositoryImpl">
        <property name="dataSource" ref="dataSource"></property>
        <!--启动的时候生成表persistent_logins,但是有的话一定要把数据库的表删掉或者把这个注释掉-->
        <!--<property name="createTableOnStartup" value="true"></property>-->
    </bean>
</beans>
MyUserDetailService :这里就动态在数据库里面动态查询了用户的权限,然后因为之前我们的User类实现了UserDetails接口,所以当返回我们自己从数据库查询的用户然后返回的时候,springSecurity会自己拿着用户输入的信息和我们数据库中的做一个比对,对比上了则认证成功
package com.ty.security;

import com.ty.mapper.UserMapper;
import com.ty.pojo.Authorization;
import com.ty.pojo.User;
import org.springframework.beans.factory.annotation.Autowired;
import org.springframework.security.core.GrantedAuthority;
import org.springframework.security.core.authority.SimpleGrantedAuthority;
import org.springframework.security.core.userdetails.UserDetails;
import org.springframework.security.core.userdetails.UserDetailsService;
import org.springframework.security.core.userdetails.UsernameNotFoundException;

import java.util.ArrayList;
import java.util.List;

/**
 * @Author:TY
 * @Descroption:
 * @Date: Created in 17:09 2019/8/1
 * @Modificd By:
 */
public class MyUserDetailService implements UserDetailsService{
    @Autowired
    private UserMapper userMapper;

    @Override
    public UserDetails loadUserByUsername(String username) throws UsernameNotFoundException {
        User user=null;
        System.out.println(username);
        if(username!=null&&!username.equals(""))
        {
              user = userMapper.findByUserName(username);
            if (user!=null)
            {
                //获取用户权限
                List<Authorization>  permList = userMapper.findAuthorizationByUserName(username);
                List<GrantedAuthority> authorizations=new ArrayList<>();
                for (Authorization perm:permList)
                {
                     GrantedAuthority authority=new SimpleGrantedAuthority(perm.getAuthorizationMark());
                     authorizations.add(authority);
                }
                user.setAuthorities(authorizations);
            }
            return user;
        }

        return user;
    }

}
然后我们自定义成功后的处理器MySuccessAthenticationHandler
package com.ty.security;

import com.fasterxml.jackson.databind.ObjectMapper;
import org.springframework.security.core.Authentication;
import org.springframework.security.web.authentication.AuthenticationSuccessHandler;

import javax.servlet.ServletException;
import javax.servlet.http.HttpServletRequest;
import javax.servlet.http.HttpServletResponse;
import java.io.IOException;
import java.util.HashMap;
import java.util.Map;

/**
 * @Author:TY
 * @Descroption:
 * @Date: Created in 19:43 2019/8/1
 * @Modificd By:
 */
public class MySuccessAthenticationHandler implements AuthenticationSuccessHandler {
    private static final ObjectMapper objectMapper=new ObjectMapper();
    @Override
    public void onAuthenticationSuccess(HttpServletRequest httpServletRequest, HttpServletResponse httpServletResponse, Authentication authentication) throws IOException, ServletException {
        Map map=new HashMap();
        map.put("success",true);
        String result = objectMapper.writeValueAsString(map);
        httpServletResponse.setContentType("text/json;charset=utf-8");
        httpServletResponse.getWriter().write(result);
    }
}
失败处理器:
package com.ty.security;

import com.fasterxml.jackson.databind.ObjectMapper;
import org.springframework.security.core.AuthenticationException;
import org.springframework.security.web.authentication.AuthenticationFailureHandler;

import javax.servlet.ServletException;
import javax.servlet.http.HttpServletRequest;
import javax.servlet.http.HttpServletResponse;
import java.io.IOException;
import java.util.HashMap;
import java.util.Map;

/**
 * @Author:TY
 * @Descroption:
 * @Date: Created in 21:23 2019/7/31
 * @Modificd By:
 */
public class MyAuthenticationFailureHandler implements AuthenticationFailureHandler{
    private    ObjectMapper objectMapper=new ObjectMapper();
    @Override
    public void onAuthenticationFailure(HttpServletRequest request, HttpServletResponse response, AuthenticationException e) throws IOException, ServletException {
        Map map=new HashMap();
        map.put("success",false);
        map.put("errorMsg",e.getMessage());
        String result = objectMapper.writeValueAsString(map);
        response.setContentType("text/json;charset=utf-8");
        response.getWriter().write(result);
    }
}
登录的时候是先验证验证码,验证码通过在验证用户名和密码
验证码的拦截器
package com.ty.security;

import org.springframework.security.core.AuthenticationException;
import org.springframework.security.web.authentication.AuthenticationFailureHandler;
import org.springframework.web.filter.OncePerRequestFilter;

import javax.servlet.FilterChain;
import javax.servlet.ServletException;
import javax.servlet.http.HttpServletRequest;
import javax.servlet.http.HttpServletResponse;
import javax.servlet.http.HttpSession;
import java.io.IOException;

/**
 * @Author:TY
 * @Descroption:,他能够确保在一次请求只通过一次filter,而不需要重复执行
 *
 * @Date: Created in 21:22 2019/8/1
 * @Modificd By:
 */
public class ImageCodeAuthenticationFilter extends OncePerRequestFilter {

    private AuthenticationFailureHandler authenticationFailureHandler;


    public void setAuthenticationFailureHandler(AuthenticationFailureHandler authenticationFailureHandler) {
        this.authenticationFailureHandler = authenticationFailureHandler;
    }

    @Override
    protected void doFilterInternal(HttpServletRequest request, HttpServletResponse response, FilterChain filterChain) throws ServletException, IOException {

        //判断当前请求,是否为登录请求,
        if (request.getRequestURI().contains("/login"))
        {
           try {
               //校验验证码
               //表单填的验证码
               String imageCode = request.getParameter("imageCode");
               System.out.println("表单填的验证码为:"+imageCode);
               //系统生成的验证码
               HttpSession session = request.getSession();
               String  sesstionCode = (String) session.getAttribute("key");
               System.out.println("session里的验证码为:"+sesstionCode);
               if(imageCode==null||imageCode.equals(""))
               {
                   throw new ImageCodeException("验证码不能为空");
               }
               if(!imageCode.equals(sesstionCode))
               {
                   throw new ImageCodeException("验证码错误");
               }
           }catch (AuthenticationException e){
             //交给自定义的
               authenticationFailureHandler.onAuthenticationFailure(request,response,e);
               return;
           }
        }
        filterChain.doFilter(request,response);
    }
}
验证码异常类
package com.ty.security;


import org.springframework.security.core.AuthenticationException;

/**
 * @Author:TY
 * @Descroption:
 * @Date: Created in 21:47 2019/8/1
 * @Modificd By:
 */
public class ImageCodeException extends AuthenticationException {

    public ImageCodeException(String msg, Throwable t) {
        super(msg, t);
    }

    public ImageCodeException(String msg) {
        super(msg);
    }
}
注意:我们是把验证码过滤器加在UserNamePasswordAuthenticationFilter前面的,当我们的验证码抛出异常,验证码没通过时会抛一个ImageCodeException,这个类继承了AuthenticationException ,所以当抛出异常之后会到我们自定义的MyAuthenticationFailureHandler,这样就可以向前端返回异常的数据
login.jsp
<%@ taglib prefix="c" uri="http://java.sun.com/jsp/jstl/core" %>
<%--
  Created by IntelliJ IDEA.
  User: TY
  Date: 2019/7/31
  Time: 19:14
  To change this template use File | Settings | File Templates.
--%>
<%@ page contentType="text/html;charset=UTF-8" language="java" %>
<html>
<head>
    <title>登录页面</title>
</head>
<body>
<c:if test="${not empty param.error}">
    <font color="red">用户名或密码错误</font>
</c:if>
<form id="loginForm">
    用户名:<input type="text" name="username"><br>
    密 码:<input type="password" name="password"><br>
    验证码:<input type="text" name="imageCode"><img id="imgcheck" src="/imageCode"><br>
    <input type="checkbox" name="remember-me" value="true">记住我
    <input type="button" id="LoginButton" value="登录">
</form>
<script type="text/javascript" src="${pageContext.request.contextPath}/js/jquery.min.js"></script>
<script type="text/javascript">
    $(function () {
        $("#LoginButton").click(function () {
            $.post("/login", $("#loginForm").serialize(), function (data) {
                if (data.success) {
                    window.location.href = "${pageContext.request.contextPath}/product/index";
                } else {
                    alert("登录失败:" + data.errorMsg);
                }
            }, "json");
        })
    })
    window.onload = function () {
        var date = new Date();
        $("#imgcheck").click(function () {
            $(this).attr('src', "/imageCode?temp=" + date);
        });
    }
</script>

</body>
</html>
如果要根据权限显示前端内容,就在pom.xml引入
<dependency>
      <groupId>org.springframework.security</groupId>
      <artifactId>spring-security-taglibs</artifactId>
      <version>4.2.3.RELEASE</version>
    </dependency>
index.jsp
<%--
  Created by IntelliJ IDEA.
  User: TY
  Date: 2019/7/31
  Time: 16:49
  To change this template use File | Settings | File Templates.
--%>
<%@ page contentType="text/html;charset=UTF-8" language="java" %>
<%@ taglib uri="http://www.springframework.org/security/tags" prefix="security" %>
<%@ taglib prefix="c" uri="http://java.sun.com/jsp/jstl/core" %>
<html>
<head>
    <title>首页</title>
</head>
<body>
<c:if test="${username != null}">
    <span>欢迎${username}登陆</span>
</c:if>
以下是网站的功能
<security:authorize access="hasAuthority('ROLE_ADD_PRODUCT')">
    <a href="/product/add">商品添加</a>
</security:authorize>
<security:authorize access="hasAuthority('ROLE_UPDATE_PRODUCT')">
    <a href="/product/update">商品修改</a>
</security:authorize>
<security:authorize access="hasAuthority('ROLE_LIST_PRODUCT')">
    <a href="/product/list">商品查询</a>
</security:authorize>

<security:authorize access="hasAuthority('ROLE_DELETE_PRODUCT')">
    <a href="/product/delete">商品删除</a>
</security:authorize>
</body>
</html>
**最后如果想要获取认证通过后的用户的信息,任何地方都能获取
可以使用SecurityContextHolder.getContext().getAuthentication().getPrincipal()
/**
     * 首页  SecurityContextHolder.getContext().getAuthentication().getPrincipal()可以在任何地方获取当前用户的信息
     */
    @RequestMapping("index")
    public String index(Model model)
    {
        Object principal = SecurityContextHolder.getContext().getAuthentication().getPrincipal();
        if(principal!=null)
        {
            if(principal instanceof UserDetails)
            {
               UserDetails userDetails= (UserDetails)principal;
               model.addAttribute("username",userDetails.getUsername());
            }
        }
        return "index";
    }
**
正文到此结束
- 本文标签: 处理器 sqlsession session rmi 加密 ssl pom find 配置 注释 key provider http JavaScript mapper HashMap 目录 druid root maven tar map 时间 XML final core Security SqlSessionFactory token mysql stream web db sql 管理 json dependencies src Authorization ORM id junit apache tab js 网站 NSA Select mybatis lib bean iBATIS JDBC update authenticate https cat IDE HTML 修改密码 build message Service IO 连接池 ssh 2019 认证 struct 产品 数据 App SpringMVC schema ACE Action 图片 equals java tk classpath ip 数据库 UI CTO list dataSource Word Property plugin ArrayList spring tag 测试 servlet description jquery CEO value Java类 删除
- 版权声明: 本文为互联网转载文章,出处已在文章中说明(部分除外)。如果侵权,请联系本站长删除,谢谢。
- 本文海报: 生成海报一 生成海报二
热门推荐


相关文章


Loading...
![[HBLOG]公众号](http://www.liuhaihua.cn/img/qrcode_gzh.jpg)

