mall-tiny:基于SpringBoot+MyBatis的单应用项目骨架
mall-tiny是从mall项目中抽取出来的项目骨架,保留了mall项目的整个技术栈,对业务逻辑进行了精简,只保留了权限及商品核心表,方便开发使用,可以自由定制业务逻辑。
技术选型
| 技术 | 版本 | 说明 |
|---|---|---|
| SpringBoot | 2.1.3 | 容器+MVC框架 |
| SpringSecurity | 5.1.4 | 认证和授权框架 |
| MyBatis | 3.4.6 | ORM框架 |
| MyBatisGenerator | 1.3.3 | 数据层代码生成 |
| PageHelper | 5.1.8 | MyBatis物理分页插件 |
| Swagger-UI | 2.7.0 | 文档生产工具 |
| Elasticsearch | 6.2.2 | 搜索引擎 |
| RabbitMq | 3.7.14 | 消息队列 |
| Redis | 3.2 | 分布式缓存 |
| MongoDb | 3.2 | NoSql数据库 |
| Docker | 18.09.0 | 应用容器引擎 |
| Druid | 1.1.10 | 数据库连接池 |
| OSS | 2.5.0 | 对象存储 |
| JWT | 0.9.0 | JWT登录支持 |
| Lombok | 1.18.6 | 简化对象封装工具 |
数据库表结构
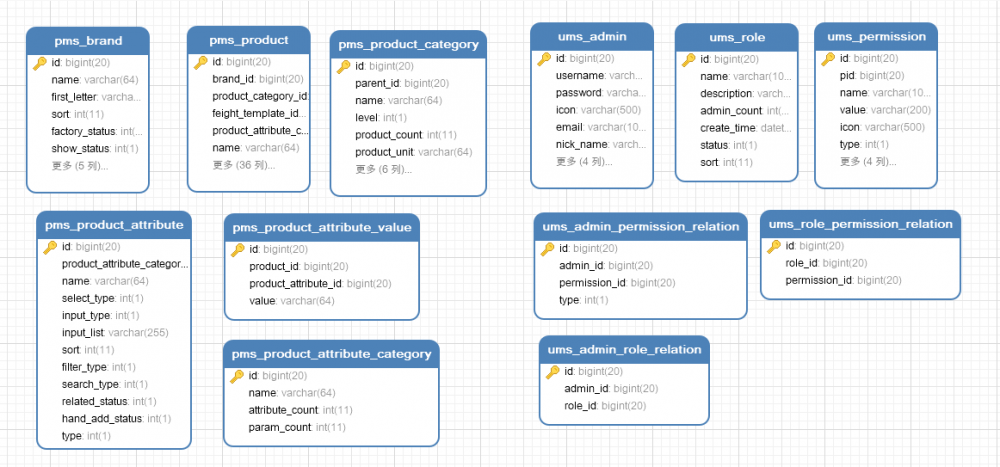
- 只保留了商品及权限相关核心表,仅12张表,业务逻辑简单;
- 数据库源文件地址: github.com/macrozheng/…
使用流程
环境搭建
本项目启动需要依赖MySql、Elasticsearch、Redis、MongoDb、RabbitMq等服务,安装依赖服务请参考 mall在Windows环境下的部署 ,数据库中需要导入mall_tiny.sql脚本。
开发规约
项目包结构
src
├── common -- 用于存储通用代码及工具类
|   ├── api -- 通用结果集封装类
|   └── utils -- 工具类
├── component -- 项目中定义的各类组件
├── config -- SpringBoot中的Java配置
├── controller -- 控制器层代码
├── dao -- 数据访问层代码,存放我们自定义查询的dao接口,以xxxDao命名
├── dto -- 数据传输对象封装
├── mbg -- MyBatisGenerator生成器相关代码
|   ├── mapper -- MyBatisGenerator自动生成的mapper接口(请勿改动)
|   └── model -- MyBatisGenerator自动生成的实体类及Example对象(请勿改动)
├── nosql -- nosql数据库操作相关类
|   ├── elasticsearch -- elasticsearch数据操作相关类
|   |   ├── document -- elasticsearch中存储文档对象封装
|   |   └── repository -- elasticsearch数据操作类
|   └── mongodb -- mongodb数据操作相关类
|       ├── document -- mongodb中存储文档对象封装
|       └── repository -- mongodb数据操作类
└── service -- 业务层接口代码
    └── impl -- 业务层接口实现类代码
复制代码
资源文件说明
res
├── com.macro.mall.tiny.mbg.mapper -- mbg自动生成的mapper.xml文件(请勿改动)
├── mapper -- 自定义的mapper.xml文件,对应dao包中的查询接口,以xxxDao.xml命名
├── application.yml -- SpringBoot的配置文件
├── generator.properties -- 用于配置MyBatisGenerator生成代码时的数据源信息
├── generatorConfig.xml -- MyBatisGenerator生成代码规则配置
└── logback-spring.xml -- 整合ELK实现日志收集时使用的配置
复制代码
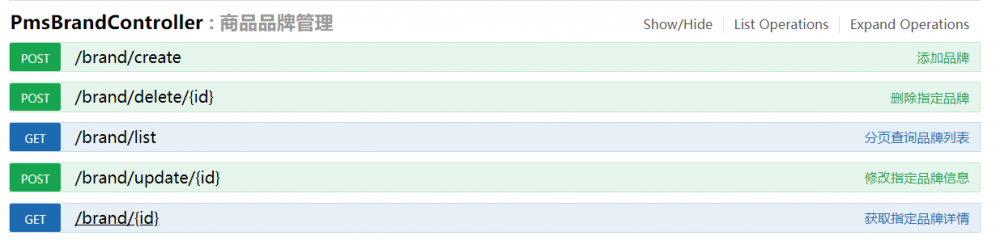
接口定义规则
- 创建表记录:POST /{控制器路由名称}/create
- 修改表记录:POST /{控制器路由名称}/update/{id}
- 删除指定表记录:POST /{控制器路由名称}/delete/{id}
- 分页查询表记录:GET /{控制器路由名称}/list
- 获取指定记录详情:GET /{控制器路由名称}/{id}
具体参数及返回结果定义可以运行代码查看Swagger-UI的Api文档:
项目运行
安装完相关依赖以后直接启动com.macro.mall.tiny.MallTinyApplication类的main函数即可。
业务代码开发流程
这里以品牌管理功能为例来说明业务代码开发流程。
创建表
创建一张pms_brand表,需要注意的是一定要写好表字段的注释,这样在生成代码时,实体类中就会有注释了,而且Swagger-UI生成的文档中也会有注释,不用再重复写注释。
CREATE TABLE `pms_brand` (
  `id` bigint(20) NOT NULL AUTO_INCREMENT,
  `name` varchar(64) DEFAULT NULL,
  `first_letter` varchar(8) DEFAULT NULL COMMENT '首字母',
  `sort` int(11) DEFAULT NULL,
  `factory_status` int(1) DEFAULT NULL COMMENT '是否为品牌制造商:0->不是;1->是',
  `show_status` int(1) DEFAULT NULL,
  `product_count` int(11) DEFAULT NULL COMMENT '产品数量',
  `product_comment_count` int(11) DEFAULT NULL COMMENT '产品评论数量',
  `logo` varchar(255) DEFAULT NULL COMMENT '品牌logo',
  `big_pic` varchar(255) DEFAULT NULL COMMENT '专区大图',
  `brand_story` text COMMENT '品牌故事',
  PRIMARY KEY (`id`)
) ENGINE=InnoDB AUTO_INCREMENT=59 DEFAULT CHARSET=utf8 COMMENT='品牌表';
复制代码
使用MyBatisGenerator生成代码
运行com.macro.mall.tiny.mbg.Generator类的main方法来生成代码,生成完后会有以下几个文件。
PmsBrandMapper接口
包含了单表查询的常用接口
public interface PmsBrandMapper {
    long countByExample(PmsBrandExample example);

    int deleteByExample(PmsBrandExample example);

    int deleteByPrimaryKey(Long id);

    int insert(PmsBrand record);

    int insertSelective(PmsBrand record);

    List<PmsBrand> selectByExampleWithBLOBs(PmsBrandExample example);

    List<PmsBrand> selectByExample(PmsBrandExample example);

    PmsBrand selectByPrimaryKey(Long id);

    int updateByExampleSelective(@Param("record") PmsBrand record, @Param("example") PmsBrandExample example);

    int updateByExampleWithBLOBs(@Param("record") PmsBrand record, @Param("example") PmsBrandExample example);

    int updateByExample(@Param("record") PmsBrand record, @Param("example") PmsBrandExample example);

    int updateByPrimaryKeySelective(PmsBrand record);

    int updateByPrimaryKeyWithBLOBs(PmsBrand record);

    int updateByPrimaryKey(PmsBrand record);
}
复制代码
PmsBrand实体类
根据数据库表生成的实体类,已添加Swagger-UI的注解。
package com.macro.mall.tiny.mbg.model;

import io.swagger.annotations.ApiModelProperty;
import java.io.Serializable;

public class PmsBrand implements Serializable {
    private Long id;

    private String name;

    @ApiModelProperty(value = "首字母")
    private String firstLetter;

    private Integer sort;

    @ApiModelProperty(value = "是否为品牌制造商:0->不是;1->是")
    private Integer factoryStatus;

    private Integer showStatus;

    @ApiModelProperty(value = "产品数量")
    private Integer productCount;

    @ApiModelProperty(value = "产品评论数量")
    private Integer productCommentCount;

    @ApiModelProperty(value = "品牌logo")
    private String logo;

    @ApiModelProperty(value = "专区大图")
    private String bigPic;

    @ApiModelProperty(value = "品牌故事")
    private String brandStory;

    private static final long serialVersionUID = 1L;
    //省略getter、setter、toString方法
}
复制代码
PmsBrandExample查询构造器
用于在复杂查询时构造查询条件。
PmsBrandMapper.xml文件
对应PmsBrandMapper接口中的mapper.xml实现,PmsBrandMapper接口中方法的具体查询实现都在此处。
编写数据访问层代码
单表查询
单表查询推荐使用查询构造器来进行查询,不用手写sql语句,比如以下的按品牌名称进行模糊查询。
@Override
public List<PmsBrand> list(int pageNum, int pageSize, String name) {
    PageHelper.startPage(pageNum, pageSize);
    PmsBrandExample example = new PmsBrandExample();
    if(StrUtil.isNotEmpty(name)){
        example.createCriteria().andNameLike("%"+name+"%");
    }
    return brandMapper.selectByExample(example);
}
复制代码
分页查询
分页查询使用PageHelper分页插件实现,只需在查询语句前添加以下代码即可。
PageHelper.startPage(pageNum, pageSize);
复制代码
多表查询
多表查询需要自己编写mapper接口和mapper.xml实现,和MyBatis中用法一致,这里以查询包含属性的商品为例。
- 首先需要需要自定义一个Dao接口,为了和mbg生成的mapper接口进行区分,mall-tiny中自定义的mapper接口都以xxxDao来命名。
public interface EsProductDao {
    List<EsProduct> getAllEsProductList(@Param("id") Long id);
}
复制代码
- 然后编写接口的xml查询实现,在mall-tiny中以xxxDao.xml来命名。
<select id="getAllEsProductList" resultMap="esProductListMap">
    select
        p.id id,
        p.product_sn productSn,
        p.brand_id brandId,
        p.brand_name brandName,
        p.product_category_id productCategoryId,
        p.product_category_name productCategoryName,
        p.pic pic,
        p.name name,
        p.sub_title subTitle,
        p.price price,
        p.sale sale,
        p.new_status newStatus,
        p.recommand_status recommandStatus,
        p.stock stock,
        p.promotion_type promotionType,
        p.keywords keywords,
        p.sort sort,
        pav.id attr_id,
        pav.value attr_value,
        pav.product_attribute_id attr_product_attribute_id,
        pa.type attr_type,
        pa.name attr_name
    from pms_product p
    left join pms_product_attribute_value pav on p.id = pav.product_id
    left join pms_product_attribute pa on pav.product_attribute_id= pa.id
    where delete_status = 0 and publish_status = 1
    <if test="id!=null">
        and p.id=#{id}
    </if>
</select>
复制代码
编写业务层代码
- 先在com.macro.mall.tiny.service包中添加PmsBrandService接口;
- 再在com.macro.mall.tiny.serviceImpl中添加其实现类。
编写控制器层代码
在com.macro.mall.tiny.controller包中添加PmsBrandController类。
项目部署
mall-tiny已经集成了docker插件,可以打包成docker镜像后使用docker来部署,具体参考: 使用Maven插件为SpringBoot应用构建Docker镜像
其他说明
SpringSecurity相关
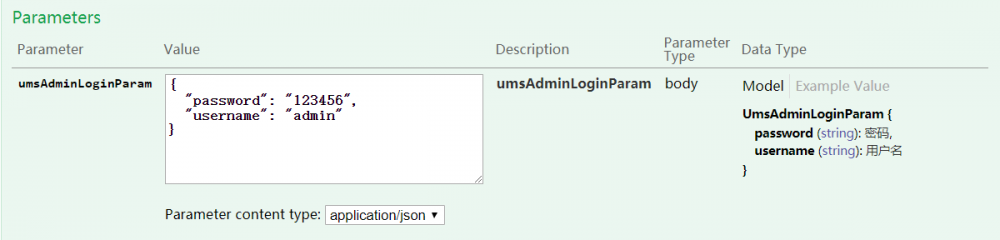
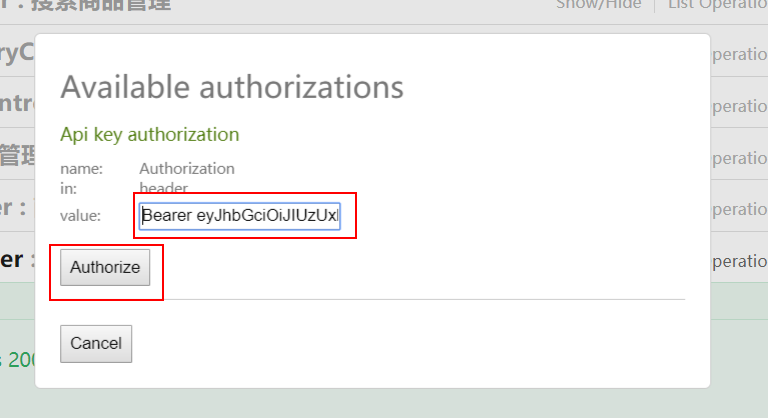
由于使用了SpringSecurity来实现认证和授权,部分接口需要登录才可以访问,访问登录接口流程如下。
- 访问Swagger-UI接口文档: http://localhost:8080/swagger-ui.html
- 调用登录接口获取token:

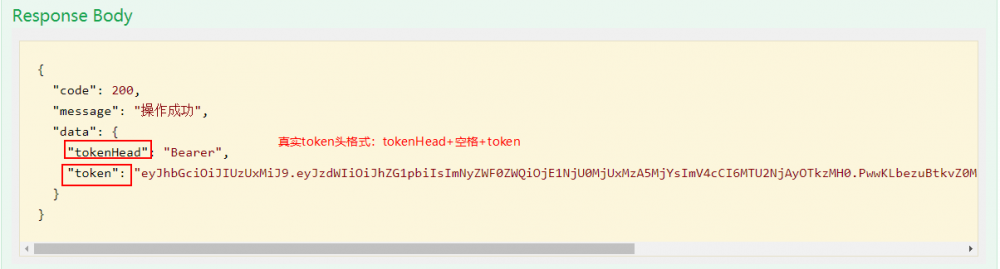
- 点击右上角Authorize按钮输入真实token:
关于日志收集
本项目已使用AOP切面记录了所有接口访问日志,同时整合了ELK实现了日志收集。ELK日志收集环境搭建可以参考: SpringBoot应用整合ELK实现日志收集 。
oss文件上传相关
oss文件上传使用时需要修改成你自己的配置,需要修改配置如下:
# OSS相关配置信息
aliyun:
  oss:
    endpoint: oss-cn-shenzhen.aliyuncs.com # oss对外服务的访问域名
    accessKeyId: test # 访问身份验证中用到用户标识
    accessKeySecret: test # 用户用于加密签名字符串和oss用来验证签名字符串的密钥
    bucketName: macro-oss # oss的存储空间
    policy:
      expire: 300 # 签名有效期(S)
    maxSize: 10 # 上传文件大小(M)
    callback: http://localhost:8080/aliyun/oss/callback # 文件上传成功后的回调地址(必须公网可以访问)
    dir:
      prefix: mall/images/ # 上传文件夹路径前缀
复制代码
关于跨域问题
已经配置了全局的过滤器,允许跨越访问,同时SpringSecurity也放行了跨域的预检OPTIONS请求。
/**
 * 全局跨域配置
 * Created by macro on 2019/7/27.
 */
@Configuration
public class GlobalCorsConfig {

    /**
     * 允许跨域调用的过滤器
     */
    @Bean
    public CorsFilter corsFilter() {
        CorsConfiguration config = new CorsConfiguration();
        //允许所有域名进行跨域调用
        config.addAllowedOrigin("*");
        //允许跨越发送cookie
        config.setAllowCredentials(true);
        //放行全部原始头信息
        config.addAllowedHeader("*");
        //允许所有请求方法跨域调用
        config.addAllowedMethod("*");
        UrlBasedCorsConfigurationSource source = new UrlBasedCorsConfigurationSource();
        source.registerCorsConfiguration("/**", config);
        return new CorsFilter(source);
    }
}
复制代码
//SecurityConfig的configure方法中已经添加
.antMatchers(HttpMethod.OPTIONS)//跨域请求会先进行一次options请求
.permitAll()
复制代码
正文到此结束
- 本文标签: 索引 产品 文件上传 selectByPrimaryKey UI http 空间 ORM spring git 消息队列 rabbitmq druid sql 参数 管理 Security HTML AOP 认证 token 数据库 list pagehelper 配置 src 注释 业务层 rmi maven Docker springboot zab 密钥 分页 2019 IDE ACE App IO 定制 mongo tar value category 安装 example 代码 bean logo db Select 分布式 缓存 搜索引擎 mybatis 部署 redis Word CTO 自动生成 update ELK key 加密 map final GitHub Service mysql Document id windows 连接池 cat 插件 rand 数据 删除 域名 mapper java https XML Elasticsearch Logback NOSQL 开发 API Property MongoDB MQ tab
- 版权声明: 本文为互联网转载文章,出处已在文章中说明(部分除外)。如果侵权,请联系本站长删除,谢谢。
- 本文海报: 生成海报一 生成海报二
热门推荐


相关文章

近期评论
-
ws0132613@gmail.comhttps://getmacos.com/gopanel/william smith
-
谢谢
-
https://www.newcmy.com/register?aff=HBVX建议您试试草莓云机场,可以流畅观看youtube和tiktok,上reddit/x也没有问题,还有各种ai优化节点。
-
-
-
想购买您这个站,我的联系方式QQ741756694微信同步 能卖联系
-
-
-
-
Loading...
![[HBLOG]公众号](https://www.liuhaihua.cn/img/qrcode_gzh.jpg)

