190820-SpringBoot系列教程web篇之Thymeleaf环境搭建
上一篇博文介绍了如何使用Freemaker引擎搭建web项目,这一篇我们则看一下另外一个常见的页面渲染引擎Thymeleaf如何搭建一个web项目
推荐结合Freemaker博文一起查看,效果更佳 190816-SpringBoot系列教程web篇之Freemaker环境搭建
I. 准备
Thymeleaf 是现代化服务器端的Java模板引擎,不同与JSP和FreeMarker,Thymeleaf的语法更加接近HTML,关于它的使用说明,可以参考官方文档
https://www.thymeleaf.org/documentation.html1. 依赖
首先我们是需要一个springboot项目,基本的pom结构大都相似
<parent>
    <groupId>org.springframework.boot</groupId>
    <artifactId>spring-boot-starter-parent</artifactId>
    <version>2.0.4.RELEASE</version>
    <relativePath/> <!-- lookup parent from update -->
</parent>

<properties>
    <project.build.sourceEncoding>UTF-8</project.build.sourceEncoding>
    <project.reporting.outputEncoding>UTF-8</project.reporting.outputEncoding>
    <spring-cloud.version>Finchley.RELEASE</spring-cloud.version>
    <java.version>1.8</java.version>
</properties>

<build>
    <pluginManagement>
        <plugins>
            <plugin>
                <groupId>org.springframework.boot</groupId>
                <artifactId>spring-boot-maven-plugin</artifactId>
            </plugin>
        </plugins>
    </pluginManagement>
</build>
<repositories>
    <repository>
        <id>spring-milestones</id>
        <name>Spring Milestones</name>
        <url>https://repo.spring.io/milestone</url>
        <snapshots>
            <enabled>false</enabled>
        </snapshots>
    </repository>
</repositories>
在这个项目中,我们主要需要引入两个依赖包,一个web,一个thymeleaf
<dependencies>
    <dependency>
        <groupId>org.springframework.boot</groupId>
        <artifactId>spring-boot-starter-web</artifactId>
    </dependency>
    <dependency>
        <groupId>org.springframework.boot</groupId>
        <artifactId>spring-boot-starter-thymeleaf</artifactId>
    </dependency>
</dependencies>
2. 配置参数
通常我们直接使用默认的thymeleaf参数配置即可,下面给出几个常用的配置
spring:
  thymeleaf:
    mode: HTML
    encoding: UTF-8
    servlet:
      content-type: text/html
    cache: false
thymeleaf的参数,主要对应的是 org.springframework.boot.autoconfigure.thymeleaf.ThymeleafProperties
II. 项目搭建演示
1. 项目结构
搭建一个web项目和我们之前的纯后端项目有点不一样,前端资源放在什么地方,依赖文件怎么处理都是有讲究的,下面是一个常规的项目结构
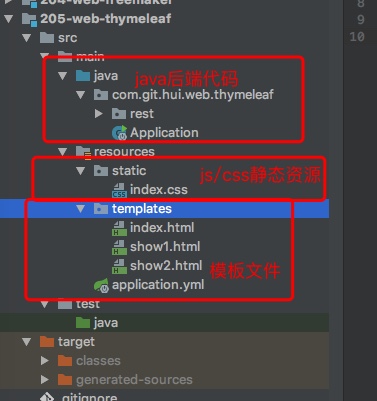
如上图,前端资源文件默认放在resources目录下,下面有两个目录
templates
static
2. Rest服务
我们这里提供了三个接口,主要是为了演示三种不同的数据绑定方式(和Freemaker这篇博文基本一样)
@Controller
public class IndexController {

    @GetMapping(path = {"", "/", "/index"})
    public ModelAndView index() {
        Map<String, Object> data = new HashMap<>(2);
        data.put("name", "YiHui Thymeleaf");
        data.put("now", LocalDateTime.now().toString());
        return new ModelAndView("index", data);
    }

    /**
     * 一般不建议直接使用jdk的String.split来分割字符串,内部实现是根据正则来处理的,虽然更强大,但在简单的场景下,性能开销更大
     */
    private static String[] contents =
            ("绿蚁浮觞香泛泛,黄花共荐芳辰。/n清霜天宇净无尘。/n登高宜有赋,拈笔戏成文。/n可奈园林摇落尽,悲秋意与谁论。/n眼中相识几番新。/n龙山高会处,落帽定何人。").split("/n");
    private static Random random = new Random();

    @GetMapping(path = "show1")
    public String showOne(Model model) {
        model.addAttribute("title", "临江仙");
        model.addAttribute("content", contents[random.nextInt(6)]);
        return "show1";
    }

    @GetMapping(path = "show2")
    public String showTow(Map<String, Object> data) {
        data.put("name", "Show2---->");
        data.put("now", LocalDateTime.now().toString());
        return "show2";
    }
}
上面的三种case中
ModelAndView
三个接口,对应的三个html文件,如下
index.html
<!DOCTYPE html>
<html xmlns:th="http://www.thymeleaf.org">
<head>
    <meta charset="UTF-8">
    <meta name="viewport" content="width=device-width, initial-scale=1">
    <meta name="description" content="SpringBoot thymeleaf"/>
    <meta name="author" content="YiHui"/>
    <meta name="viewport" content="width=device-width, initial-scale=1.0"/>
    <title>YiHui's SpringBoot Demo</title>
    <link rel="stylesheet" href="index.css"/>
</head>
<body>

<div>
    <div class="title">hello world!</div>
    <br/>
    <div class="content" th:text="'欢迎访问' + ${name}">默认的内容</div>
    <br/>
    <div class="sign" th:text="'当前时间' + ${now}">默认的签名</div>
    <br/>
    <a href="show1">传参2测试</a>
    <a href="show2">传参3测试</a>
</div>
</body>
</html>
show1.html
<!DOCTYPE html>
<html xmlns:th="http://www.thymeleaf.org">
<head>
    <meta charset="UTF-8">
    <meta name="viewport" content="width=device-width, initial-scale=1">
    <meta name="description" content="SpringBoot thymeleaf"/>
    <meta name="author" content="YiHui"/>
    <meta name="viewport" content="width=device-width, initial-scale=1.0"/>
    <title>YiHui's SpringBoot Demo</title>
    <link rel="stylesheet" href="index.css"/>
</head>
<body>

<div>
    <div class="title" th:text="${title}">标题!</div>
    <div class="content" th:text="${content}">内容</div>
</div>
</body>
</html>
show2.html
<!DOCTYPE html>
<html xmlns:th="http://www.thymeleaf.org">
<head>
    <meta charset="UTF-8">
    <meta name="viewport" content="width=device-width, initial-scale=1">
    <meta name="description" content="SpringBoot thymeleaf"/>
    <meta name="author" content="YiHui"/>
    <meta name="viewport" content="width=device-width, initial-scale=1.0"/>
    <title>YiHui's SpringBoot Demo</title>
    <link rel="stylesheet" href="index.css"/>
</head>
<body>

<div>
    <div class="title" th:text="${name}">标题!</div>
    <div class="content" th:text="${now}">内容</div>
</div>
</body>
</html>
在上面的模板文件中,需要注意引用css样式文件,路径前面并没有static,我们对应的css文件
index.css
.title {
    color: #c00;
    font-weight: normal;
    font-size: 2em;
}

.content {
    color: darkblue;
    font-size: 1.2em;
}

.sign {
    color: lightgray;
    font-size: 0.8em;
    font-style: italic;
}
3. 演示
启动项目后,可以看到三个页面的切换,模板中的数据根据后端的返回替换,特别是主页的时间,每次刷新都会随之改变
II. 其他
0. 项目
- 工程: https://github.com/liuyueyi/spring-boot-demo
- 项目地址: https://github.com/liuyueyi/spring-boot-demo/blob/master/spring-boot/205-web-thymeleaf
1. 一灰灰Blog
尽信书则不如,以上内容,纯属一家之言,因个人能力有限,难免有疏漏和错误之处,如发现bug或者有更好的建议,欢迎批评指正,不吝感激
下面一灰灰的个人博客,记录所有学习和工作中的博文,欢迎大家前去逛逛
- 一灰灰Blog个人博客 https://blog.hhui.top
- 一灰灰Blog-Spring专题博客 http://spring.hhui.top

打赏 如果觉得我的文章对您有帮助,请随意打赏。
正文到此结束
- 本文标签: App build java IO git 2019 UI DOM 文章 测试 bug tar 时间 dependencies spring cache ip rand 配置 HTML文件 博客 服务器 springboot GitHub 参数 目录 plugin servlet freemaker map Document http web id js CSS REST ORM pom HashMap 标题 HTML src update Master https 数据 XML Freemarker maven bus description
- 版权声明: 本文为互联网转载文章,出处已在文章中说明(部分除外)。如果侵权,请联系本站长删除,谢谢。
- 本文海报: 生成海报一 生成海报二
热门推荐


相关文章

近期评论
-
谢谢
-
https://www.newcmy.com/register?aff=HBVX建议您试试草莓云机场,可以流畅观看youtube和tiktok,上reddit/x也没有问题,还有各种ai优化节点。
-
-
-
想购买您这个站,我的联系方式QQ741756694微信同步 能卖联系
-
-
-
-
-
https://www.liuhaihua.cn/archives/40657.html 这篇博客中的图片打不开了
Loading...
![[HBLOG]公众号](https://www.liuhaihua.cn/img/qrcode_gzh.jpg)

